着信コール通知の表示
前のセクションでは、コールのエージェントの可用性を切り替える方法を確認しました。 エージェントの空き状況がコールに使用可能に設定されると、次の設定ステップでは、CTIサプライヤからのインバウンド・コール通知をメディア・ツールバーおよびFusionアプリケーションに表示します。
着信コール通知を実装するステップ
- メディア・ツールバー・アプリケーションにコール・パネル・コンポーネントを追加します。
callContextプロパティを定義します。- 着信コール・イベント中にコール・パネル・コンポーネント・プロパティを更新するファンクション
handleIncomingCallを定義します。 src/ts/appController.tsファイルに汎用関数を追加して、コール・ペインの状態を更新します。integrationEventsHandlerクラスにincomingCallHandlerというメソッドを追加します。
第2部: Fusionアプリケーションでの着信コール通知の表示
FusionHandlerクラスにshowIncomingCallNotificationInFusionというメソッドを追加し、newCommEventを公開するロジックを記述します。incomingCallHandler関数からshowIncomingCallNotificationInFusion関数をコールします。vendorHandlerファイルからincomingCallNotificationHandler関数をコールします。
FusionHandlerクラスにshowIncomingCallNotificationInFusionというメソッドを追加し、newCommEventを公開するロジックを記述します。incomingCallHandler関数からshowIncomingCallNotificationInFusion関数をコールします。vendorHandlerファイルからincomingCallNotificationHandler関数をコールします。
パート1: メディア・ツールバー・アプリケーションに着信通話通知を表示
CTIサプライヤからコールされた着信が届くと、UIコンポーネントがメディア・ツールバーUIに表示されます。
このコンポーネントは、コールの受入れまたは拒否のためのコール情報と2つのボタンで構成されるJETコンポーネントです。 コール情報は、着信電話番号とIVRデータに関連付けられた担当者名で構成されます。 着信電話番号がFusionアプリケーションに保存されていない場合は、「不明な番号」というラベルが表示されます。 前のステップに従った場合、このコンポーネントはメディア・ツールバー・アプリケーションにすでに作成されている可能性があります。 そのため、このコンポーネントをアプリケーションに追加するだけで済みます。
メディア・ツールバー・アプリケーションにコール・パネル・コンポーネントを追加
index.htmlファイルに追加できます。 src/index.htmlファイルで、次の例に示すように、ロールmainを持つコンポーネントをdivに追加します:
<oj-bind-if test="[[callContext().state === 'RINGING' || callContext().state === 'ACCEPTED']]">
    <call-panel call-context="[[callContext]]"></call-panel>
</oj-bind-if>appController.tsファイルにcallContext を定義する必要があります。 callContextプロパティには、電話番号、発信者名、方向、イベントID、IVRデータ、コールの状態などのコール関連情報が含まれます。 簡単にするために、メディア・ツールバー・アプリケーションへのコールに3つの状態を定義できます: - RINGING: エージェントが顧客から着信コールを受信すると、ツールバー・アプリケーションは「RINGING」状態になります。 エージェントがカスタマへのアウトバウンド・コールを開始するときに、まだピック・アップされていないツールバー・アプリケーションもリング状態になります。
- ACCEPTED: エージェントが顧客からの着信コールを受け入れると、ツールバー・アプリケーションは「ACCEPTED」状態になります。 また、顧客がエージェントによって開始されたアウトバウンド・コールを受け入れると、ツールバー・アプリケーションはACCEPTED状態になります。
- DISCONNECTED: エージェントが顧客からの着信コールを拒否した場合、または顧客との進行中のコールを切断した場合、ツールバー・アプリケーションはDISCONNECTED状態に移行します。
コール・コンポーネントが条件付きでロードされるのは、コール状態がRINGINGまたはACCEPTEDの場合のみです。
callContextプロパティの定義
callContextプロパティは、コール・パネル・コンポーネントに渡す必要があります。 次のコードを使用して、src/ts/appController.tsにあるappController.tsファイルでcallContextプロパティを定義します:
//.....
import "oj-c/button";
import "./jet-composites/call-panel/loader";
// ....

interface CallContext {
  phonenumber: string;
  callerName: string;
  direction: string;
  eventId: string;
  ivrData: { [key: string]: string };
  state: string;
}

class RootViewModel {
    // ....
    callContext: ko.Observable<CallContext>;
    // ...

    constructor() {
        // ....

        // CTI app properties
        this.callContext = ko.observable({
            phonenumber: "+918921670701",
            callerName: "John Doe",
            direction: "inbound",
            eventId: this.mockEventId(),
            ivrData: {
                jobTitle: "Developer",
                phoneType: "Work Phone",
                additional: "Some more"
            },
            state: "AVAILABLE" //AVAILABLE RINGING
        } as CallContext);
        //...
    }
}
着信コール・イベント中にコール・パネル・コンポーネント・プロパティを更新するファンクションhandleIncomingCallを定義
//.....
import "oj-c/button";
import "./jet-composites/call-panel/loader";
// ....

interface CallContext {
  phonenumber: string;
  callerName: string;
  direction: string;
  eventId: string;
  ivrData: { [key: string]: string };
  state: string;
}

class RootViewModel {
    // ....
    callContext: ko.Observable<CallContext>;
    mockEventId: ko.Observable<string> = ko.observable(Date.now().toString());
    // ...

    constructor() {
        // ....

        // CTI app properties
        this.callContext = ko.observable({
            phonenumber: "+918921670701",
            callerName: "John Doe",
            direction: "inbound",
            eventId: this.mockEventId(),
            ivrData: {
                jobTitle: "Developer",
                phoneType: "Work Phone",
                additional: "Some more"
            },
            state: "AVAILABLE" //AVAILABLE RINGING
        } as CallContext);
        //...
    }
    public handleIncomingCall = (customerName: string, incomingPhoneNumber: string, eventId: string) => {
        this.callContext({...this.callContext(),
            direction: 'inbound',
            phonenumber: incomingPhoneNumber,
            callerName: customerName,
            eventId: eventId,
            state: 'RINGING'});
    };
    public updateCallPanelState = (state: string) => {
        this.callContext({...this.callContext(), state: state});
    }
}
src/ts/appController.tsに汎用関数を追加して、コール・ペインの状態を更新
通話のライフサイクル中に、コール・ペイン・コンポーネントの状態を数回更新する必要があります。 次の汎用関数updateCallPanelStateを簡単に定義できます:
//.....
import "oj-c/button";
import "./jet-composites/call-panel/loader";
// ....

interface CallContext {
  phonenumber: string;
  callerName: string;
  direction: string;
  eventId: string;
  ivrData: { [key: string]: string };
  state: string;
}

class RootViewModel {
    // ....
    callContext: ko.Observable<CallContext>;
    mockEventId: ko.Observable<string> = ko.observable(Date.now().toString());
    // ...

    constructor() {
        // ....

        // CTI app properties
        this.callContext = ko.observable({
            phonenumber: "+918921670701",
            callerName: "John Doe",
            direction: "inbound",
            eventId: this.mockEventId(),
            ivrData: {
                jobTitle: "Developer",
                phoneType: "Work Phone",
                additional: "Some more"
            },
            state: "AVAILABLE" //AVAILABLE RINGING
        } as CallContext);
        //...
    }
    public updateCallPanelState = (state: string) => {
        this.callContext({...this.callContext(), state: state});
    }
}
integrationEventsHandlerクラスにメソッドincomingCallHandlerを追加
incomingCallHandlerメソッドは、CTIサプライヤからの着信コール・イベント中にコールする必要がある汎用メソッドとみなすことができます。 このメソッドから、handleIncomingCall関数をコールして、ツールバー・アプリケーションに着信コール通知コンポーネントを表示できます。
/**
     *
     * @param incomingPhoneNumber
     * @param connectionId
     * Invoke this function when you receive an incoming call notification from your CTI system.
     * Once this is invoked, an incoming call notification popup will be shown in the fusion application.
     * Please refer doc shared for more information on newCommEvent API.
     */
public async incomingCallHandler(incomingPhoneNumber: string, eventId: string): Promise<void> {
    try {
        this.ctiAppViewModel.handleIncomingCall('', incomingPhoneNumber, eventId);
    } catch {
        // Catch errors
    }
}handleIncomingCall関数の最初のパラメータは、電話番号に関連付けられている担当者名です。 現時点では、空の文字列として渡されます。 次の部分では、Fusionアプリケーションから担当者名を取得して、空の文字列ではなくここで渡せるようにする方法を説明します。
第2部: Fusionアプリケーションでの着信コール通知の表示
CTIサプライヤからの着信コールがある場合、Fusionアプリケーションにコール通知ダイアログ・ボックスが表示されます。
次のリング受信シナリオがこのプロセスを処理します。
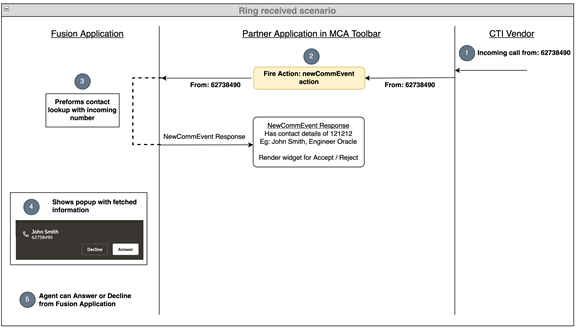
2. FusionHandlerクラスにメソッドshowIncomingCallNotificationInFusionを追加し、newCommEventを公開するロジックを記述
showIncomingCallNotificationInFusionファンクション・コールからnewCommResponseを取得します。 次の例に示すように、このレスポンスから担当者名を取得し、handleIncomingCallファンクションに渡すことができます:
public async incomingCallHandler(incomingPhoneNumber: string, eventId: string): Promise<void> {
    try {
        // Add logic to render the incoming call component and to notify Fusion about the incoming call
        const newCommResponseFromFusion: IMcaOutData = await FusionHandler.showIncomingCallNotificationInFusion(incomingPhoneNumber, eventId);
        const incomingCallCustomerName: string = newCommResponseFromFusion['SVCMCA_CONTACT_NAME'] ? newCommResponseFromFusion['SVCMCA_CONTACT_NAME'] : 'Unknown Number';
        this.ctiAppViewModel.handleIncomingCall(incomingCallCustomerName, incomingPhoneNumber, eventId);
    } catch {
        // Catch errors
    }
}
incomingCallHandlerファンクションからshowIncomingCallNotificationInFusionファンクションをコール
showIncomingCallNotificationInFusionファンクション・コールからnewCommResponseを取得します。 次の例に示すように、このレスポンスから担当者名を取得し、handleIncomingCallファンクションに渡すことができます:
public async incomingCallHandler(incomingPhoneNumber: string, eventId: string): Promise<void> {
    try {
        // Add logic to render the incoming call component and to notify Fusion about the incoming call
        const newCommResponseFromFusion: IMcaOutData = await FusionHandler.showIncomingCallNotificationInFusion(incomingPhoneNumber, eventId);
        const incomingCallCustomerName: string = newCommResponseFromFusion['SVCMCA_CONTACT_NAME'] ? newCommResponseFromFusion['SVCMCA_CONTACT_NAME'] : 'Unknown Number';
        this.ctiAppViewModel.handleIncomingCall(incomingCallCustomerName, incomingPhoneNumber, eventId);
    } catch {
        // Catch errors
    }
}
3. vendorHandlerファイルからincomingCallNotificationHandler関数をコール
CTIサプライヤのドキュメントを参照して、APIを使用してCTIアプリケーションに着信コールがどのように通知されるかを確認してください。 incomingCallNotificationHandlerファンクションは、そこからコールする必要があります。 vendorHandler.tsファイルにロジックを追加できます:
import { ICtiVendorHandler } from './ICtiVendorHandler';

export class VendorHandler implements ICtiVendorHandler {
    public async makeAgentAvailable() {
        // TODO: call the vendor specific api to make the agent available
        // TODO: call the vendor specific api to show incoming call notification
    }
    public async makeAgentUnavailable() {
        // TODO: call the vendor specific api to make the agent unavailable
    }
    public async makeOutboundCall(phoneNumber: string, eventId: string) {
        throw new Error('Method not implemented.');
    }
    public async acceptCall() {
        throw new Error('Method not implemented.');
    }
    public async rejectCall() {
        throw new Error('Method not implemented.');
    }
    public async hangupCall() {
        throw new Error('Method not implemented.');
    }
}
進捗の確認
前述のステップを完了したら、OJETを使用してアプリケーションを起動し、Fusionアプリケーションにサインインします。 メディア・ツールバーを開き、エージェントの空き状況ボタンをクリックして、エージェントがコールに使用できるようにします。 次に、カスタマ・ケア番号へのコールを開始します。 この間、メディア・ツールバーの状態がRINGING状態に変更され、メディア・ツールバー・アプリケーションに着信コール通知が表示されます。