(Fluid) Working With Paycheck Modeler
This topic provides an overview of Fluid Paycheck Modeler, lists setup steps, delivered user role, common elements, and discusses pages that are used to set up and calculate modeled paychecks.
|
Page Name |
Definition Name |
Usage |
|---|---|---|
|
PY_CFG_TMPL_PG |
Set up display and text options for Paycheck Modeler pages. |
|
|
PY_CFG_IMG_SEC |
Upload images used in the page background. |
|
|
PY_CFG_TXFRMHDR_PG |
Set up the page header for Paycheck Modeler tax withholding pages. |
|
|
PY_CFG_TAX_PG |
Set up display and text options for Paycheck Modeler tax withholding pages. |
|
|
PY_CFG_TAX_FLDINFO |
View or update section field labels. |
|
|
- |
Start the paycheck modeling process. |
|
|
PY_MOD_MULTIJOB_FL |
Choose a job for the paycheck simulation. |
|
|
PY_MOD_START_FL |
Acknowledge the usage terms and conditions of Paycheck Modeler. |
|
|
PY_MOD_SEL1_FL |
Select the starting point of the modeling process. |
|
|
PY_MOD_EDTL_FL |
Modify earnings information for the modeled paycheck calculation. |
|
|
PY_MOD_DDTL_FL |
Modify deduction information for the modeled paycheck calculation. |
|
|
PY_MOD_TXDTL_FL |
View tax withholding information for the modeled paycheck calculation. |
|
|
PY_MOD_TAX_SCF |
Modify federal tax withholding information for the paycheck calculation. |
|
|
PY_MOD_ST_TAX_SCF |
Modify state tax withholding information for the modeled paycheck calculation. |
|
|
PY_MOD_LT_TAX_SCF |
Modify local tax withholding information for the modeled paycheck calculation. |
|
|
PY_MOD_RSLT_FL |
View the modeled paycheck results. |
|
|
PY_MOD_CALRSLT_SCF |
View details of the corresponding paycheck. |
|
|
PY_MOD_CMP_RSLT_FL |
View paycheck details before and after the paycheck modeling process. |
|
|
PY_MOD_AUDIT_SCF |
View changes made in the paycheck modeling process. |
Fluid Paycheck Modeler enhances the paycheck modeling process, providing employees a modern and intuitive user interface to simulate paychecks with their what-if scenarios.
Employees can use Paycheck Modeler to get quick estimates on their net pay based on changes in earnings, deductions, or tax withholding that they anticipate in life. For example, an employee is aware that a big bonus is coming. They can use the paycheck modeling tool to estimate future net pay with the bonus included and see if it is sufficient to fund a family trip.
To support the paycheck modeling process more effectively, Fluid Paycheck Modeler:
Updates the design of the pages to improve user experience. It:
Provides users the option to choose the starting point of the process.
Adds visual indicators to help users identify where changes are made during the process.
Allows users to calculate the modeled check at any time when a change is made in earnings, deductions, or tax withholding, without the need to go through all the pages unnecessarily.
Supports the configuration of pages, which enables administrators to set up what gets displayed on pages easily through configuration, for example, instructional text, page information, images, and section content.
Can be run and is accessible on all form factors.
Warning! Modeled paychecks that are generated by Paycheck Modeler intend to provide general guidance and estimates only. They are not genuine paychecks and there is no guarantee that the estimates from modeled paychecks would match what appears on the actual paychecks. Do not make important decisions solely based on modeled paycheck results.
Fluid Paycheck Modeler supports U.S. employees with US-based jobs only. The functionality is currently not available to USF or CAN employees, or U.S. employees with jobs that are not based in the United States.
Refer to the Understanding Paycheck Modeler topic for more information about paycheck modeling that Fluid Paycheck Modeler supports.
The system provides administrators flexible configuration options to determine what appears on Paycheck Modeler pages for employees to simulate their paychecks.
Page Configuration
PeopleSoft delivers a page configuration template (PYCHKMOD for U.S. Payroll) that enables the dynamic rendering of details of pages used in Paycheck Modeler. Depending on the nature of the page, configuration options are available to manage page displays, such as instructional texts (which are displayed with the Information icon), page information, background color and image, for these pages:
Paycheck Modeler - Welcome Page (PY_MOD_START_FL)
Paycheck Modeler - Select a Job Page (PY_MOD_MULTIJOB_FL)
Paycheck Modeler - Decision Page (PY_MOD_SEL1_FL)
Paycheck Modeler - Earnings Page (PY_MOD_EDTL_FL)
Add (or Edit) Earnings page (PY_MOD_SS_ERN_SCF)
Paycheck Modeler - Deductions Page (PY_MOD_DDTL_FL)
Add Deductions page (PY_MOD_DED_ADD_SCF)
Edit Deductions page (PY_MOD_DEDEDIT_SCF)
Paycheck Modeler - Taxes Page (PY_MOD_TXDTL_FL)
Model Federal Tax Withholding Page (PY_MOD_TAX_SCF)
Model State Tax Withholding Page (PY_MOD_ST_TAX_SCF)
Modeled Local Tax Withholding Page (PY_MOD_LT_TAX_SCF)
Paycheck Modeler - Results Page (PY_MOD_RSLT_FL)
Paycheck Details Page (PY_MOD_CALRSLT_SCF)
Compare Modeled Check Page (PY_MOD_CMPRSLT_SCF)
View Modeled Changes Page (PY_MOD_AUDIT_SCF)
This image illustrates the relationship between page elements of Paycheck Modeler page and where they were configured on the page configuration.
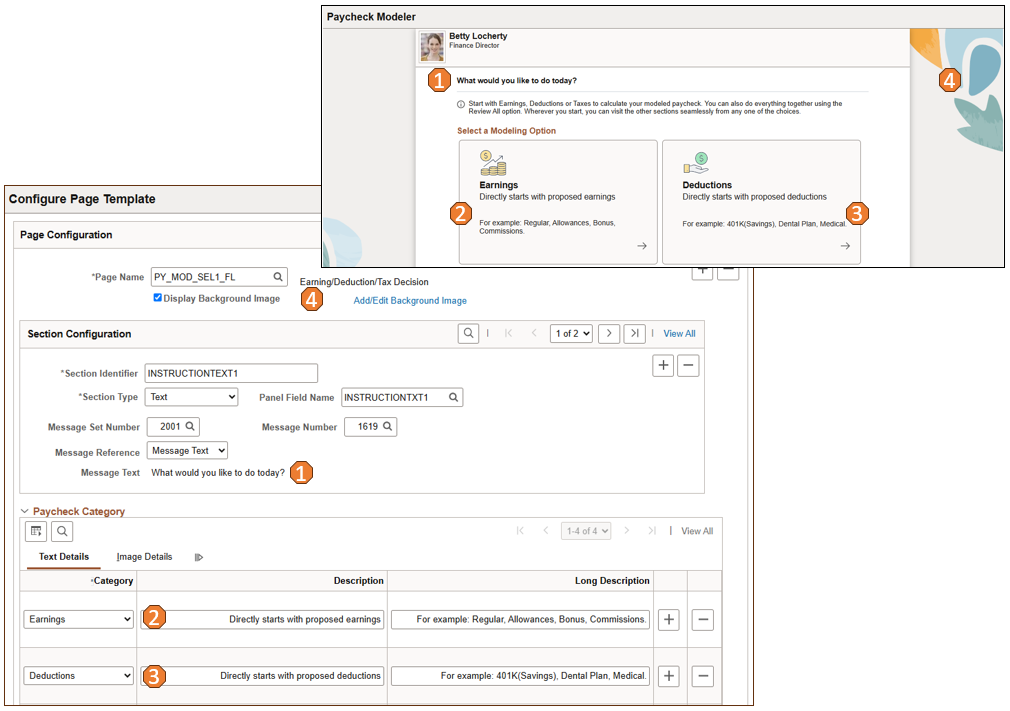
From the Paycheck Modeler page image (top screenshot), each page element that has an assigned number is controlled by the field on the configuration page (bottom screenshot) with the same assigned number.
Administrators can create custom templates to modify the look and feel of pages based on their requirements by cloning from the system-delivered template.
Tax Form Page Configuration
Additionally, PeopleSoft delivers tax page configuration to support the dynamic rendering of details for federal, state, and local tax withholding pages that are available on the Paycheck Modeler - Taxes Page. These setup pages include:
Configure Tax Page Header Page, specifying the image, tax form report template, and tax form instructions used for the tax withholding page, which are displayed in the header area of the page.
The system delivers page header setup for federal and state withholding pages.
Configure Tax Page Page, which includes what appears on the withholding page, such as page sections, as well as fields and texts included in each section.
The system delivers tax page setup for federal, state, and local tax withholding pages. Administrators can create custom tax page configuration to modify tax page display based on their requirements by cloning from the delivered templates.
Note: The system does not deliver configuration setup for states that do not have state income tax, with an exception for Washington. A system-delivered template for WA is available to support paycheck modeling on paid family and medical leave tax classes for the state of Washington.
This image illustrates the relationship between page elements on the header of a tax withholding page and where they were configured on the tax page header and page template pages.
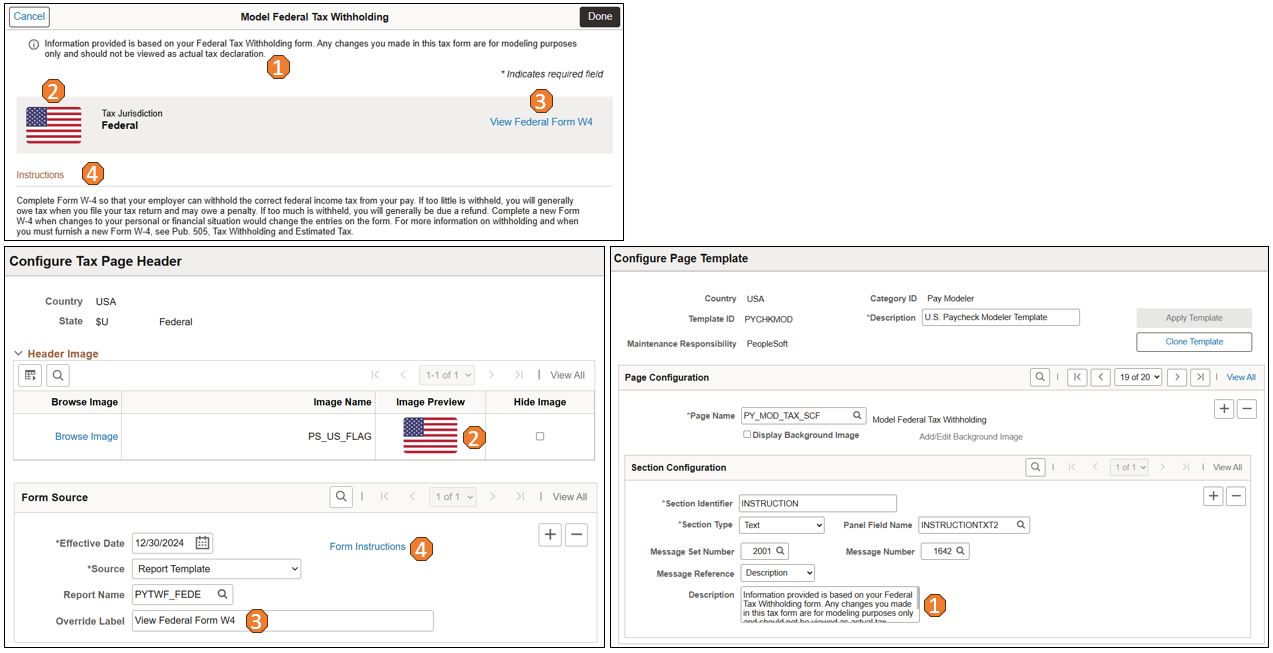
From the page header image, each page element in the federal tax withholding page header (top screenshot) that has an assigned number is controlled by the field on a configuration page (either bottom screenshot) with the same assigned number.
This image illustrates the relationship between page elements on a tax withholding page and where they were configured on the tax page configuration.
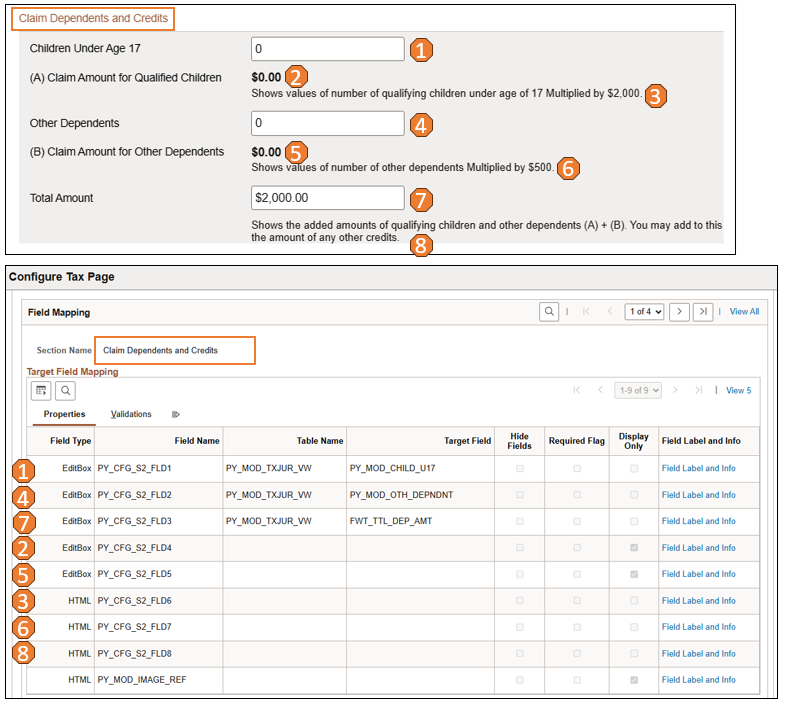
From the page section image, each page element in the Claim Dependents and Credits section of the federal tax withholding page (top screenshot) that has an assigned number is controlled by the field on the configuration page (bottom screenshot) with the same assigned number.
Here are the high-level steps for setting up Fluid Paycheck Modeler:
Review and ensure that the setup tasks for the classic version of Paycheck Modeler are completed.
Review the delivered setup for Paycheck Modeler pages on the Configure Page Template Page.
If changes need to be made to the page display, such as different images, texts, or hide an action, clone from the delivered template and update the custom template.
Review the delivered setup for federal, state, and local tax withholding pages on the Configure Tax Page Header Page and Configure Tax Page Page.
If changes need to be made to the page display, such as different texts, or hide a field, clone from the delivered template on the Configure Tax Page page and update the custom template. Use the Configure Tax Page Header page to make changes to the page header as needed.
U.S. employees need to be members of the U.S. Fluid Paycheck Modeling user role to be able to model their paychecks using Fluid Paycheck Modeler.
The permission list for accessing Fluid Paycheck Modeler is HCCPPY1008.
This section lists the common page controls that are used on Paycheck Modeler pages in Fluid Employee Self-Service.
|
Field or Control |
Description |
|---|---|
|
Calculate Check |
Select to calculate the modeled check using the information on Earnings, Deductions and Tax pages, and view the results on the Paycheck Modeler - Results Page. This button becomes available when a change is made. You cannot calculate modeled checks if the configured maximum daily limit or concurrent user access has been exceeded for the company on the Company Controls Page. If the daily limit is reached, the system generates an error message when you select the Paycheck Modeler tile, preventing you from starting a modeling session. |
|
View Modeled Result |
Select to review details of the paycheck to be used for modeling on the Paycheck Modeler - Results Page. Depending on the state of the session when the button is selected, the messages and results presented can be different. For example:
|
|
Exit |
Select to leave Paycheck Modeler. Data updated during the session is not saved when you exit. |
|
|
Select to add new earnings or deduction rows with relevant information to be used in modeling the paycheck. A Modeled tag is displayed for each added row. |
|
Clear All |
Select to set the amounts of all rows and the total amount on the page to zero. A Modeled tag is displayed for each row that has a cleared amount. |
|
Restore |
Select to revert all changes on the page back to their original values. This button becomes available when one or more values have been cleared or changed. |
|
Sort |
Select to sort table data by column in ascending or descending order. |
|
|
Select to update the details (for example, amount or gross percentage) of the corresponding row on the Edit Earnings page, Edit Deductions page, or Model <Federal/State/Local> Tax Withholding page. A Modeled tag is displayed for each row that has been edited. |
|
|
Select to set the amount of the corresponding row to zero. A Modeled tag is displayed for each row that has a cleared amount. |


Use the Configure Page Template page (PY_CFG_TMPL_PG) to set up display and text options for Paycheck Modeler pages.
Navigation:
This example illustrates the fields and controls on the Configure Page Template page.
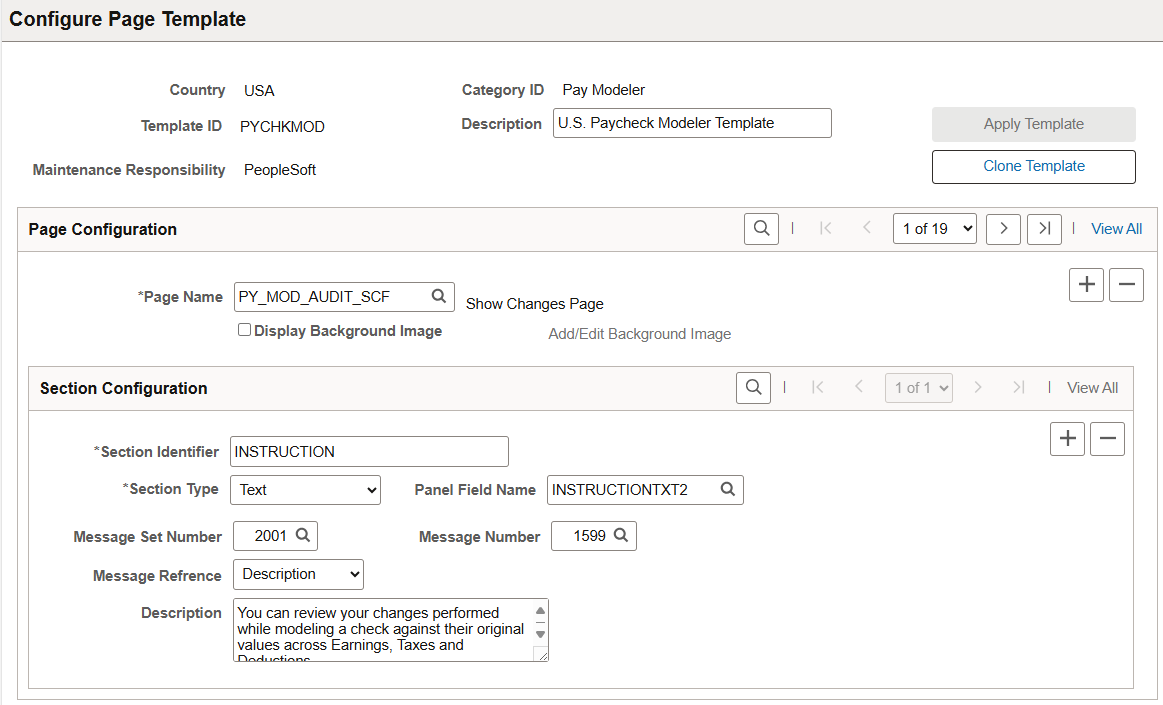
Oracle delivers the PYCHKMOD template to configure Paycheck Modeler pages for U.S. Payroll.
|
Field or Control |
Description |
|---|---|
|
Apply Template |
Select to use this template to render the Paycheck Modeler pages of the specified country and category. For example, use this button to switch to use a custom template you just updated,or back to the delivered template if preferred. This field is read-only if the template you're viewing is the one used for page rendering already. |
|
Clone Template |
Select to create a new template by cloning from template you're viewing. Note: If customers wish to create their own templates to modify the look and feel of the pages used, Oracle recommends that they create customer-maintained templates by cloning from the delivered template, and make updates in the new templates as desired. |
Page Configuration
|
Field or Control |
Description |
|---|---|
|
Page Name |
Select a page to be configured as part of the template. |
|
Display Background Image |
Select to enable the display of a background image on the specified page. |
|
Add/Edit Background Image |
Select to add background images for the specified page on the Background Image Configuration Page. This link becomes available when the Display Background Image field is selected. |
Section Configuration
|
Field or Control |
Description |
|---|---|
|
Section Identifier |
Specify a name to identify the section. Some section identifiers included in the delivered template include BACKGROUNDCOLOR and INSTRUCTION. |
|
Section Type |
Select the type of section configuration. Available values are: Background Color HTML Text |
|
Panel Field Name |
Select the panel field to which the configuration applies. |
|
Theme |
Select how the background color of the page is specified. Values are: Color Code: When selected, enter a hex code for the color in the Hexadecimal field that appears. Solid Color: When selected, choose a color from the Color field that appears. This field appears if the selected section type is Background Color. |
|
HTML Code |
Enter the HTML code for the display. This field appears if the selected section type is HTML. |
|
Add Bind Values |
Enter bind values that are included in the HTML code on the Add Bind Values page (PY_CFG_HTMLBIND_PG). This link appears if the selected section type is HTML. |
|
Message Set Number and Message Number |
Specify the Message Catalog set number and number of the text (for example, instructional text) to use, if desired. This field appears if the selected section type is Text. |
|
Message Reference |
Select to display text from a free-form description field or a Message Catalog entry. Values are: Description Message Text This field appears if the selected section type is Text. |
|
Description |
Enter free-form text. This field appears if the selected message reference type is Description. |
|
Message Text |
Displays the message text of the specified message set number and message number. This field appears if the selected message reference type is Message Text. |
Paycheck Category
This section controls which:
Modeled check cards and associated images are displayed on the Paycheck Modeler - Results Page (PY_MOD_RSLT_FL).
Paycheck Modeler page cards and associated images are displayed Paycheck Modeler - Decision Page (PY_MOD_SEL1_FL).
|
Field or Control |
Description |
|---|---|
|
Category |
Select a category to appear on the selected page as a card. Available values change based on the selected page. Values for PY_MOD_RSLT_FL are: Modeled Check After Modeled Check Before Modeled Check Insights Values for PY_MOD_SEL1_FL are: Deductions Earnings Review All Taxes |
|
Description and Long Description |
Enter a short and a long description of the category. The short description is used as the title of the card. |
|
Browse Image |
Select the link to choose a graphic for the specified category on the Browse Image Catalog page. For more information about the Image Catalog, refer to PeopleTools: Portal Technology, "Administering Portals," Browsing the Image Catalog. |
|
Image Name and Image Preview |
Displays the name and image of the selected graphic. |
Next Actions
Use this section to insert additional actions that are available to users on the Paycheck Modeler - Results Page.
|
Field or Control |
Description |
|---|---|
|
Display Order |
Enter the order in which the action appears in the Next Steps section of the results page. |
|
Content Reference Name |
Specify the name of the content reference for the related action that users can take after viewing the simulation results. |
|
Description and Long Description |
Enter a short and a long description of the entry. The short description is used as the link label of the card. The long description appears below the link label. |
|
Open in New Window |
Select to open the page of the action in a new browser tab or window. |
|
Hide |
Select to not show the action. |
|
Browse Image |
Select the link to choose a graphic for the specified action on the Browse Image Catalog page. |
|
Image Name and Image Preview |
Displays the name and image of the selected graphic. |
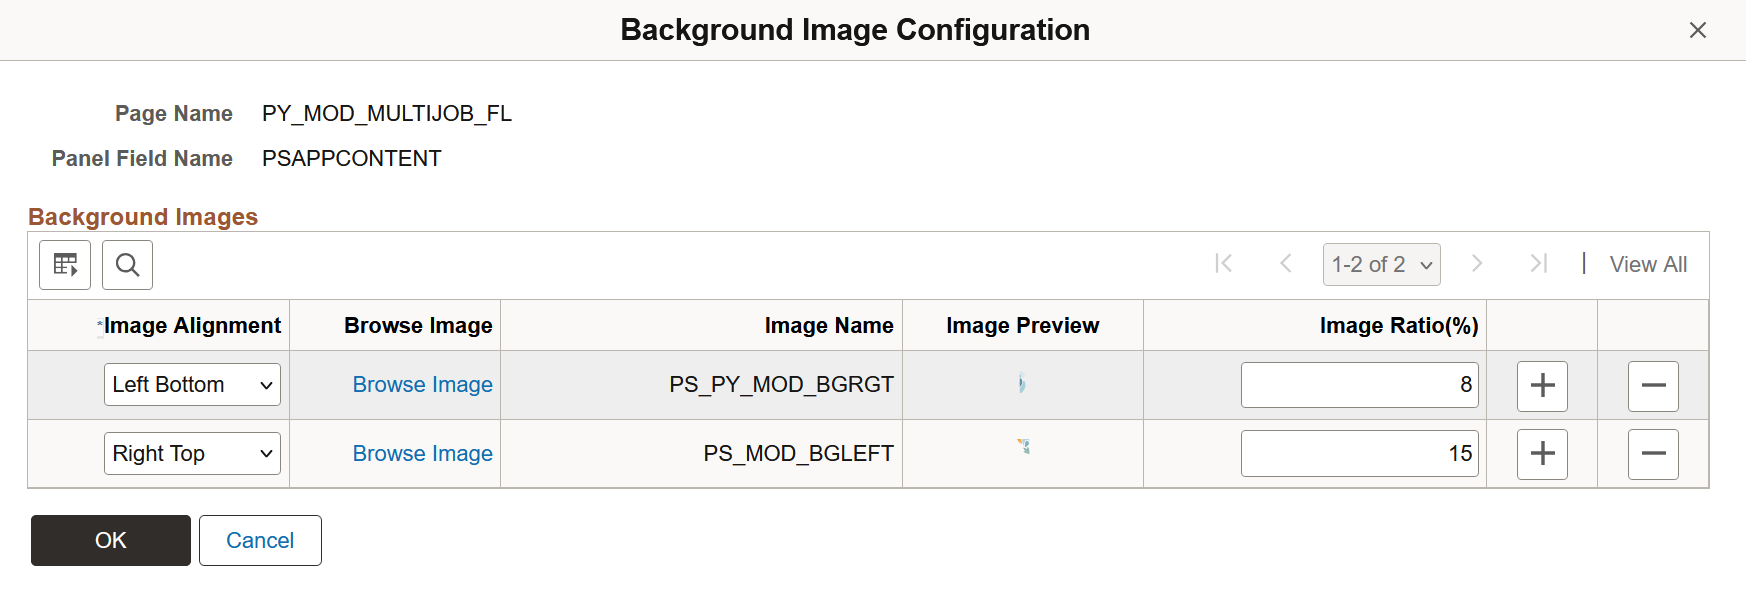
Use the Background Image Configuration page (PY_CFG_IMG_SEC) to upload images used in the page background.
Navigation:
Select the Add/Edit Background Image link on the Configure Page Template page.
This example illustrates the fields and controls on the Background Image Configuration page.
|
Field or Control |
Description |
|---|---|
|
Image Alignment |
Select the corner location of the page to place the image. |
|
Browse Image |
Select the link to choose a graphic for the specified page on the Browse Image Catalog page. |
|
Image Name and Image Preview |
Displays the name and image of the selected graphic. |
|
Image Ratio |
Enter the ratio of the image to the page. Enter between 1 to 100. |
Use the Configure Tax Page Header page (PY_CFG_TXFRMHDR_PG) to set up the page header for Paycheck Modeler tax withholding pages.
Navigation:
This example illustrates the fields and controls on the Configure Tax Page Header page.
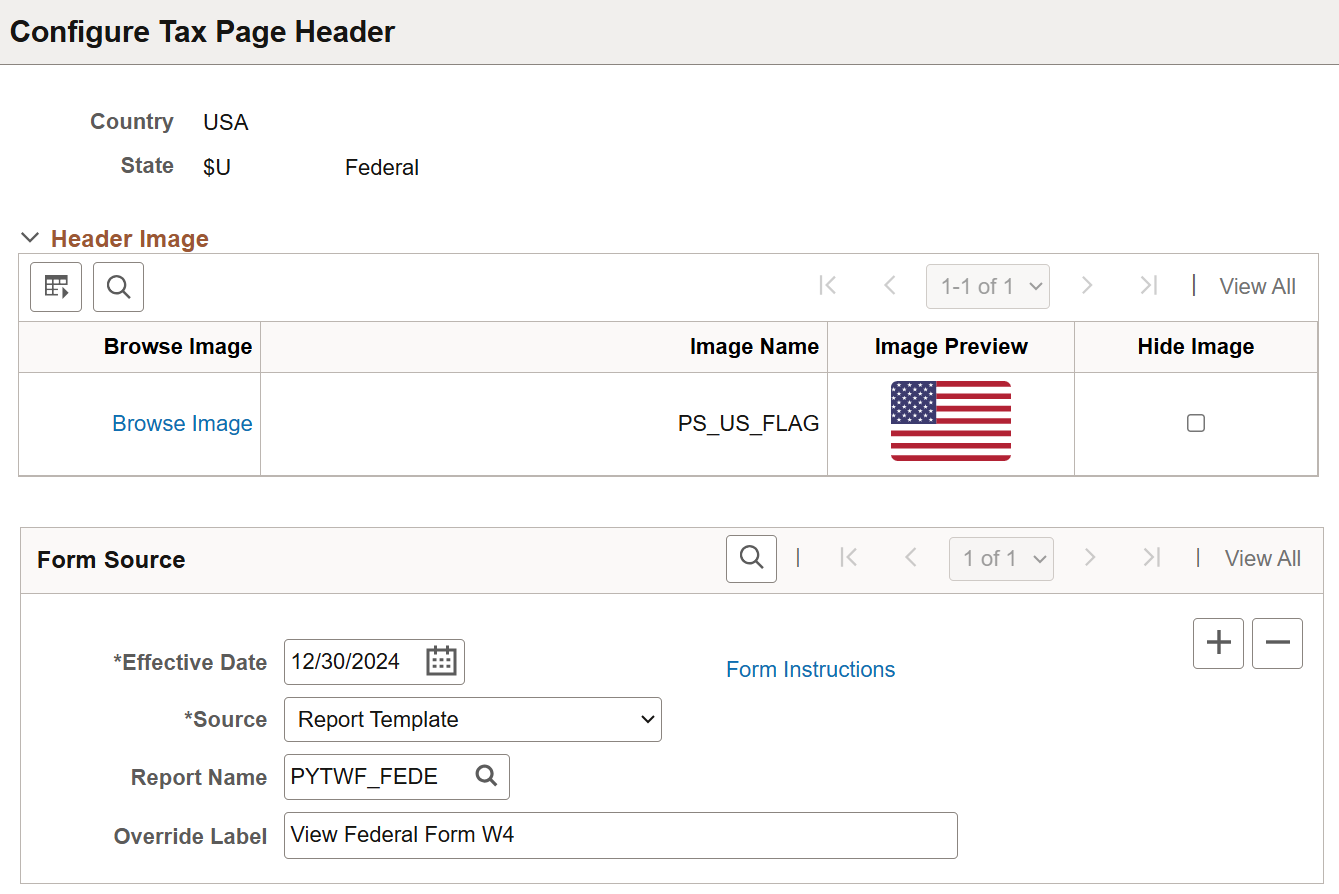
The system delivers tax page header configuration for federal and states.
|
Field or Control |
Description |
|---|---|
|
Browse Image |
Select the link to choose a graphic for the specified category on the Browse Image Catalog page. |
|
Hide Image |
Select to not show the image on the tax withholding page header. |
Form Source
|
Field or Control |
Description |
|---|---|
|
Source |
Select the source of tax form link, which appears in the header of the tax withholding page. Values are: None: No link to display. Report Template: Select to specify the BI Publisher report template for the tax form in the Report Name field that appears. URL: Select to specify the URL of the tax form in the URLID field that appears. |
|
Override Label |
Enter a new label for the tax form link if needed. |
|
Form Instructions |
Select to view or update the instructional text for the tax form on the Form Instructions page (PY_CFG_FORMINS_SEC), if applicable. Entered text appears in the Instructions section of the corresponding federal or state tax withholding page. If there is no instructional text defined, the Instructions section is not displayed. Note that this instructional text is tax form-specific; it is different from the instructional text for Paycheck Modeler pages that is displayed with the Information icon, which is defined on the Configure Page Template Page. |
Use the Configure Tax Page page (PY_CFG_TAX_PG) to set up display and text options for Paycheck Modeler tax withholding pages.
Navigation:
This example illustrates the fields and controls on the Configure Tax Page page.
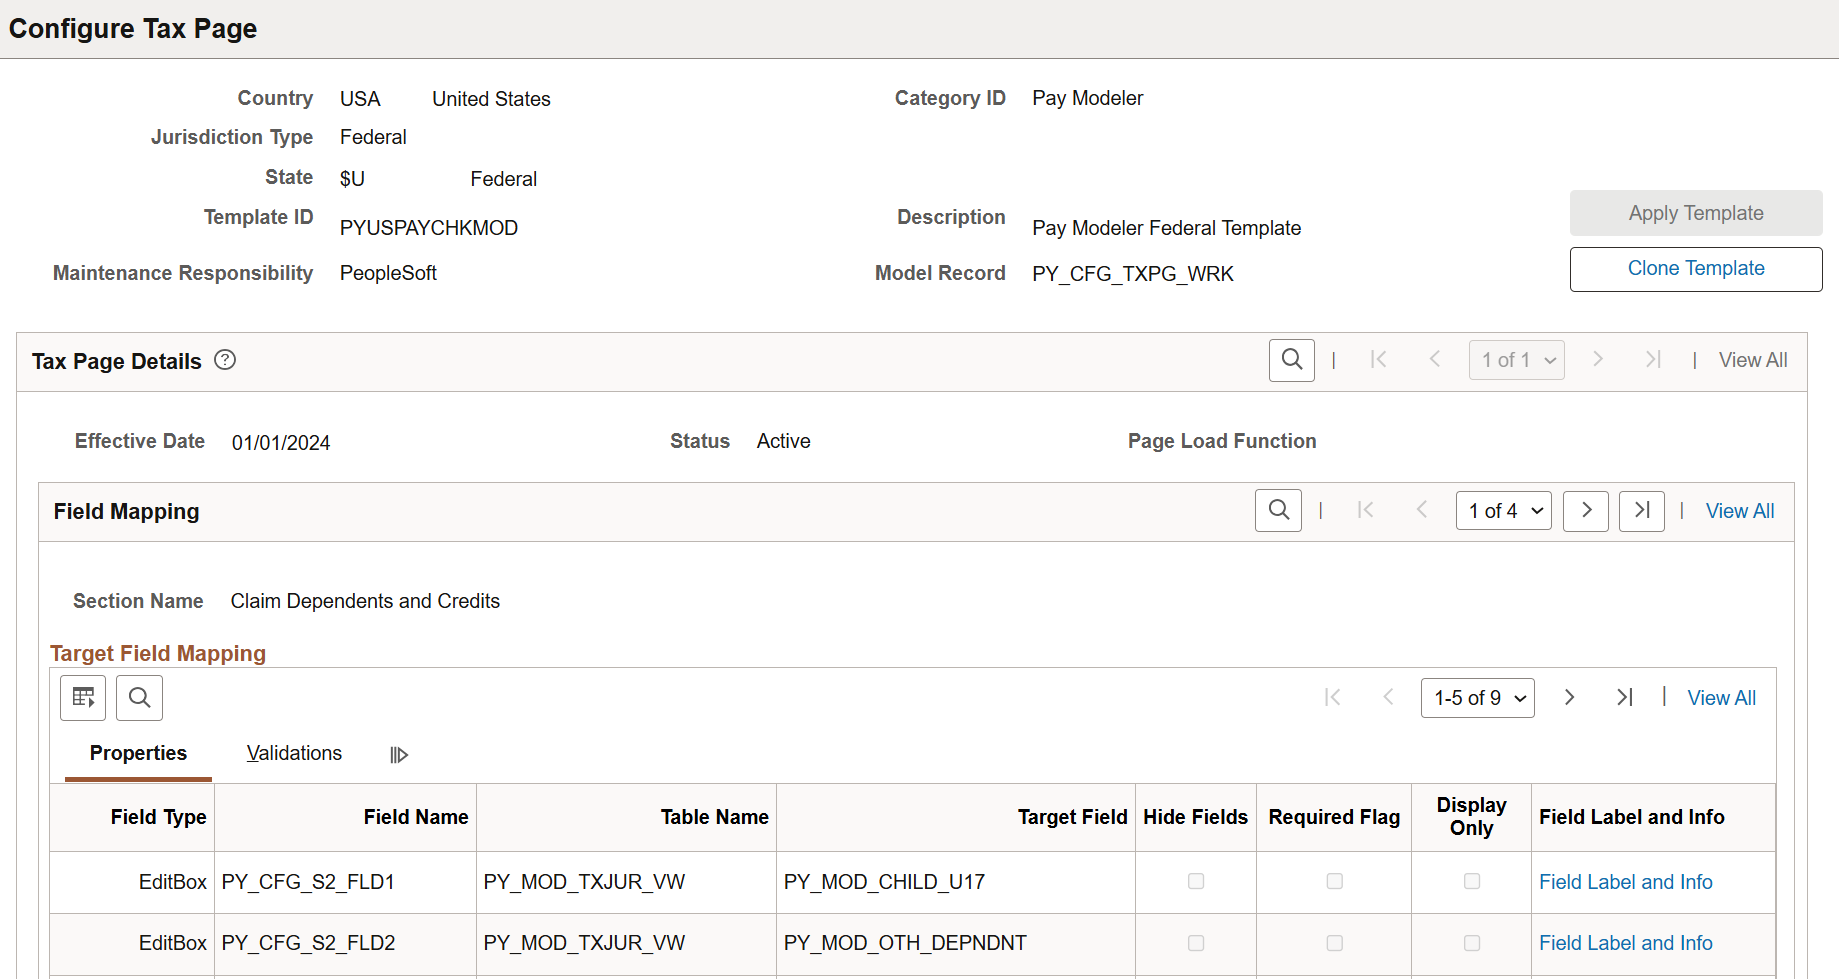
The system delivers tax page configuration for:
Federal tax withholding
State tax withholding (for states that have income tax, and WA)
Local tax withholding (for IN, MI, and NY, where locality details are also available on their state W-4.)
Tax page configuration is used for rendering tax withholding pages in Paycheck Modeler. Each delivered configuration includes page fields to support its W-4, field properties and validation.
Administrators can use system-delivered configuration, or create custom configurations if they wish to modify field properties (hidden, required, read-only) or change field labels to suit their needs.
|
Field or Control |
Description |
|---|---|
|
Apply Template |
Select to use this active template to render the tax withholding page of the specified country, category, jurisdiction type, and state. For example, use this button to switch to use a custom template you just updated,or back to the delivered template if preferred. This field is read-only if the template you're viewing is the one used for page rendering already. |
|
Clone Template |
Select to create a new template by cloning from template you're viewing. Note: If customers wish to create their own templates to modify the look and feel of their federal, state, and local tax withholding pages, Oracle recommends that they create customer-maintained templates by cloning from the delivered templates, and make updates in the new templates as desired. |
Tax Page Details
Tax page configuration is effective-dated and can be inactivated. The system uses the latest active configuration to render tax withholding pages.
Field Mapping
|
Field or Control |
Description |
|---|---|
|
Section Name |
Displays or select the name of a section on the tax withholding page. |
Target Field Mapping
This section displays fields that appear in the specified section.
|
Field or Control |
Description |
|---|---|
|
Field Type |
Displays or select the type of the field. Values are: CheckBox DropDown EditBox HTML Push Button Radio Button |
|
Field Name, Table Name, and Target Field |
Identifies the field to be displayed in the page section. |
|
Hide Fields |
Displays whether the field is shown or hidden on the page, or select to hide the field. |
|
Required Flag |
Displays whether or not the field is required, or select to indicate that the field is required. |
|
Display Only |
Displays whether or not the field is read-only, or select to indicate that the field is read-only. |
|
Field label and Info |
Select to view or update field label or instructional text (for HTML field type) on the Field Label and Information Page. |
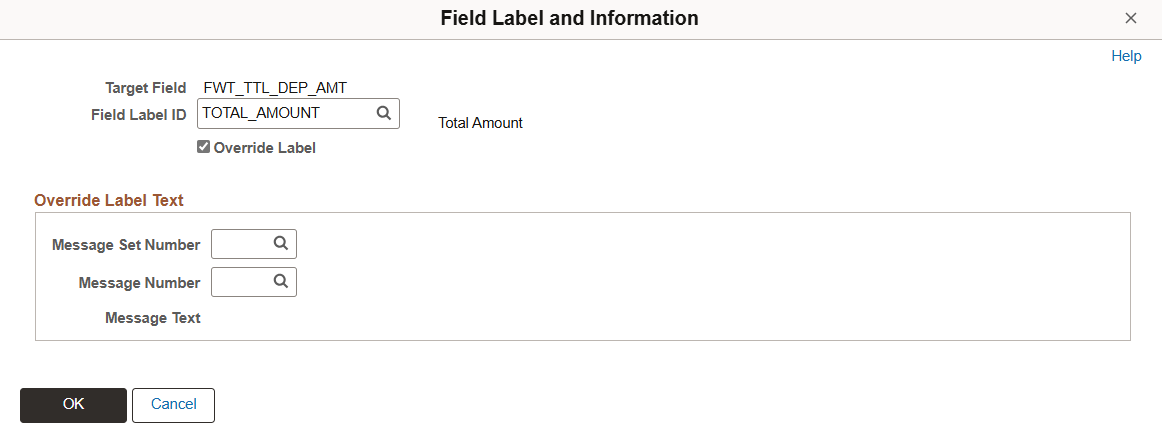
Use the Field Label and Information page (PY_CFG_TAX_FLDINFO) to view or update section field labels.
Navigation:
Select the Field Label and Info link on the Configure Tax Page page.
This example illustrates the fields and controls on the Field Label and Information page.
|
Field or Control |
Description |
|---|---|
|
Override Label |
(When page is read-only) Displays whether or not the existing field label has been overridden. (When page is editable) Select to replace the existing label of the field. When selected, the Override Label Text section that appears. |
Override Label Text
Select text from the Message Catalog to be the new field label by specifying the text's message set number and number.
Use the Paycheck Modeler tile to start the paycheck modeling process.
Navigation:
The Paycheck Modeler tile is delivered as part of the Payroll Dashboard, but you can add the tile to any home page through personalizations.
This example illustrates the Paycheck Modeler tile.
The paycheck modeling process calculates hypothetical checks based on the suggested changes you made on your earnings, deductions, as well as tax withholding.
Note: Paycheck Modeler is available to employees who have at least one generated paycheck in the system.
Use the Paycheck Modeler - Select a Job page (PY_MOD_MULTIJOB_FL) to choose a job for the paycheck simulation.
Navigation:
Select the Paycheck Modeler tile.
This example illustrates the fields and controls on the Paycheck Modeler - Select a Job page.
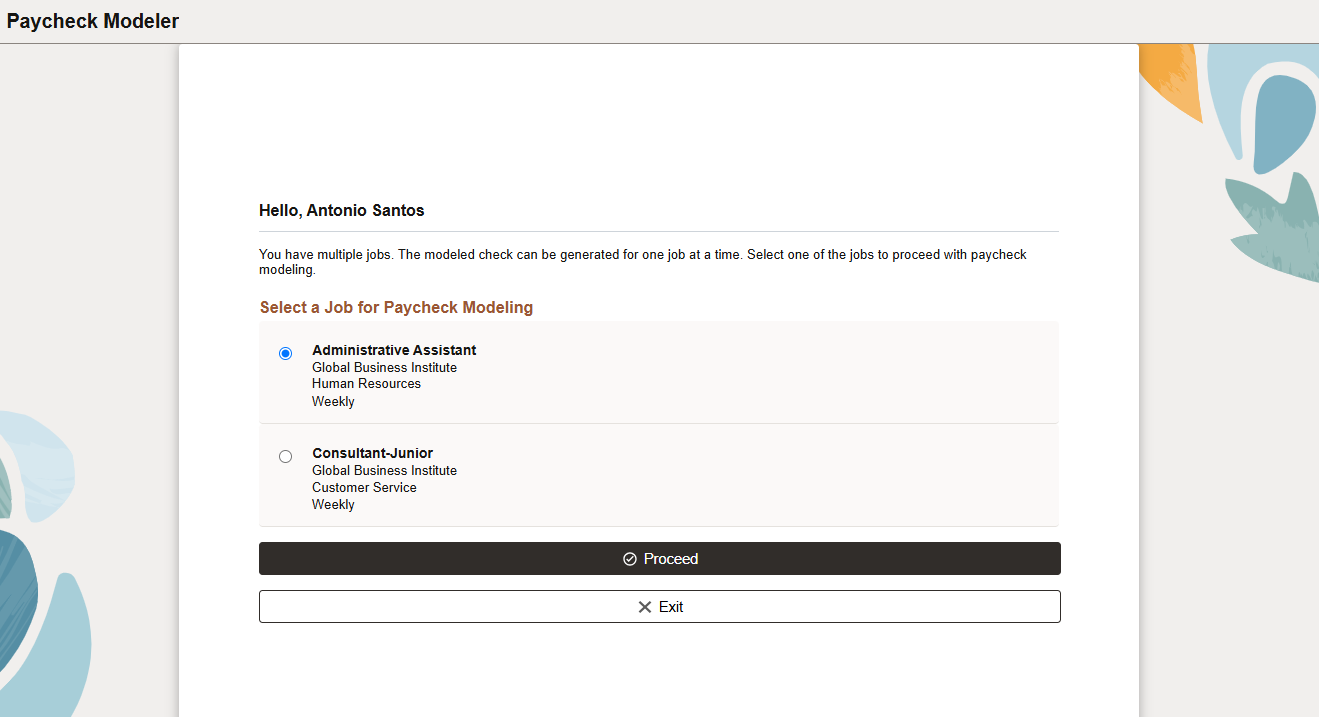
Paycheck Modeler can model paycheck for one job at a time. This page appears if the system determines that the employee has multiple jobs.
The default job is the job for employment record 0, or the lowest numbered active employee record if job 0 is inactive or does not exist.
Select the job to use to model the paycheck. Select the Proceed button to move to the next step, or Exit to leave the tool.
Use the Paycheck Modeler - Welcome page (PY_MOD_START_FL) to acknowledge the usage terms and conditions of Paycheck Modeler.
Navigation:
(Single job) Select the Paycheck Modeler tile on the Payroll dashboard.
(Multiple jobs) Select the Proceed button on the Paycheck Modeler - Select a Job page.
This example illustrates the fields and controls on the Paycheck Modeler - Welcome page.
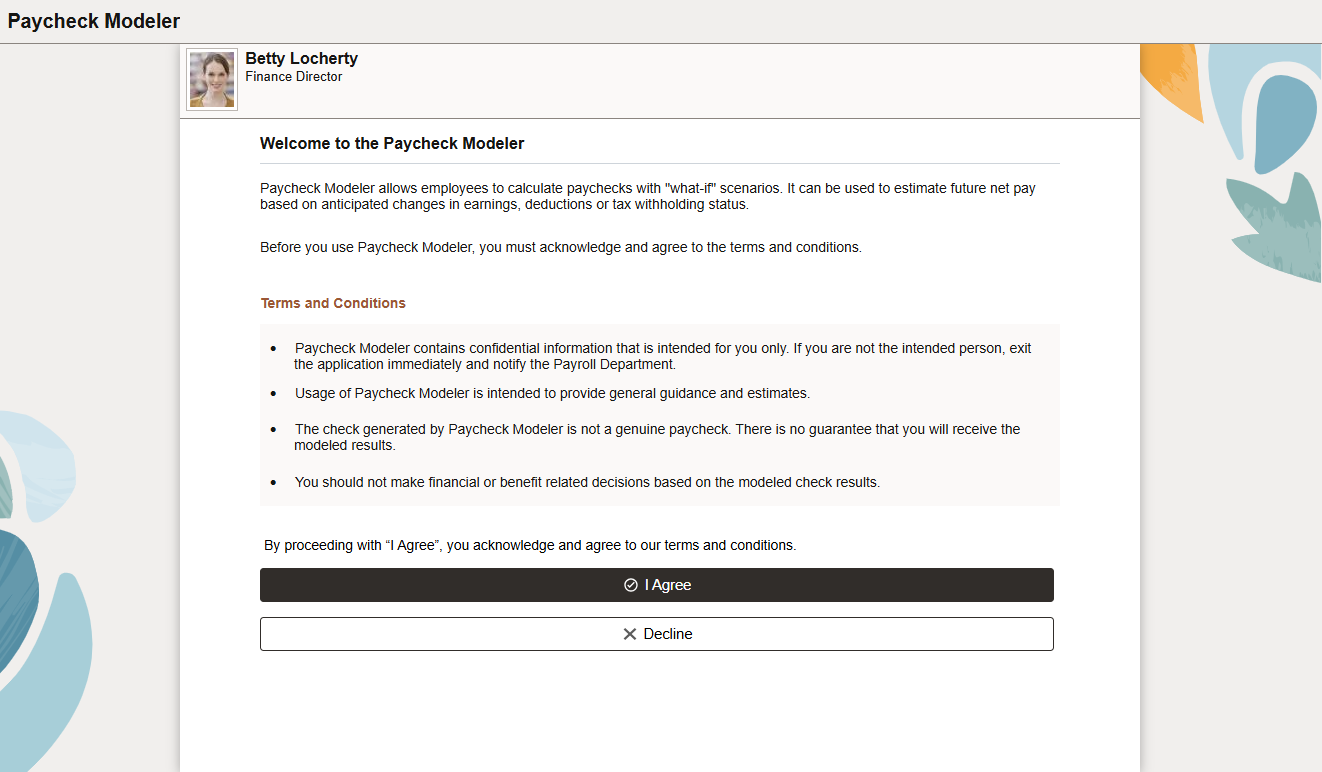
The welcome page introduces Paycheck Modeler and lists the terms and conditions for using the tool. Select the I Agree button to provide acknowledgement and move to the step, which is to decide where to start the paycheck modeling session.
Select Decline to exit the tool.
Use the Paycheck Modeler - Decision page (PY_MOD_SEL1_FL) to select the starting point of the modeling process.
Navigation:
Select the I Agree button on the Paycheck Modeler - Welcome page.
This example illustrates the fields and controls on the Paycheck Modeler - Decision page.
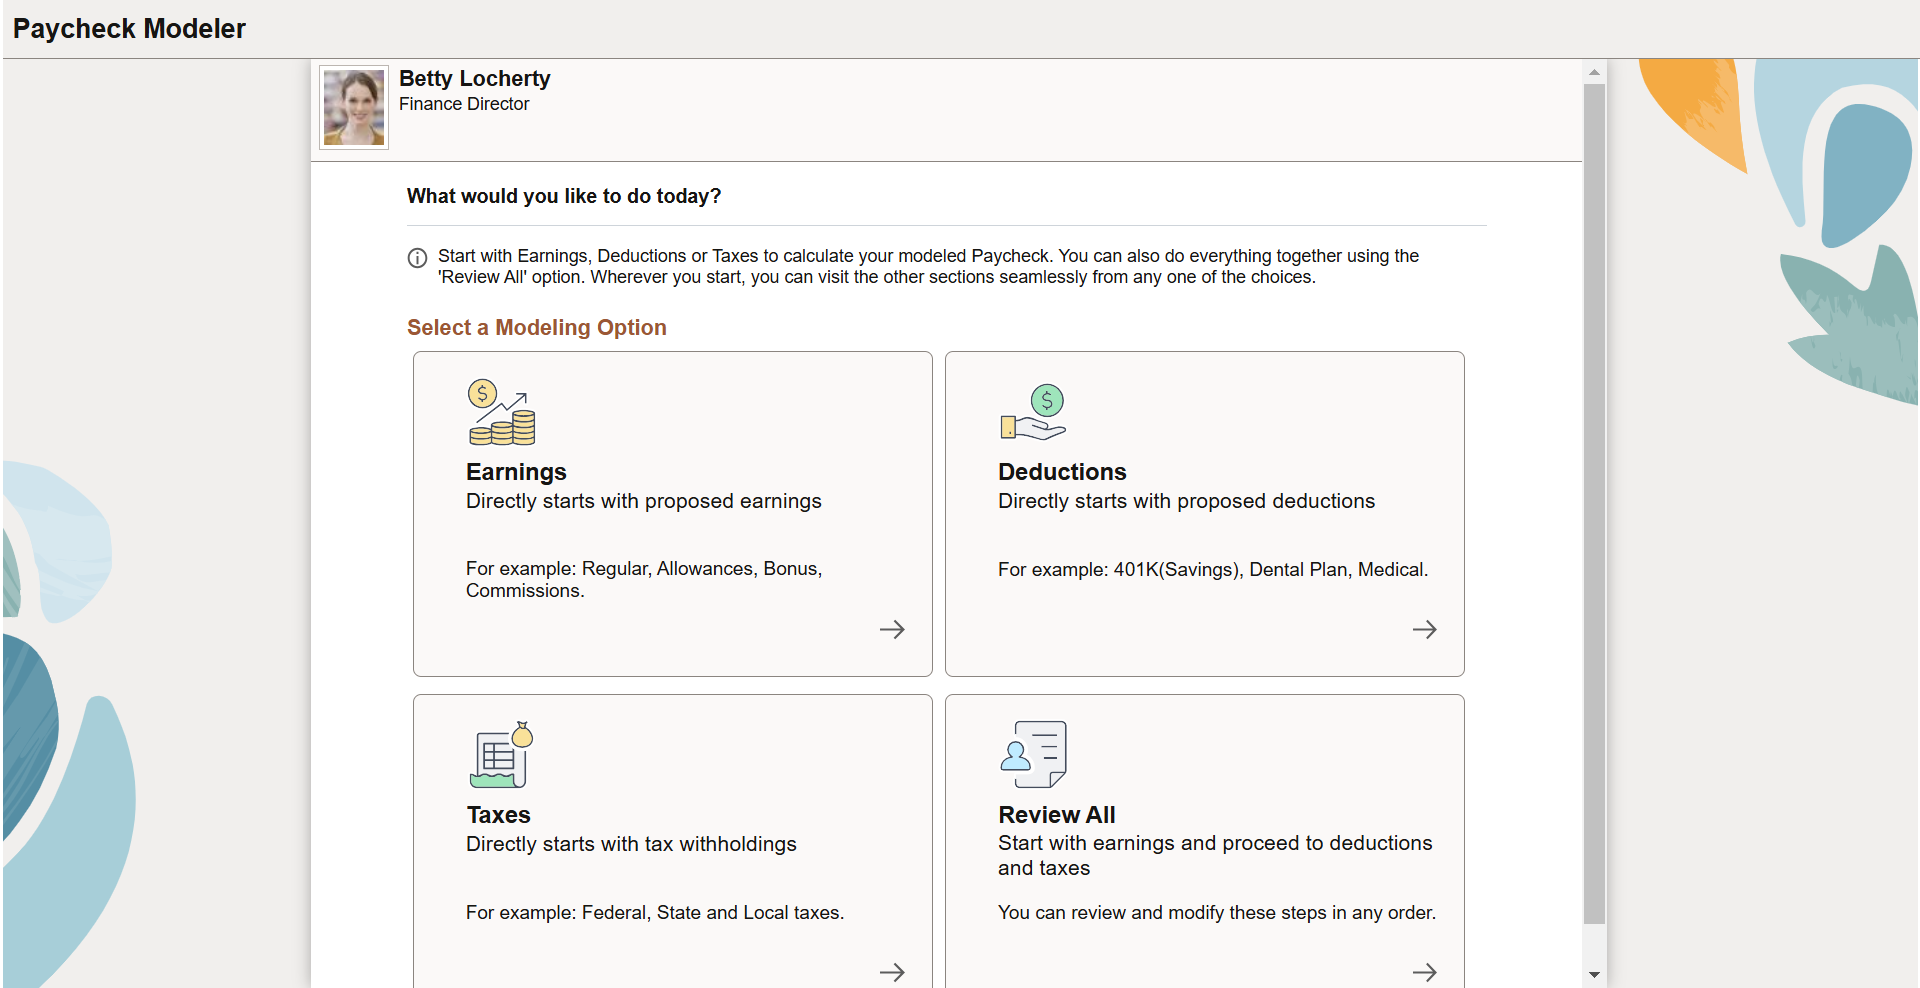
This page displays four available options to launch the paycheck modeling session. Start by:
Making earnings changes on the Paycheck Modeler - Earnings Page.
Making deduction changes on the Paycheck Modeler - Deductions Page.
Making tax withholding changes on the Paycheck Modeler - Taxes Page.
Making updates on earnings, followed by deductions and tax withholding information.
If you plan to make one type of changes (for example, deductions) only, it is quicker to navigate directly to that page and make the updates. Note that when you are on a page, you can navigate freely to other pages to view or edit the information that is used to calculate the modeled paycheck.
Use the Paycheck Modeler - Earnings page (PY_MOD_EDTL_FL) to modify earnings information for the modeled paycheck calculation.
Navigation:
Select the Earnings or Review All card on the Paycheck Modeler - Decision page.
Select the Earnings tab in Paycheck Modeler.
This example illustrates the fields and controls on the Paycheck Modeler - Earnings page.

This page displays employee's standard earnings from the last confirmed paycheck.
The additional earnings that are available to add to paycheck modeling are based on the earnings defined for the employee's company and pay group on the Pay Group Parameters - Earnings Definition Page.
See Common Elements Used in Fluid Paycheck Modeler.
For more information about the Earnings page, refer to the Paycheck Modeler - Earnings Page section of the Understanding the Self-Service Paycheck Modeling Process topic.
Use the Paycheck Modeler - Deductions page (PY_MOD_DDTL_FL) to modify deduction information for the modeled paycheck calculation.
Navigation:
Select the Deductions card on the Paycheck Modeler - Decision page.
Select the Deductions tab in Paycheck Modeler.
This example illustrates the fields and controls on the Paycheck Modeler - Deductions page.
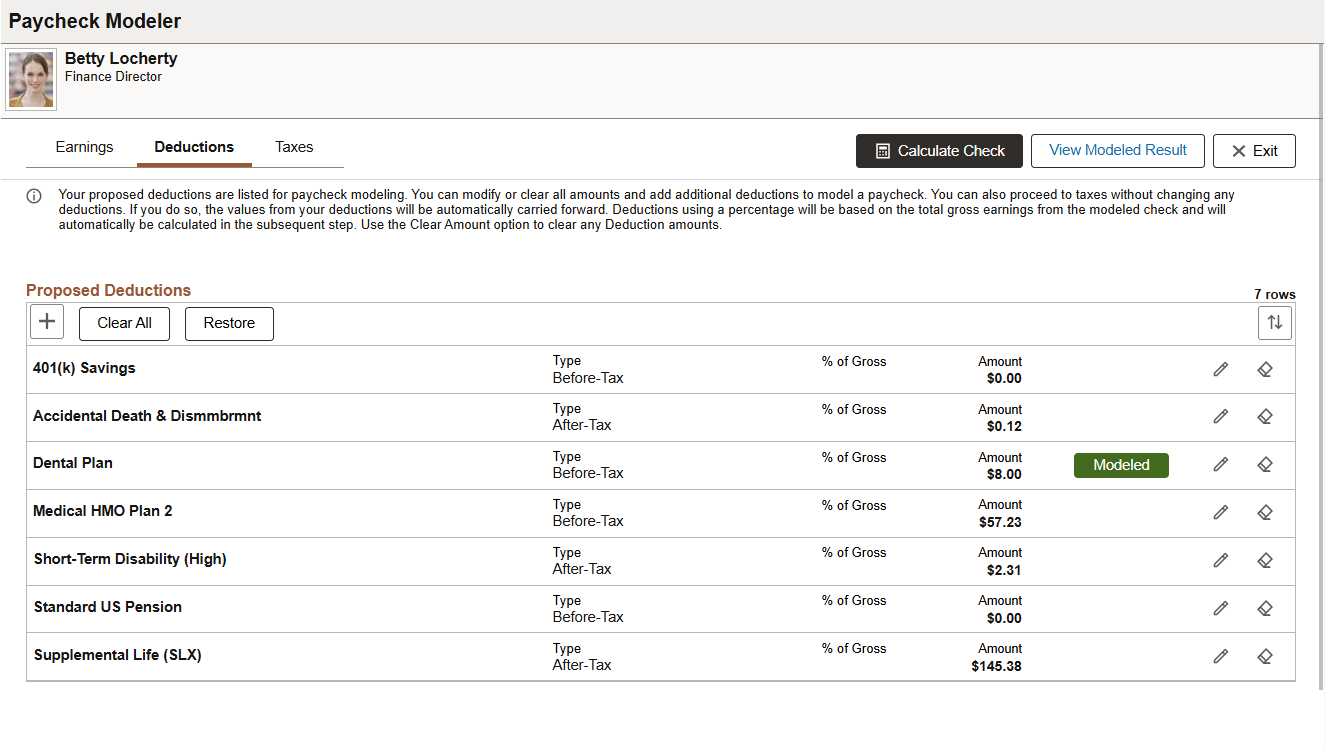
This page displays employee’s standard deductions that are scheduled to be taken in the next open calendar.
The additional deductions that are available to add to paycheck modeling are based on the deductions defined for the employee's company and pay group on the Pay Group Parameters - Deduction Definition Page.
If the specified calculation method of a deduction is Percentage of Gross, the calculation is based on the total gross earnings of the modeled check.
See Common Elements Used in Fluid Paycheck Modeler.
For more information about the Deductions page, refer to the Paycheck Modeler - Deductions Page section of the Understanding the Self-Service Paycheck Modeling Process topic.
Use the Paycheck Modeler - Taxes page (PY_MOD_TXDTL_FL) to view tax withholding information for the modeled paycheck calculation.
Navigation:
Select the Taxes card on the Paycheck Modeler - Decision page.
Select the Taxes tab in Paycheck Modeler.
This example illustrates the fields and controls on the Paycheck Modeler - Taxes page.
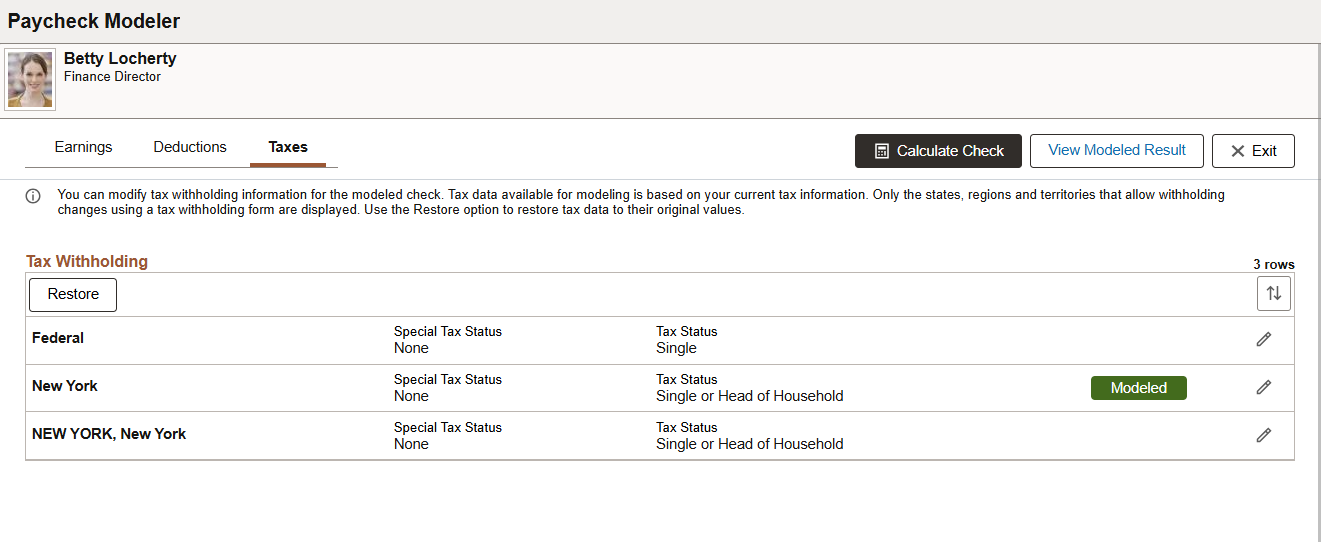
This page displays the employee's tax withholding information from the last confirmed paycheck. It includes a federal tax withholding row, a state tax withholding row based on the employee's work or resident state, as well as local tax if the locality that the employee lives or works has taxation.
Edit the details of the tax withholding rows as needed for paycheck modeling.
See Common Elements Used in Fluid Paycheck Modeler.
For more information about the Taxes page, refer to the Paycheck Modeler - Taxes Page section of the Understanding the Self-Service Paycheck Modeling Process topic.
Use the Model Federal Tax Withholding page (PY_MOD_TAX_SCF) to modify federal tax withholding information for the modeled paycheck calculation.
Navigation:
Select Edit on the federal tax withholding row on the Paycheck Modeler - Taxes page.
This example illustrates the fields and controls on the Model Federal Tax Withholding page (1 of 2).
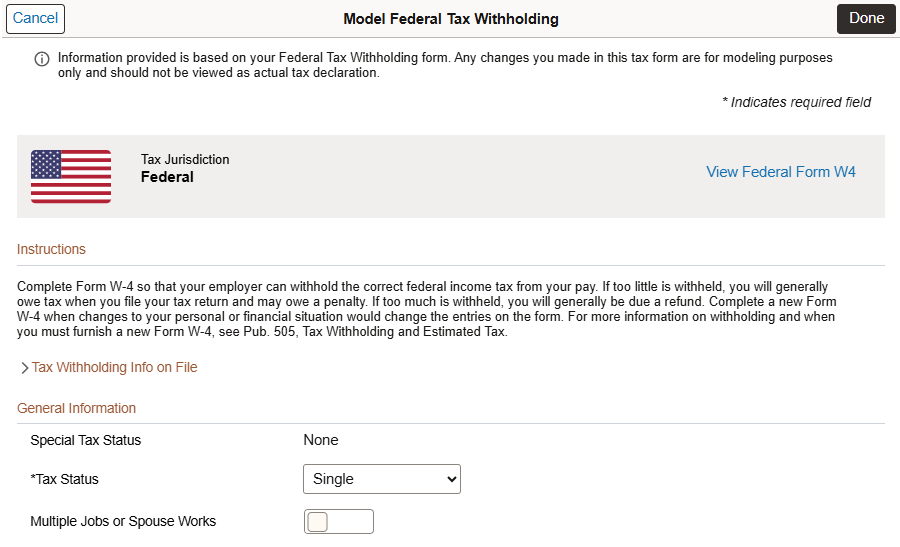
This example illustrates the fields and controls on the Model Federal Tax Withholding page (2 of 2).
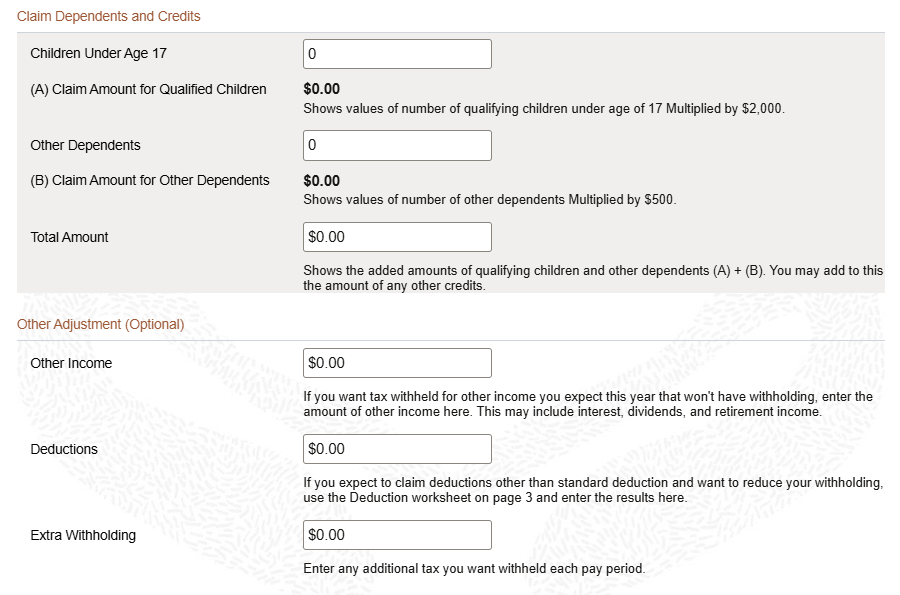
The employee can update federal tax information for the simulation, such as tax filing status, dependent claim and other withholding amounts.
Use the Model State Tax Withholding page (PY_MOD_ST_TAX_SCF) to modify state tax withholding information for the modeled paycheck calculation.
Navigation:
Select Edit on the state tax withholding row on the Paycheck Modeler - Taxes page.
This example illustrates the fields and controls on the Model State Tax Withholding page.
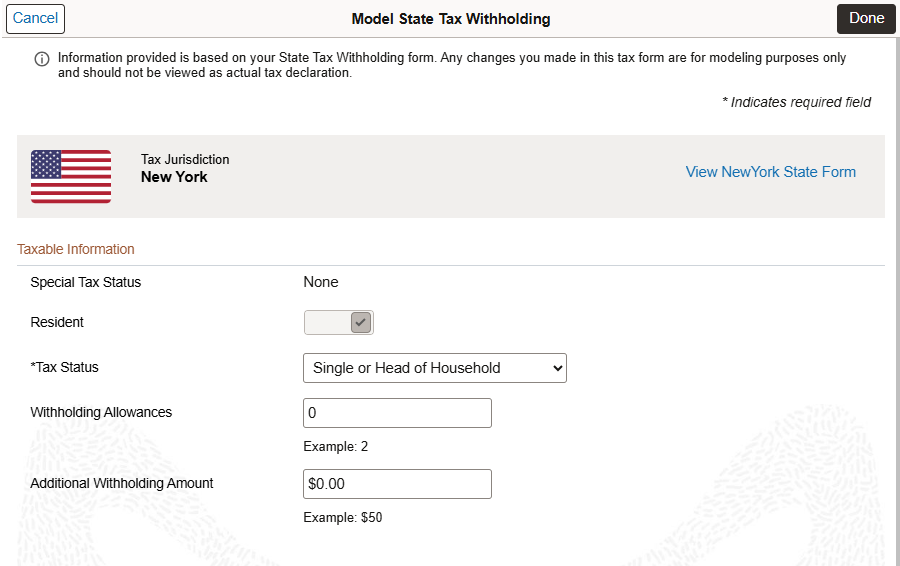
The employee can update state tax information for the simulation, such as tax filing status and additional withholding allowance amount.
Use the Modeled Local Tax Withholding page (PY_MOD_LT_TAX_SCF) to modify local tax withholding information for the modeled paycheck calculation.
Navigation:
Select Edit on the local tax withholding row on the Paycheck Modeler - Taxes page.
This example illustrates the fields and controls on the Local Tax Withholding page.

Use the Paycheck Modeler - Results page (PY_MOD_RSLT_FL) to view the modeled paycheck results.
Navigation:
Select the Calculate Check button on a Paycheck Modeler page.
This example illustrates the fields and controls on the Paycheck Modeler - Results page.
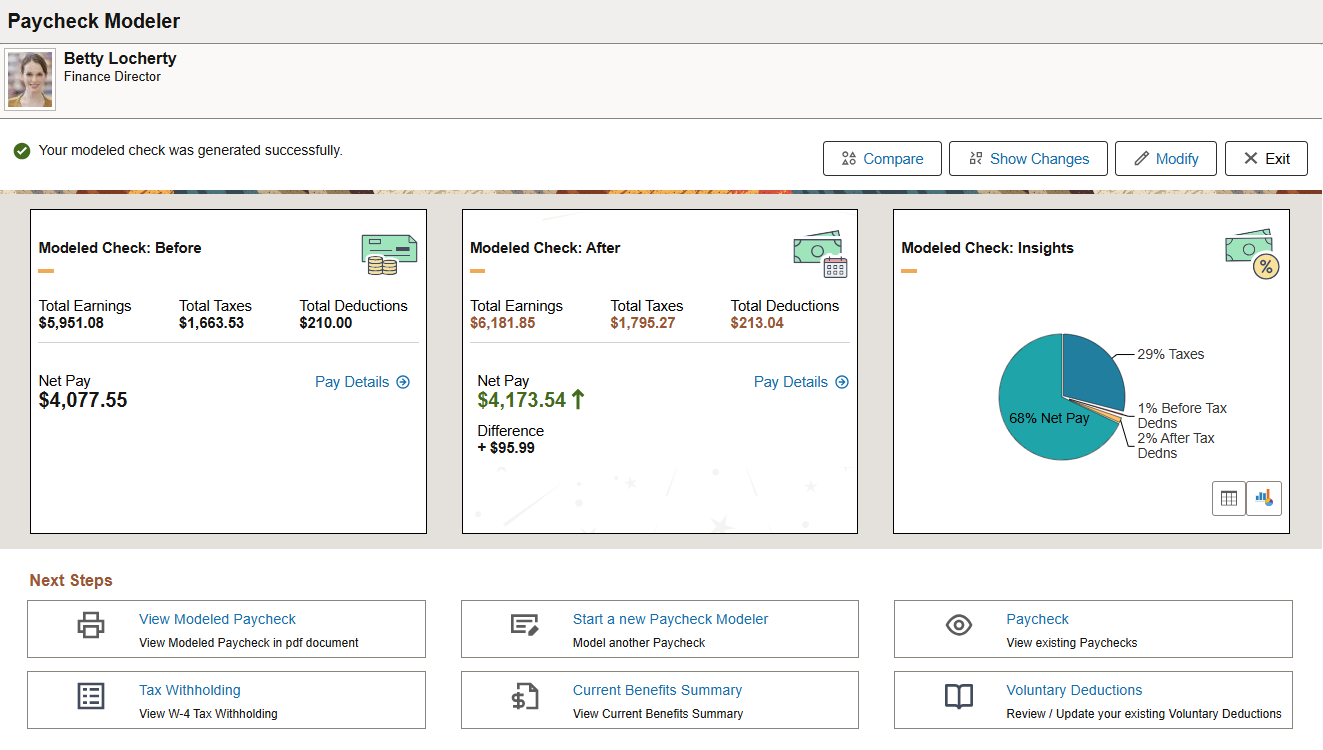
Note: Only employee amounts appear. Employer amounts are not part of a modeled paycheck.
|
Field or Control |
Description |
|---|---|
|
Compare |
Select to view the side-by-side display of all earnings, deduction, and tax entries as well as the net pay amounts of the modeled check before and after the calculation on the Compare Modeled Check Page. Each updated entry has a Modeled tag to indicate that it was edited during the simulation. A Recalculated tag is attached to each entry that changed during the calculation of the modeled check. |
|
Show Changes |
Select to view the changes you made to earnings, deduction, and tax entries in the modeled check on the View Modeled Changes Page. The page shows the before and after values for each modeled entry and the net pay of the check. |
|
Modify |
Select to make further updates on Earnings, Deductions, and Taxes pages and calculate the paycheck again. |
|
Exit |
Select to leave Paycheck Modeler. Data updated during the session is not saved when you exit. |
The Modeled Check: Before and Modeled Check: After cards display important amounts pertaining to the paycheck, such as total earnings, total deductions, total taxes, and net pay. Select the Pay Details link for a detailed view of all the entries and associated amounts included in the check on the Paycheck Details Page.
The Modeled Check: Insights card shows the percentage distribution of the modeled paycheck amounts in a pie chart or tabular format (which includes amount values).
These cards are configurable on the Configure Page Template Page.
Next Steps
The list of available actions (which are available for the PY_MOD_RSLT_FL page) are set up on the Configure Page Template Page.
Note: To access these actions, make sure popup windows are allowed in your browser.
|
Field or Control |
Description |
|---|---|
|
View Modeled Paycheck |
Select to view the modeled paycheck in PDF. The modeled paycheck file is non-negotiable and unofficial, with the word Estimated displayed as the watermark. |
|
Start a new Paycheck Modeler |
Select to start new modeling session with another paycheck. |
|
Paycheck |
Select to view paychecks on the Paychecks Page. |
|
Tax Withholding |
Select to view or manage tax withholding information on the Tax Withholding Page. |
|
Current Benefits Summary |
Select for a summary view of your benefits information on the Benefits Summary Page. |
|
Voluntary Deductions |
Select to view or manage voluntary deductions on the Voluntary Deductions Page. |
Use the Paycheck Details page (PY_MOD_CALRSLT_SCF) to view details of the corresponding paycheck.
Navigation:
Select the Pay Details link on the Paycheck Modeler - Results page.
This example illustrates the fields and controls on the Paycheck Details page.
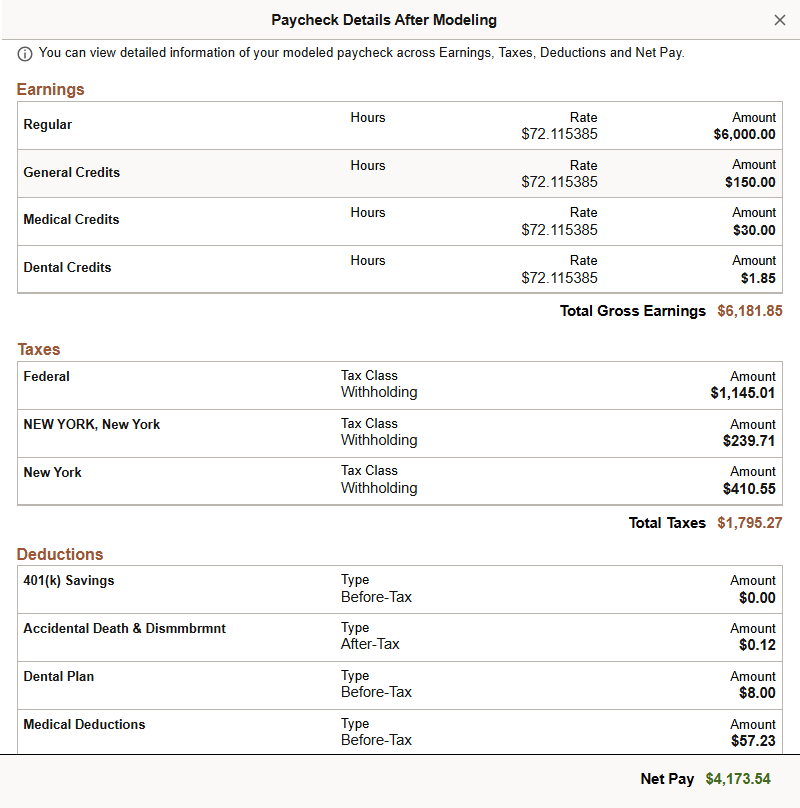
You can select to view the details (for example, net pay, totals for earnings, deductions, and taxes, and individual entry amount) of either the original or modeled paycheck.
Use the Compare Modeled Check page (PY_MOD_CMP_RSLT_FL) to view paycheck details before and after the paycheck modeling process.
Navigation:
Select the Compare button on the Paycheck Modeler - Results page.
This example illustrates the fields and controls on the Compare Modeled Check page.
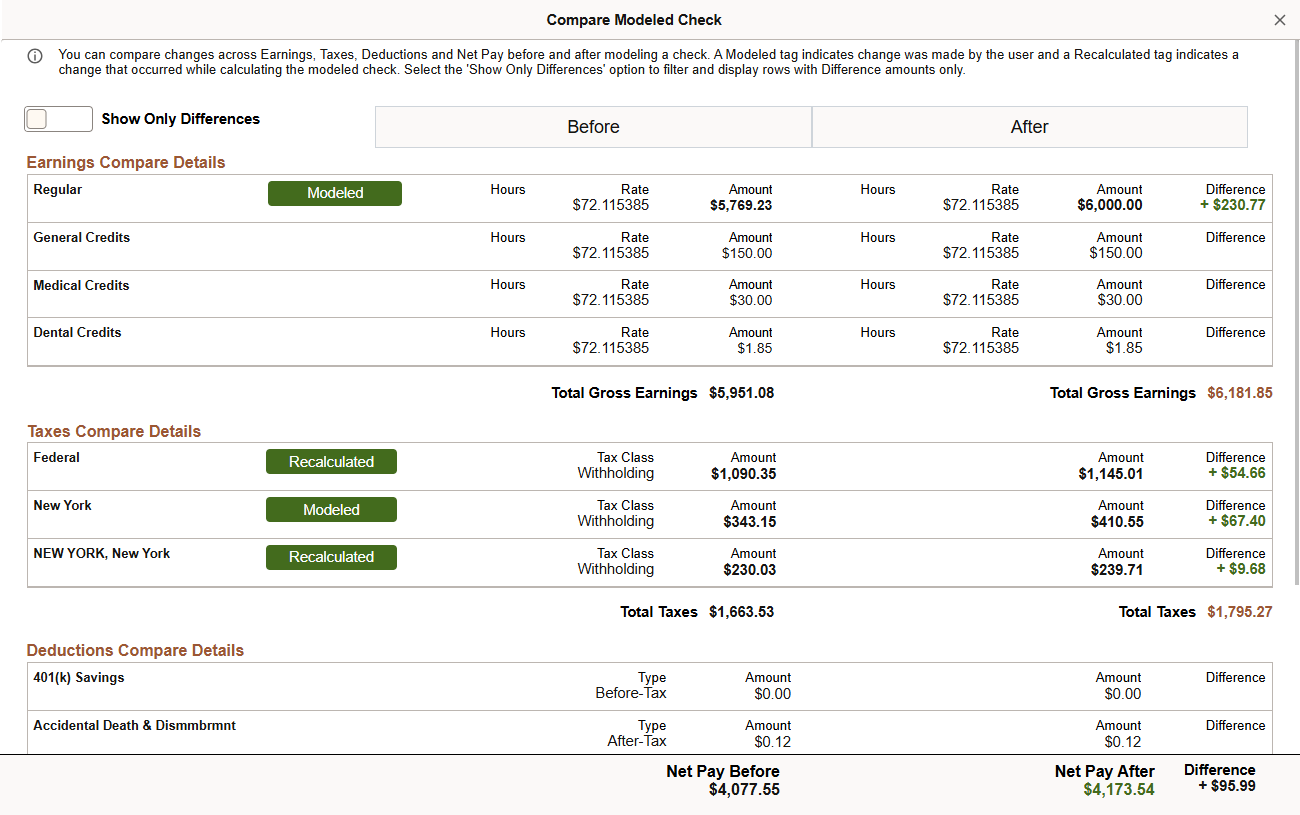
This page enables you to compare the details of the original and modeled paychecks side-by-side.
|
Field or Control |
Description |
|---|---|
|
Show Only Differences |
Use the slider to update the page to show rows with difference amounts only, in other words, rows that are Modeled or Recalculated. |
Use the Modeled Changes page (PY_MOD_AUDIT_SCF) to view changes made in the paycheck modeling process.
Navigation:
Select the Show Changes button on the Paycheck Modeler - Results page.
This example illustrates the fields and controls on the View Modeled Changes page.
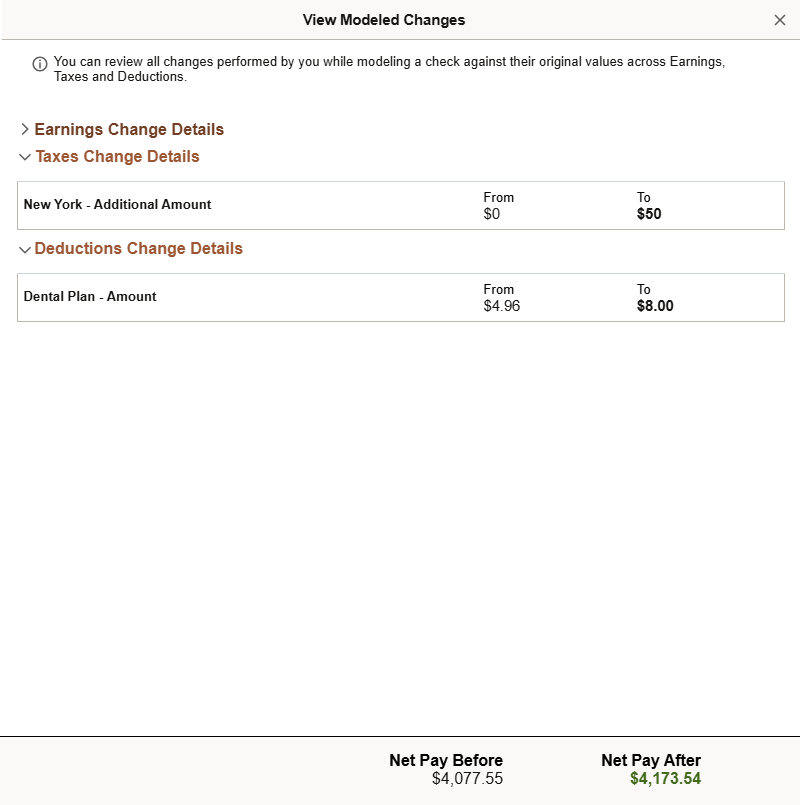
This page lists the changes (From and To values) that were made for the modeled paycheck by section, if applicable.