- DSR Cloud Installation Guide
- Installation
- Installing OL8.8 and KVM
2.4 Installing OL8.8 and KVM
Perform the following procedure to install Oracle Linux 8.8 OS with HTTP or USB media:
Note:
- If you’re using a hardware in a remote lab, install Linux remotely on a Windows computer. Ensure that remote Windows machine has the OL 8.8 ISO locally located.
- The installation process is specific to Oracle Linux OS installations.
- The Oracle Linux 8.8 release is utilized and validated for the Oracle Linux OS.
- The snapshot used for this procedure has been taken from ORACLE SERVER X9-2 RMS.
- This procedure can be executed on any flavor of RMS that require install on OL8.8 and KVM.
Each respective infrastructure must be operational.
Check in every step after completion.
Note:
For any assistance, see My Oracle Support (MOS).- Log in to iLOM as admusr using the following URL:
https://<Ipv6 ILOM IP address>.Figure 2-14 Log in to iLOM

- To launch the remote console, do the following:
- Go to Navigation and select
Summary.
Figure 2-15 Summary

- Click Launch that is next to the remote console
and click Continue on the JAVA security warning
pop-up.
Figure 2-16 Launch

- Go to Navigation and select
Summary.
- To install OL 8.8 image through Local USB media
Note:
To install OL8.8, if requires HTTP server to start the media. Please skip this step and proceed with Step 4- On the ILOM Console, from the KVMS menu, select
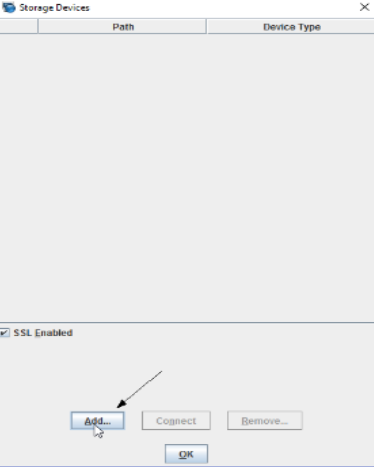
the Storage option.A window entitled Storage Device will open.
Figure 2-17 Storage

- Click Add and navigate to the location of the
ISO on the local workstation.
Figure 2-18 Storage device
- Select the ISO and click
Select.
Figure 2-19 Select ISO

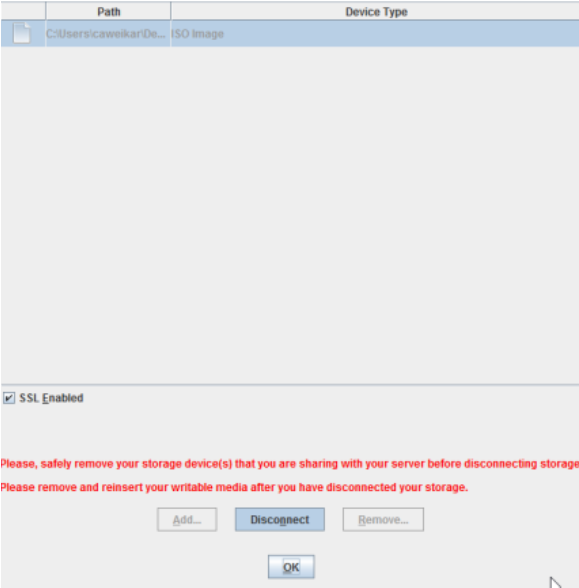
- The ISO file will now be included in the list of available storage
devices. Select it in the Storage Devices window and then click
Connect.
Figure 2-20 Connect

- Click OK to confirm and close the
window.
Figure 2-21 Click OK
- On the ILOM Console, from the KVMS menu, select
the Storage option.
- Install OL 8.8 image through HTTP server.
Note:
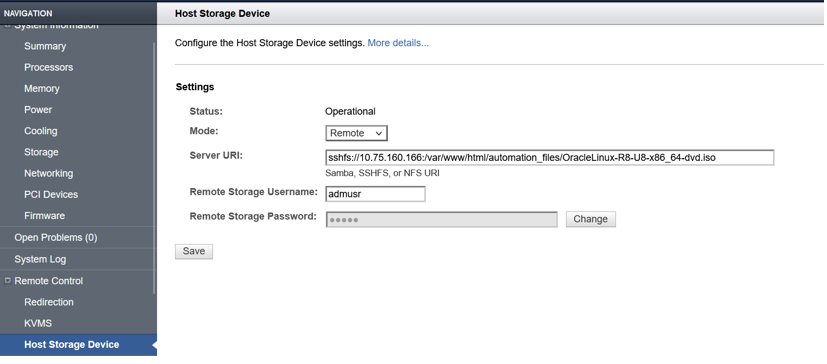
To install OL8.8, if requires local USB to start the media as mentioned in step 3. Please skip this step and proceed with Step 5- Navigate to
Remote Control/Host Storage Deviceto place the OL 8.8 iso image on the existing HTTP web server and connect it through Server URI in Host Storage Device of iLOM GUI.Figure 2-22 Host storage device
- Navigate to
- Shut down the server
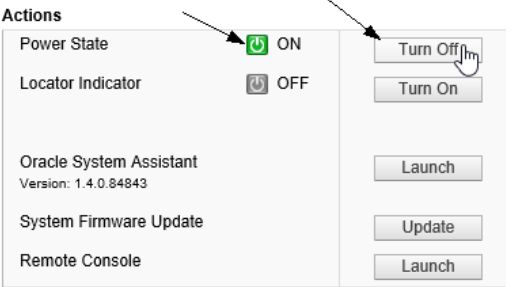
- On the System Summary page click the Turn Off in
the Actions Pane.
Figure 2-23 Turn off
Note:
- This will shut down the operating system prior to powering off the host server. Wait for the indicator to signify that the server is powered down before proceeding to the next step.
- If at any point the internet connection on the local workstation is lost, or the browser being used is closed, and the OSA has not yet been updated, the Oracle System Assistant Updater ISO must be remounted using the previous steps.
- On the System Summary page click the Turn Off in
the Actions Pane.
- Set CDROM as the next boot device.
- Under the Host Management tab select the Host
Control option. From the drop-down menu for Next Boot
Device, select the CDROM option and then click
Save
Figure 2-24 CDROM

- Under the Host Management tab select the Host
Control option. From the drop-down menu for Next Boot
Device, select the CDROM option and then click
Save
- Power ON the server
- On the System Summary page click the Power State Turn
On in the Actions Pane to
restart into the Oracle System Assistant Updater ISO.
Figure 2-25 Power on

- Click OK when prompted.
- On the System Summary page click the Power State Turn
On in the Actions Pane to
restart into the Oracle System Assistant Updater ISO.
- Perform the following procedure to install Oracle Linux OS
- Navigate to the window that contains the Remote Console. If the window was closed, re-launch the Console in the Actions Pane. The system will restart for installation.
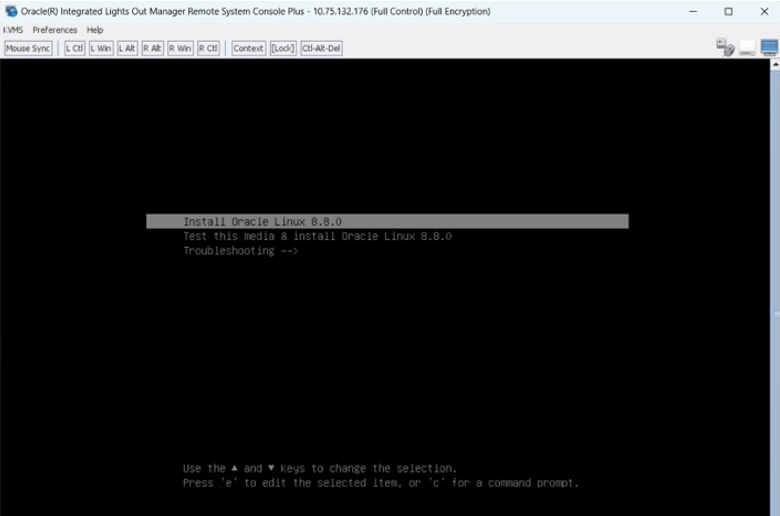
- Select install Oracle Linux 8.8 and click
Enter.
Figure 2-26 Install linux
- Select Language and Continue.
Figure 2-27 Language

- Select Date and Time and then select Done.
Figure 2-28 Date and time
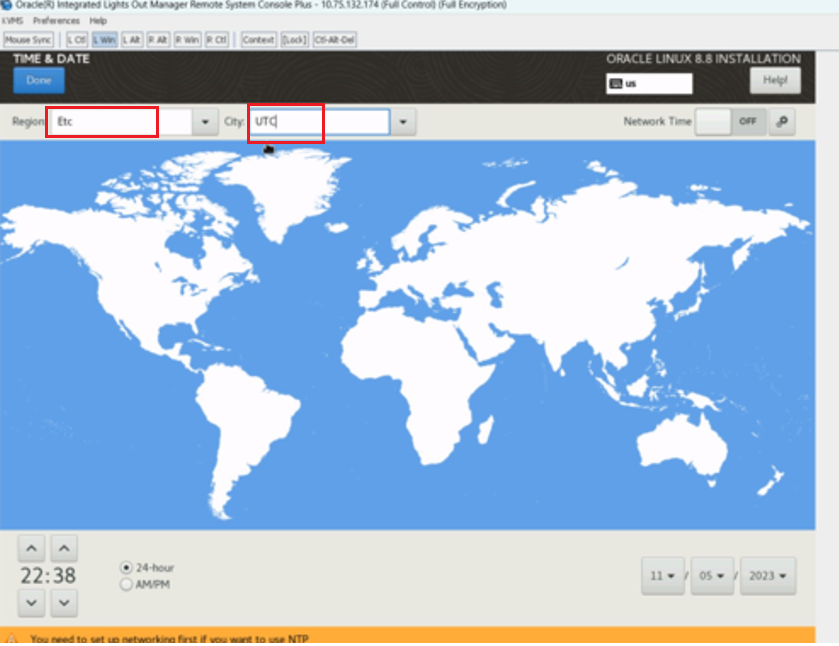
- Select Region as ETC and City as UTC
- Select Software selection with the following options:
- Basic Environment: Server with GUI
- Select the following add-ons on Additional software
for Selected Environment:
- Virtualization Client
- Virtualization Hypervisor
- Virtualization Tools
- Legacy UNIX Compatibility Libraries
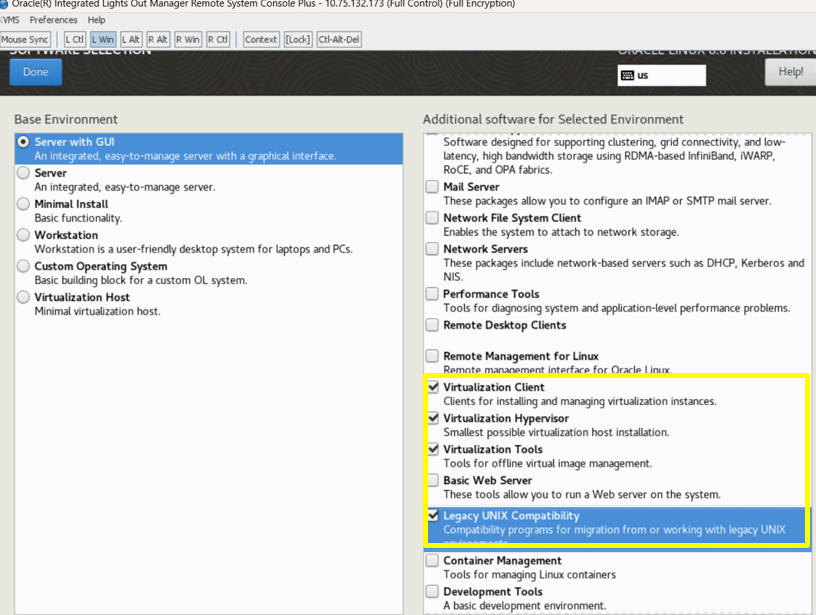
- Confirm and click Done.
- Select Installation Destination
- Select 2 hard drives to be installed.
- From Other Storage Options, ensure Custom configure partitioning is selected.
- Click Done.
Figure 2-29 Click done

Note:
Skip to Step 6 if space is available for partitioning. - If there is not enough disk space, check if you can make additional
space, on the Other Storage Options.
Note:
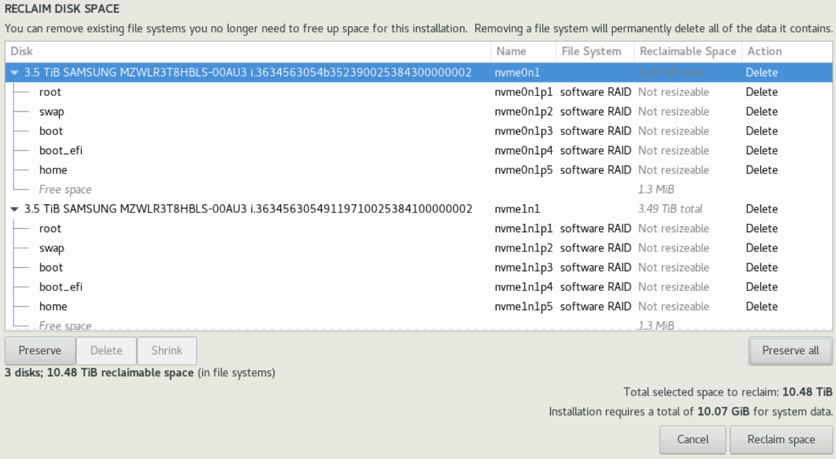
You may need to check the box with Automatically configure partition, later select Custom Configure. - When you click Done, the following screen will
allow you to Delete all, then Reclaim
space
Figure 2-30 Reclaim space
- Click Done to continue.
- Again, select the Installation Destination.
- From Other Storage Options, select Custom configure partitioning.
- Remove any unknown volume by clicking on Delete
.
Note:
Skip this step if no unknown volume is present.Figure 2-31 Unknown volume
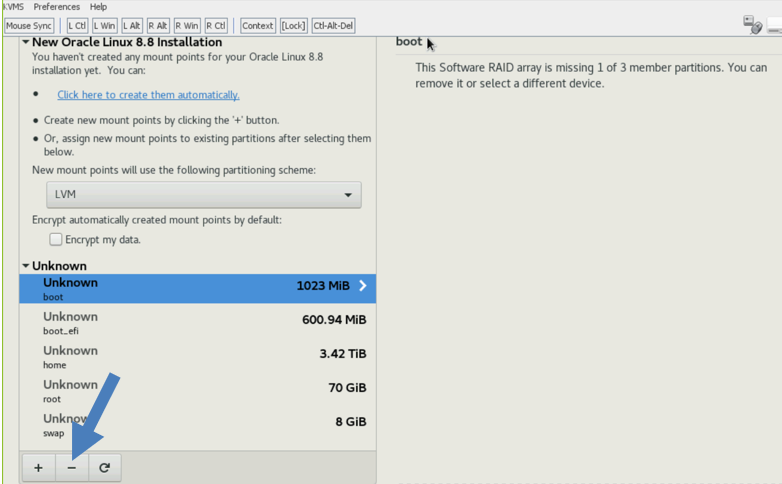
Figure 2-32 Delete

- Ensure the Available Space = Total Space.
- Click on Click here to create them
automatically.
Figure 2-33 Available space
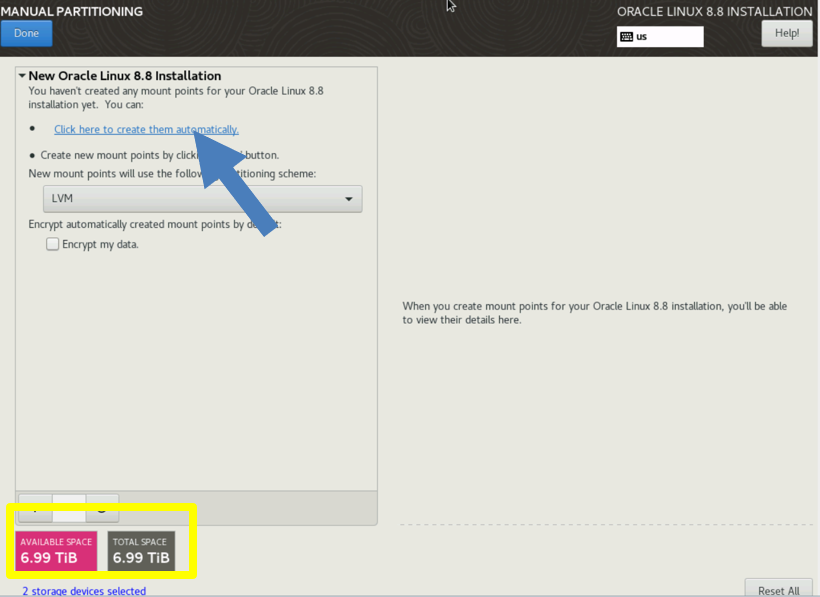
Table 2-3 Manual partitioning
Partition Size Device Type RAID Level Format (Syatem Default) / 70 GiB RAID RAID1 ext4 or xfs /boot 1024 MiB RAID RAID1 ext4 or xfs /boot/efi 600 MiB RAID RAID1 efi /home 3.4 (Remaining all) TiB RAID RAID1 ext4 or xfs /swap 8 GiB RAID RAID1 swap Figure 2-34 Manual partitioning boot
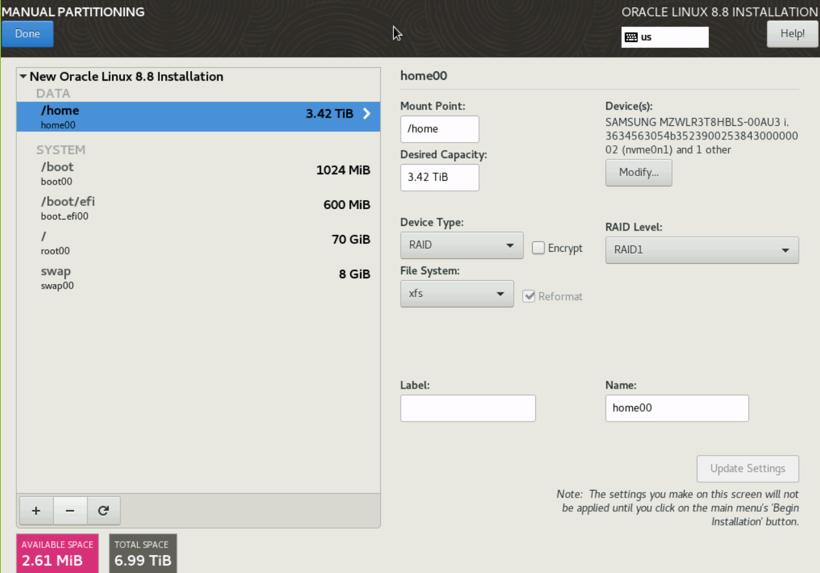
Figure 2-35 Manual partitioning boot efi
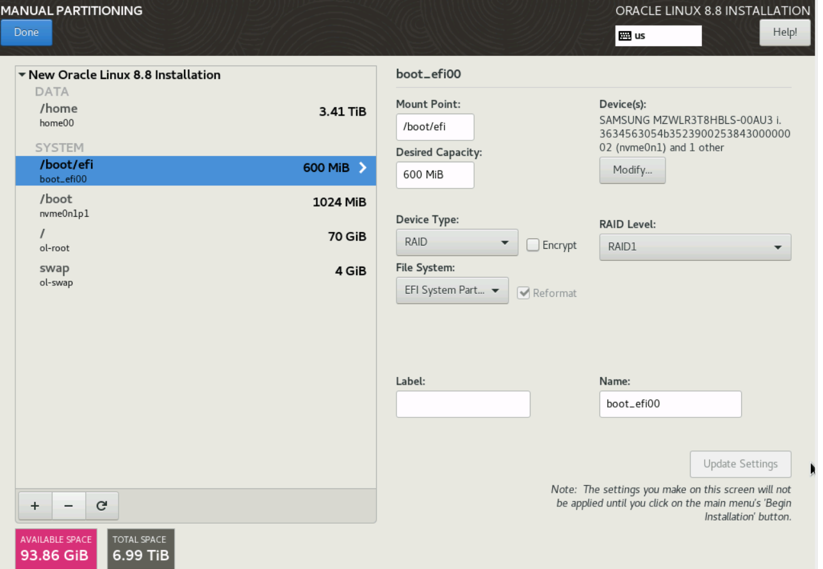
Figure 2-36 Manual partitioning boot
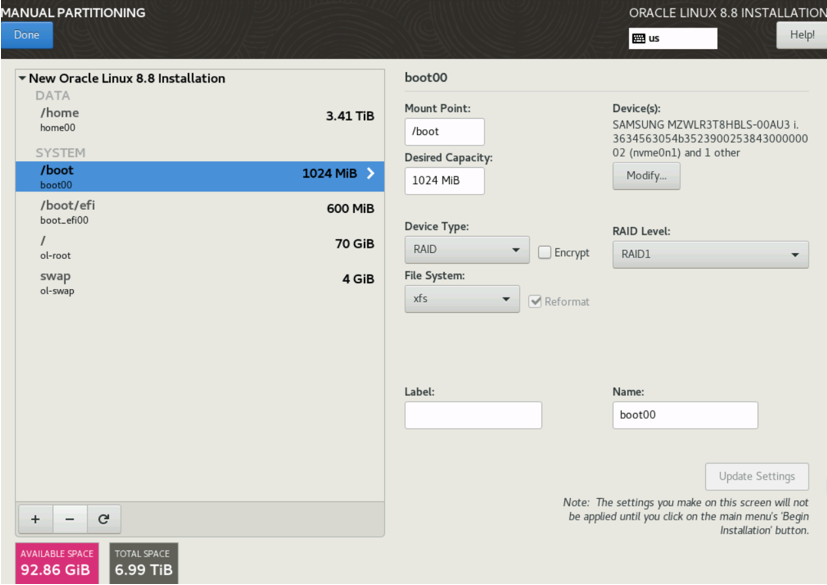
Figure 2-37 Manual partitioning root
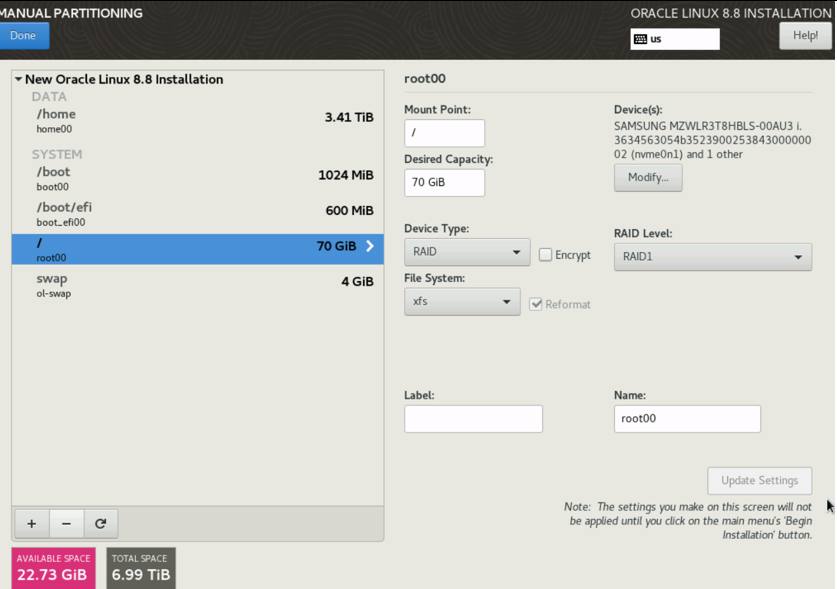
Figure 2-38 Manual partitioning swap
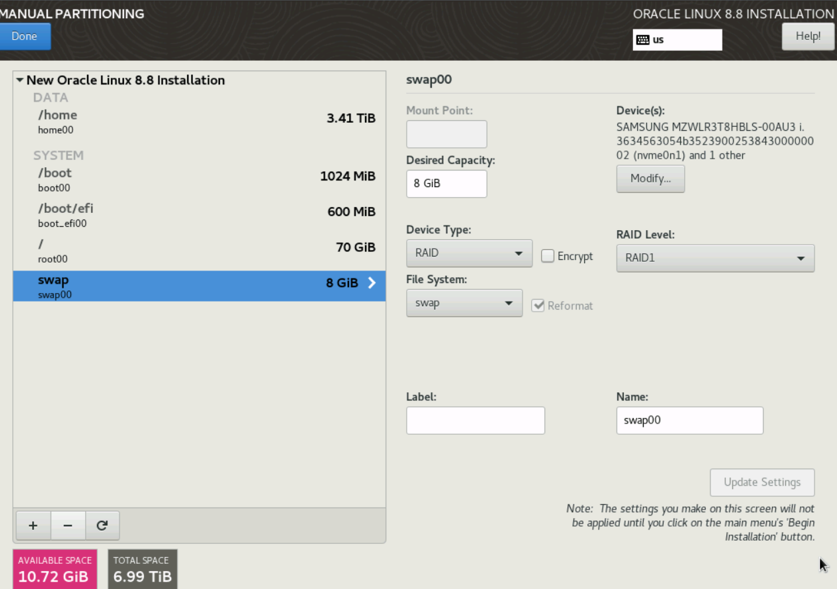
Figure 2-39 Destroy device
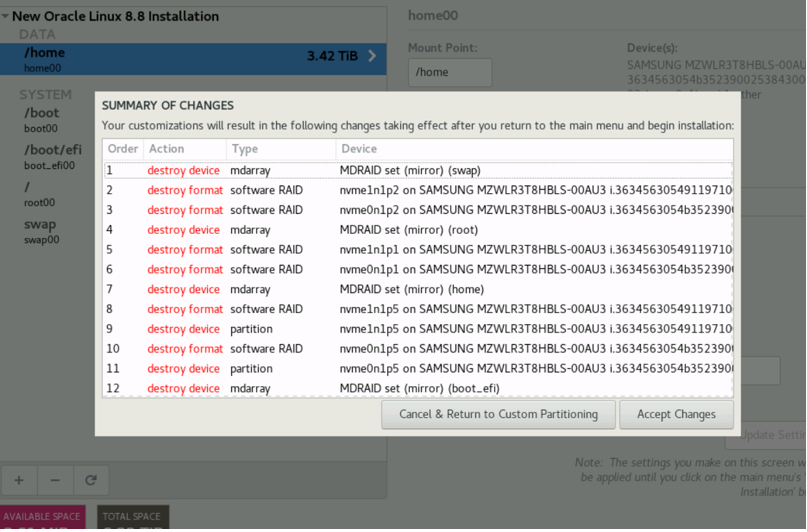
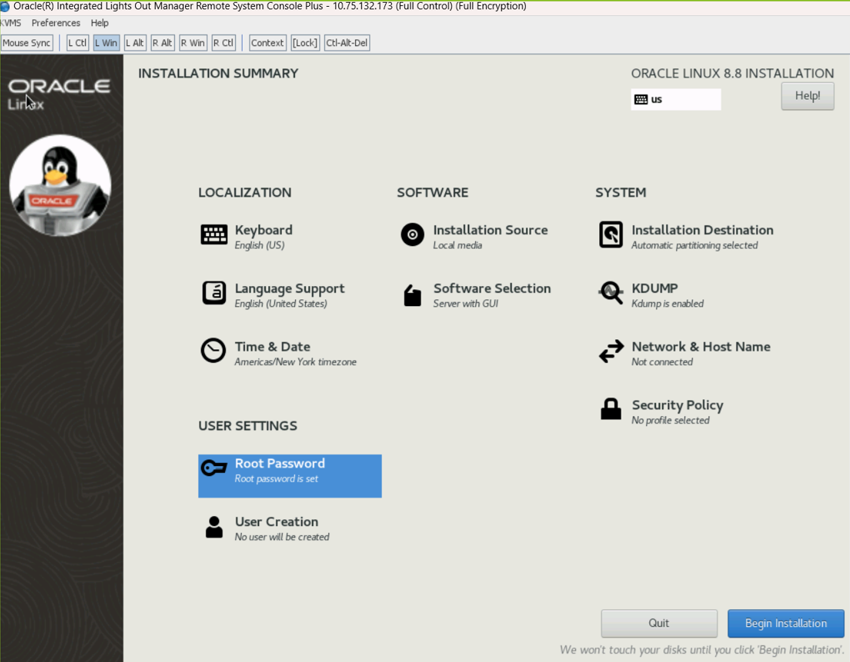
- Select and enter information for root
password.
Figure 2-40 Root password
- Select and enter information for User
Creation.
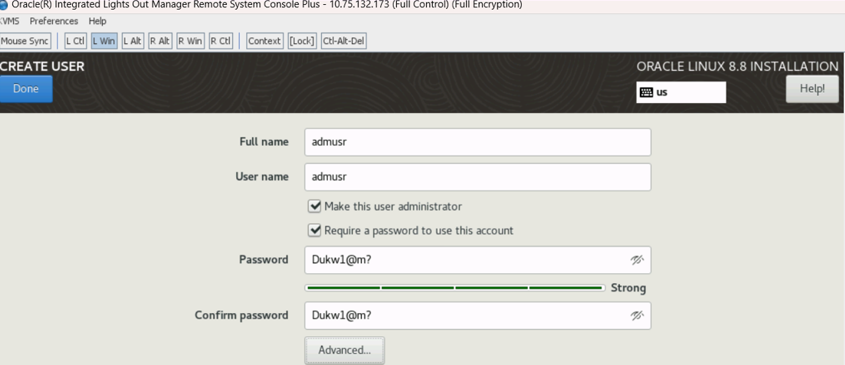
Figure 2-41 User creation
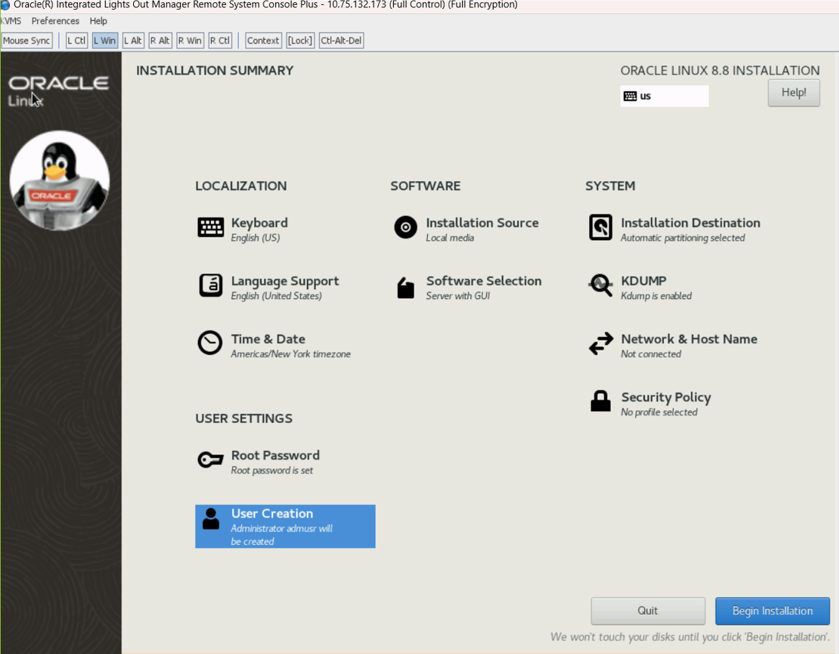
Figure 2-42 User example
- Click Begin Installation
Figure 2-43 Begin installation
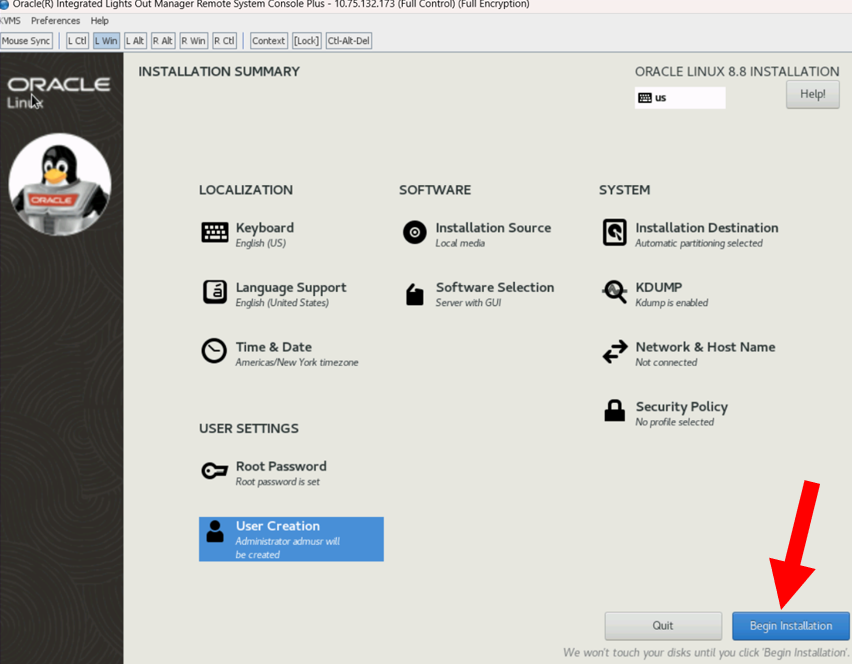
Figure 2-44 Starting package installation progress
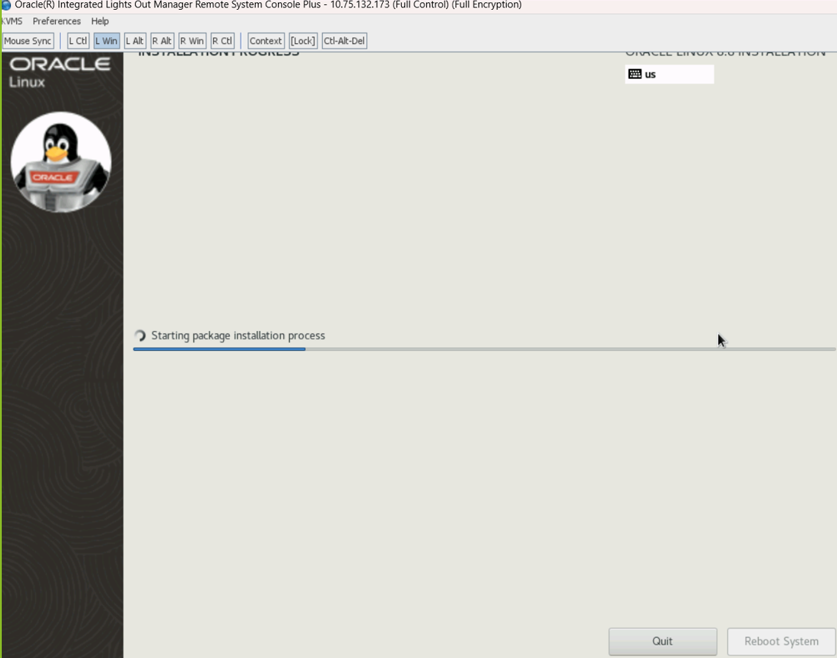
- Reboot after installation
- When OL8.x installation is complete, you are prompted to reboot server
and start OL8.x.
Figure 2-45 Installation progress
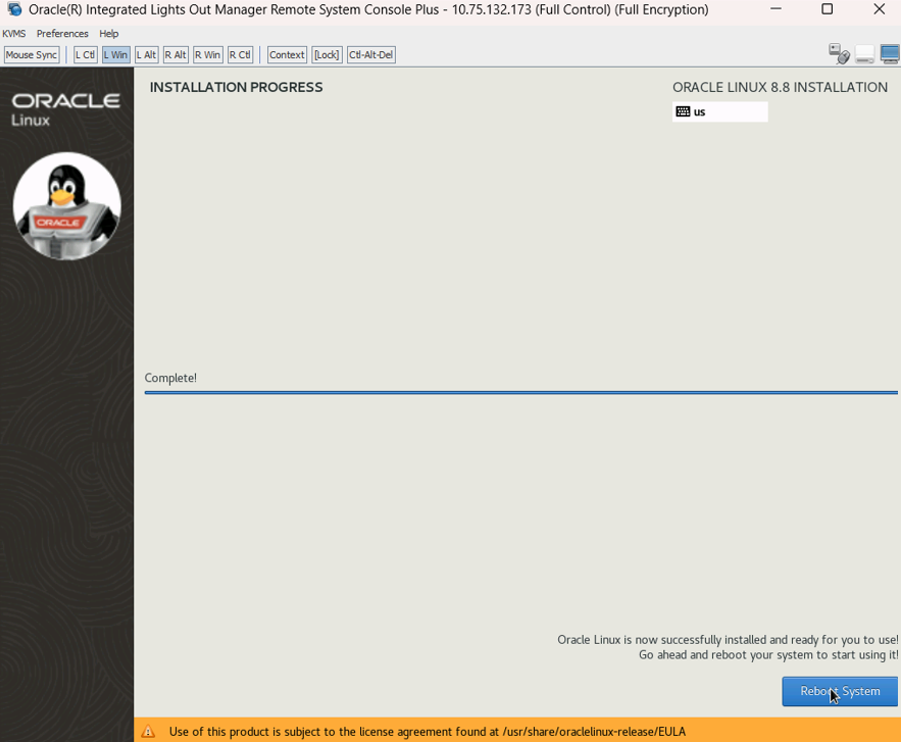
- When OL8.x installation is complete, you are prompted to reboot server
and start OL8.x.
- Select License
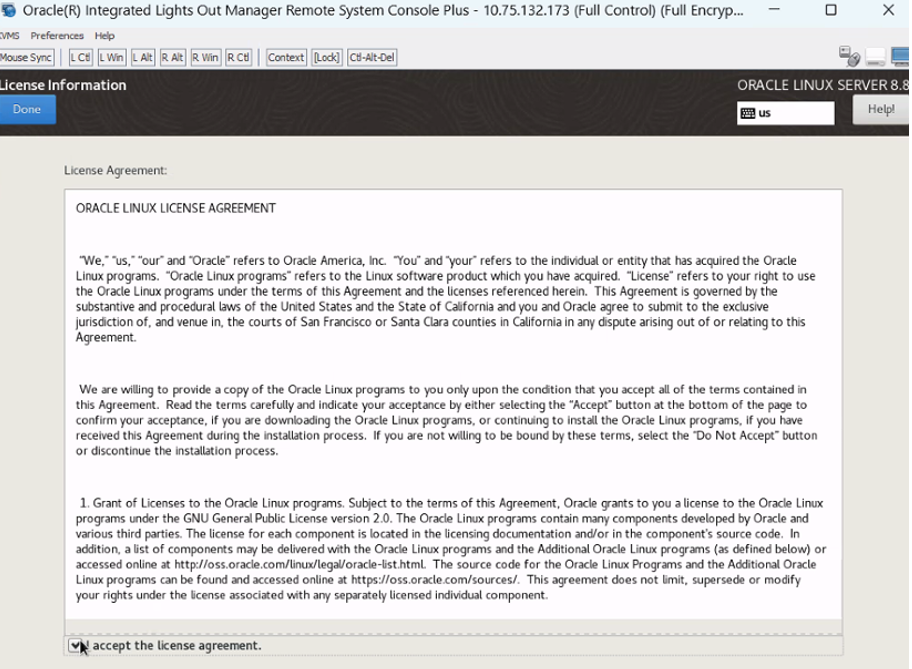
- Check in the box I accept the license agreement to accept the
license.
Figure 2-46 License
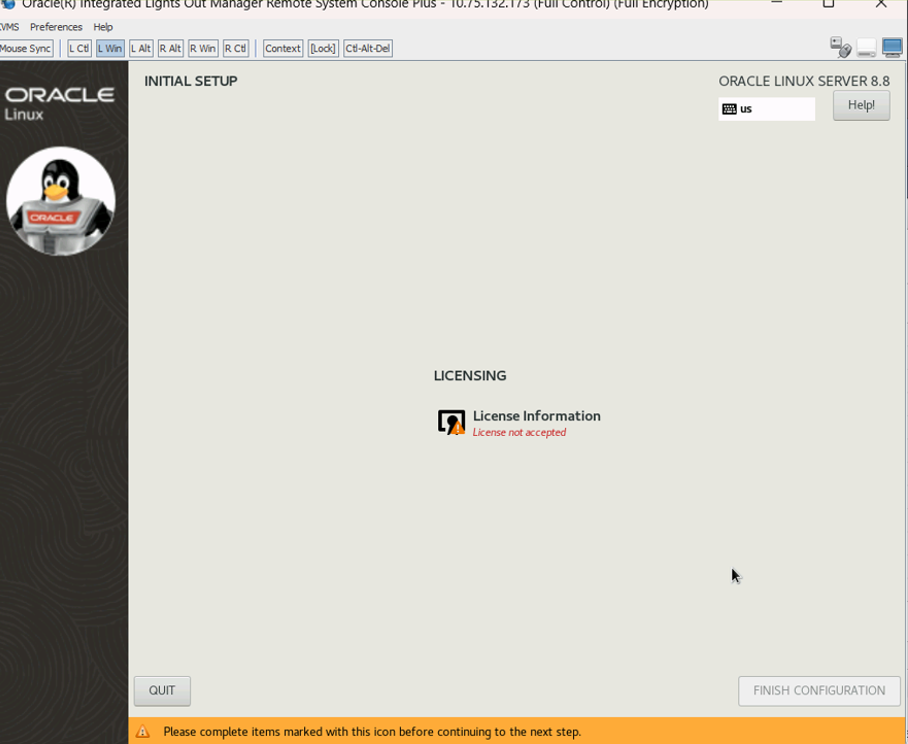
- License will change to Accepted.
Figure 2-47 Licence acceptance
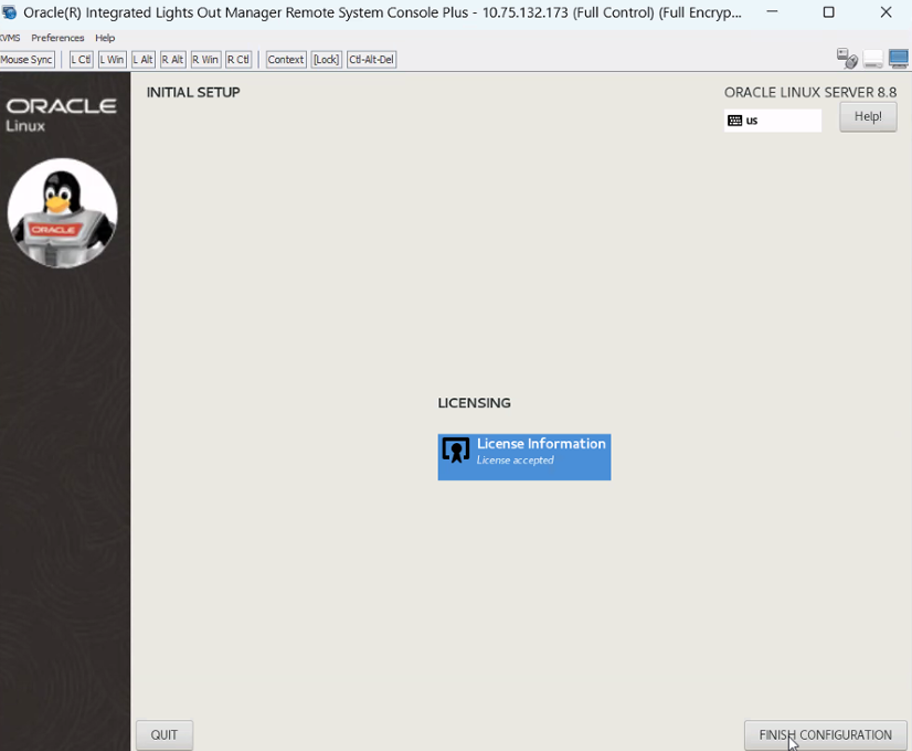
- Select FINISH CONFIGURATION to complete.
Figure 2-48 License Configuration
- Check in the box I accept the license agreement to accept the
license.
- Verify kernel version and KVM version:
- Open terminal console window and verify the following commands in the
code:
-
$ uname -a -
$ virsh version
cat /etc/os-release NAME="Oracle Linux Server" VERSION="8.8" ID="ol" ID_LIKE="fedora" VARIANT="Server" VARIANT_ID="server" VERSION_ID="8.8" PLATFORM_ID="platform:el8" PRETTY_NAME="Oracle Linux Server 8.8" ANSI_COLOR="0;31" CPE_NAME="cpe:/o:oracle:linux:8:8:server" HOME_URL="https://linux.oracle.com/" BUG_REPORT_URL="https://bugzilla.oracle.com/" ORACLE_BUGZILLA_PRODUCT="Oracle Linux 8" ORACLE_BUGZILLA_PRODUCT_VERSION=8.8 ORACLE_SUPPORT_PRODUCT="Oracle Linux" ORACLE_SUPPORT_PRODUCT_VERSION=8.8 [2:49 PM] Linux sentinel6-6 5.15.0-101.103.2.1.el8uek.x86_64 #2 SMP Mon May 1 20:11:30 PDT 2023 x86_64 x86_64 x86_64 GNU/Linux Using library: libvirt 8.0.0 Using API: QEMU 8.0.0 Running hypervisor: QEMU 6.2.0 Linux sentinel6-6 5.15.0-101.103.2.1.el8uek.x86_64 -
- Open terminal console window and verify the following commands in the
code:
- Disconnect the ISO from storage if Step 3 is followed, if not skip the
following step From ILOM Console, Go to
KVMS/Storage, select the ISO and then select disconnect.