Setting Up and Using Fluid Approvals
This topic discusses the various approval options when using PeopleSoft Fluid. The approval options are displayed as per the configurations set in the Fluid Approval Setup component.
Note: To enable a user to receive PeopleSoft Fluid User Interface for approvals, the user should be a member of the Approvals Fluid role. See Fluid Approval Installation document on My Oracle Support (support.oracle.com), note number 2166359.1.
PeopleSoft Fluid User Interface is designed for users to access PeopleSoft pages using multiple form factors:
SFF: Small Form Factor, such as smart phones.
MFF: Medium Form Factor, such as tablets.
LFF: Large Form Factor, such as some tablets, laptops, and desktops.
When using a mobile device, you can access the approval pages by selecting the Approvals tile from any home page. When you access approval pages from the Approvals tile, the first page you see is the Pending Approvals page, which displays differently depending on your form factor. Approval transactions listed for each user depends on the permission level established for the user logged in.
Note: PeopleSoft Fluid Approvals uses the Approval Workflow Framework as configured for the specific application. The Approval Workflow Framework must be enabled and configured properly for each application before implementing Fluid Approvals for the transactions.
|
Page Name |
Definition Name |
Usage |
|---|---|---|
|
HMAP_MBL_TYPE_SET |
Configure the general settings for Mobile Approvals. |
|
|
HMAP_MBL_TYPE_SET2 |
Configure the transaction settings for Mobile Approvals. |
|
|
NA |
Access the Pending Approvals page. |
|
|
NA |
View a list of all transactions that apply to the selected transaction category and access the respective transactions that are pending your approval. |
|
|
NA |
Review the details of the approval request, make a comment, and take action on the request. |
|
|
NA |
View a list or approval transactions you have worked on in the past. |
|
|
NA |
View all pending approvals to which you have access and can take actions on. |
Using Fluid, you can take five actions on any approval transaction based on how the transaction has been configured. These actions include:
Approve
Deny
Pushback
Hold
Request Information
The applicable action buttons are displayed on the approval pages, sub-banner to the right.
Mass Action for Pending Approvals
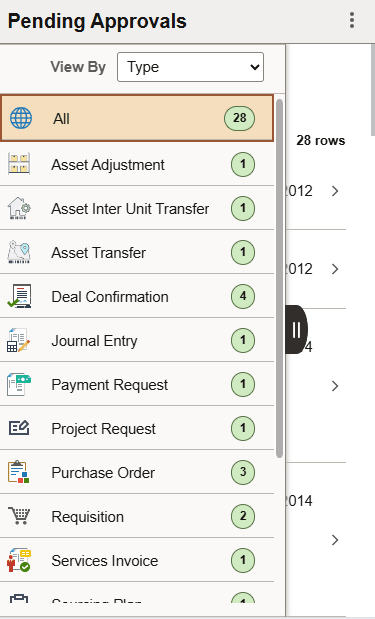
This example illustrates the fields and controls on the Pending Approvals page when Mass Approvals is enabled for a transaction category.
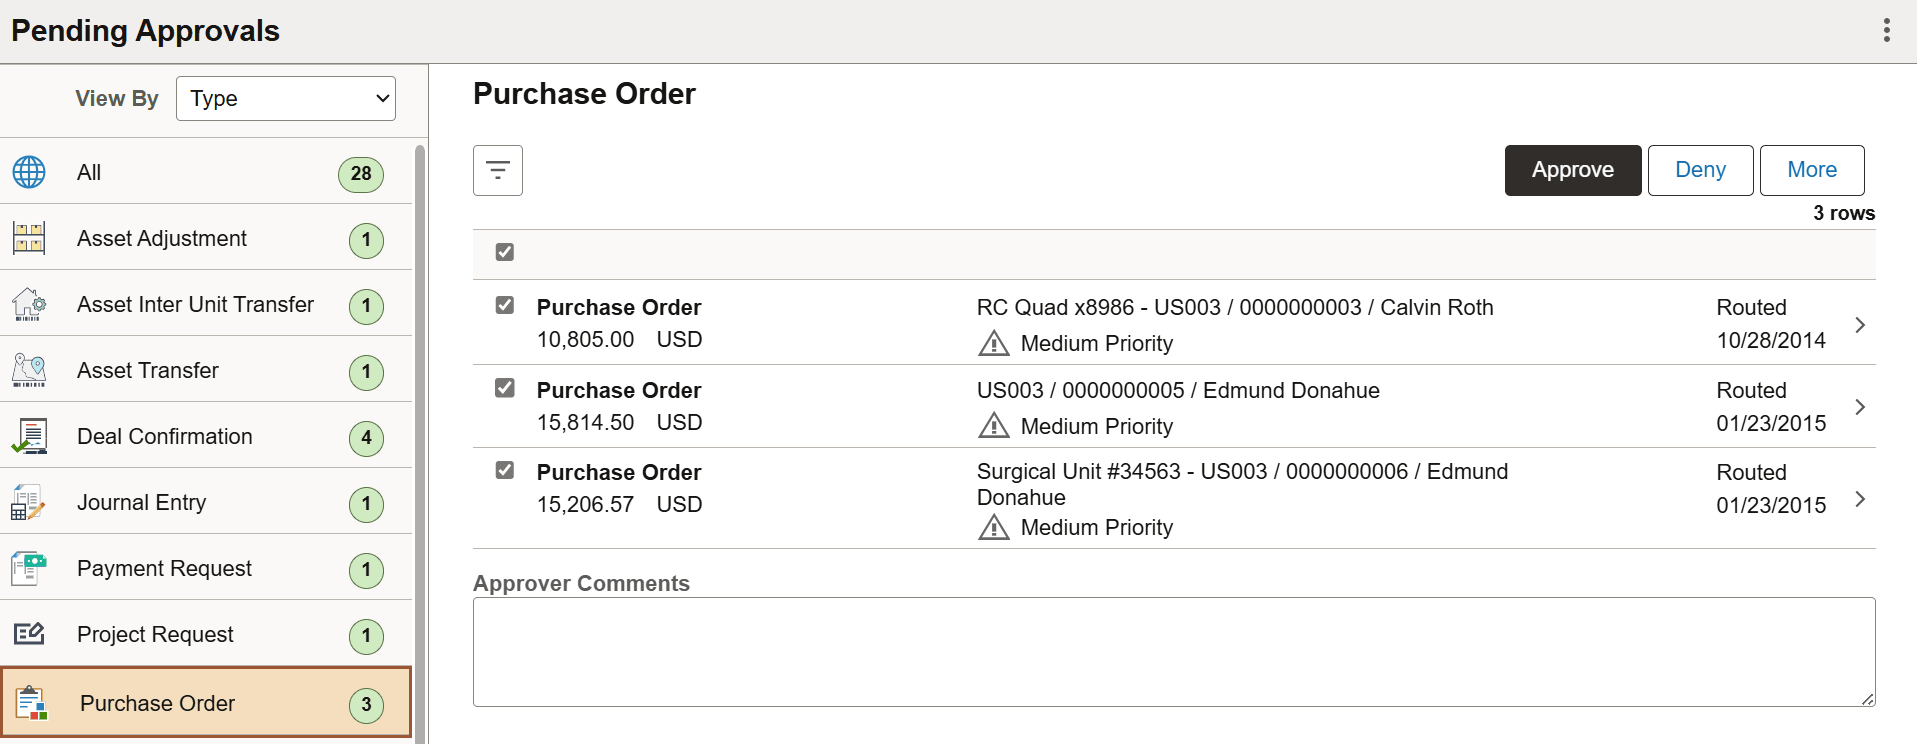
Mass approval is available for the following approvals:
When Type selected in the View By drop-down.
When the transaction has been configured for mass approval.
When an individual transaction or transaction group has been selected.
When a transaction type that is enabled for mass approvals is selected in the left panel, the approval requests in the right panel display with check boxes in each row. Applicable action buttons are displayed on the top-right of the grid. The approval requests are deselected by default and the approval action buttons are disabled. The action buttons are enabled only when at least one row is selected. A Select All check box is available above the grid to select all approvals in the grid. The approver can enter comments before taking an approval action. The comments are applied to all selected requests.
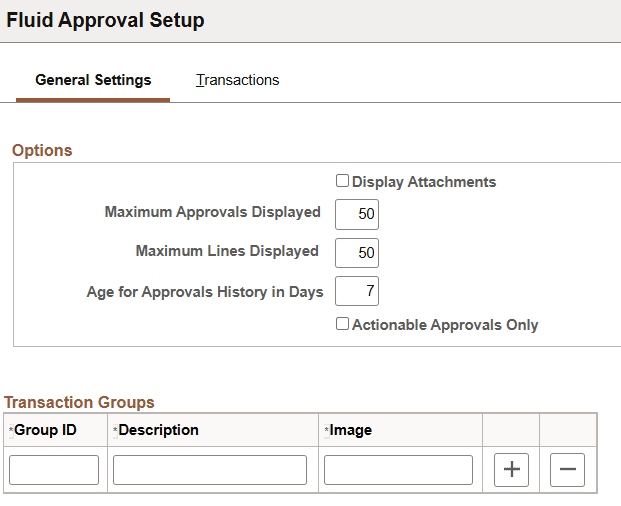
Use the Fluid Approval Setup - General Settings Page page (HMAP_MBL_TYPE_SET) to set the general options for mobile approvals.
Navigation:
This example illustrates the fields and controls on the Fluid Approval Setup - General Settings Page page.
Field or Control |
Description |
|---|---|
Display Attachments |
Select to allow all approvers to view attachments at the system level. If you select this option, you must also select a process scheduler server for the Process Server field with proper distribution node setup. Note: Attachments are not available for all transactions. |
Maximum Approvals Displayed* |
Enter the maximum number of approvals to be displayed on the Pending Approvals page. The Pending Approvals page also has a Load More button, to display remaining transactions in chunks. This is irrespective of the transactions entered on the Fluid Approval Setup - Transactions Page tab. |
Maximum Lines Displayed* |
Enter the maximum number of approval lines to be displayed for each transaction that contains approvals at the line level. |
Age of Approvals History in Days* |
Enter the number of days, prior to today’s date, to include when displaying approval history. |
Actionable Approvals Only |
Select to view only transactions that require your approval action. |
|
Group ID |
Unique ID for the Transaction group. |
|
Description |
Name for the group which is displayed in Mobile Approvals |
|
Image |
The image associated with the group to display in Mobile Approvals. |
Note: * These three approval options (Maximum Approvals Displayed, Maximum Lines Displayed, and Age of Approvals History in Days) can be synchronised between multiple pillars. For example, if you have configured multiple systems, such as HCM and FSCM for fluid approvals, changes made to these options from any one system are propagated to other systems when the Fluid Approval Setup page is saved. To do this, enable the service operation HMAP_GEN_OPTIONS in PeopleTools, Integration Broker, Integration Setup, Service Operations.
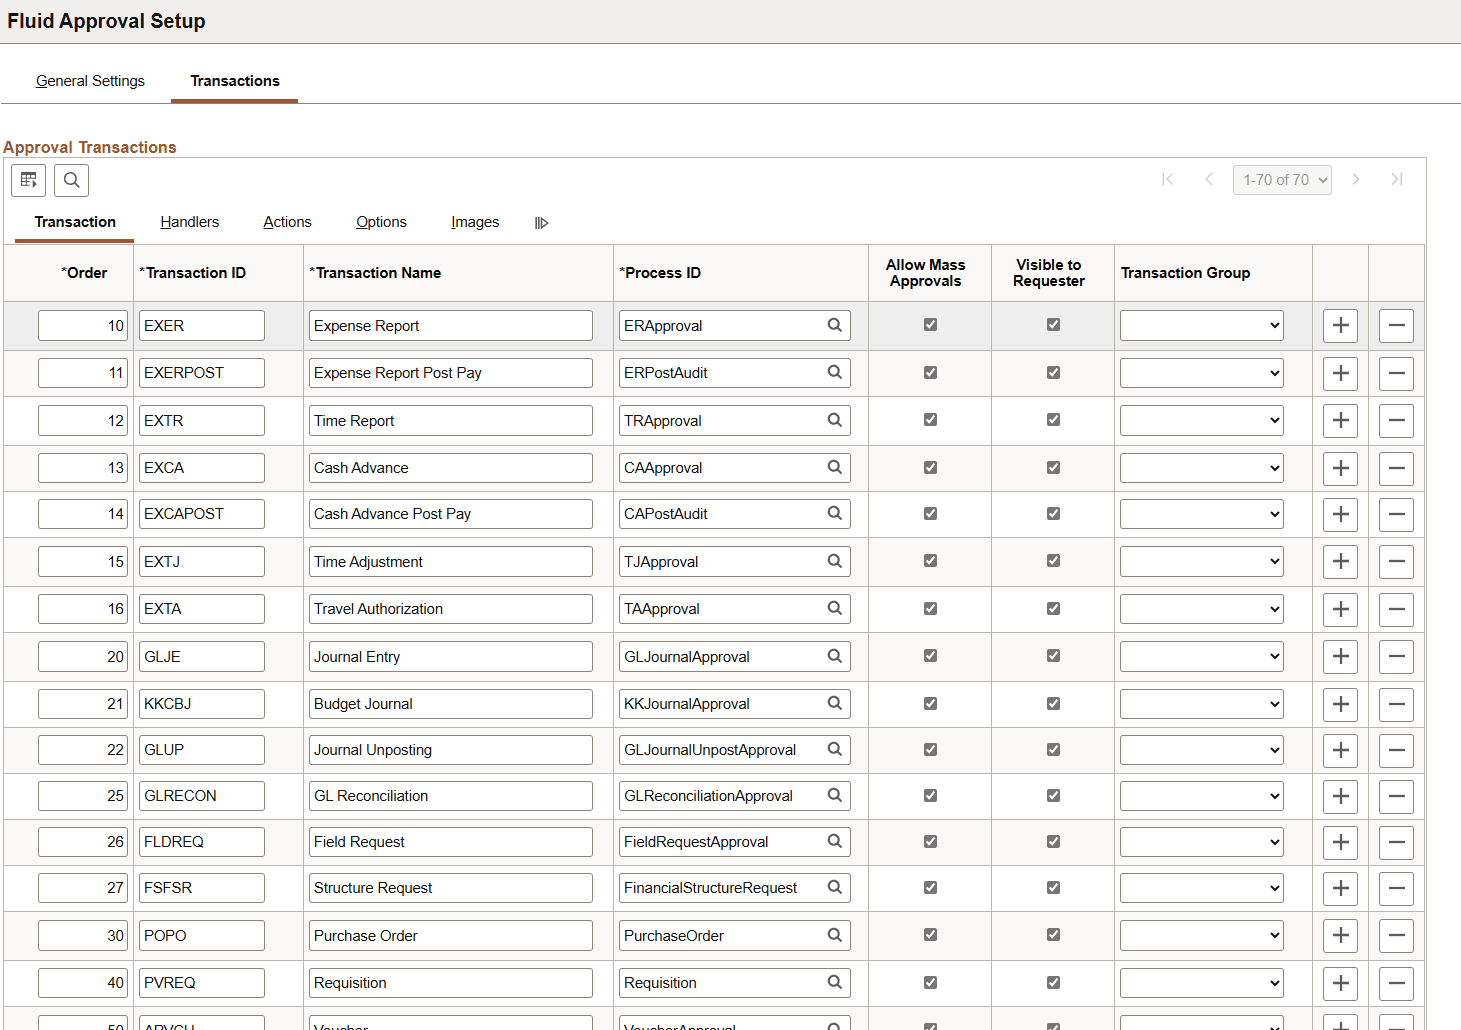
Use the Fluid Approval Setup — Transactions page (HMAP_MBL_TYPE_SET2) to set the transaction options for fluid approvals.
Navigation:
This example illustrates the fields and controls on the Fluid Approval Setup - Transactions page: Transaction tab
Field or Control |
Description |
|---|---|
Order |
Enter a display order for each transaction ID. |
Transaction ID, Transaction Name and Process ID |
Select to enable the transaction for Fluid Approvals. |
Allow Mass Approvals |
Select to indicate whether users can select multiple transactions in the list when viewing by type, and perform approval actions against all of them. Users can allow mass approvals for all or only some of the transactions in the same transaction group. |
|
Visible to Requesters |
Select to indicate that the transaction is displayed on the View Approval Status page for the pillar. Deselect to hide the transaction from requesters. For more information about the View Approval Status page, see:
|
Transaction Group |
Select to allow users to add multiple transactions into a group (as defined on General Settings tab) to display them together in the transaction list. This is an optional field. |
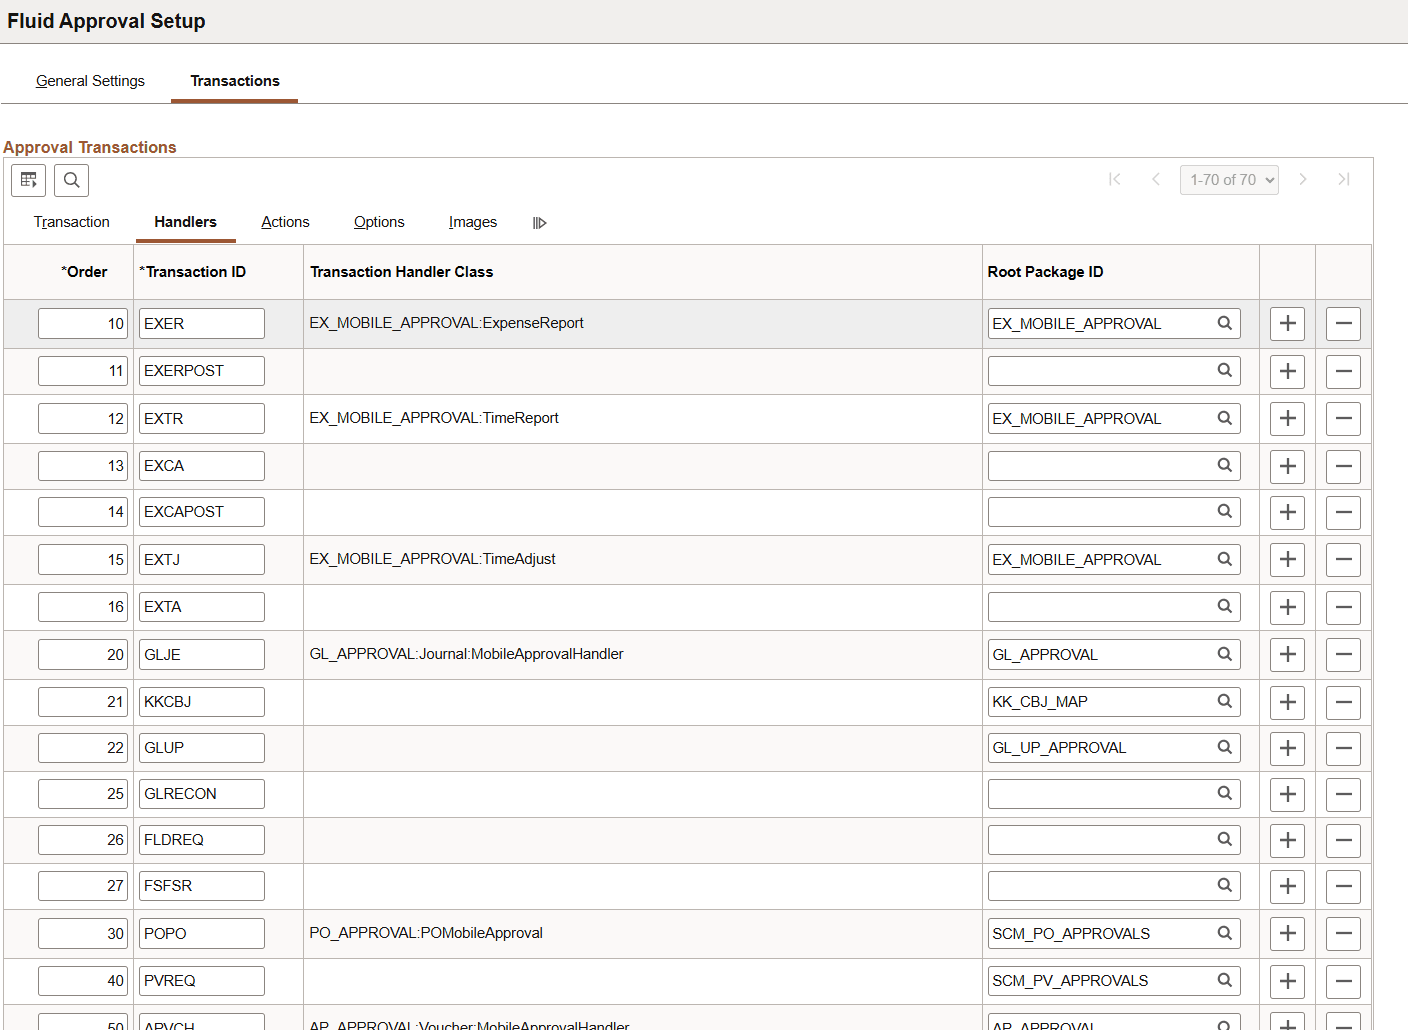
This example illustrates the fields and controls on the Fluid Approval Setup - Transactions page: Handlers tab.
Field or Control |
Description |
|---|---|
Root Package ID |
Select the application package that holds the DataHandler, DetailDocument, and SubPage classes for the transaction. |
This example illustrates the fields and controls on the Fluid Approval Setup - Transactions page: Actions tab.
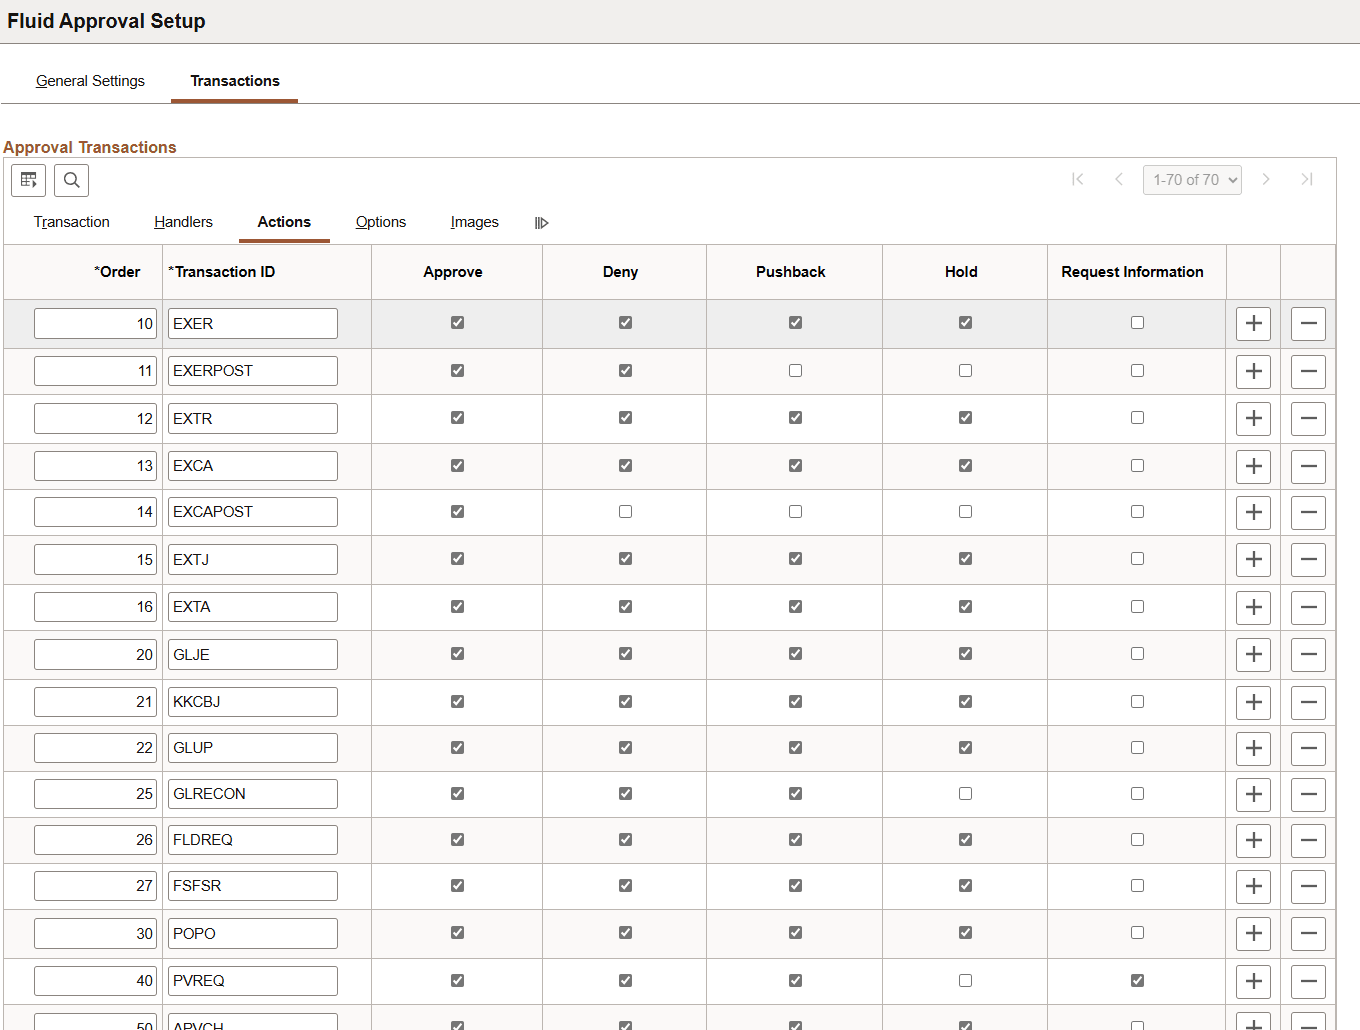
Select the approval actions that are visible as push buttons in Fluid Approvals.
Note: The approval transaction handler must support the transaction.
This example illustrates the fields and controls on the Fluid Approval Setup - Transactions page: Options tab.

Field or Control |
Description |
|---|---|
Require Comments for Deny |
Select to make it mandatory to enter comments if the action is Deny. |
Show Terminated Transactions |
Select to include terminated transactions in the Transaction History. |
This example illustrates the fields and controls on the Fluid Approval Setup - Transactions page: Images tab.
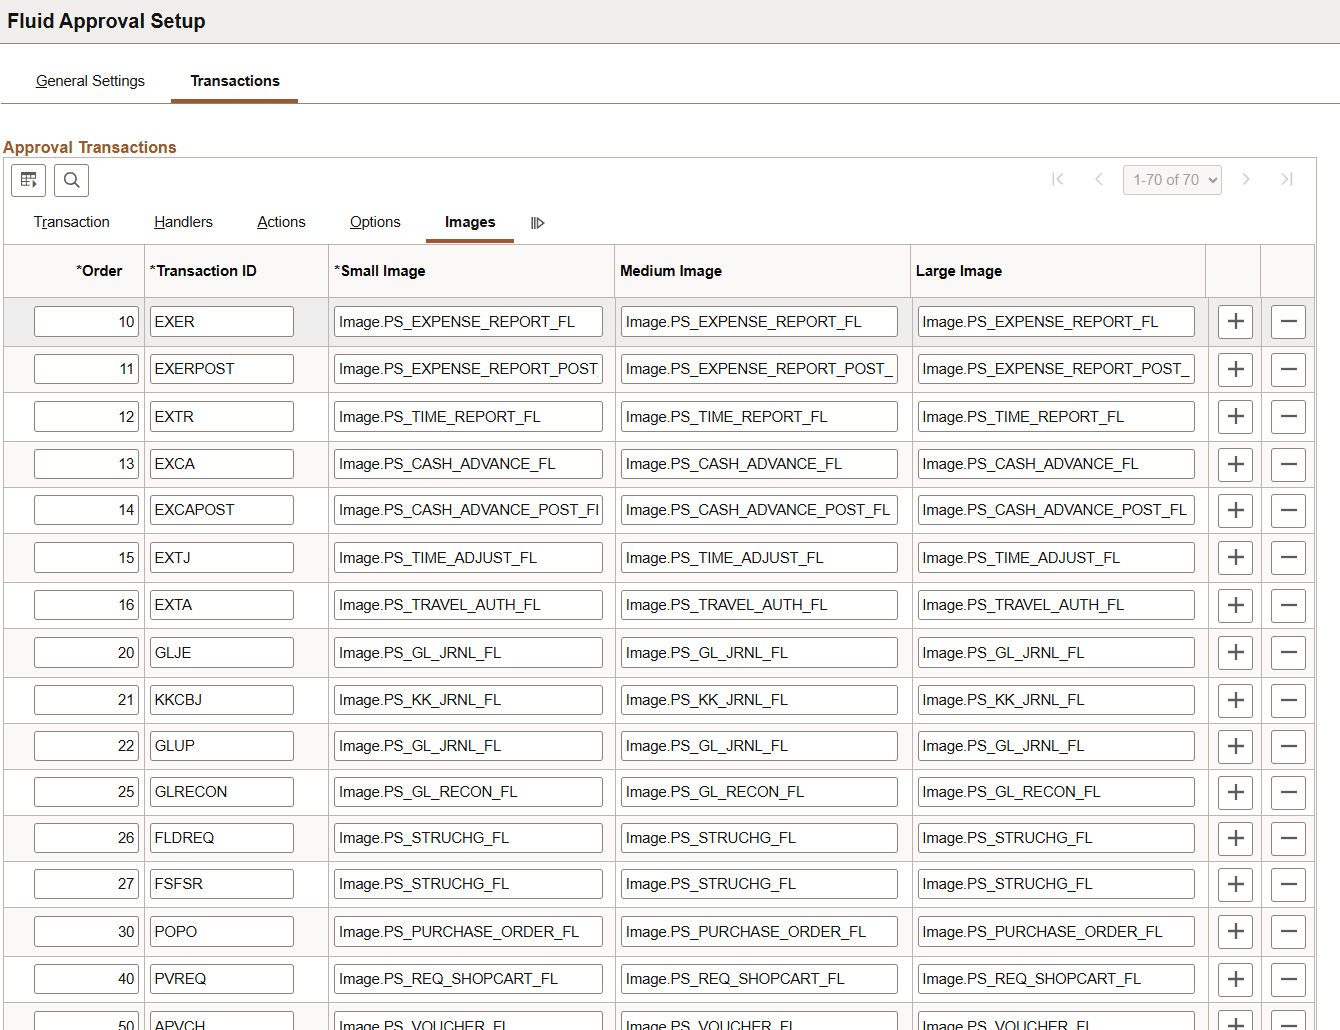
Small Image is required by Fluid Approvals. This is the image displayed in the transaction list for the associated transaction.
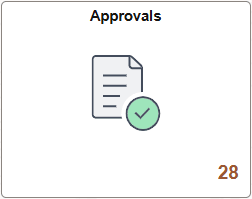
Use the Approvals tile (HMAP_APPR_TILE_FL) to review pending and historical approval requests that are associated with the logged-in manager.
Navigation:
From any Fluid Homepage, select the Approvals tile.
This is an example of the Approvals tile that appears on the Manager Self-Service home page.
Use the Personalize Homepage to add a tile to a PeopleSoft Fluid Home page.
The tile may show the total number of pending approvals. If no pending approvals are available, the tile does not display a number count.
Use the Pending Approvals page (EOAWMA_MAIN_FL) to review and approve pending transactions.
Navigation:
Select the Approvals tile on any Homepage.
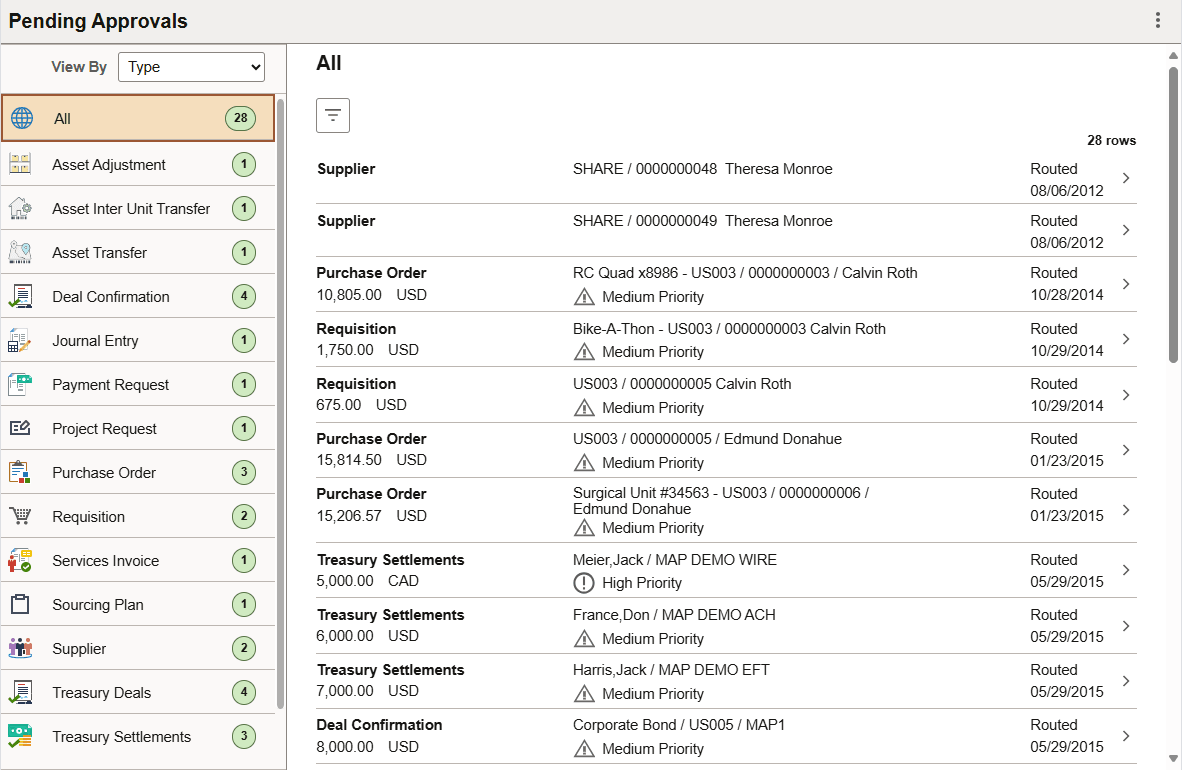
This example illustrates the fields and controls on the Pending Approvals page.
This example illustrates the list of transaction categories on the Pending Approvals page for the smartphone.
Both Landscape and Portrait views are supported on a tablet. The Pending Approvals page has two panels in landscape mode and the left panel is locked in place and is not collapsible. The left panel defaults to the Type grouping with the All category selected and the right panel displays all pending approvals in the user’s queue sorted by the date/time on which they were received with the oldest one displayed first. The right panel title displays the name of the selected category. The number of rows are displayed at the top-right of the list and a filter button is displayed to the top-left of the list.
In Portrait mode, the left panel is hidden and only the right panel is displayed as a full page. The left panel can be invoked as an overlay. Even though the left panel is hidden, the All category of the Type grouping will be defaulted. The page in portrait mode displays all pending approvals in the approver’s queue.
Viewing Pending Approvals Summary
On a phone, when a user launches Approvals, the user is presented with list of pending approvals grouped by transaction type. The page title will be Pending Approvals. The user can view approvals that are in a Pending status for them.
Pending Approvals can be categorized in 5 views:
Date Routed
From
Priority (not used in HCM)
Requester
Type (default view)
The user can switch between the different groupings by selecting a grouping from the grouping drop-down. The Priority grouping is not applicable to all transactions. If none of the transactions in an approver’s pending approvals queue has a priority associated, the grouping will not be displayed in the drop-down list.
When the user clicks on any category on the left panel, the right panel is refreshed with pending approvals for the selected category. The panel title on the right panel reflects the selected category. A user can filter the list of approvals by clicking on the grid filter icon. The Filter window gives the following filter options:
Field or Control |
Description |
|---|---|
Type |
Displays user's pending approvals by transaction type. |
Priority |
Displays user's pending approvals by priority. If an approval request has no priority specified, it is grouped under the No Priority category. Note: Priority is not used in HCM. For Requisition and Purchase Orders in FSCM, Rush priority is available along with High, Medium, and Low. |
Date Routed |
Displays user's pending approvals by routing date using date groupings such as This Week, Last Week, 2 Weeks Ago, and Older. |
From |
Displays user's pending approvals by last sender. The last sender could be either the last approver in the approval chain or the requester of the transaction if the current approver is the first approver in the chain. |
Requester |
Displays user's pending approvals by requester. |
Each Pending Approvals row on the right panel will display the information about the approval request in 3 columns.
Field or Control |
Description |
|---|---|
Column 1 |
This column displays the Transaction Name and the Object Name for this transaction (Person, Position etc.) |
Column 2 |
This column displays the Transaction Summary and Priority (if applicable). |
Column 3 |
This column displays the date on with the approval was received. |
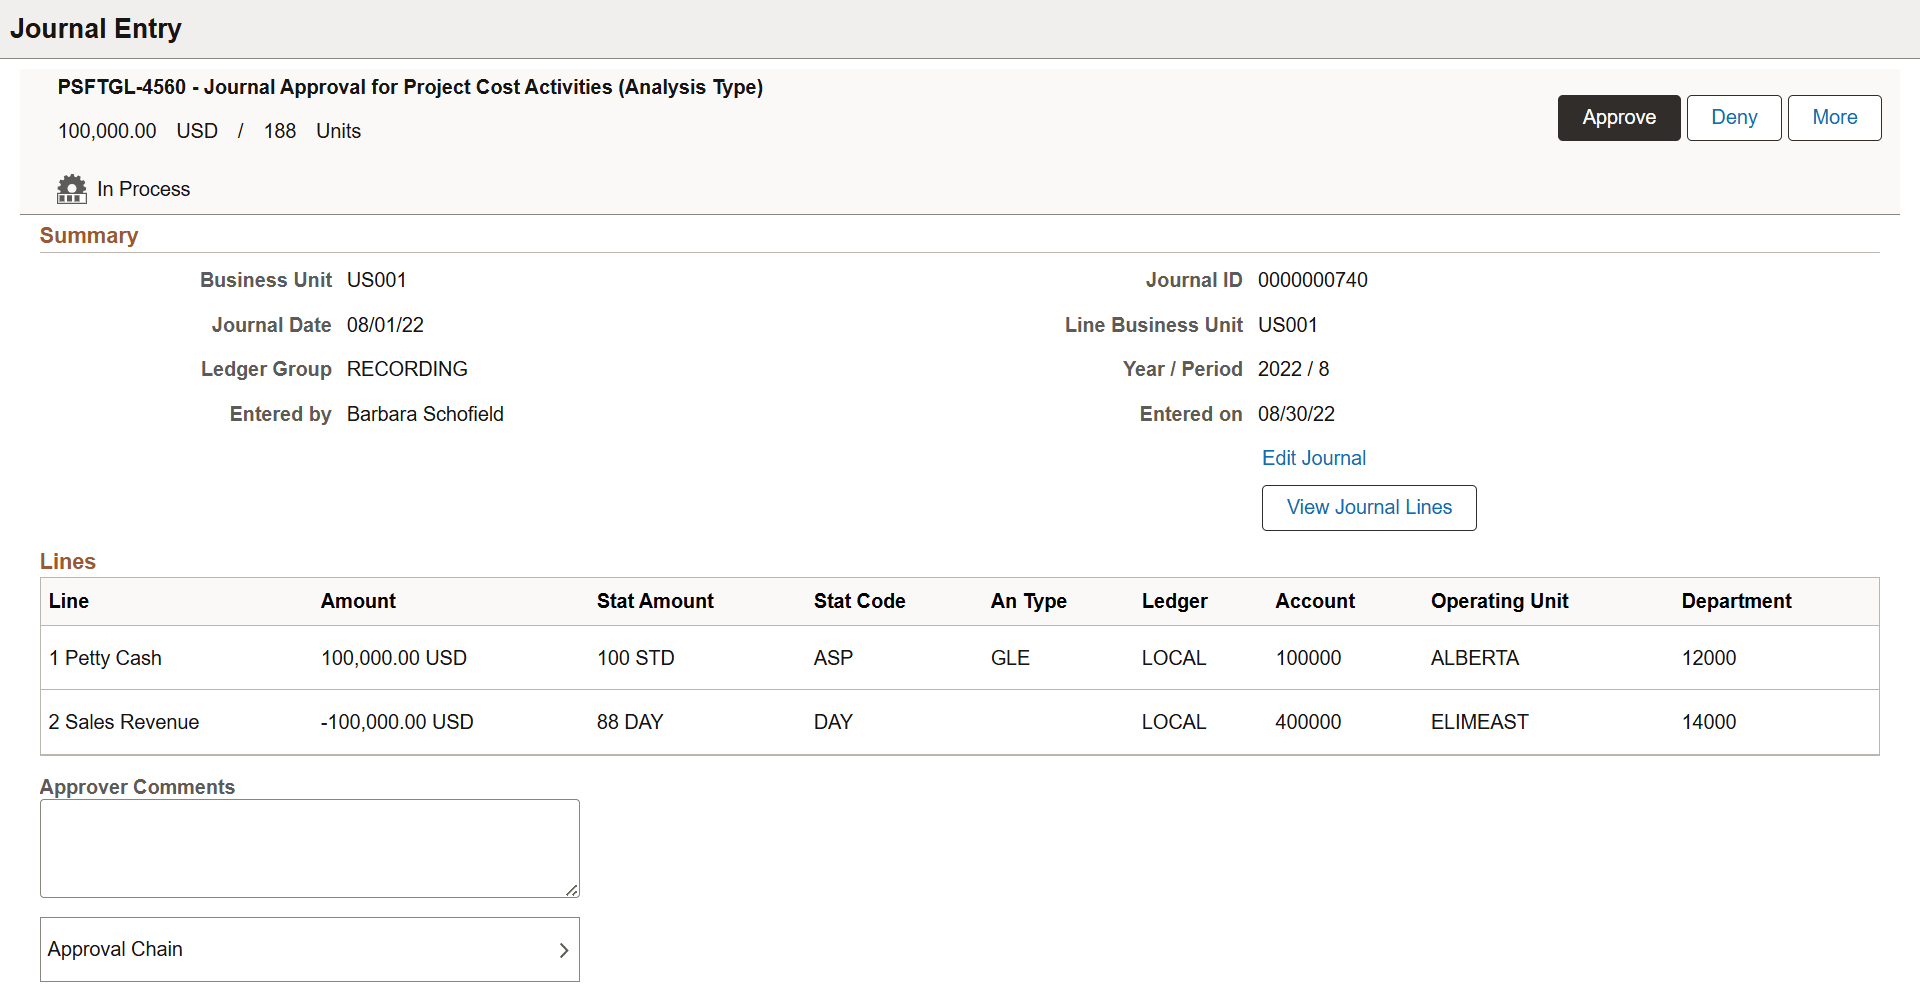
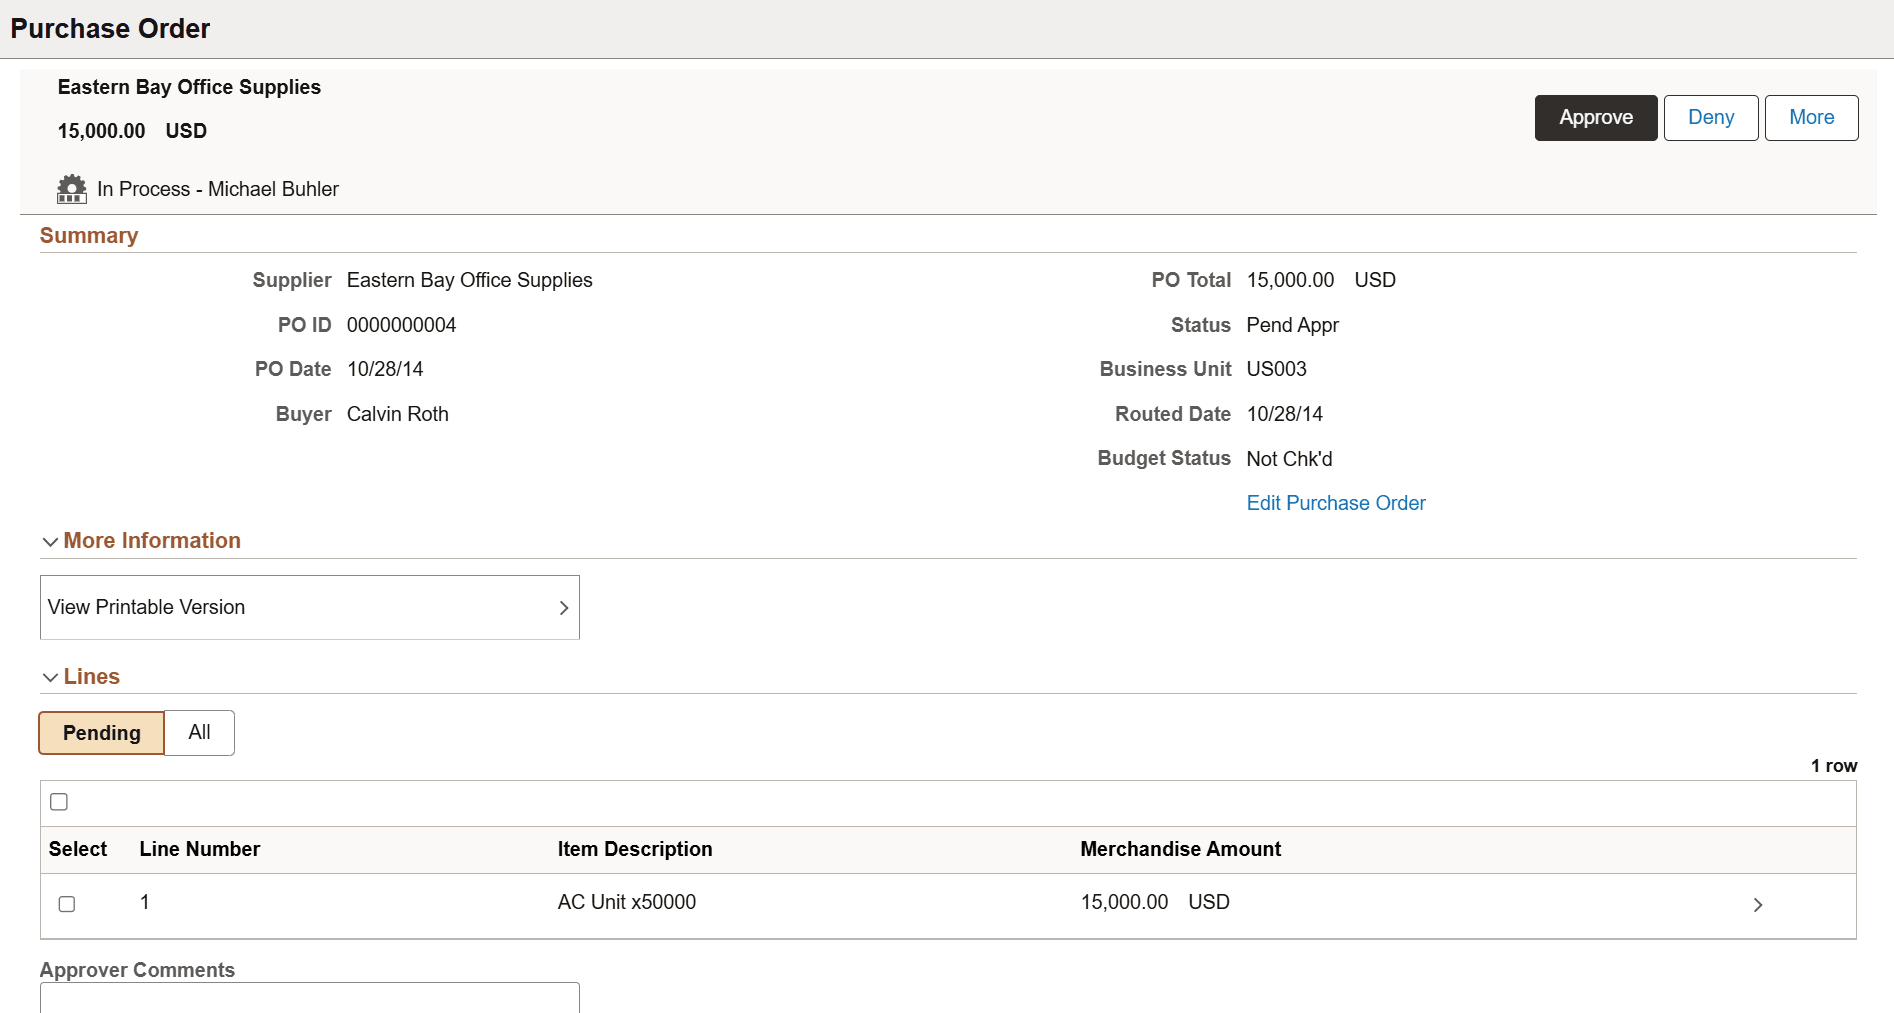
Use the Pending Approval - <Transaction Details> page to review the details of the approval request, make a comment, and take action on the request.
Navigation:
Click an individual approval request transaction from the Pending Approvals page.
This example illustrates the fields and controls on the Pending Approvals - <Transaction Details> page.
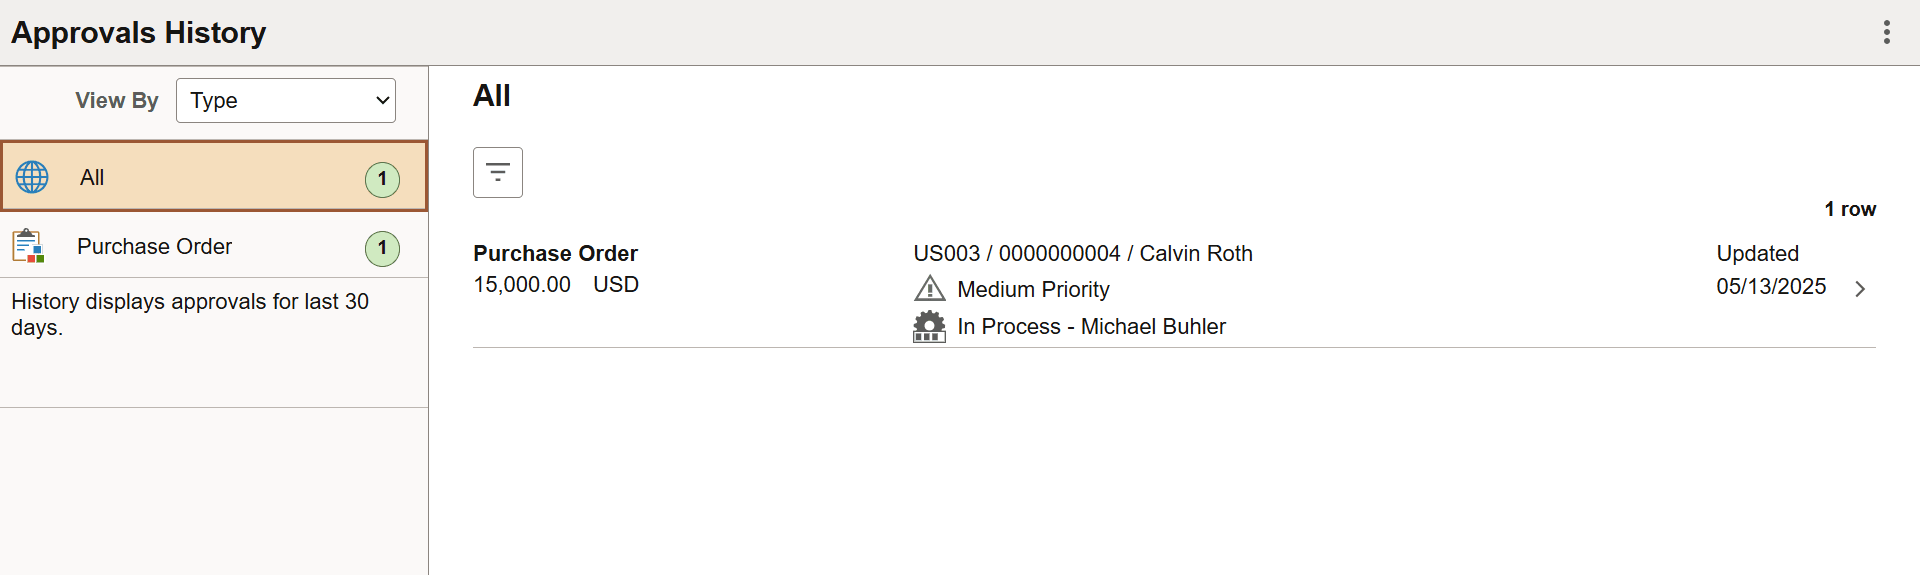
Use the Approvals History page (EOAWMA_MAIN_FL) to view approvals requests that you have worked on.
Navigation:
Select the More Actions icon in the upper/right of the page, and select Approvals History.
This example illustrates the fields and controls on the Approvals History page.
There are five views by which a user can view historical approvals.
From
Priority (not used in HCM)
Requester
Status
Type
The Priority grouping is not applicable to all transactions. For Requisition and PO in FSCM, the Rush priority is available along with High, Medium, and Low. If none of the transactions in an approver’s approval history have a priority associated, the Priority grouping will not be displayed in the drop-down list. A configuration is available to administrators to define how far back in time should the history be displayed. The left panel displays a message at the end of the last category indicating the time period for which the history is displayed, example, “History displays approvals for last 90 days.” If this configuration has not been set, no such message will be displayed. For more details on the settings, see Fluid Approval Setup - General Settings Page.
Users can also change the view and design of the Approvals page with the Page Composer feature. For more details, see Understanding Page Composer.
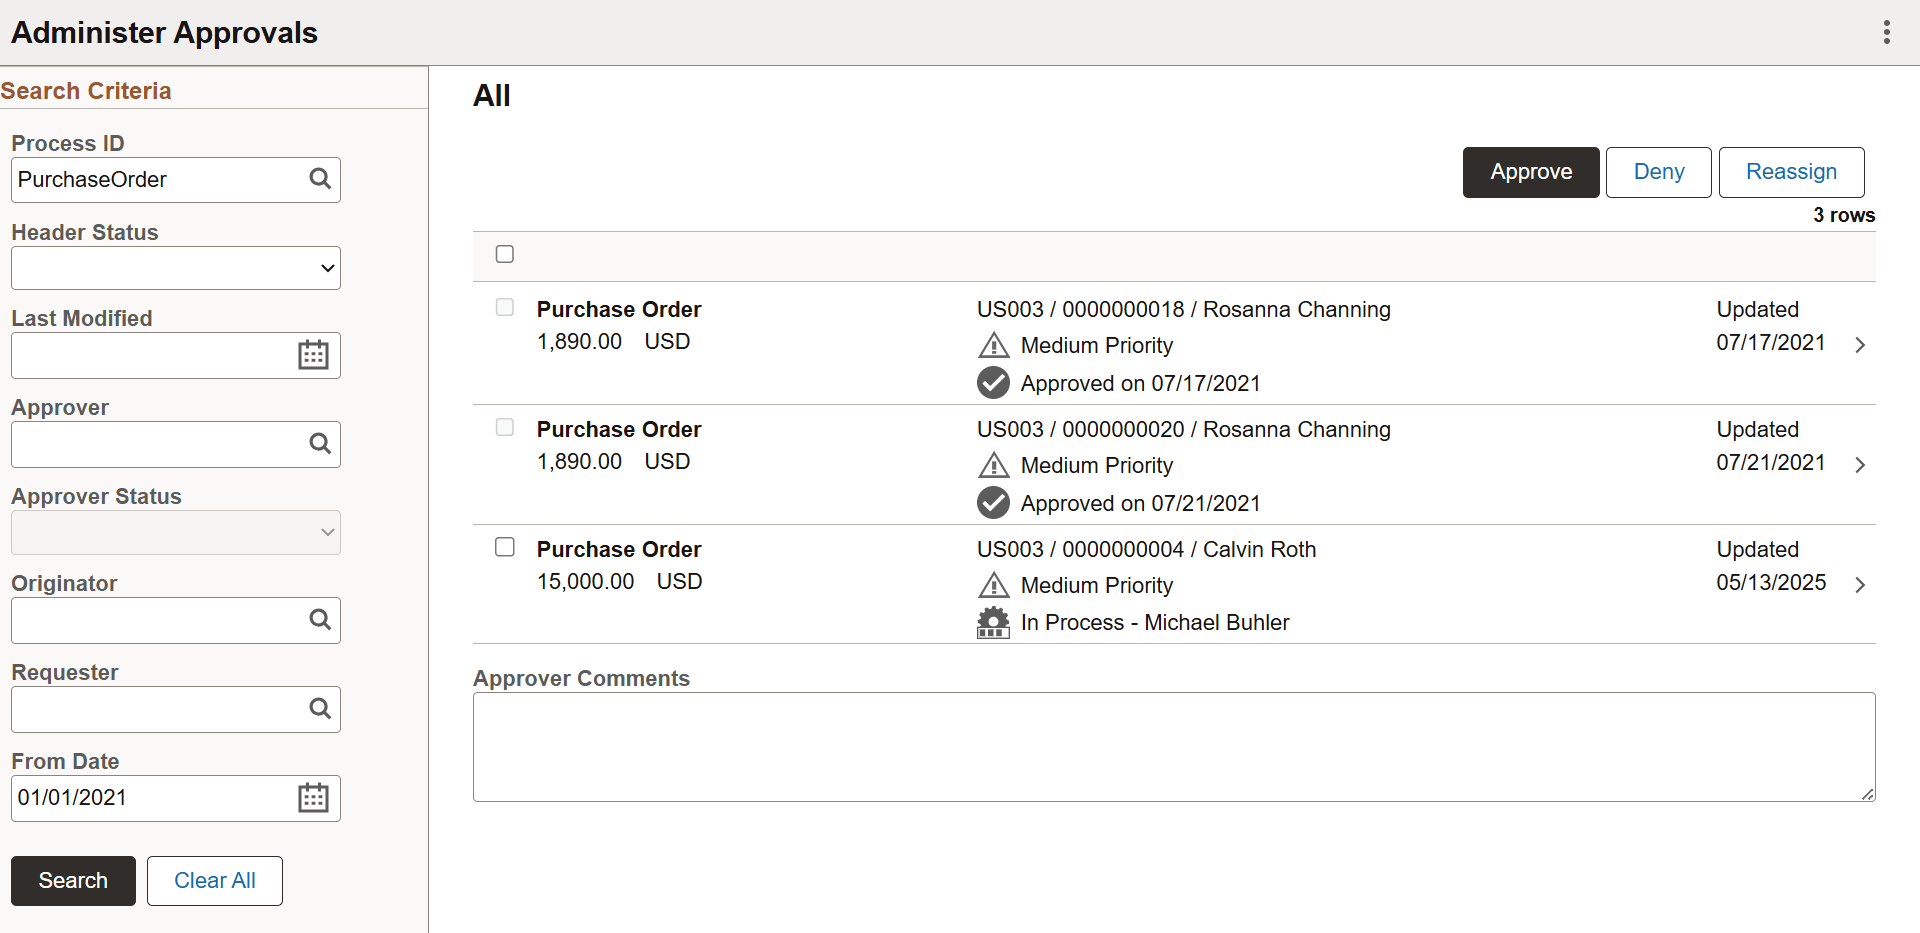
Use the Administer Approvals page to view all pending approvals to which you have access and can take actions on.
Navigation:
Select the More Actions icon in the upper/right of the page, and select Administer Approvals.
This example illustrates the fields and controls on the Administer Approvals page
You can view the approvals based on the specified search criteria in the left panel. The search criteria are:
Field or Control |
Description |
|---|---|
Process ID |
Choose the process type of the approval transactions. |
Header Status |
Current status of the approval transaction. |
Last Modified |
Last modified date of the approval transaction. |
Approver |
Choose current approver. |
Approver Status |
Choose the approval status of the current approver. |
Originator |
Choose based on the originator of the approval transaction |
Requester |
Choose approval transactions from a requester. |
From Date |
Choose approvals from a certain date. |
If you look up approval transactions by process ID and the selected process ID (or transaction) is configured to allow mass approvals, these action buttons appear on the page for you to perform actions on multiple transactions simultaneously:
Approve - select to approve the selected transactions.
Deny - select to deny the selected transactions.
Reassign - select to re-assign the selected transactions.
Select an individual approval transaction to view the details for that transaction.
This is an example of the Administer Approvals - <Transaction Details> page.
Based on the setup, status, and type of the approval transaction, you may be presented with one or more of these action buttons, such as Approve, Deny, Reassign, Pushback and Resubmit. If more than three action buttons are available for the approval request, use the More button to access the additional action buttons that are not displayed on the page.