Using Work Management in the Receivables WorkCenter
The PeopleSoft Fluid Receivables WorkCenter can optionally use the Work Management framework, which is an Enterprise Components feature.
This topic discusses how to setup up Work Management for the Receivables WorkCenter.
The purpose of the Work Management Framework is to view and manage transactions when they appear in the My Work section of the WorkCenter.
It is important to understand the Work Management Framework from a high-level perspective before applying it to PeopleSoft Receivables. Please see Setting Up and Using the Work Management Framework for additional information. Some transaction categories that appear in the My Work section of a WorkCenter may not be a candidate for the Work Management framework and therefore are not delivered. However, you can enable this framework for transaction categories as well as related actions for delivered or custom transactions as needed.
One or more people can work on Work Management transactions in your organization. If another user acts on a transaction, you can view the transactions assigned to that person by changing your view to All Assigned. This view displays all transactions regardless of who it is assigned to. Select the Exception History action and view the name in the User Name column to discover who is working on a transaction.
This list provides the steps to setup the optional Work Management feature for the Receivables WorkCenter.
Use the EOXC_USER role to access the Work Management setup pages.
Access the Work Management Link ID's Page.
Search for the corresponding Link ID (component ID) for each type of transaction where you want to use the Work Management feature.
Receivables pages and their corresponding Link ID are:
Link ID
Description
AR_ACCT_ENT_NOT_TO_GL
Accounting Entries to GL
AR_BILLS_NOT_IN_AR
Bills
AR_CASHCTL_NOT_TO_GL
Cash Control Entries to GL
AR_CASHDRAWER_RECEIPTS
Cash Drawer Receipts
AR_CONVR_TO_REVIEW
Conversations To Review
AR_CR_PYMNTS_AVIL_POST
Credit Card Payments to Post
AR_DEPOSIT_BAL_ERRORS
Deposit Balancing Errors
AR_DJ_ACCTG_ERROR
Direct Journal Accounting Entry Errors
AR_DJ_NOT_TO_GL
Direct Journals to GL
AR_EC_DEPOSIT_ERROR
Electronic Deposits in Error
AR_ELECTRONIC_DEPOSITS
Electronic Deposits
AR_EP_PYMNTS_AVIL_POST
eCheck Payments to Post
AR_EXCEL_PYMNT_UPLOAD
Excel Payment Upload
AR_EXCEL_UPLOAD_ERRORS
Excel Upload Deposit Errors
AR_EXPRESS_DEPOSITS
Express Deposits to Post
AR_INCOMPLETE_CRCD_PAY
Incomplete Credit Card Payments
AR_INCOMPLETE_PYMNTS
Incomplete Payments
AR_MAINT_WS_POSTING
Maintenance Worksheets to Post
AR_OPEN_ITEMS
Open Items
AR_PENDING_ITEM_GRP
Pending Item Groups to Post
AR_PYMNTS_AVAIL_TO_POS
Payments to Post
AR_REFUNDS
Refunds
AR_REV_ESTM_EXCEPT
Direct Journal Budget Exceptions
AR_STMT_EMAIL_ERR
Statement Email Error
AR_TRNSF_WS_POSTING
Transfer Worksheets to Post
AR_WC_DJ_BC
Direct Journals to Budget Check
AR_WC_DJ_CM
Direct Journals to Complete
AR_WC_PP_PAYMENTS
Payments for Predictor
AR_WC_REF_STATUS
Refund Status
Select the View button to access the Enable Work Management Exception Page.
Select the Enable option to activate the Work Management feature for that transaction.
Follow instructions in the Enterprise Components documentation for the Enable Work Management Exception Page to complete your setup.
Use the EOXC_USER role to access the Receivables WorkCenter.
This is an example for the Work Management enabled page. Use the Receivables WorkCenter page when Work Management is enabled to access and manage outstanding transactions in various views.
Navigation
Select the Receivables WorkCenter tile.
This example illustrates the fields and controls on the Receivables WorkCenter with Work Management enabled.
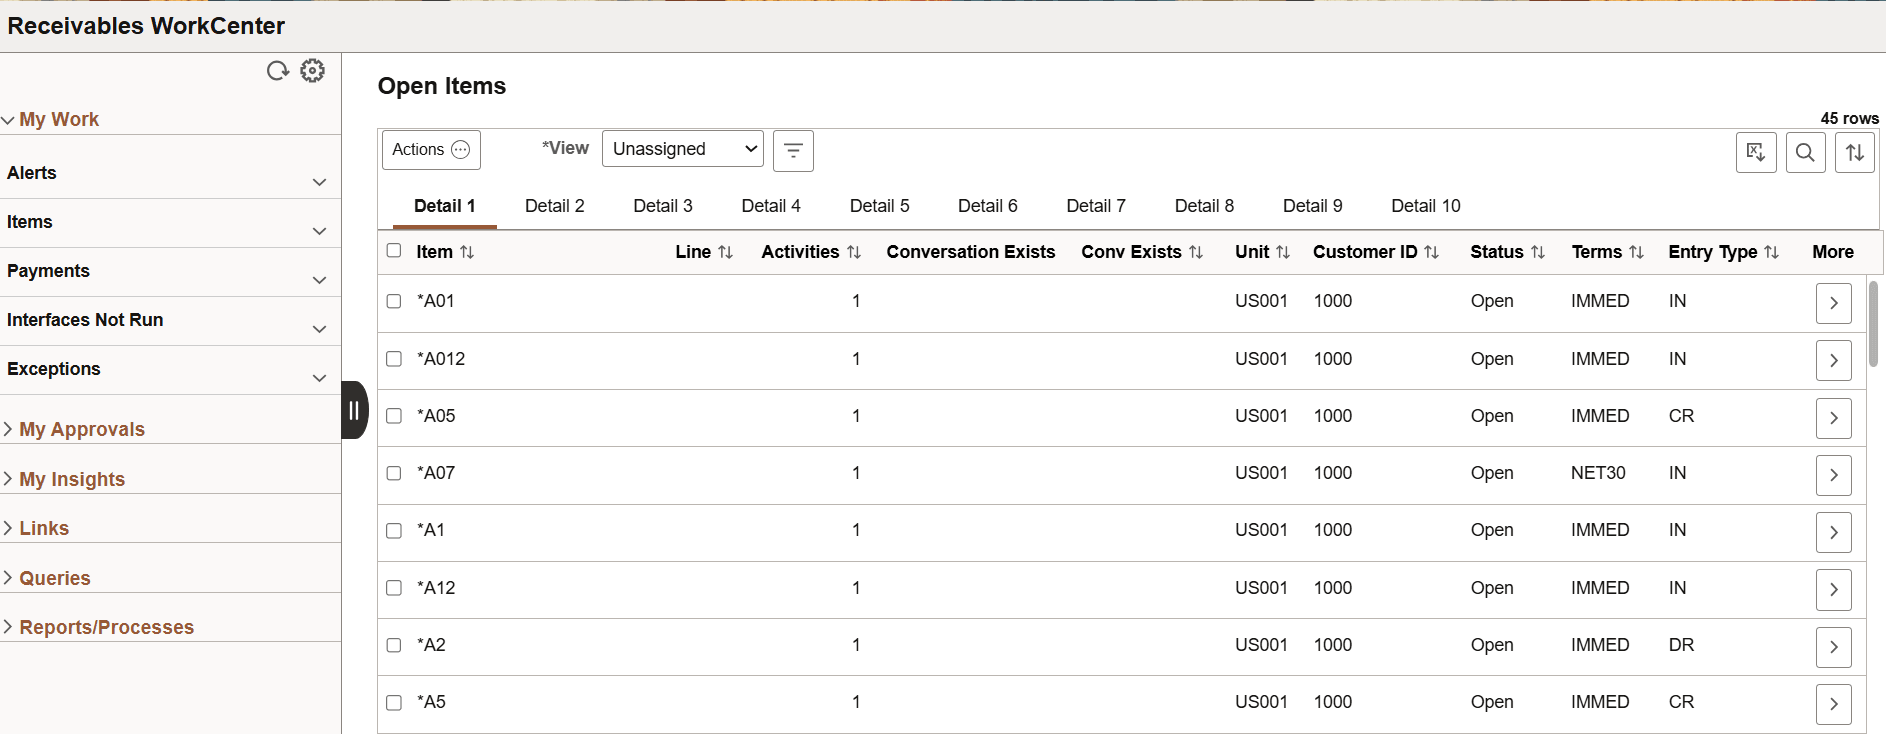
When Work Management is enabled, there are two changes on the WorkCenter page:
The View drop-down box appears above the grid.
Additional action options are added to the Actions button.
The original action options remain. The additional (Work Management) action options depend on the View option selected.
See Understanding the Work Management Framework, Actions by View section for more information.