Setting Up the Fluid User Interface to Create Requisitions
|
Page Name |
Definition Name |
Usage |
|---|---|---|
|
PV_MOB_SRCHSET_SCF |
View and edit preferences. |
|
|
PV_REQTYPE_TMP_FL |
Enable or disable Custom fields (for Header and Line) display in the drop-zone area of the requisition. |
|
|
PV_WSR_CREATE_FL |
Administrators can define a rule with weights and visibility for multiple attributes. |
|
|
PV_MASS_CHANGE_FL |
Replace the original Requester of the selected Requisitions with a new Requester |
|
|
PV_MOB_AMT_ONL_CTG |
Designate the Amount Only flag for the selected item category. Based on this designation, the Amount Only flag is defaulted on the Special Requests, Fixed Cost Service, Variable Cost Service, and Time and Materials pages. |
|
|
PV_LEFTNAV_FL |
Configure eProcurement requisition search bar Settings, left navigation order, and labels for the Fluid User Interface. |
|
|
PV_RQSTR_RECENT_FL |
Configure the item visibility on the Create Requisition Item History page. Depending on the Purge Requester Item History and Load Requester Item History configurations, the item list appears on the Create Requisition Item History page. |
|
|
PV_EXTCAT_SRCH_FL |
Import supplier catalogs and review import history. |
Use the Settings page (PV_MOB_SRCHSET_SCF) to set up user preferences for the required pages.
Navigation:
Click  icon and then Settings.
This example illustrates the fields and controls on the Settings page. You can find definitions for the fields and controls later on this page.
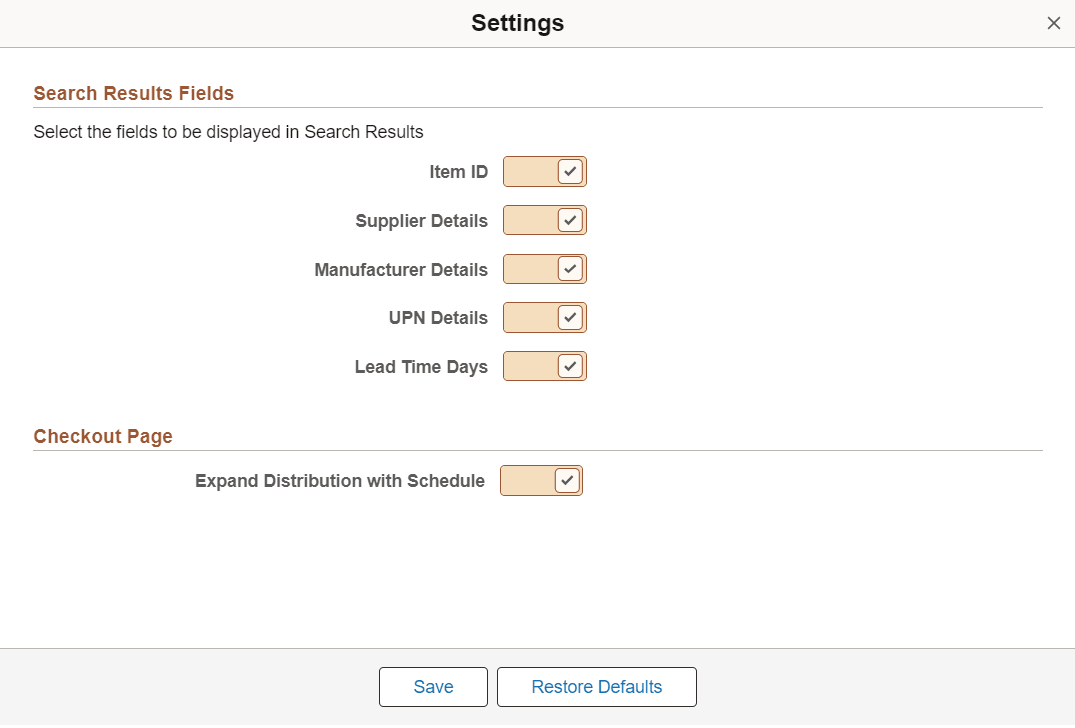
The values that you select on this page override what is selected on the Setting Up Installation Options for Fluid eProcurement and the Customize Search Results Display Page.
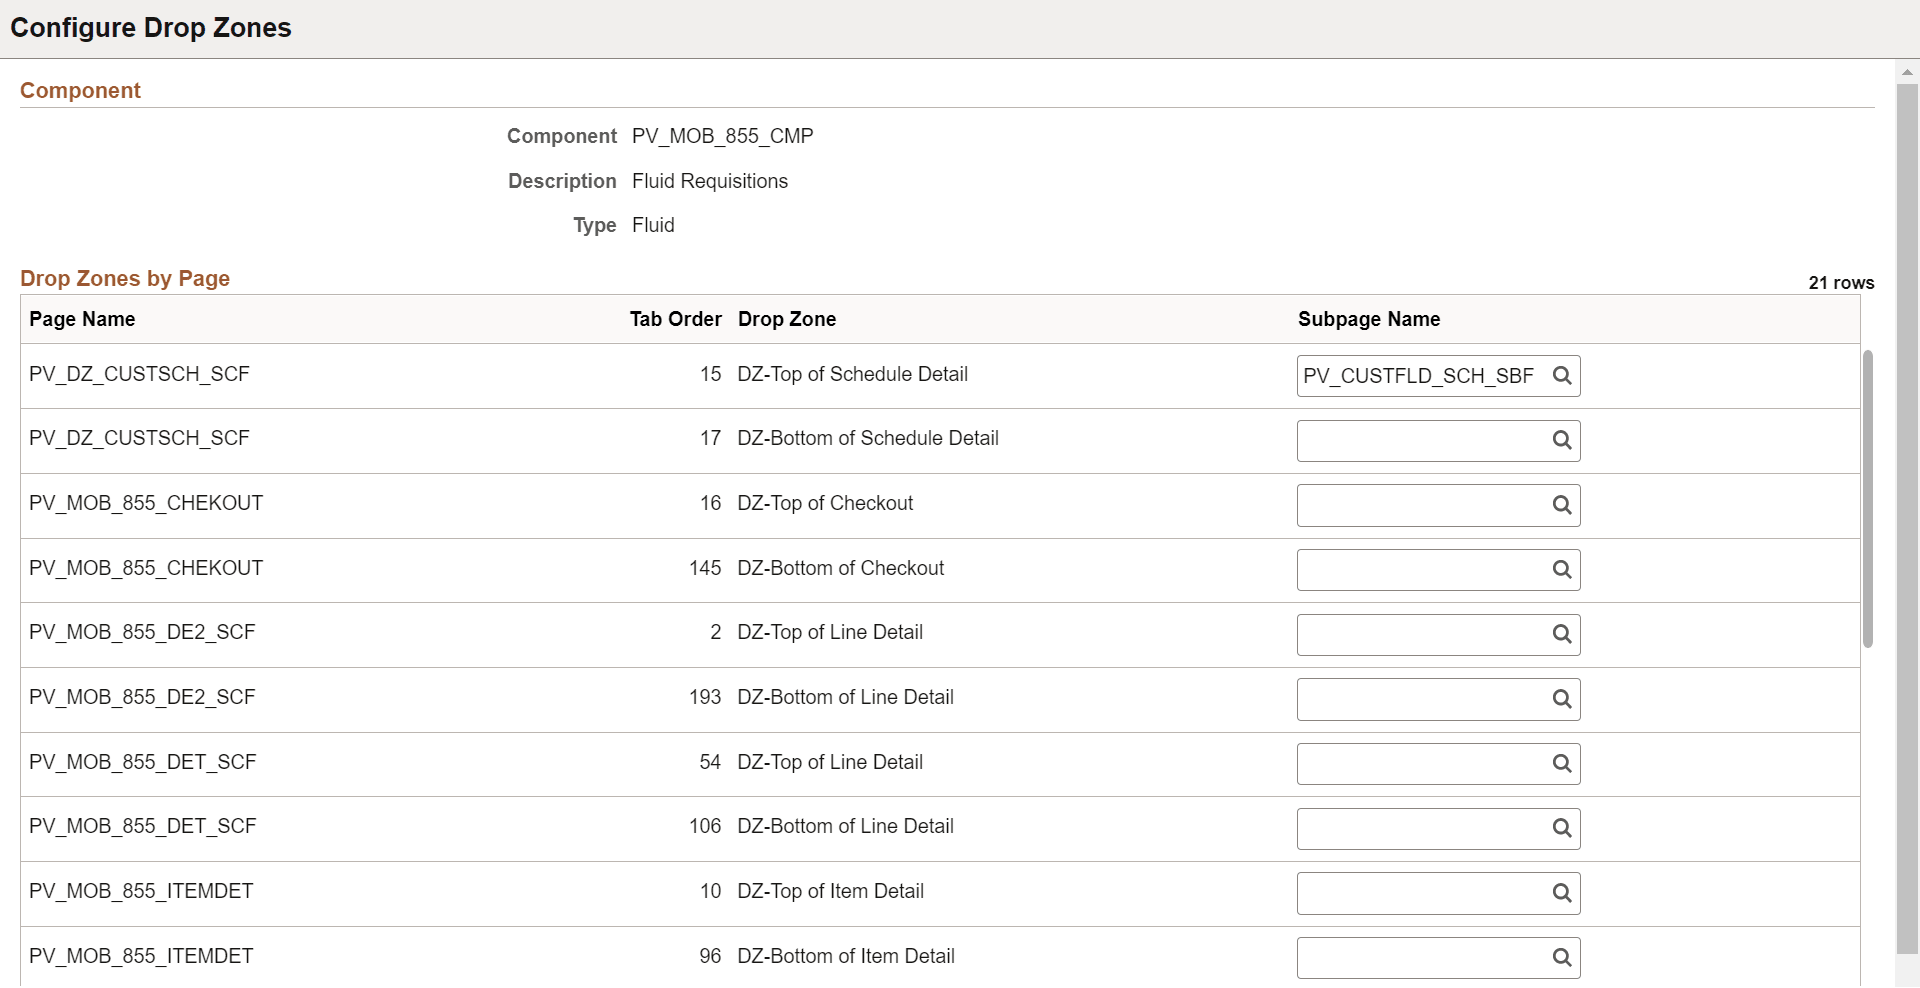
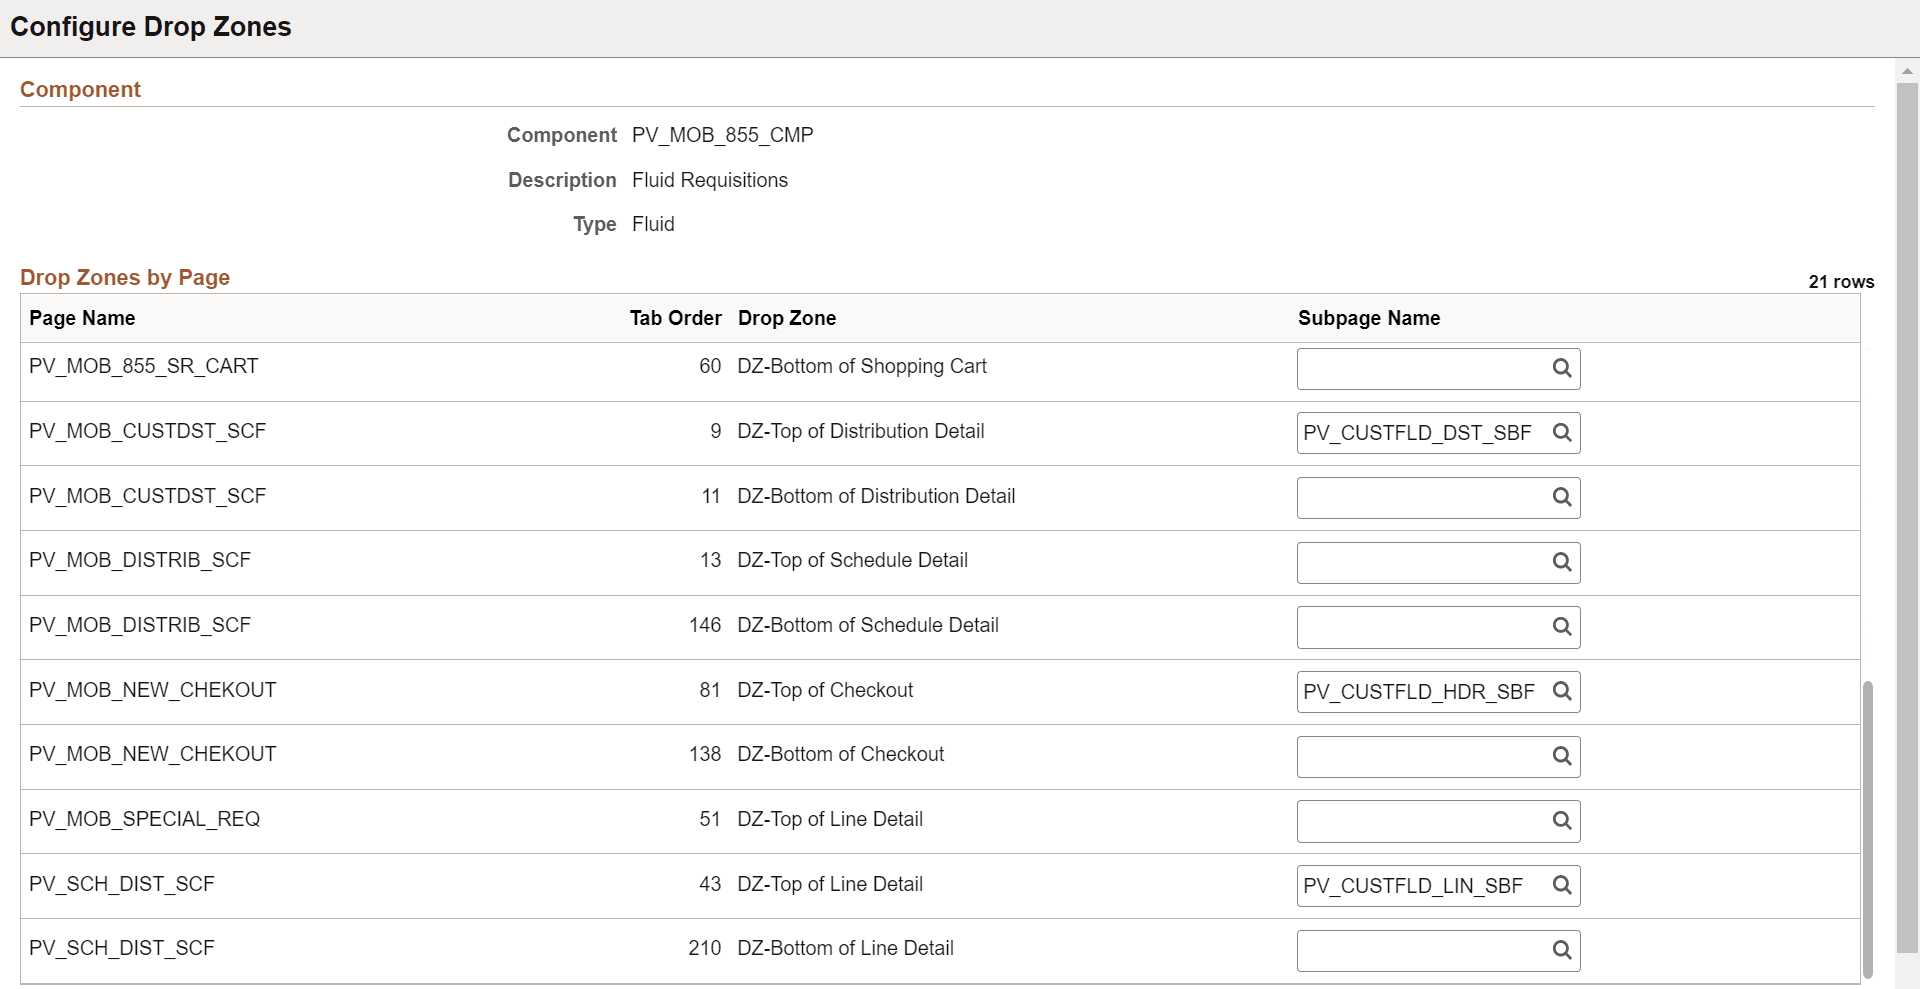
The approved method for using custom fields in fluid requisition is to use drop zones. In eProcurement, you need to set up subpages for header, line, schedule, distribution, or only for the sections for which you need drop zone pages.
Navigation:
Note: The user defined fields are available on the procurement transactions when you check the Enter Custom Fields check box under General Purchasing Controls on the Purchasing Installation Options page. See Installation Options - Purchasing Page.
This example illustrates the fields and controls on the Configure Drop Zones page (1 of 2).
This example illustrates the fields and controls on the Configure Drop Zones page (2 of 2).
For more information about Drop Zones, see Understanding Drop Zones and the product documentation for PeopleTools: Fluid User Interface Developer’s Guide, “Creating Pages for Fluid Applications”, Creating and Configuring Drop Zones.
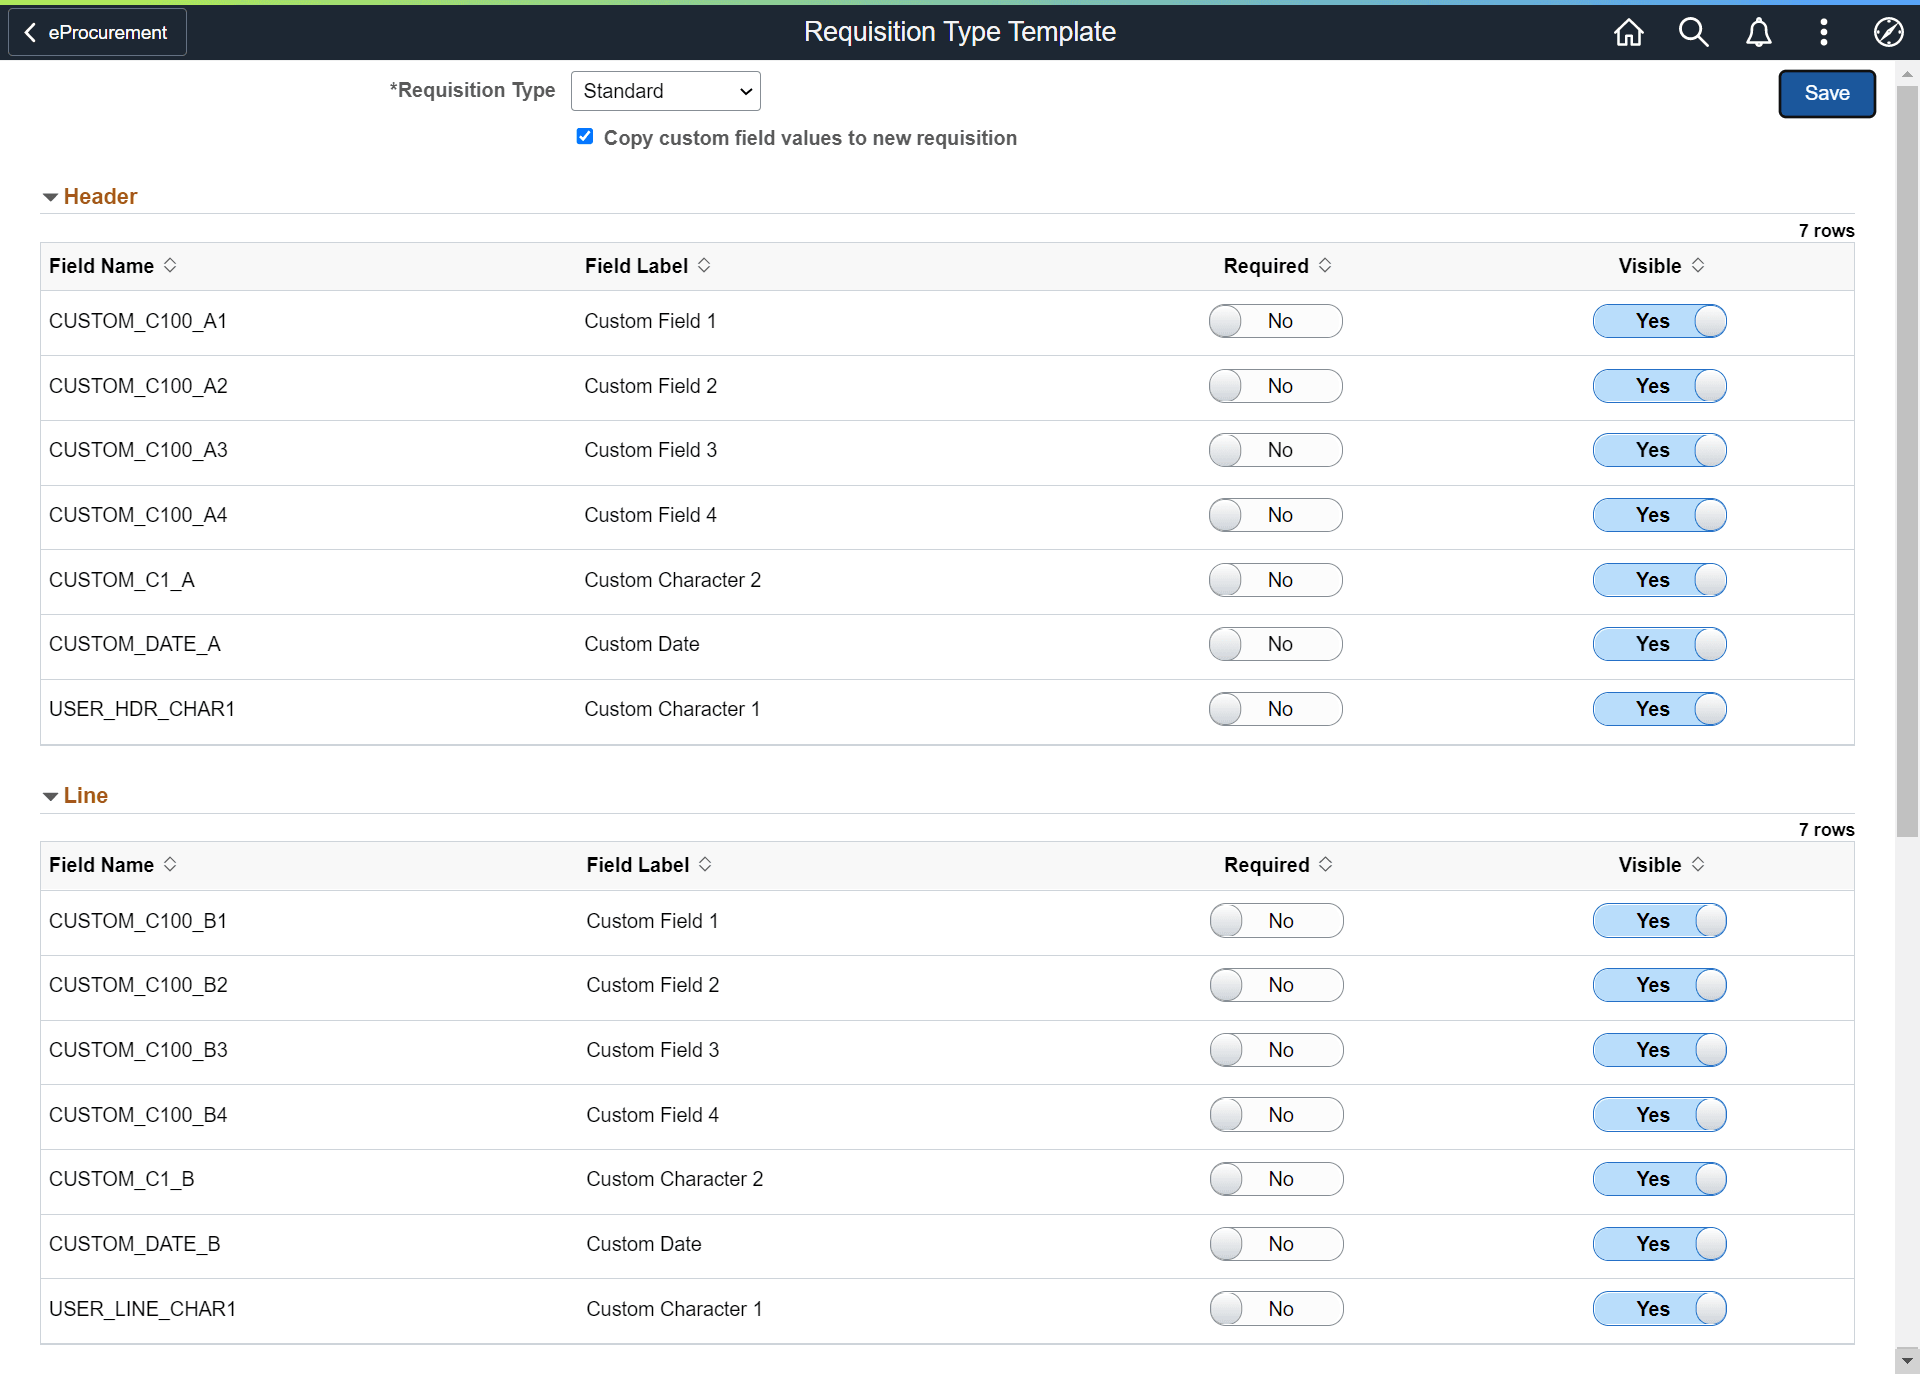
Use Requisition Type Template page (PV_REQTYPE_TMP_FL) to enable or disable custom fields (for Header and Line) which will be displayed in the drop-zone area of the fluid requisition component only.
The template type settings will affect fields only on fluid ePro requisitions. The fields available on the template page will depend on the fields in the records, PUR_USR_HDR_SBR for header and PUR_USR_LIN_SBR for line.
Navigation:
This example illustrates the fields and controls on the Requisition Type Template Page. You can find definitions for the fields and controls later on this page.
|
Field or Control |
Description |
|---|---|
|
Requisition Type |
Select the Requisition Type (Standard, Bill Only, and Bill and Replace) from the drop-down. The Header and Line custom fields will appear on the selected type of requisitions. Standard is the normal ePro Requisition used in the past. |
|
Copy custom field values to new requisition |
Select Copy custom field values to new requisition to allow to copy the custom field values from previously saved requisition to new requisition. If this is turned off, then custom field values will never be copied when a requisition is copied. |
|
Header and Line |
Provides the list of Header and Line custom fields available for the drop-zone area of the requisition pages.
|
Use Manage Weighted Sort Rules page (PV_WSRULE_SRCH_FL) to define weight for the attributes (for example, contract = 10, inventory = 5, preferred supplier = 10, and so on) and whether that attribute will be visible on the search row. Administrators can define a rule with weights and visibility to multiple attributes, which is used by the Relevance Weighted Sort to dynamically push the items with the highest total weight to the top of the search results.
For each Rule ID, a number of attributes can be selected and determine the weighting of that attribute and also control whether that attribute will be visible on the search row.
Navigation:
This example illustrates the fields and controls on the Manage Weighted Sort Rules Page. You can find definitions for the fields and controls later on this page.

|
Field or Control |
Description |
|---|---|
 Actions |
Click the Actions icon to perform related actions for the selected rule.
|
|
Active |
Click the toggle button to enable or disable the selected Weighted Sort Rules. You can enable only one Weighted Sort Rule at a time. If you try to active second rule when one rule is already active, a prompt will be displayed with a confirmation message to disable the already active one. |
 Edit |
Click the Edit icon to view or modify the Weighted Sort Rules details. |
Adding Weighted Sort Rules
Use Create Weighted Sort Rule page (PV_WSR_CREATE_FL) to add new rules for the weighted sort.
Navigation:
This example illustrates the fields and controls on the Create Weighted Sort Rule Page. You can find definitions for the fields and controls later on this page.

|
Field or Control |
Description |
|---|---|
|
Rule ID |
Enter a Rule ID for this Weighted Sort Rule configuration. |
|
Description |
Enter a description for this Weighted Sort Rule configuration. |
|
Attribute Display Name |
Select the attribute from the drop-down for which you want to set the rule. |
|
Attribute Type |
Displays the attribute type: Supplier Attribute, Role Controlled, Custom Attribute, or Visibility Required. |
|
Value |
Enter/select the attribute value for the selected attribute. Depending on the attribute selection, value field type may vary, such as drop-down list, Yes or No field, text field, and search box. |
|
Show on results row |
If you want to display the attribute in the search result, set the Show on results row button to Yes else set it to No. Note: For Inventory Item and Contract Item, the attributes are displayed based on Role configuration. For Preferred Supplier, by default Show on results row is set to Yes and disabled. Irrespective of rule set up, Preferred Supplier will always be displayed in the Create Requisition search results. |
|
Weight (0-10) |
Enter the weight of the of the attribute in the scale of 0 to 10 in integer. According to the weight, search result score will get boosted. Weight value 0 indicates the row is added to show on result purpose only. Weighted Sort Rule dynamically pushes the items with the highest total weight to the top of the search results. |
|
Add a new row |
Click to add a new line. |
|
Delete row |
Click to delete the added row. |
|
Sort By |
Set the sort order of the added rows. |
|
Search Existing |
Click to view the list of already added Weighted Sort Rules. |
|
Save |
Click to save the Weighted Sort Rules configuration. |
Configuring Attributes for Weighted Sort Rule
Attributes available under Attribute Display Name drop-down on the Create Weighted Sort Rule page are controlled by the setup record, PV_WSRULE_SETUP. These attributes are added and delivered with EP_PV_MASTERITEMVENDOR_SD and EP_PV_MASTERITEM_SD Search Definitions.
Following attributes can be configured for Weighted Sort Rule:
Classification
Contract Item (Incremental index is mandatory for contract Item attribute, even if RTI is enabled)
Disabled
Emerging Small Business
Ethnicity
HUBZone Program
Inventory Item
Item Fld C1 B
Item Fld C1 C
Item Fld C1 D
Item Fld C2
Item Fld C4
Item Fld C6
Item Fld C8
Other Preference Programs
Preferred Supplier
SDB Program
Size of Small Business
Special Purchase
Type of Contractor
Veteran
Veteran-Owned Small Business
Women-Owned Business
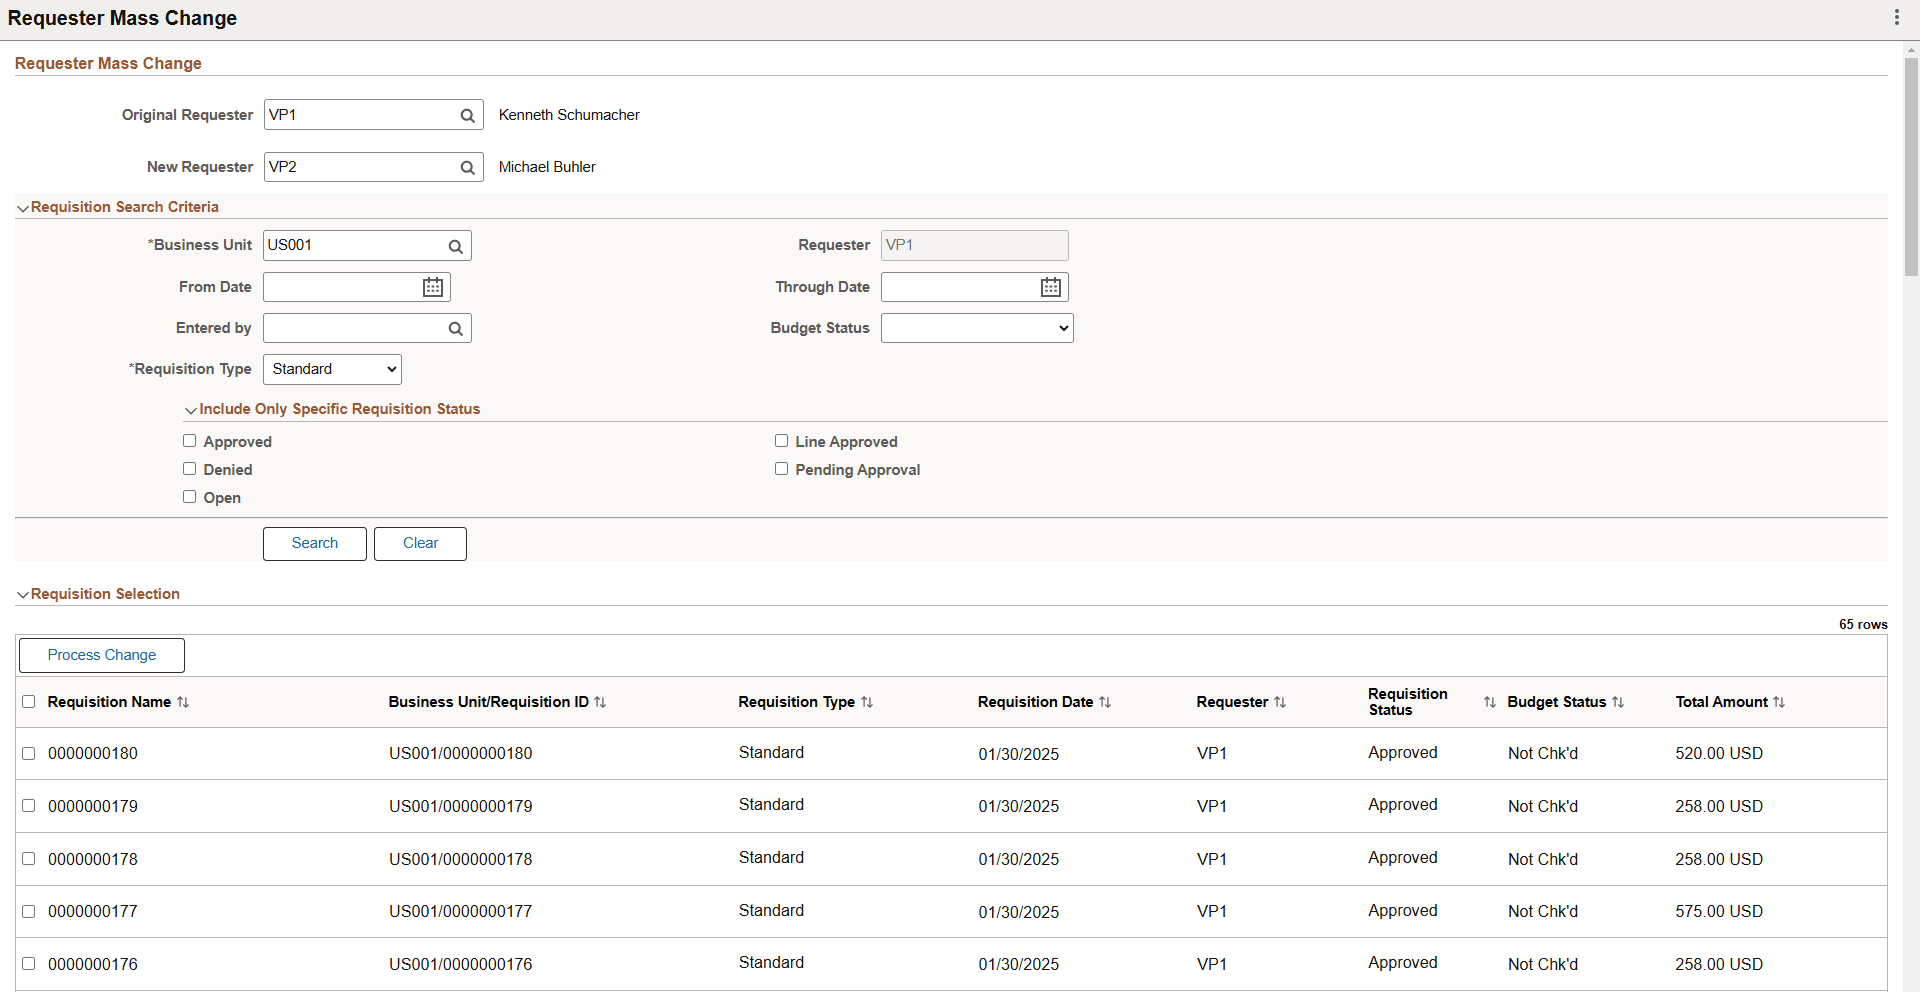
Use the Requester Mass Change page (PV_MASS_CHANGE_FL) to replace the original requester of the selected requisitions with a new requester. The new requester gets future notifications and can receive the requisitions entered by the original requester.
Navigation:
This example illustrates the fields and controls on the Requester Mass Change Page. You can find definitions for the fields and controls later on this page.
Requester Mass Change
|
Field or Control |
Description |
|---|---|
|
Original Requester |
Enter the User ID of the original requester who created the requisitions. |
|
New Requester |
Enter the User ID of the new requester. All the selected requisitions will be updated with the new requester. |
Requisition Search Criteria
Use the Requisition Search Criteria to search the requisitions created by the original requester. Use the filter criteria to search the requisitions.
|
Field or Control |
Description |
|---|---|
|
Business Unit and Requester |
Business Unit and Requester fields are defaulted from the original requester. You can override the Business Unit to search for a specific requisition. |
|
From Date and Through Date |
Enter the creation date or date range to search the requisitions for that period. |
|
Entered by |
Enter the User ID of the individual who created the requisition. This is usually the requester, but it can be another individual. Note: If BO is enabled for the SYSTEM_SOURCE on the Maintain Translate Values page, REQLOAD is available to select and filter the Bill Only requisitions created from the XML upload. |
|
Budget Status |
Based on the selected budget status, requisitions are displayed in the search results. Select any of the following budget statuses for the requisition:
|
|
Requisition Type |
The search results display requisitions based on the selected requisition type. Select any of the following requisition types:
Note: The requisition type filter appears only if BO is enabled for the SYSTEM_SOURCE on the Maintain Translate Values page. Standard requisition type refers to all requisitions that are not BO or BR. |
|
Include Only Specific Requisition Status |
Select one or more statuses from the Include Only Specific Requisition Status drop-down menu to search the requisitions only with the selected status. If no status is selected, the search results will display the requisitions for all the statuses. |
|
Search |
Click Search to view the list of requisitions created by the original requester. |
|
Clear |
Click to clear the search filter and start a new search. |
Requisition Selection
Use Requisition Selection to view the search results. You can select one or more requisitions and change the requester.
|
Field or Control |
Description |
|---|---|
|
Process Change |
Select one or more requisitions using the checkbox on the left for specific items on the results grid or the select all checkbox on the top left of the grid. Then click Process Change to replace the original requester of the selected requisitions with the new requester. Note: Every time a Requester Mass Change is made to a requisition, the change is updated in the Requisition Header Comments and Attachments, which can be accessed on the My Requisitions page. |
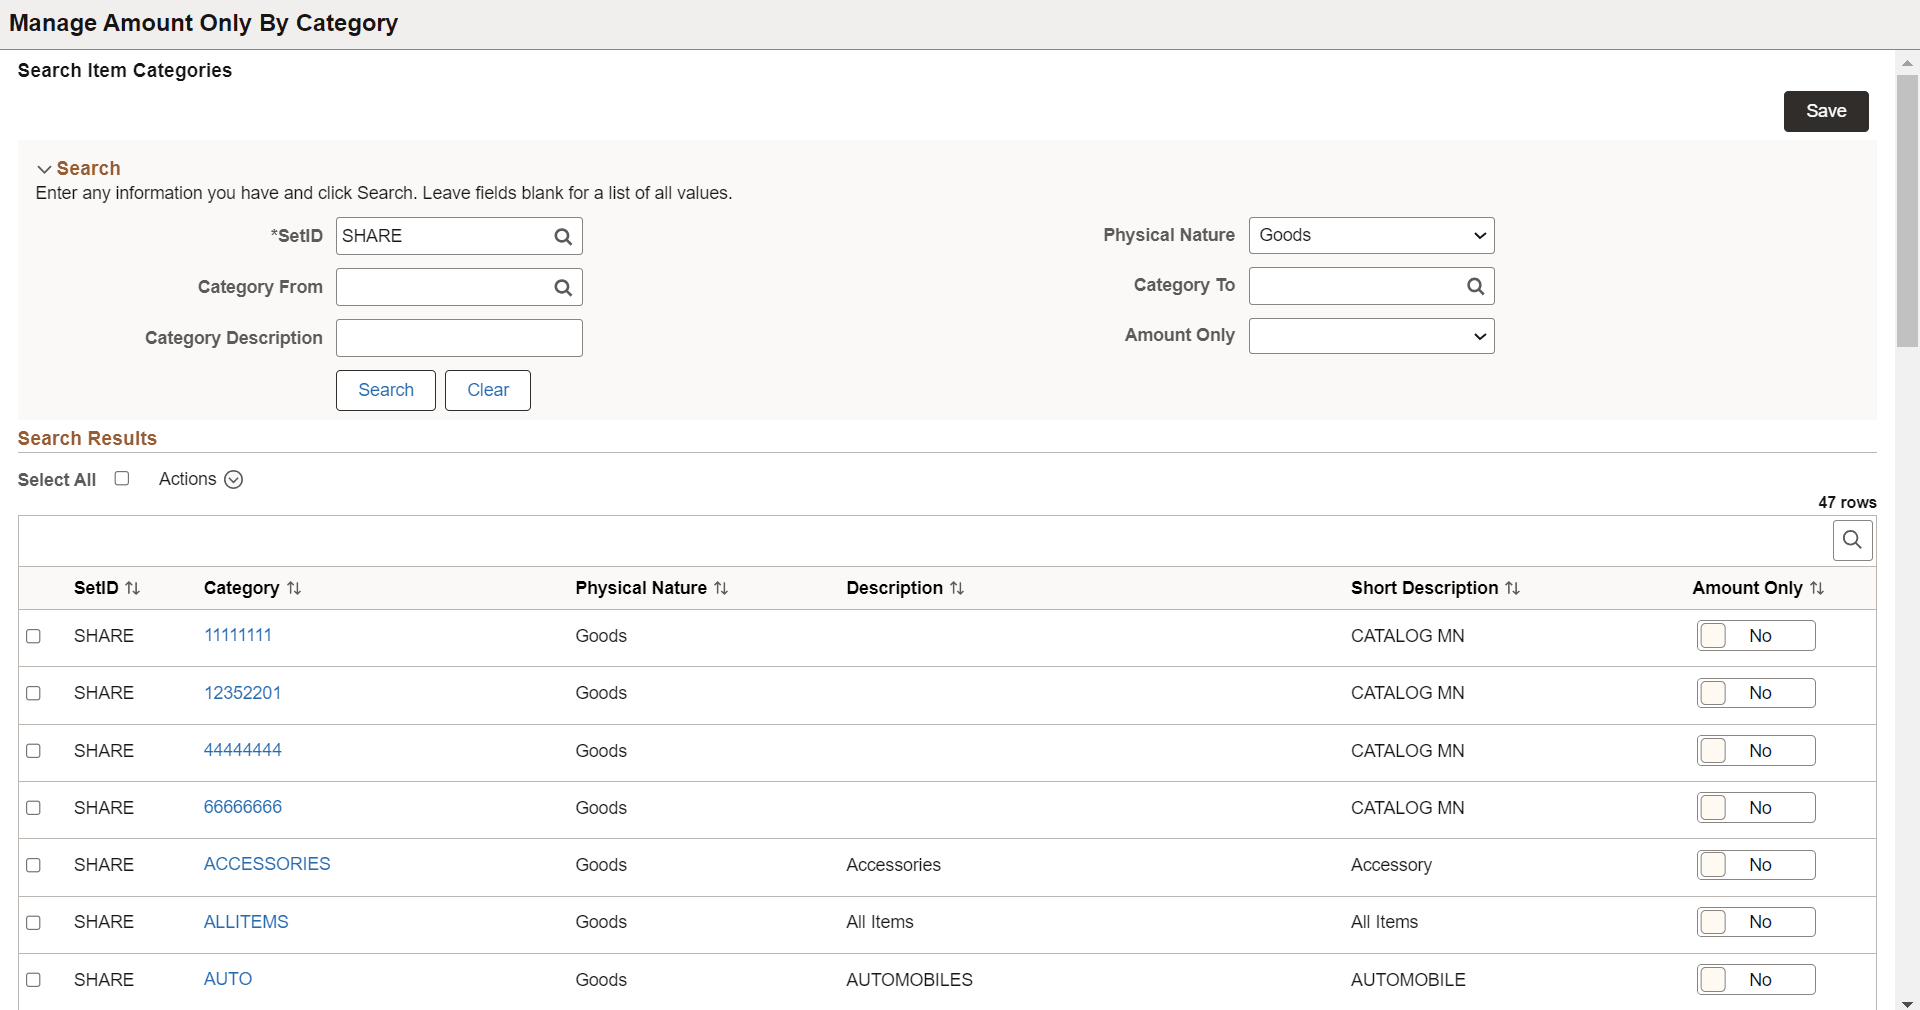
Use the Manage Amount Only By Category page (PV_MOB_AMT_ONL_CTG) to designate the Amount Only flag for the selected item category. Based on this designation, the Amount Only flag is defaulted on the Special Requests, Fixed Cost Service, Variable Cost Service, and Time and Materials pages.
Navigation:
This example illustrates the Manage Amount Only tile.
Note: This tile is displayed only if it is configured for the Fluid Structure Content eProcurement home page. You can enable Manage Amount Only tile under PeopleTools, Portal, Structure and Content, Fluid Structure Content, Fluid Homepages, Edit eProcurement, Tile Content tab.
This example illustrates the fields and controls on the Manage Amount Only By Category page. You can find definitions for the fields and controls later on this page.
Search
Use this section to search the list of categories based on the selected search criteria.
|
Field or Control |
Description |
|---|---|
|
SetID |
Enter the SetID or select it from the Lookup page. The categories displayed in the search results are based on the selected SetID. This is a mandatory field. |
|
Category From and Category To |
Select the range of category values for which you want to default the Amount Only flag. For example, if you enter Category From as A and Category To as D, all the category names that start with the letters A, B, C, and D appear on the search results. Note: Click the Search icon to open the search Lookup page to search for a specific category. On the Lookup page, you can use advanced search criteria, including operators, to find a specific category. |
|
Category Description |
Enter the category description or partial description. Search results display the categories that contain the entered description keywords. |
|
Physical Nature |
Select the physical nature of the category: Goods, Services, or Blank. Select blank to view both the Goods and Services categories. By default, Services is selected. |
|
Amount Only |
Select to view the categories for which the Amount Only flag is designated or not. |
|
Search |
Click to get the results based on the applied criteria. |
|
Clear |
Click to clear the search criteria. Note: SetID and Physical Nature will be reset to their default values. |
Search Results
Use this section to view the list of categories. Select one or more categories and designate the Amount Only flag.
|
Field or Control |
Description |
|---|---|
|
Actions |
Click Actions to set the Amount Only flag to Yes or No in bulk. Note: Before performing the action, either click the Select All check box to select all the category lines or select individual lines by clicking the respective check boxes. |
|
Category |
Click this link to view Item Category Details. |
|
Amount Only |
Click to enable or disable the Amount Only flag for that category. Note: You can toggle the Amount Only button for any row in the search result without selecting the checkbox for that row. |
Use the Requisition Page Navigation (PV_LEFTNAV_FL) to configure eProcurement requisition search bar Settings, left navigation order, and labels for the Fluid User Interface.
Navigation:
This example illustrates the fields and controls on the Requisition Page Navigation tile.
This example illustrates the fields and controls on the Requisition Page Navigation. You can find definitions for the fields and controls later on this page.
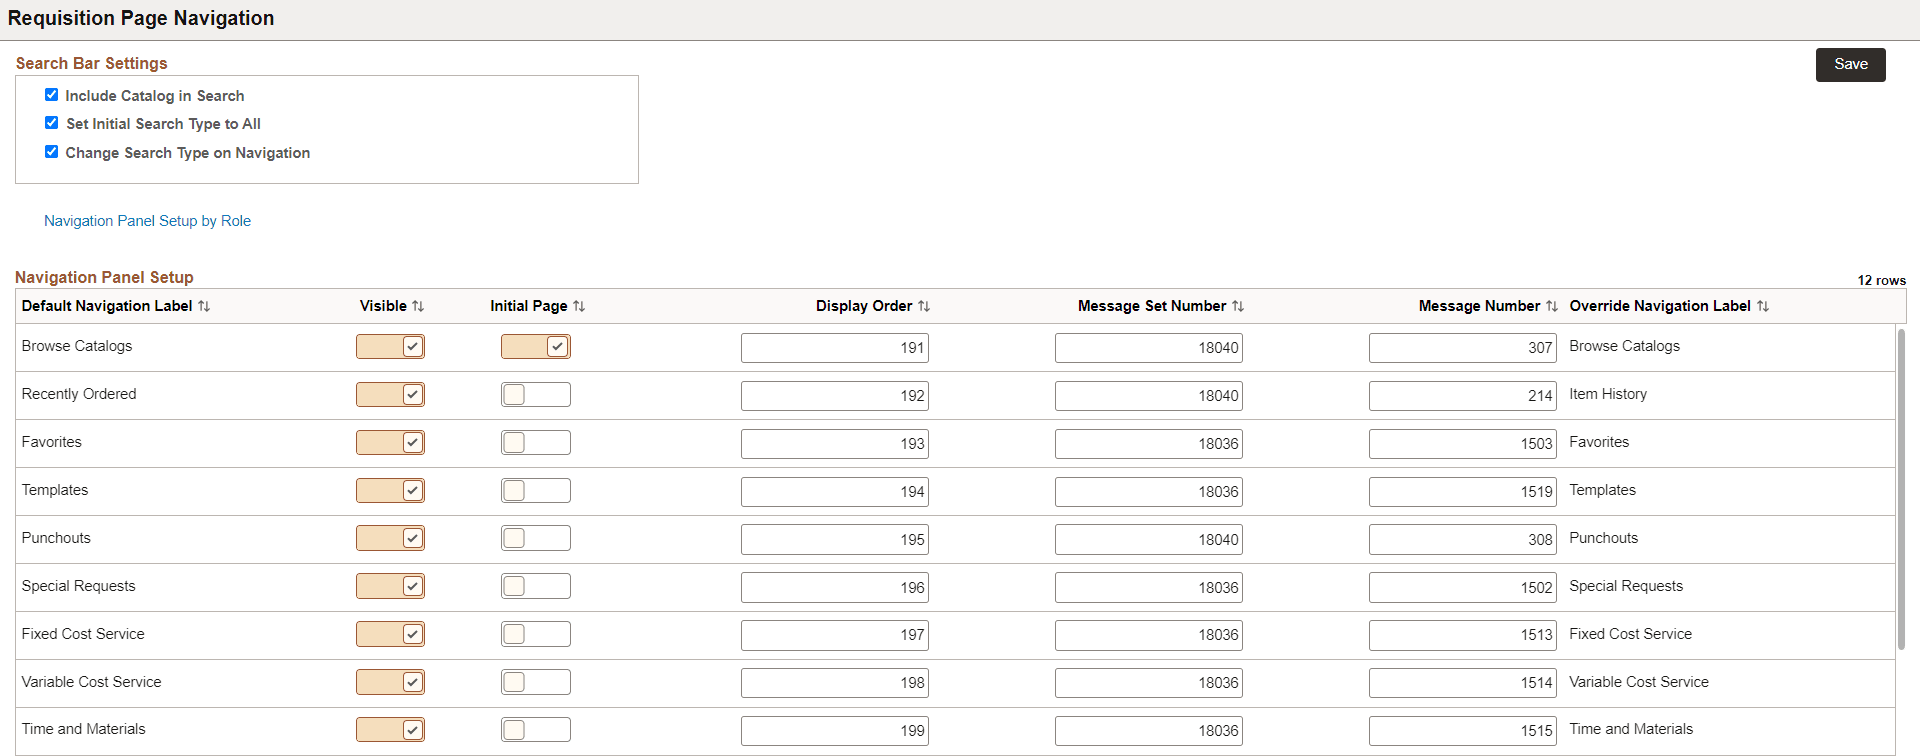
Search Bar Settings
|
Field or Control |
Description |
|---|---|
|
Include Catalog in Search |
Select this checkbox to display the items in the search result from the catalog. |
|
Set Initial Search Type to All |
Select this checkbox to set the search result for all the categories. For example, if one item is available in the catalog and another is available as a special item, the search results will display all of them. |
|
Change Search Type on Navigation |
If this option is checked, the system will function as it currently does, changing the search type as the user navigates through the navigation. If this option remains unchecked, the system will set the default search type or the user's selections as the left-hand menu options remain unchanged. |
Navigation Panel Setup
Configure the Create Requisition left navigation. For more information about the fields and description of the Navigation Panel Setup section, see Setting Up eProcurement Requisition Navigation: Classic Page.
Navigation Panel Setup by Role
Click the Navigation Panel Setup by Role link on the Requisition Page Navigation to assign Role Names to a specific Navigation ID.
This example illustrates the fields and controls on the Navigation Panel Setup by Role page.
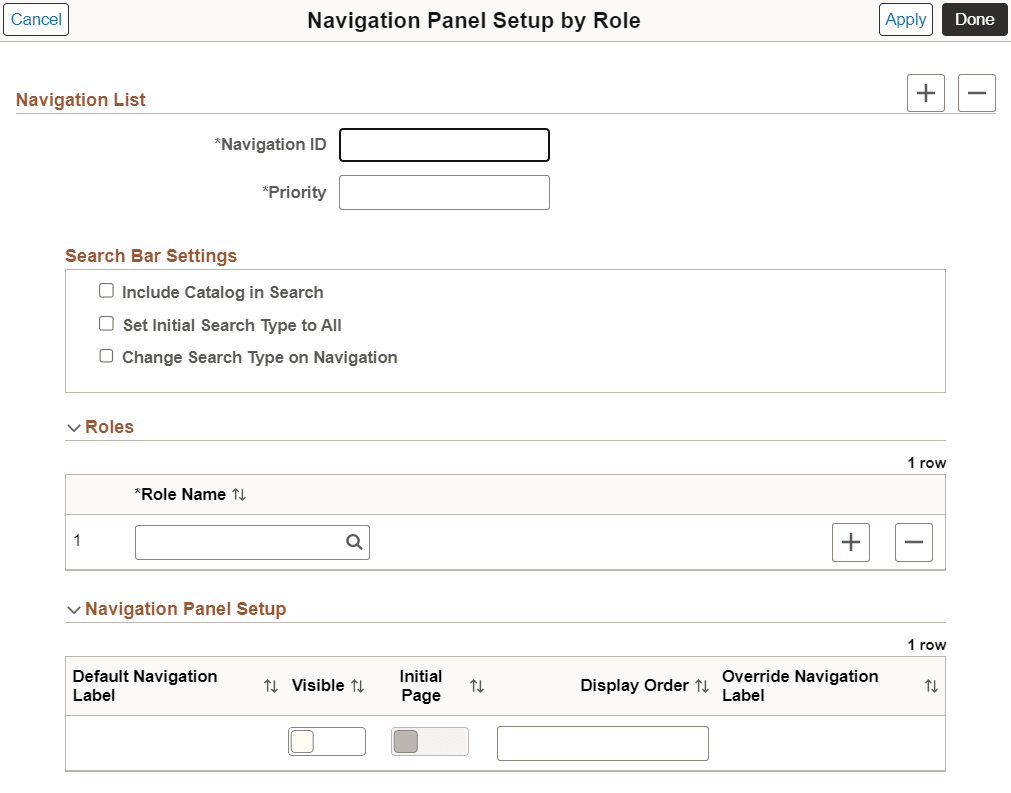
For more information about the fields and description of Navigation Panel Setup by Role page, see Setting Up eProcurement Requisition Navigation: Classic Page.
Use the Requester Item History page (PV_RQSTR_RECENT_FL) to configure the item visibility on the Create Requisition Item History page. Depending on the Purge Requester Item History and Load Requester Item History configurations, the item list appears on the Create Requisition Item History page.
Navigation:
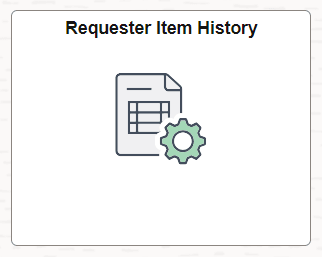
This example illustrates the fields and controls on the Requester Item History tile.
Purge Requester Item History
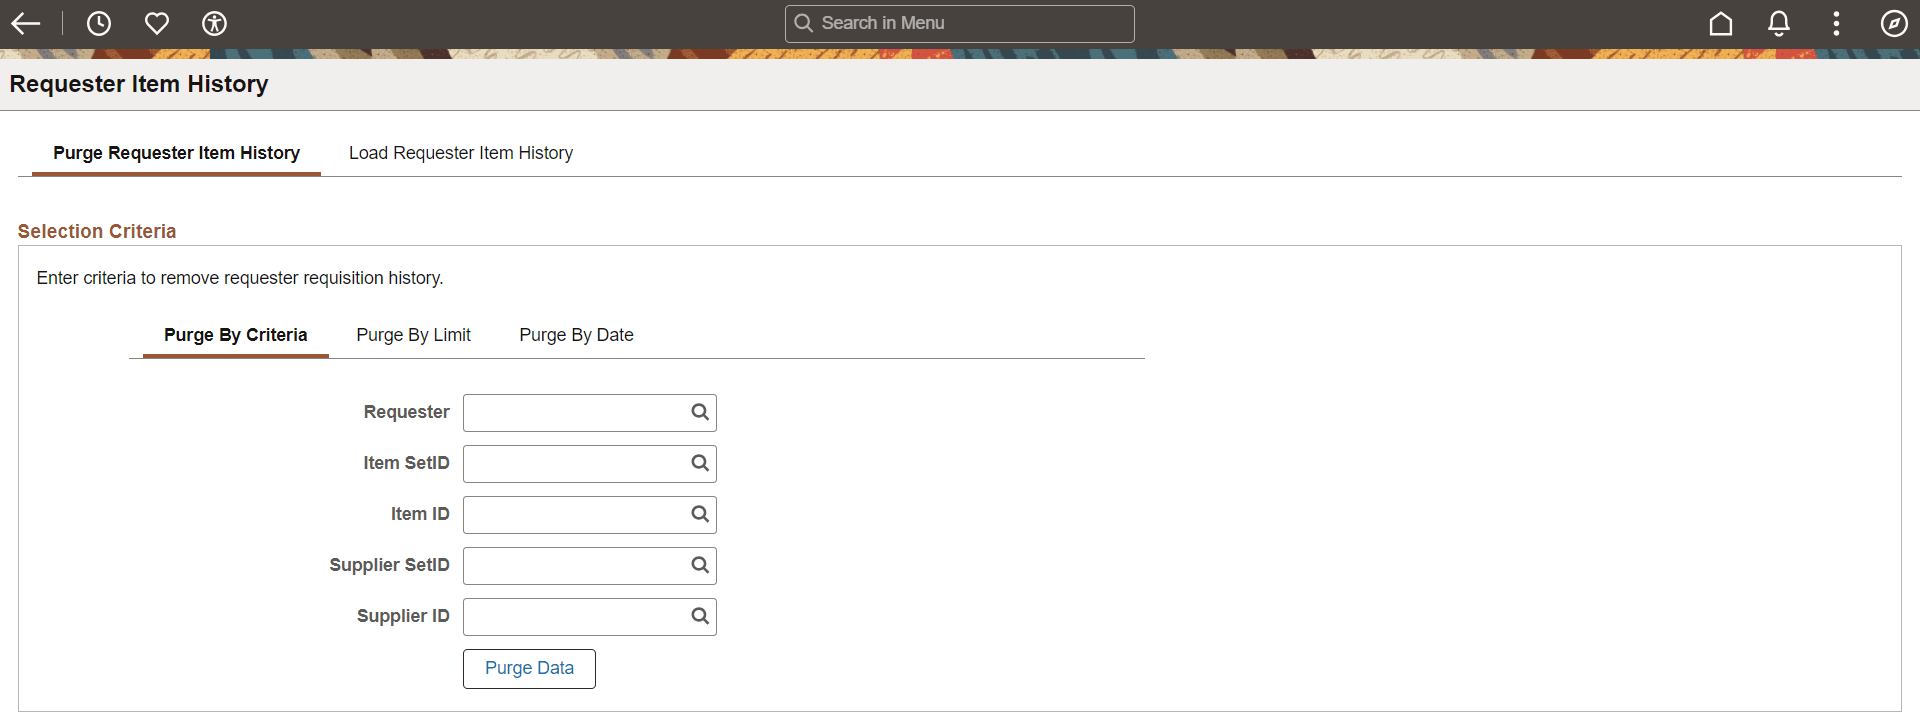
This page allows you to remove items from the item history based on the given parameters. If many item rows are available in the item history and no longer required, remove the items from the list based on the requirements. The Item History is created from the previously load and/or from saving the requisitions.
This example illustrates the fields and controls on the Purge Requester Item History page. You can find definitions for the fields and controls later on this page.
|
Field or Control |
Description |
|---|---|
|
Purge By Criteria |
To remove the items based on the selection, select any of the search criteria. For instance, when you select a requester, Purge Data eliminates all the items from the item history that the requester has requisitioned. You can use any of the following criteria to remove items from the item history.
|
|
Purge By Limit |
Enter the value for Limit Rows Per Requester. Depending on the entered value, item history keeps only these many item rows from each requester and removes the rest of the item history. For instance, if you have three requesters and have set the Limit Rows Per Requester to 10, the system will display 10 items from each requester, totaling 30 items, in the item history and delete the remaining items. |
|
Purge By Date |
Enter the Purge Before date. It will delete all item history prior to that date. The item history will display the item list from that date. |
Load Requester Item History
Use this page to control the display of items on the Item History page. The Load Data configuration determines the number or selection of items displayed on the Item History page.
This example illustrates the fields and controls on the Load Requester Item History page. You can find definitions for the fields and controls later on this page.

|
Field or Control |
Description |
|---|---|
|
Load By Requester |
Select the Requester and Date From. The item history page displays all the previously ordered items within the date range of the entered date to today's date for the selected requester. |
|
Load By Limit |
Enter the value for Load By Limit. Item history displays only this many item rows from each requester, depending on the entered value. Example: If you set Limit Rows Per Requester to 10 and there are three requesters, the item history will display 10 items from each requester, totaling 30 items. |
|
Load By Date |
Enter the from date. Item history displays the item list from that date. |
Note: If no data is available for the selected configuration, then there will be no item list on the Item History page. For example, if you are configuring the Load By Date and there are fewer items ordered from that selected date, these items will only be displayed, and other items will be hidden. You can adjust the criteria to display the items again according to your requirements. Load Requester Item History process deletes the item history (with the same criteria) prior loading the requester item history to prevent duplicate errors.
Use the Maintain External Catalogs page (PV_EXTCAT_SRCH_FL) to import supplier catalogs and review import history.
The ePro Administrator obtains catalog files from external suppliers and imports them into PeopleSoft Create Requisition. If errors occur during the import process, the ePro Administrator can review them using the import history.
Navigation:
This example illustrates the fields and controls on the Maintain External Catalog tile.
This example illustrates the fields and controls on the Maintain External Catalogs page. You can find definitions for the fields and controls later on this page.
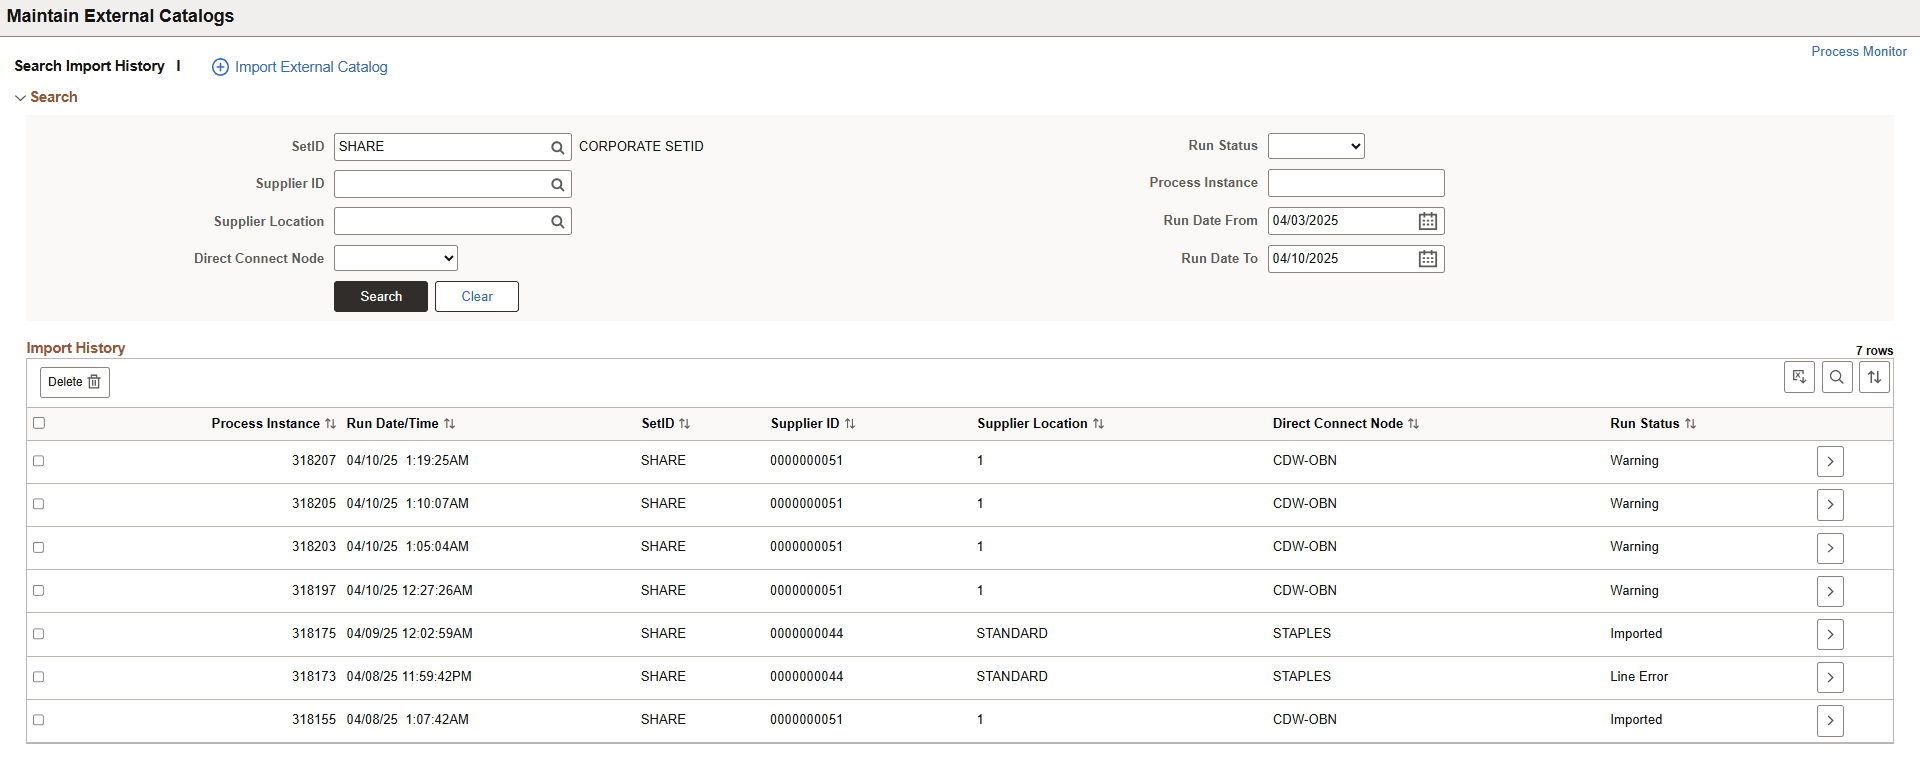
Search
Search the catalog import history using the defined search parameters.
|
Field or Control |
Description |
|---|---|
|
SetID |
Enter the SetID to access its import history. |
|
Supplier ID and Supplier Location |
Enter the external supplier ID and location linked to the catalogs imported by the ePro Administrator. |
|
Direct Connect Node |
Choose the Direct Connect Node associated with the supplier. The list displays only configured and linked Direct Connect supplier names. To link a direct connect supplier, see Setting Up PeopleSoft eProcurement for Direct Connect. |
|
Run Status |
Select an import status to filter the results accordingly. |
|
Process Instance |
Enter the Process Instance number to search a specific import process. |
|
Run Date From and Run Date To |
Enter the start and end dates to display the import history within the selected date range. |
|
Search |
Enter the required search criteria, then click the Search button to display the import history. |
|
Clear |
Click to remove all entered search criteria values from the fields. |
Import History
The Import History section displays a list of imports based on the specified search criteria, with each row representing a single import process.
This section includes import history for both processes: imports performed through the Import External Catalog option on the Maintain External Catalogs page, and those imported via the Oracle Business Network (OBN) method. Detailed description is provided later on this page.
The Import History section displays key details such as the Process Instance Number, Run Date/Time, SetID, Supplier ID, Supplier Location, Direct Connect Node associated with the supplier, and the Run Status of each import process.
|
Field or Control |
Description |
|---|---|
 (Select row check box) |
Select the 'Select All' checkbox to mark all rows in the import history. Alternatively, you can choose specific rows by clicking their respective 'Select Row' checkboxes. |
 (Delete) |
Select the rows in the import history and click 'Delete' to remove them. |
|
Run Status |
Displays the status of the import process. The In Progress status indicates the import process is ongoing. Upon completion, the status changes to one of the following:
For more details on troubleshooting errors or warnings, refer to the Details page documentation later on this page. |
 (Import Details) |
Click to open the Details page and review process and line details. For more details refer to the Details page documentation later on this page. |
 (Download to Excel Import History) |
Click to export all data to an Excel sheet. |
 (Find Import History) |
Use the search functionality to locate a row based on the specified keyword. |
 (Sort Import History) |
Click to modify the sort order of the search history by Process Instance, Run Date/Time, SetID, Supplier ID, Supplier Location, Direct Connect Node, or Run Status. |
Details Page
The Details page provides process details and displays error information if issues occur during the import process. You can download the input file by clicking the File Name link on this page. However, if the file is imported via the Oracle Business Network (OBN), the input file cannot be downloaded.
Navigation:
Select the Import Details button corresponding to a row of the Import History table on the Maintain External Catalogs page.
This example illustrates the fields and controls on the Details page with Line Error. You can find definitions for the fields and controls later on this page.
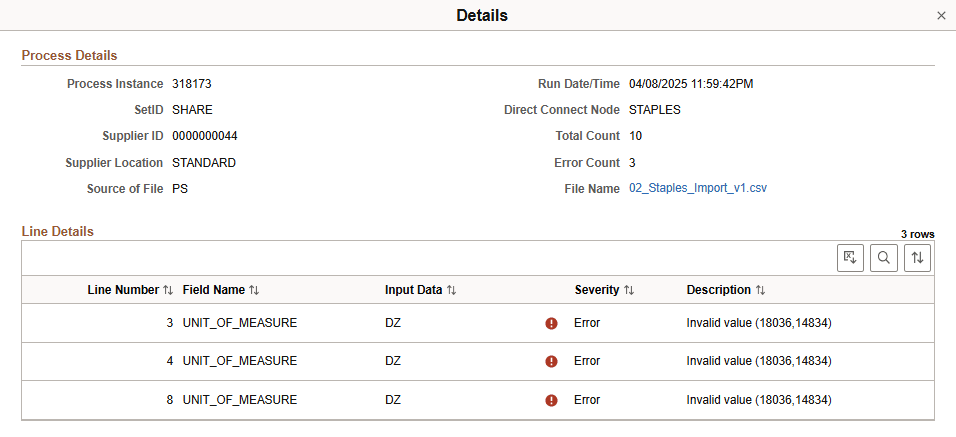
If the import process status is Imported, the Process Details section displays the total count of imported rows.
If the import process status is Error, it indicates that the file was not processed. In this case, line-level error information is unavailable. The ePro Administrator can download the input file, rectify the error, and attempt the import again.
If the import process status is Line Error or Warning, the ePro Administrator can access line-level error details on the Details page. These details include the affected line number, field name, input data, severity (Error or Warning), and a full error or warning description for the affected lines.
For Line Error, the ePro Administrator can download the error input file, resolve the line errors, and re-run the import process for those lines.
For Warning, the import process continues, as warnings are meant to notify the supplier. If necessary, the ePro Administrator can download the warning data, share it with the supplier to address the issues, and re-import the corrected file.
Importing External Catalog
Use the Import External Catalog page to import external supplier item catalogs. The ePro Administrator can import item catalogs from external suppliers integrated with OBN, as well as from punchout suppliers not integrated via OBN.
Navigation:
Click Import External Catalog link on the Maintain External Catalogs page.
This example illustrates the fields and controls on the Import External Catalog page. You can find definitions for the fields and controls later on this page.

|
Field or Control |
Description |
|---|---|
|
Direct Connect Node |
Select the Direct Connect Node associated with the external supplier. Only configured and linked Direct Connect supplier names will appear in the list. To link a Direct Connect supplier, refer to Setting Up PeopleSoft eProcurement for Direct Connect. |
|
Choose External Catalog File |
Click the Choose External Catalog File button to upload the catalog file provided by the external supplier. For more details about External Catalog File, refer Configuring External Catalog File documentation later on this page. |
|
Run |
After selecting the Direct Connect Node and uploading the catalog file, click Run to initiate the catalog import process. |
|
Process Monitor |
Once the import process begins, click the Process Monitor link to navigate to the Process Monitor page and track the progress of the import process. |
|
Search Import History |
Click the Search Import History link to return to the Search Import History page, where you can view a detailed import history, including the import status. |
Upon completion of the import process, a new row is added to the Import History table, allowing you to view the details of the latest import. The imported catalogs appear on the Fluid Create Requisition Browse Catalog search results page, based on the Direct Connect Node used for importing the items. For additional information, refer to Create Requisition: Search Results Page.
Configuring External Catalog File
To import external catalog items, configure the .csv file and upload it using the 'Choose External Catalog File' option on the Import External Catalog page. Ensure the values for the following fields in the .csv file follow the specified character limits.
|
Field Name |
Description |
Character Limit |
|---|---|---|
|
Action |
Type of operation (e.g., SYNC, DEL). |
NA |
|
Description |
Description of the catalog item. |
254 |
|
SupplierPartID |
Supplier-assigned part identifier. |
50 |
|
SupplierPartAuxiliaryID |
Additional supplier-assigned ID. |
25 |
|
UnitOfMeasure |
Unit of measurement (e.g., EA). |
3 |
|
UnitPrice |
Numeric value for item price (up to 5 decimals). |
10 |
|
Currency |
ISO currency code (e.g., USD, INR). |
3 |
|
Classification |
Classification code. |
18 |
|
ManufacturerPartID |
Part number assigned by the manufacturer. |
50 |
|
ManufacturerName |
Name of the manufacturer. |
60 |
|
Image |
File name of the product image. |
30 |
|
ImageURL |
URL linking to the image. |
Long |
This example illustrates the fields and character limit of the External Catalog File .csv template.

This example illustrates External Catalog .csv file with sample data.

Note: The data shown in the above illustration is for illustrative purposes only.