Defining Remote Database Connections
This section provides an overview of remote database connections and discusses how to define remote database connections.
|
Page Name |
Definition Name |
Usage |
|---|---|---|
|
REMOTEDB |
Define remote database connections. |
Data sources represent the location of the source data that is extracted, transformed, and loaded to the target. Remote data source data is extracted from a separate (remote) database and migrated into the local database. You must define remote database connections to source data from a database other than your local PeopleSoft database instance.
The Remote Database Access Management page enables you to define connectivity information for relational databases to be used for sourcing data for PeopleSoft Data Transformer. You can define connectivity information only for databases of the same type as the Target PeopleSoft database instance. For example, if the PeopleSoft database instance is Oracle, then you can define only Oracle remote connections. Remote database connections are established once for a local connect and once for each database that will be sourced. You must define one local connection for the current PeopleSoft instance. This connection is used during remote database access to retrieve information for the target database.
Note: If you are accessing data from a local database, then you do not need to set up remote database connections.
Here is a recommended procedure for setting up data transformation in an environment (be sure to replace the sample information used in this procedure with your environment and database information):
Install JDBC driver for the test database.
For SQL Server, download the appropriate JDBC driver version from the Microsoft website.
See PeopleTools Database Management, Installing and Configuring Microsoft SQL Server JDBC Driver.
Set up a local database connection (for example, H881C338).
In PIA, navigate to . Add a local database connection with sample information as follows:
Name: H881C338
Local Connect: Selected
Description: H881C338
Server: ECHAN2091903
User ID: <user ID>
Password: <password>
Save the page and click the Test Connection button to verify that the connection information entered is correct. The Good Connection message appears if the information is correct.
Set up a remote database connection (for example, HC881TM1)
Navigate to . Add a remote database connection with sample information as follows:
Name: HC881TM1
Description: HC881TM1
Server: ADDB0106
User ID: satst
Password: password
Save the page and click the Test Connection button to verify that the connection information entered is correct.
Set up data transformation installation options.
Navigate to . On the Data Transformation Installation Options page, enter the following sample information:
Maximum Rows to Preview: 10
Tablespace Name: EOECLRG
Message Set Number: 18024
Save the page.
Define subject area.
Navigate to . Add a subject area by entering the following sample information:
Subject Area: NACNV
Description/More Information: Enter some text
Default Subject Area: Selected
Create Temporary Table: Selected
Save the change.
Define source data object.
Navigate to . Add a new source data object by entering the following sample information:
Source Data Object: DEPARTMENT
Subject Area: NACNV
Description: Department
Data Source Type: Remote
Data Source Name: HC881TM1
Source Record (left field): PS_DEPT_TBL
Source Record (right field): Department Table
Navigate to the Fields page and click the Synchronize fields button. Select these fields:
SETID, DEPTID, EFFDT, EFF_STATUS, DESCR, DESCRSHORT, and COMPANY
Save the page.
Set default values for target fields.
Navigate to . Add two target fields using the following sample information:
Target Field: SETID
Source Input Value: SNSZZ
Target Field: DEPTID
Source Input Value: ABCDE
Save the change.
Define map information.
Navigate to . Add a map object using the following sample information:
Map Object: DEPT
Subject Area: NACNV
Description: Department ETL
Source: DEPARTMENT
Target: DEPT_TBL
Navigate to the Map Field Detail page and click the Apply AutoMapper button. Next, click the Source Input Type column heading twice to bring the rows with non-blank source input type to the top of the list. Change the source input type for the SETID and DEPTID target fields to Default. Change the source input type for the EFFDT target field to Source and select EFFDT as the source prompt because the Auto Field Mapper sets this to blank by default. Now there should be seven fields with non-blank source input types. Navigate to the Preview Map Results page and click the Preview button. Note that 10 rows of DEPT_TBL in HC881TM are displayed with SETID and DEPTID showing the default values set up in step 7.
Test the data transformation setup.
When testing the Data Transformer ETL, note that:
The jar files downloaded for Microsoft SQL Server in step 1 will need to be added to psprcs.cfg (process scheduler configuration file) if they were not copied into <ps_home>\class
A successful run depends on what data exists in the source table and the target table, otherwise the job may end with a duplicate error.
To verify that the ETL can correctly access the remote table data, delete all the rows in the local PS_DEPT_TBL, set the seven fields in the map to use Source as source input type and run the ETL. To do so, navigate to . Add a run control using the following sample information:
Data Transformer Object Type: Map
Map Object: DEPT
Target Load Option: Full Load
Destructive Load: Clear
Parallel Processing: Selected
Click the Run button. Two processes are executed: EOEW_ETL_EXE and EOEW_ETL_RUN.
Note that as the two processes run to Success, in Query Analyzer, the PS_DEPT_TBL row count matches that in the source table.
Note: If the data transformation process is not loading data into target tables, the problem may originate from the CLASSPATH, which was defined in your system. Also, this behavior can be caused by the process scheduler if it doesn't have the right access to the JDBC drivers.
Oracle Database Considerations
If you are using an Oracle database, you need to update the content of both psappsrv.cfg and psprcs.cfg to reflect your Oracle connectivity settings. Basically you should determine the Oracle home directory and specify it in both psappsrv.cfg and psprcs.cfg.
Before you can use remote data access with Oracle, the appropriate database connectivity software must be installed on the system where the application server or batch server is running. See the PeopleTools Certification information in My Oracle Support for the supported versions of Oracle Database connectivity software.
To connect to a remote Oracle database, you must manually edit the application server configuration file, psappsrv.cfg. If the batch server is being used, you must manually edit the batch server configuration file, psprps.cfg, as well.
See PeopleTools: Data Management, Configuring Application Servers or Process Scheduler Servers for Remote Data Access for Oracle.
From the Remote Database Connection page (), you can specify an Oracle datasource as specific or with TNSNAMES. Specific doesn't require a TNSNAMES entry, and will use the Oracle "thin" JDBC driver. If TNSNAMES is configured for the remote database, you can use the TNSNAMES style entry.
Use the Remote Database Access Management page (REMOTEDB) to define remote database connections.
Navigation:
This example illustrates the fields and controls on the Remote Database Access Management page.
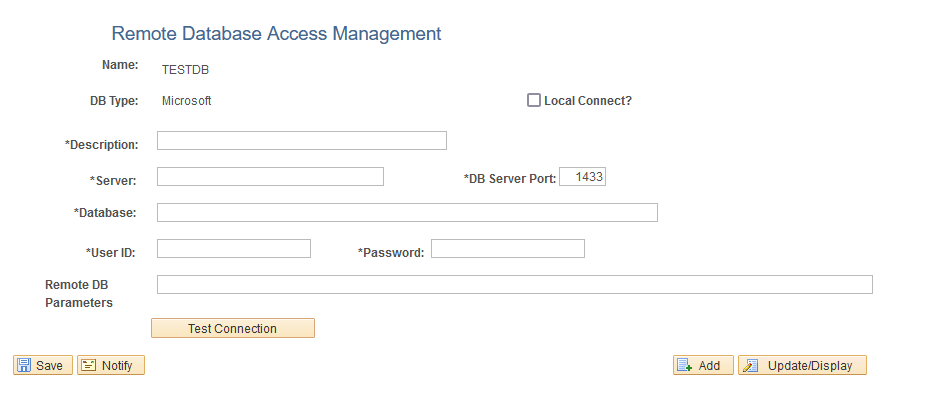
Important! Different fields may appear on the page based on the database DB type.
This table illustrates the page variance by database type:
|
Database Type |
Required Information |
|---|---|
|
Db2 z/OS |
Enter a description, server, database, userID, and password. |
|
Microsoft |
Enter a description, server, database, userID, and password. Note: If the SQL Server database is set up for encrypted connections, the Remote Database Parameters field should contain the following data: encrypt=true;trustServerCertificate=false |
|
Oracle |
For Oracle and a Connection Type of TNSNames, enter a description, TNS Entry, user ID and password. Note: TNS Names is a preconfigured file (tnsnames.ora) with previously defined database connection information. Select a connection type of Specific if you want to set up a database that does not already have a TNS Entry defined, or when you don't want to use the TNS entry. |
All fields and definitions can be found in PeopleTools documentation. See PeopleTools Data Management, Configuring Remote Data Access, Defining Remote Database Connections.