Accessing Environment Details
The Environment Details page (ECL_ENV_DET_FL) is a navigation collection that enables administrators to access more details of the environment from one location. It also enables the user to perform additional actions that can be performed on the environment such as performing applying a PeopleTools patch, viewing logs, and managing PUM connections.
Navigation:
Click the tile corresponding to an environment. Alternatively, click the Related Actions button corresponding to the environment and then select Details. The Environment Details page is displayed.
This example illustrates the fields and controls on the Environments Details Page. You can find definitions for the fields and controls later on this page.
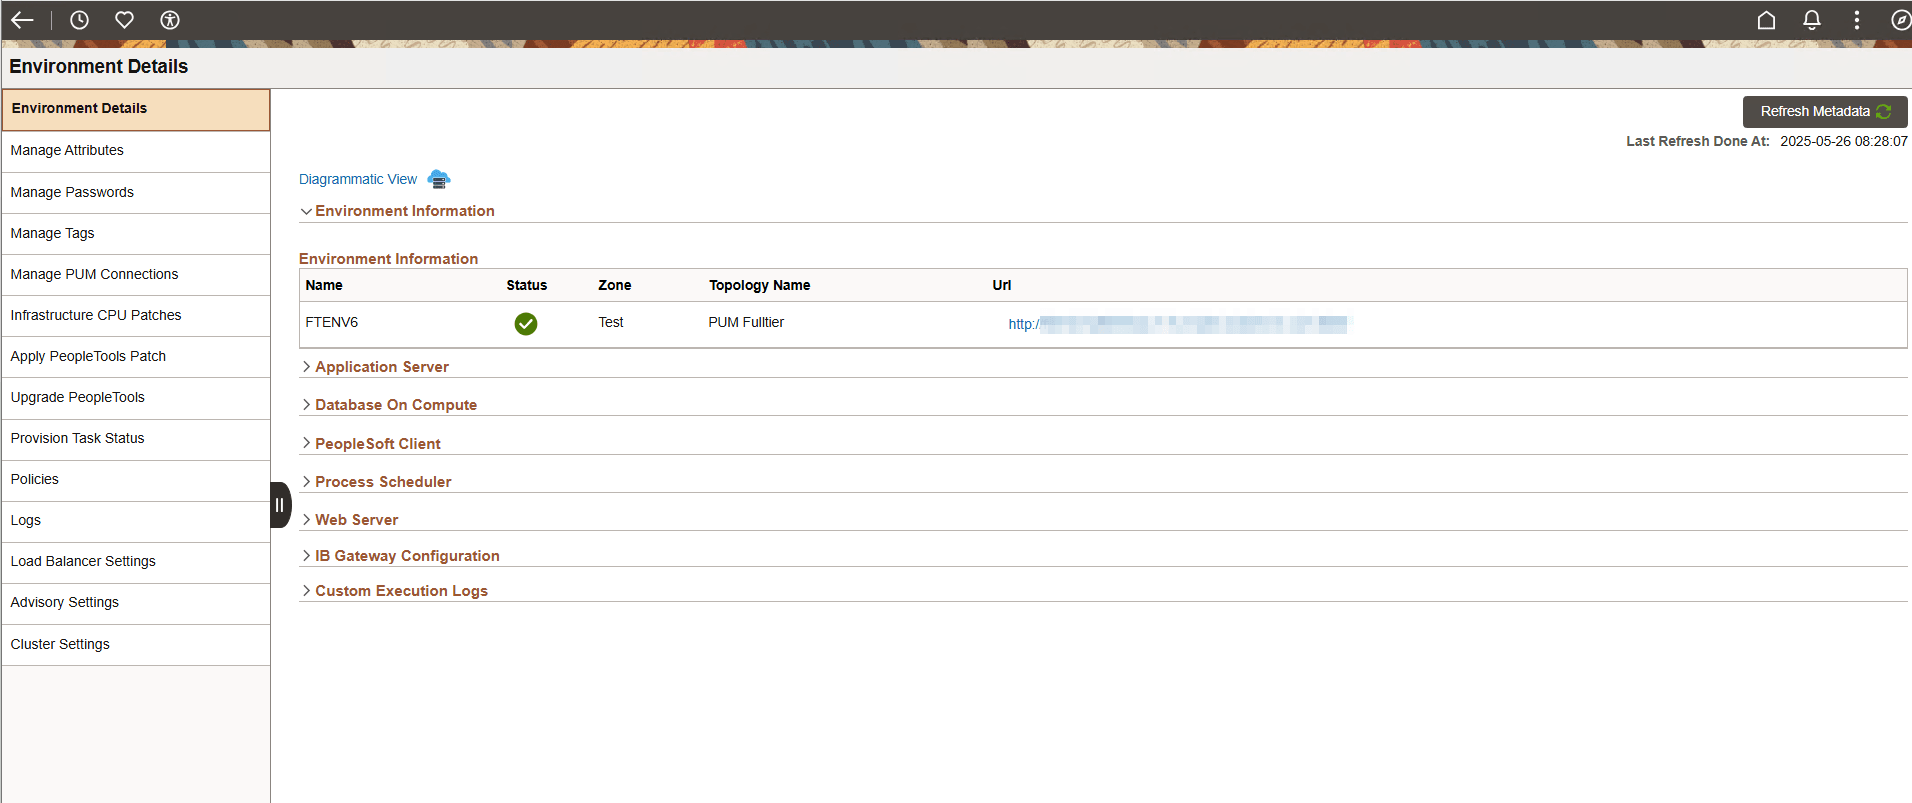
|
Field or Control |
Description |
|---|---|
|
Refresh Metadata |
Click the Refresh Metadata button, at the upper-right corner of the page, to fetch the current status of the nodes in the environment and the PeopleSoft domains within the nodes. This also updates the diagrammatic view and configured gateways for the environment. |
|
Diagrammatic View |
Click to view a diagrammatic representation of all the instances and domains running inside the VMs. |
|
Process Scheduler |
This section provides details of the process scheduler component of the deployed PeopleSoft application environment. The Process Scheduler is responsible for processing scheduled tasks or jobs that typically do not happen during the course of a user's browser request. |
|
Application Server |
This section provides details of the application server component of the deployed PeopleSoft application environment. The application server acts as the business logic engine of the PeopleSoft system. |
|
Database on: Compute |
This section provides details of the database server of the deployed PeopleSoft application environment. The PeopleSoft applications refers to Oracle PeopleSoft products such as PeopleSoft Customer Relationship Management (CRM), PeopleSoft Enterprise Learning Management (ELM), PeopleSoft Financials and Supply Chain Management (FSCM), PeopleSoft Human Capital Management (HCM), and PeopleSoft Interaction Hub. |
|
Web Server |
This section provides details of the web server component of the deployed PeopleSoft application environment. |
|
IB Gateway Configuration |
This section displays the ID and URL of existing Integration Broker gateways for the managed environment, which aid in environment discovery. |
|
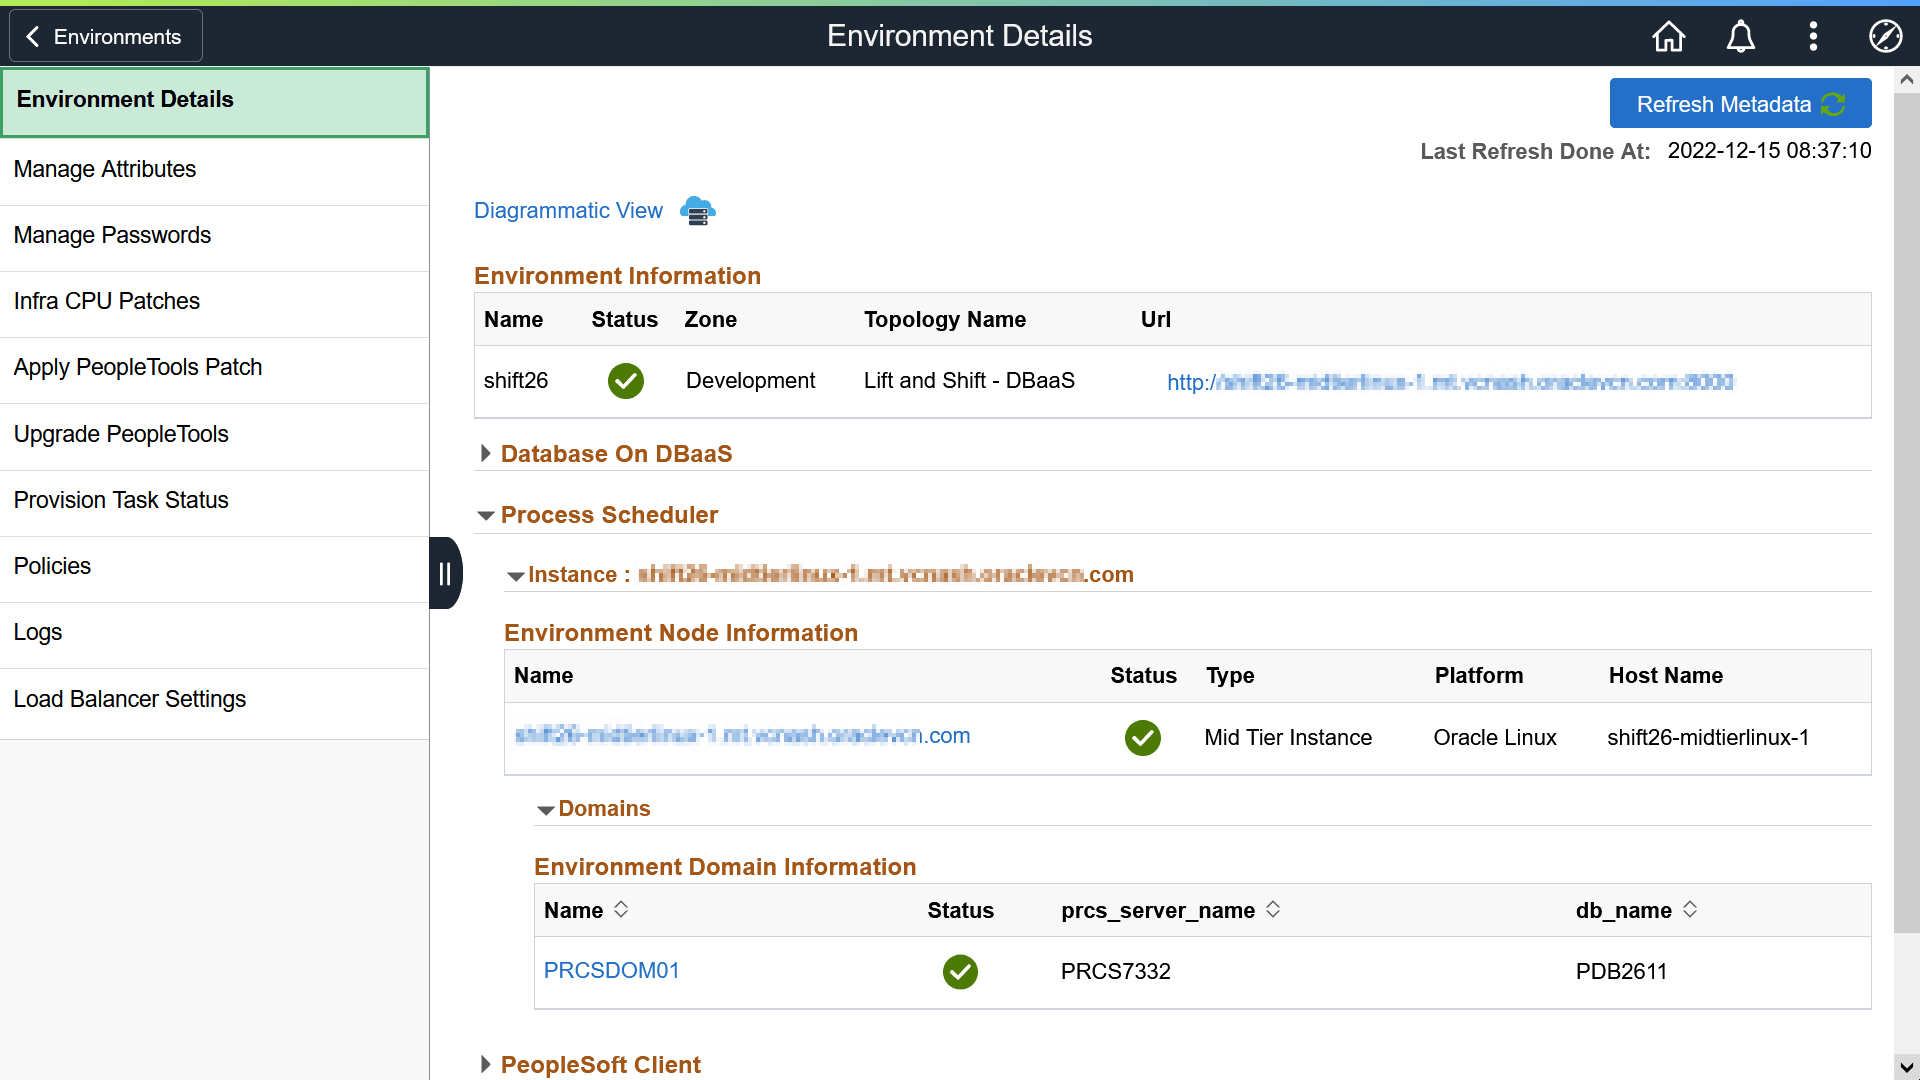
Database on: DBaaS |
This section provides details of the database server of the deployed PeopleSoft application environment. The PeopleSoft applications refers to Oracle PeopleSoft products such as PeopleSoft Customer Relationship Management (CRM), PeopleSoft Enterprise Learning Management (ELM), PeopleSoft Financials and Supply Chain Management (FSCM), PeopleSoft Human Capital Management (HCM), and PeopleSoft Interaction Hub. Note: The 'Database on: DBaaS' section is displayed only when a user selects 'Database as a Service' node in topology. |
|
PeopleSoft Client |
This section provides details of the Windows Client of the deployed PeopleSoft application environment. This is the Microsoft Windows virtual machine on which PeopleSoft Application Designer and PeopleSoft Change Assistant will be installed. |
Note: To access PSIDE (PeopleSoft Application Designer) and Change Assistant applications for this environment, connect with Remote Desktop (RDP) to the Windows VM using the IP address or hostnames provided under the PeopleSoft Client section.
This example illustrates the fields and controls on the Diagrammatic View page that can be viewed on clicking Diagrammatic View link.
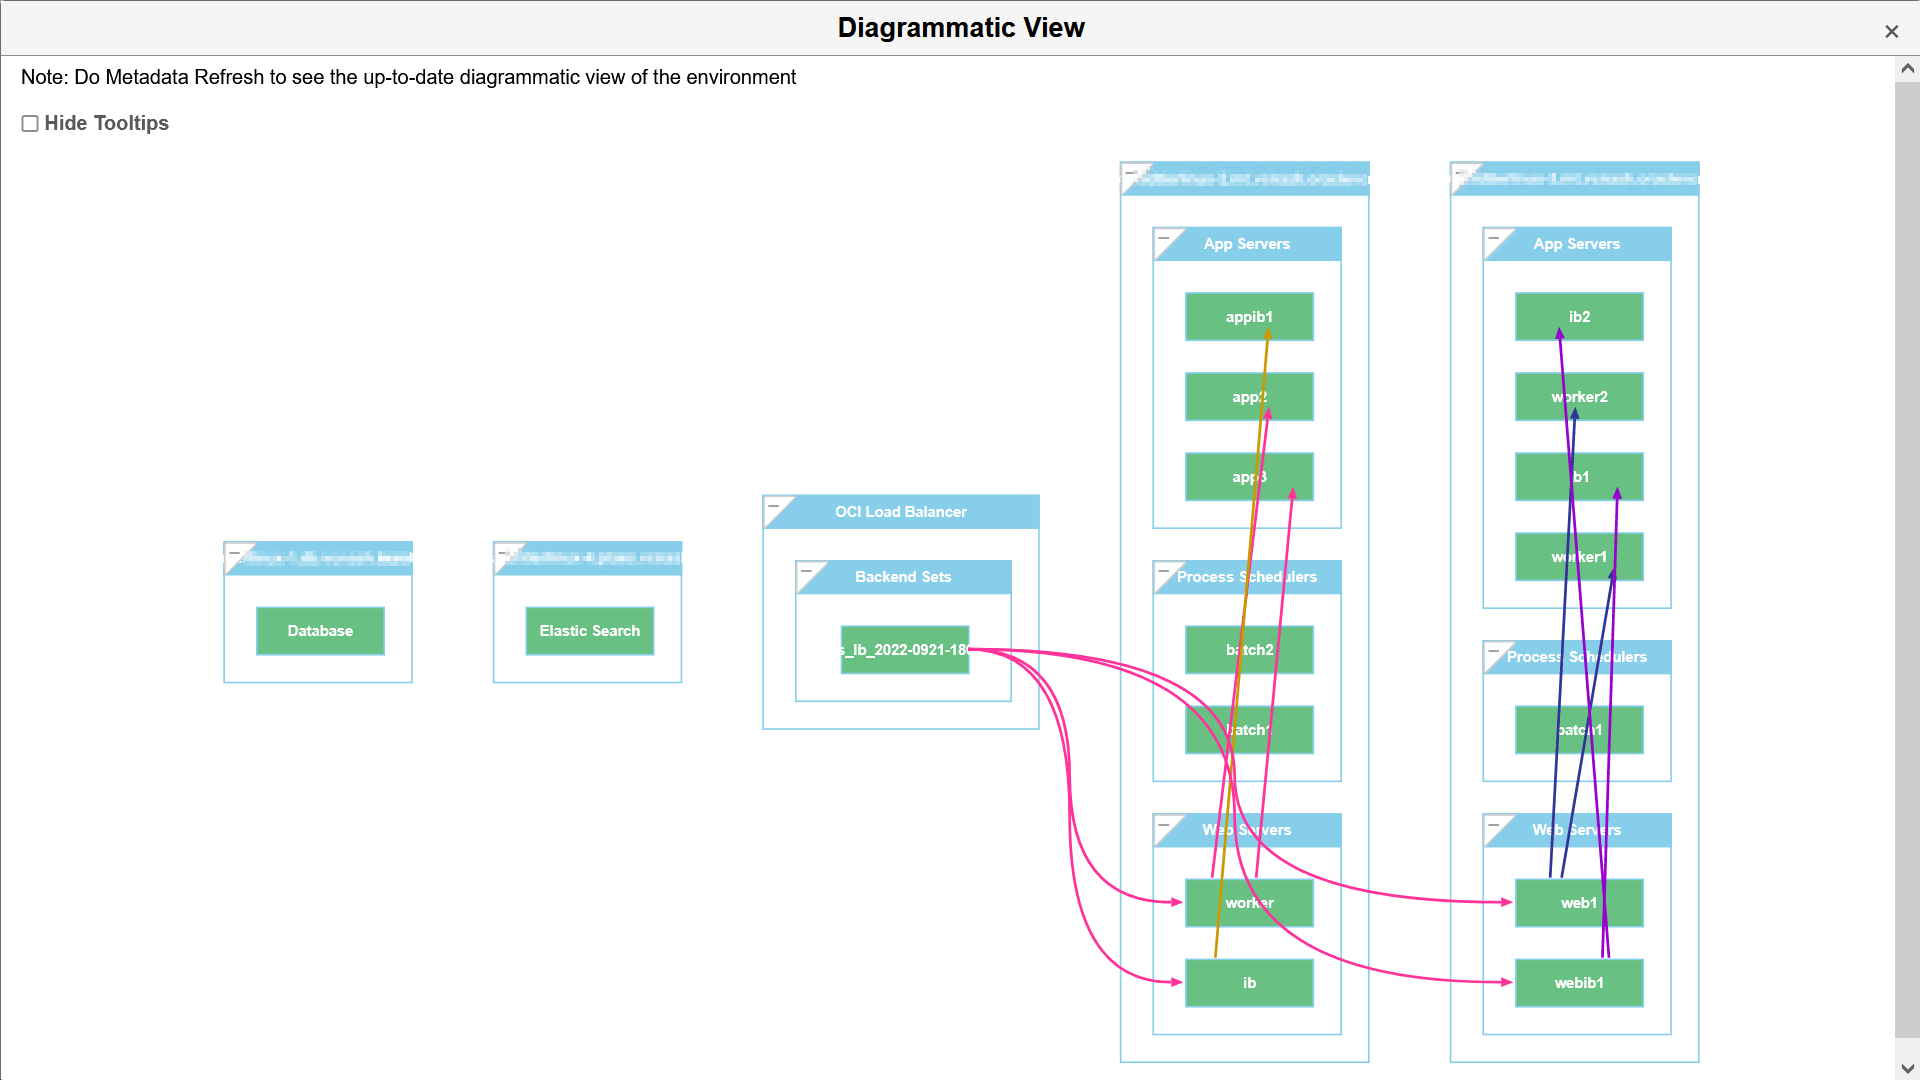
Hover the mouse over each instance for viewing the details.
You can view the status of different PeopleSoft services running within the VMs (application servers domains, process scheduler domains, web server domain, and the like) as shown:
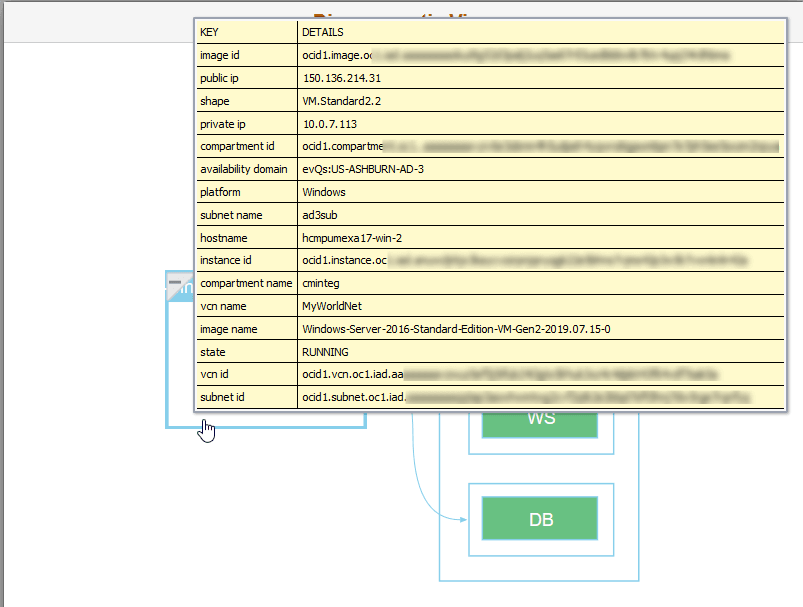
This example illustrates the fields and controls on the Diagrammatic View Instance Details page.
As an illustration, Process Scheduler domain details are described in the following section.
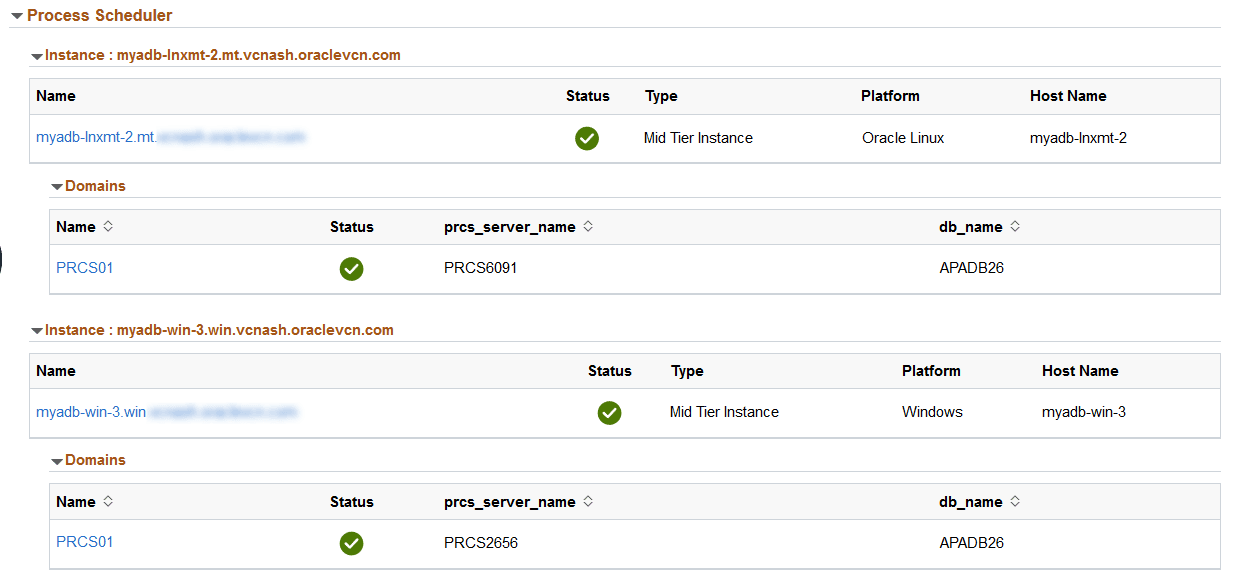
Process Scheduler Domain
This section provides details of the Process Scheduler component of the deployed PeopleSoft application environment. The Process Scheduler is responsible for processing scheduled tasks or jobs that typically do not happen during the course of a user's browser request.
Navigation:
Expand Process Scheduler available on the Environment Details page.
This example illustrates the fields and controls on the Process Scheduler section for Process Scheduler middle tier on Linux.
This is an example of where Process Scheduler was configured on a Windows instance.
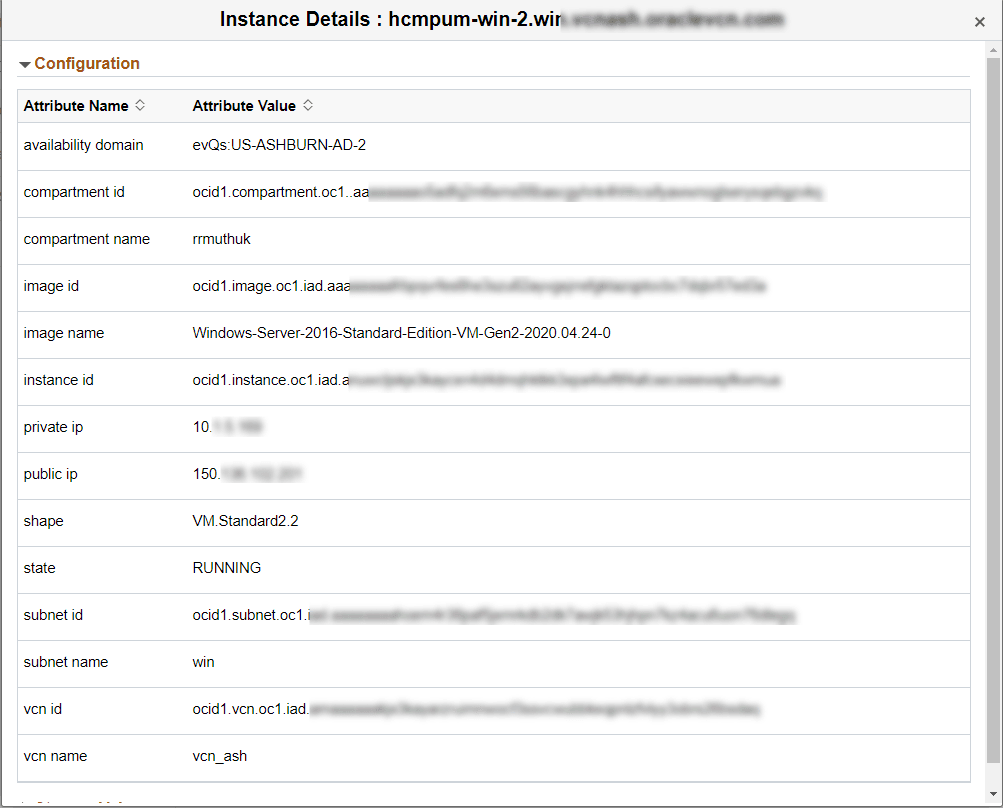
Instance Details Modal Window
Use Instance Details modal window to view more details about the virtual machine.
Navigation:
Click on the instance name.
This example illustrates the instance details for PeopleSoft Client.
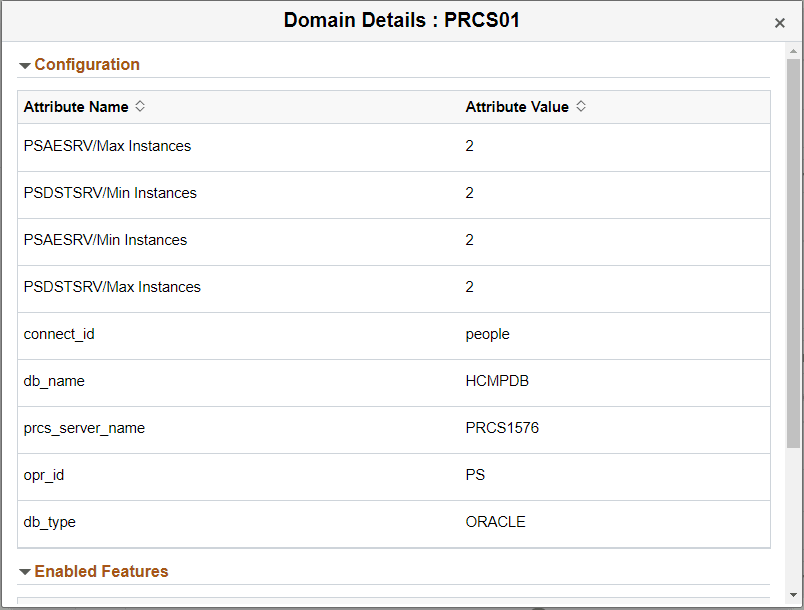
Domain Details Modal Window
Use the Domain Details modal window to view domain details.
Navigation:
Click on the domain name.
This example illustrates the configuration domain details for the Process Scheduler PRCS01.
This example illustrates the enabled features for the Process Scheduler domain PRCS01.
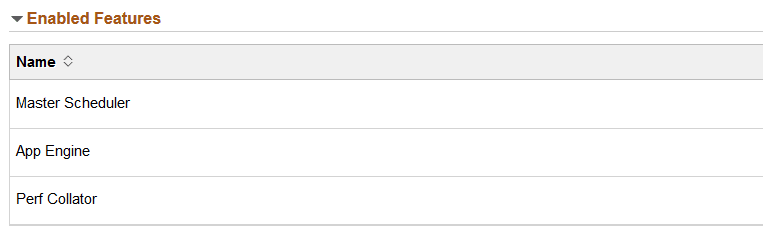
Master Scheduler, Application Engine, and Performance Monitor features can be enabled for the instance.
The IB Gateway Configuration section can be used for configuring IB gateways on managed environments.
You can use the IB Gateway Configuration section on the Environment Details page to support the following IB configurations from Cloud Manager:
Reconfiguring local IB gateway for an environment
Configuring multiple environments using a single shared gateway
Configuring remote gateway for an environment
Configuring load balancer on local gateway for an environment
Renaming IB nodes
You can utilize pre-defined policies to configure IB on an environment according to your dynamic requirements. The IB Gateway Configuration section on Environment Details page displays the existing IB gateways for a managed environment.
This example illustrates the IB Gateway Configuration section on Environment Details page.
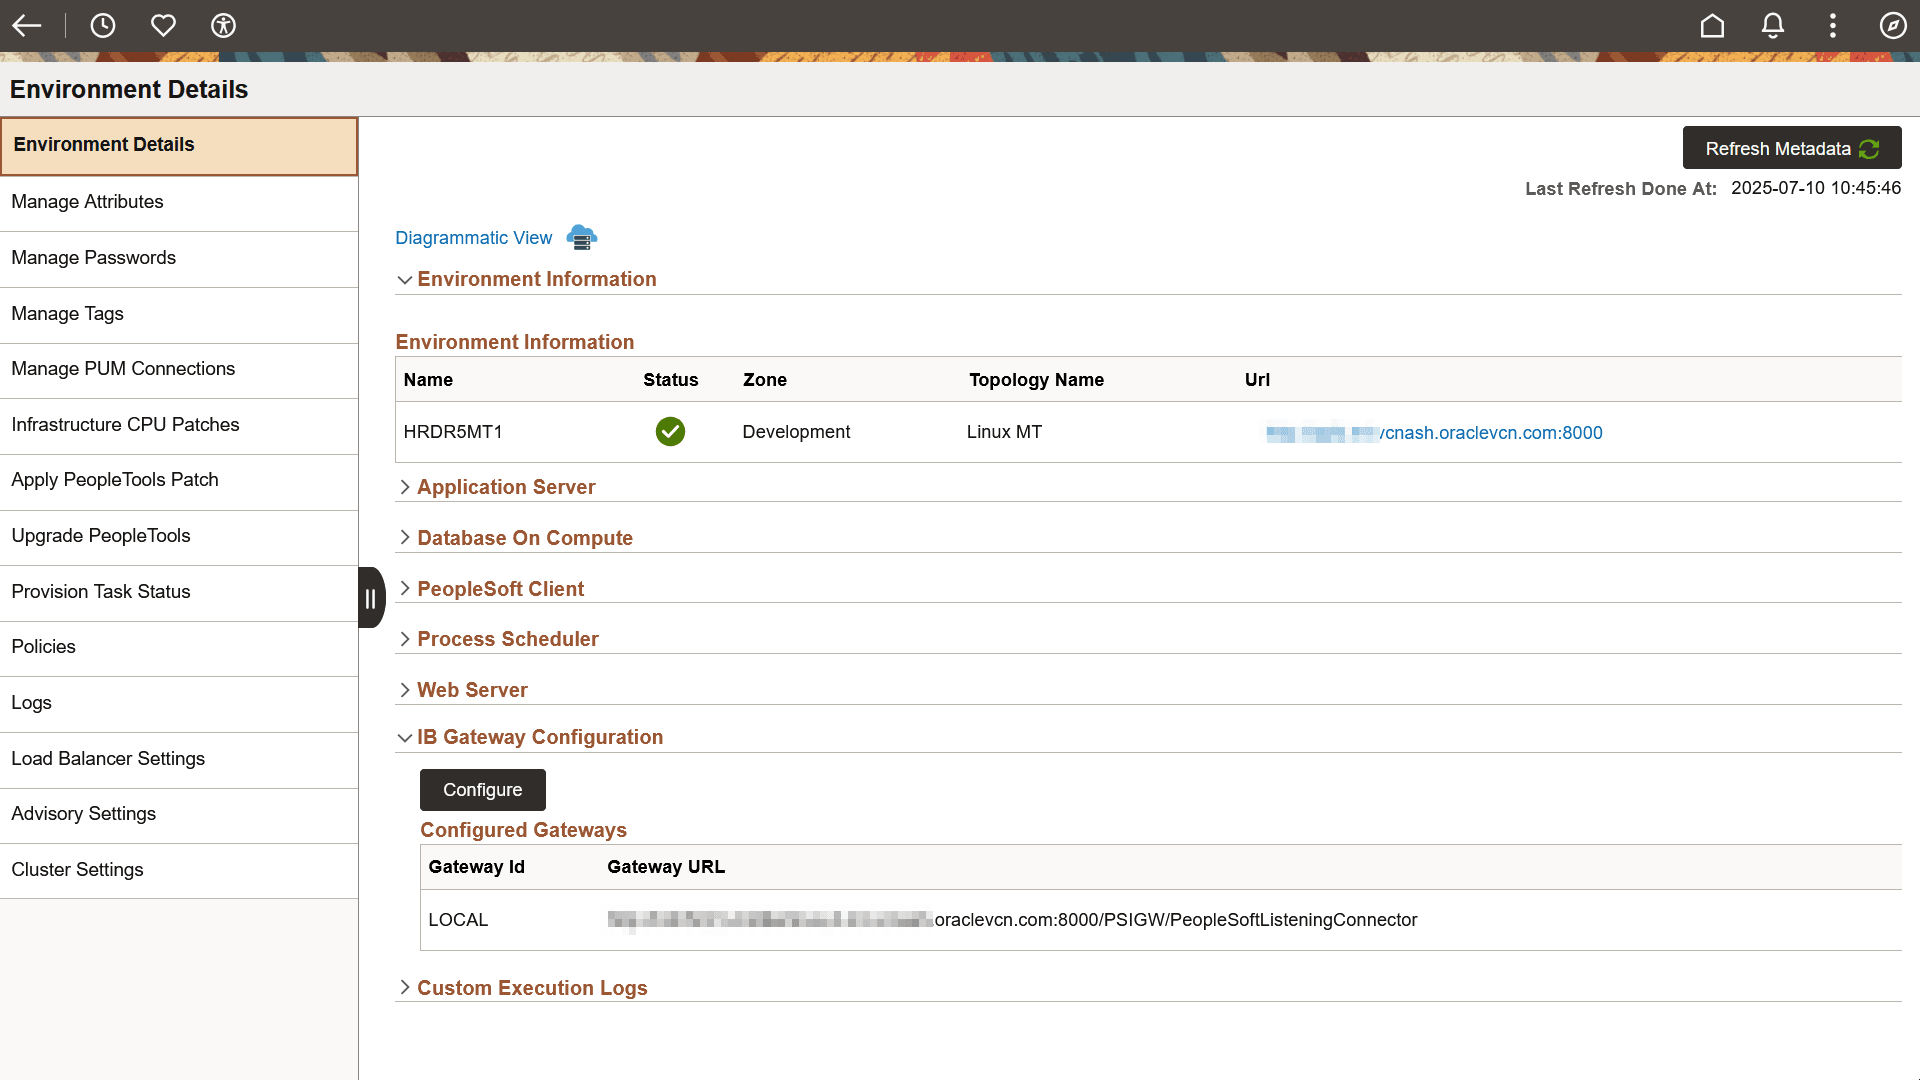
Click Configure to open the Configure IB Gateway page that lets you edit the parameters of the pre-defined internal policy action Configure IB Gateway.
Reconfiguring Local IB Gateway for Environments
To configure local IB gateway on an existing environment:
Click Configure on IB Gateway Configuration section. The IB Gateway Configuration page is displayed.
Alternatively, navigate to Orchestration Manager > Policy Editor and click the View/Edit button corresponding to Configure IB Gateway internal policy.
Click the Parameters button on Policy Action Parameters field, corresponding to the policy action Configure IB Gateway.
This example illustrates the fields on Policy Action Parameters dialog box.
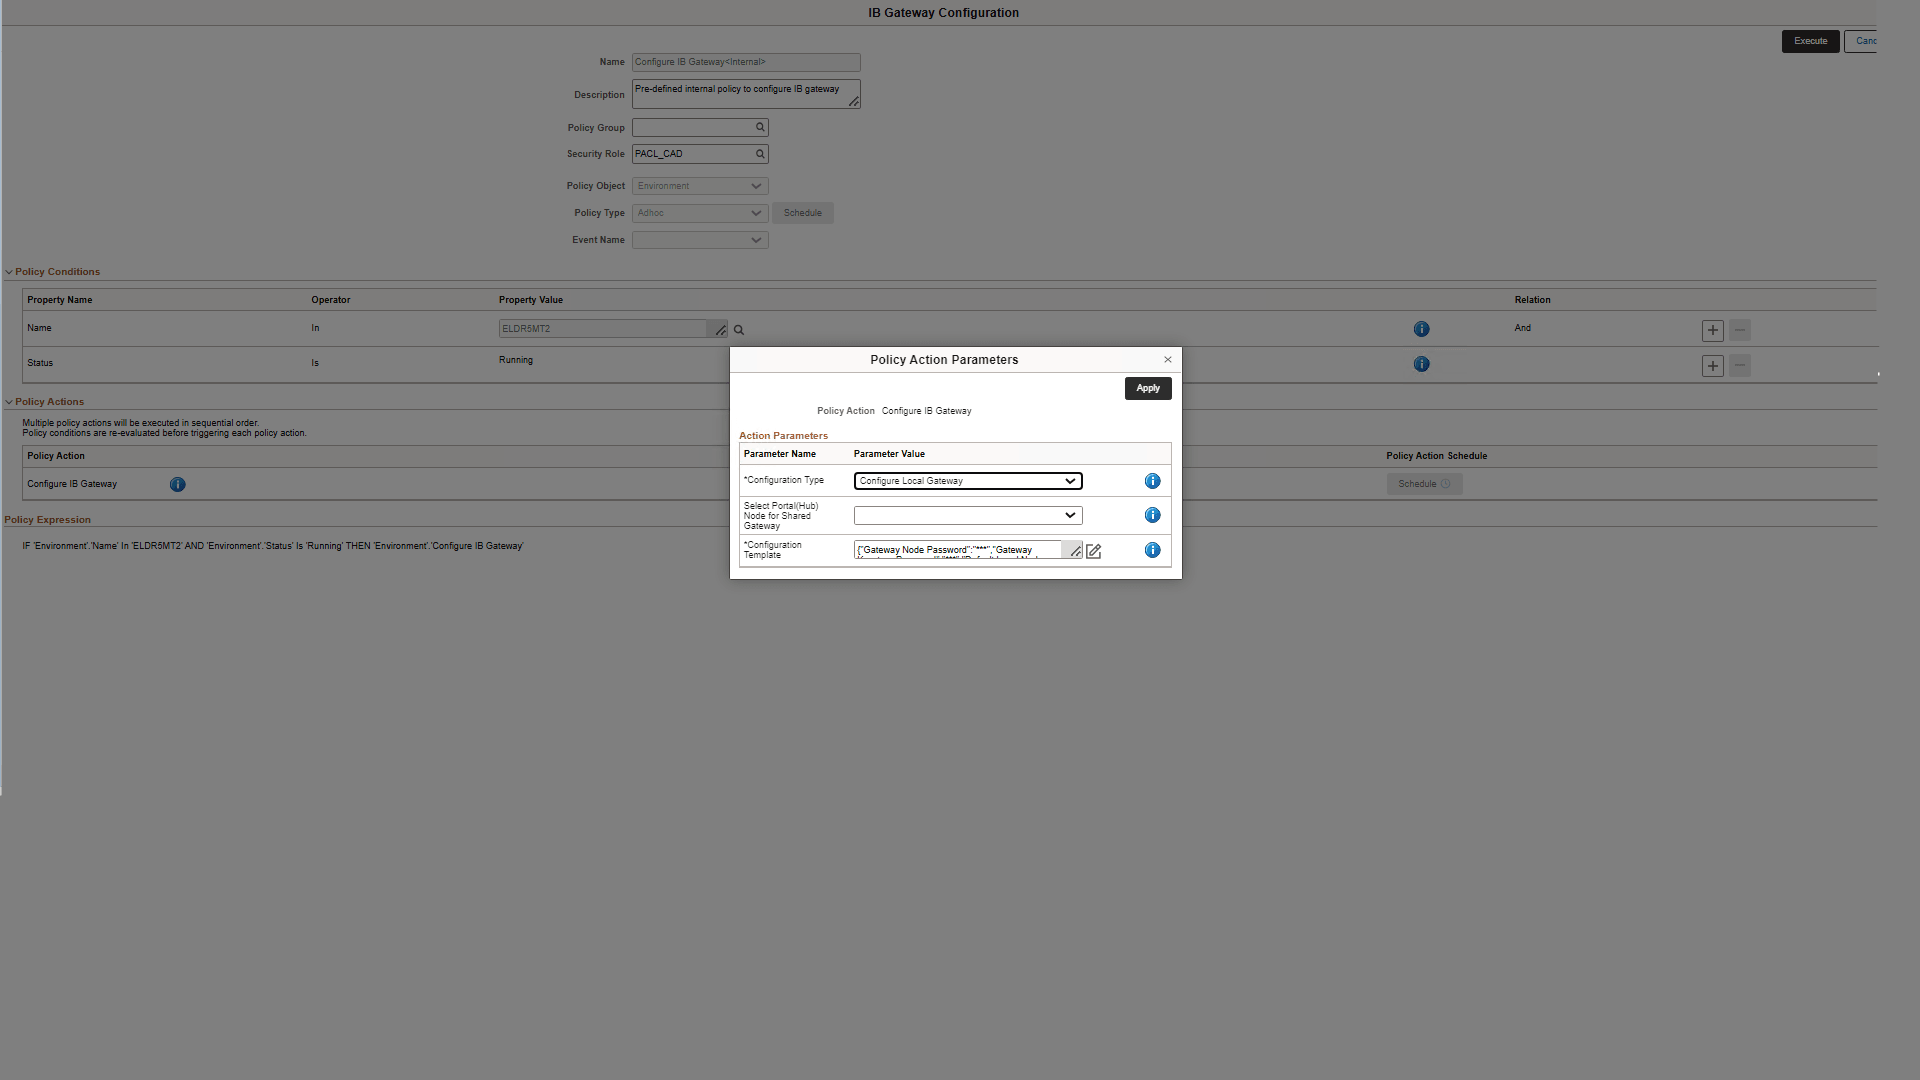
Select Configure Local Gateway as the Configuration Type. You can ignore the field for selecting portal node because it applies only for shared gateways.
Click the Activate button next to Configuration Template field, which is auto-populated when you select the configuration type. The Configuration Template page is displayed.
This example illustrates the fields on Configuration Template for Local Gateway.
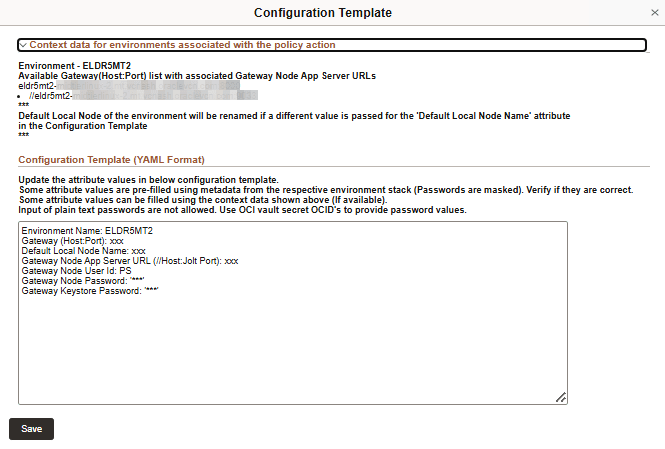
Use the attribute values provided in the Context Data section to replace the variables given in attributes in the YAML format.
Field or Control
Description
Context data for environments associated with policy action
This section provides context help for filling up the configuration template. The available environments and gateways are listed.
Configuration Template (YAML Format)
The following attribute values are listed in YAML format:
Environment Name: This value is pre-filled.
Gateway (Host:Port):Enter an available Gateway (Host:Port) from the context data section.
Default Local Node Name:Enter the name of the local node in the selected environment.
Gateway Node App Server URL:Enter an available application server URL associated with the selected web domain from the context data section.
Gateway Node User Id:The user ID associated with gateway node. This value is pre-filled.
Gateway Node Password:The password associated with gateway node. This value is pre-filled.
Gateway Keystore Password:This value is pre-filled for new environments provisioned through Cloud Manager. Enter the OCID vault secret if the value is not pre-filled. Plain text passwords do not work in this field.
Click Save.
Click Apply. The policy action parameters are validated.
Click Execute on the IB Gateway Configuration page. A confirmation message is displayed. When you confirm, Cloud Manager runs the policy and the Policy Monitor page is displayed. When you run the policy from the Policy Editor page in Orchestration Manager, click the Run Policy button corresponding to the Configure IB Gateway policy to run the policy.
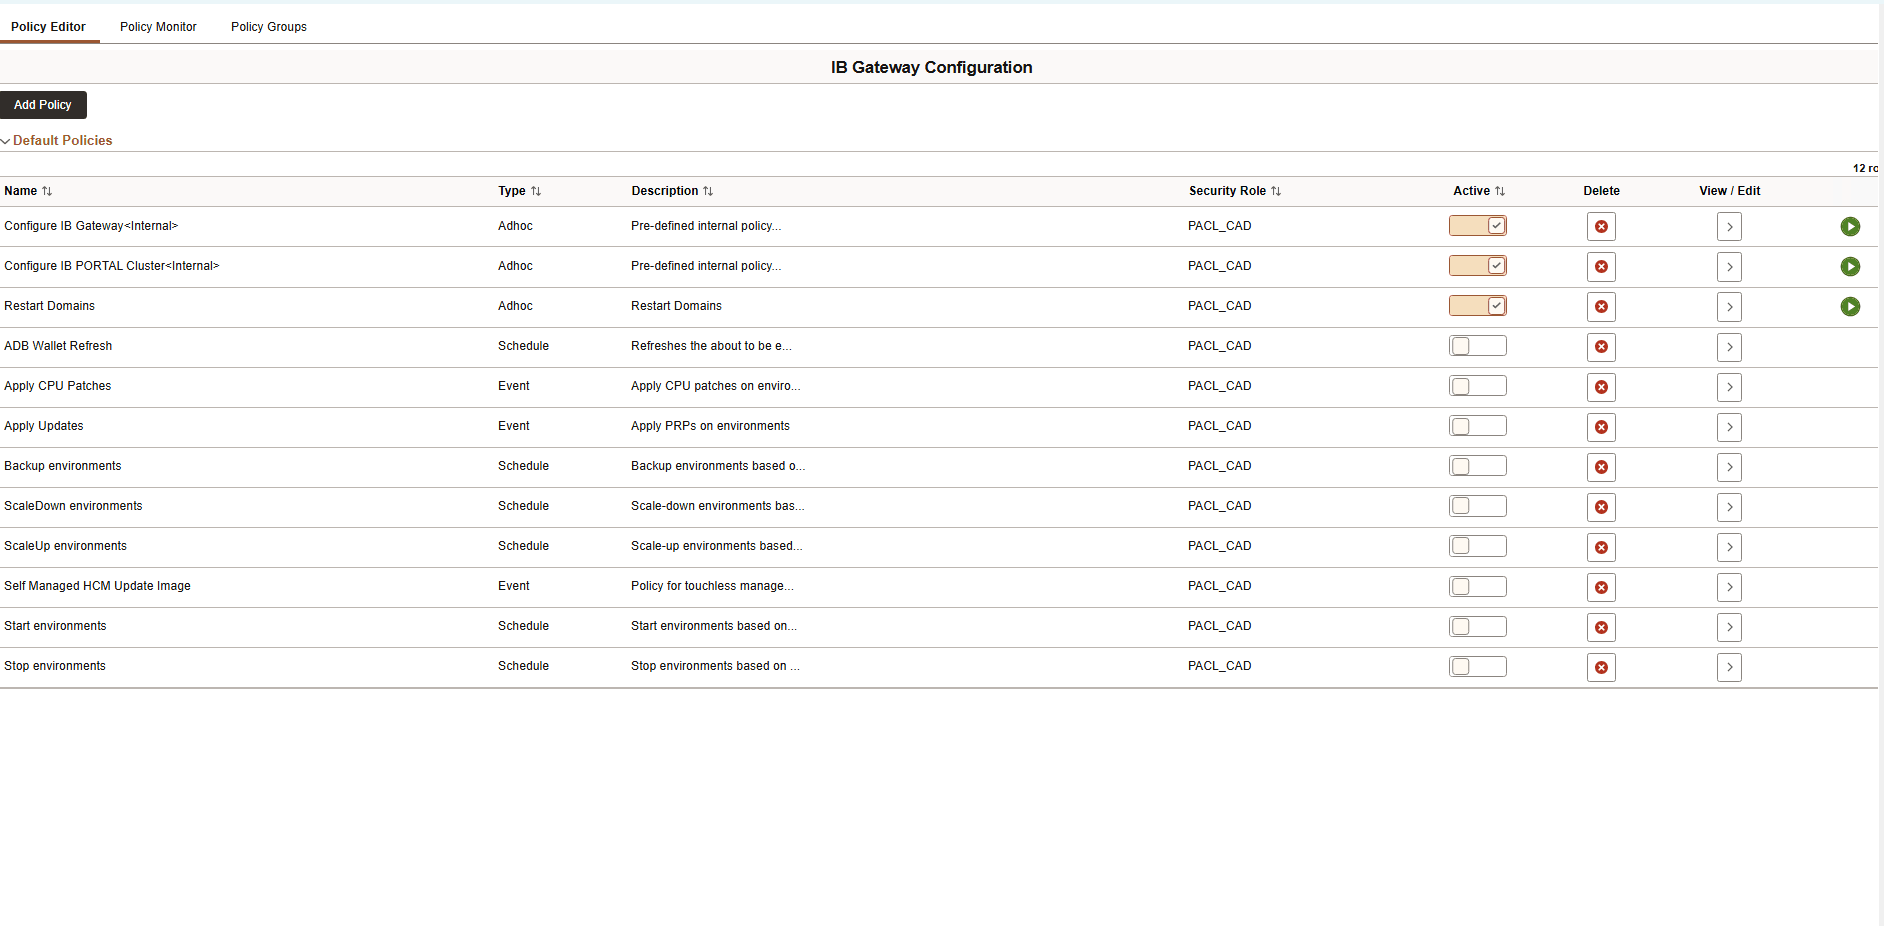
This example illustrates the fields on Policy Editor page.
You can also configure the local IB gateway for a newly created environment while selecting the required configuration for an environment or node using Domain Connections while provisioning an environment with multiple middle tier nodes or while adding a new node.
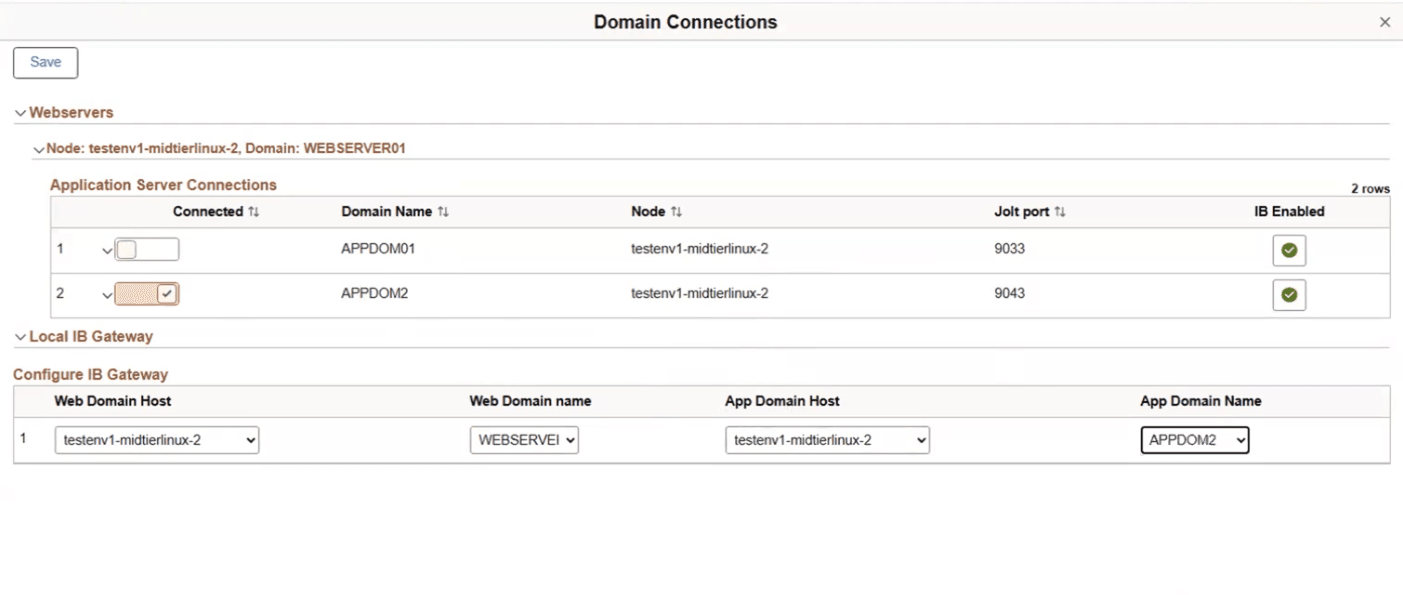
Configure connections between application server domains and web server domains using Domain Connections page.
This example illustrates the fields and controls on the Domain Connections page.
|
Field or Control |
Description |
|---|---|
|
Web Domain Host |
Select one of the available middle tier nodes, which is IB enabled. |
|
Web Domain Name |
Select the name of the web server associated with the web domain host. |
|
App Domain Host |
Select the app server node that is connected to the selected web server. |
|
App Domain Name |
Select the domain that you want the web domain to be connect with. |
Renaming IB Nodes
You can use the IB Gateway Configuration page to rename the IB nodes before you refresh the existing IB node definitions.
To rename an IB node on an existing gateway:
Click Configure on IB Gateway Configuration section. The IB Gateway Configuration page is displayed.
Alternatively, navigate to Orchestration Manager > Policy Editor and click the View/Edit button corresponding to Configure IB policy.
Click the Parameters button on Policy Action Parameters field, corresponding to the policy action Configure IB Gateway.
Select Rename Node as the Configuration Type. You can ignore the field for selecting portal node.
Click the Activate button next to Configuration Template field, which is auto-populated when you select the configuration type. The Configuration Template page is displayed.
This example illustrates the fields on Configuration Template for Rename Node Configuration Type.
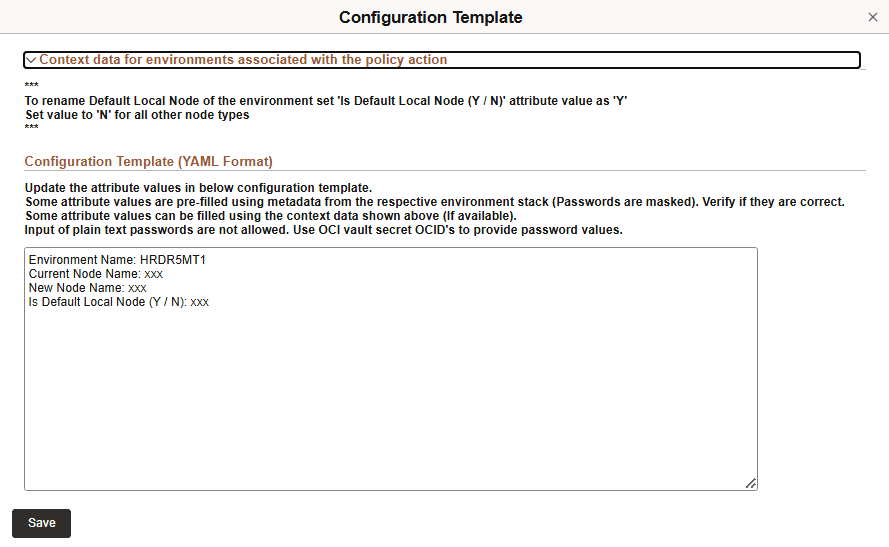
Use the attribute values provided in the Context Data section to replace the variables given in attributes in the YAML format.
Field or Control
Description
Context data for environments associated with policy action
This section provides context help for filling up the configuration template. The available environments and gateways are listed.
Configuration Template (YAML Format)
The following attribute values are listed in YAML format:
Environment Name: This value is pre-filled.
Current Node Name:Enter the name of the node you want to rename.
New Node Name:Enter the new name of the node.
Is Default Local Node (Y/N):Enter 'Y' if you want to rename the default local node associated with the selected environment. Enter 'N' if you want to rename any other node.
Click Save.
Click Apply. The policy action parameters are validated.
Click Execute on the IB Gateway Configuration page. The policy to rename an IB node on an existing gateway is triggered.
Configuring Shared Gateway
You can use the IB Gateway Configuration page to configure a setup where multiple PeopleSoft applications share the same local IB gateway.
The following are the prerequisites for configuring environments with a shared gateway:
The shared gateway node must be at the same or higher release of PeopleTools.This restriction is not applicable for content nodes.
The environments must not be separated through firewalls.
All the environments with a shared gateway must be in Running state.
To configure a shared gateway:
Click Configure on IB Gateway Configuration section. The IB Gateway Configuration page is displayed.
Alternatively, navigate to Orchestration Manager > Policy Editor and click the View/Edit button corresponding to Configure IB policy.
Click the search icon next to the default environment name that is displayed in the Policy Conditions section and associate all the environments for the shared cluster to the policy definition.
Click the Parameters button on Policy Action Parameters field, corresponding to the policy action Configure IB Gateway.
Select Configure Shared Gateway as the Configuration Type.
Select the gateway environment as the Portal (Hub) node for Shared Gateway.
Click the Activate button next to Configuration Template field, which is auto-populated when you select the configuration type. The Configuration Template page is displayed.
This example illustrates the fields on Configuration Template for Shared Gateway.
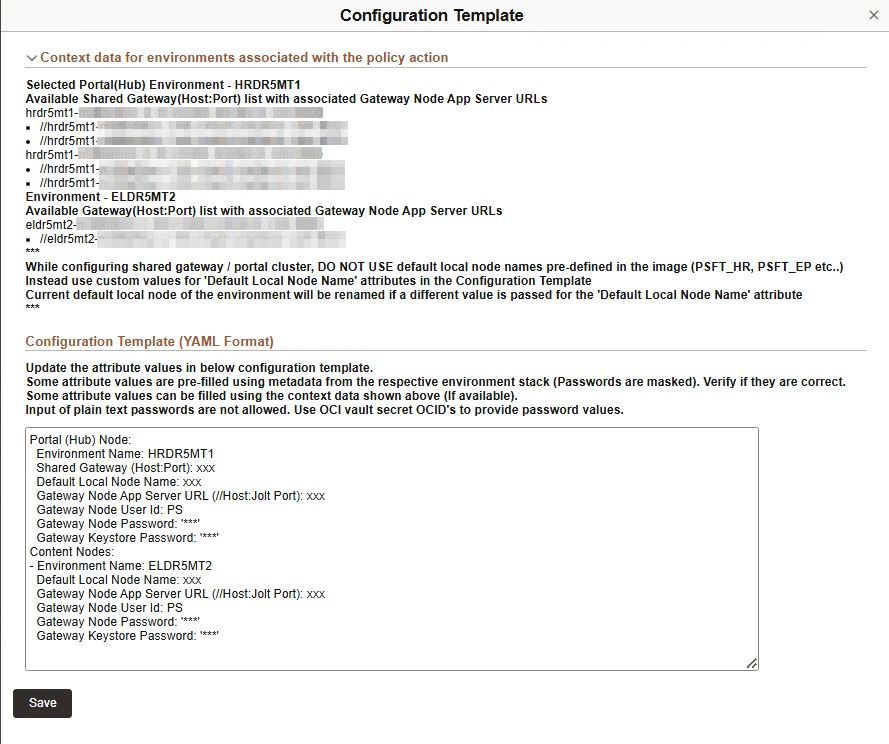
Use the attribute values provided in the Context Data section to replace the variables given in attributes in the YAML format.
Field or Control
Description
Context data for environments associated with policy action
This section provides context help for filling up the configuration template. The available environments and gateways are listed. There must be at least two environments listed here.
Configuration Template (YAML Format)
The attributes for portal and content nodes are listed separately.
The following attribute values are listed in YAML format:
Environment Name: This value is pre-filled.
Gateway (Host:Port):Enter an available gateway (host:port) from the context data section.
Default Local Node Name:Enter the name of the local node in the selected environment.
Gateway Node App Server URL:Enter an application server URL associated with the selected gateway from the context data section.
Gateway Node User Id:The user ID associated with gateway node. This value is pre-filled.
Gateway Node Password:The password associated with gateway node. This value is pre-filled.
Gateway Keystore Password: This value is pre-filled for new environments provisioned through Cloud Manager. Enter the OCID vault secret if the value is not pre-filled. Plain text passwords do not work in this field.
Click Save.
Click Apply. The policy action parameters are validated.
Click Execute on the IB Gateway Configuration page. The policy to configure a shared gateway is triggered.
Configuring Remote Gateway
Remote gateways enable two-way communication between integration participants where the local gateway for one application serves as the remote gateway for the other application. You can configure a remote gateway when a direct connection between integration participants is not possible through the internet. IB uses the default remote gateway connector (PeopleSoft Listening connector) on the local gateway to send messages to the PeopleSoft listening connector on the remote gateway.
Note: Both the environments must be in Running state for configuring the remote gateway.
To configure a remote gateway:
Click Configure on IB Gateway Configuration section. The IB Gateway Configuration page is displayed.
Alternatively, navigate to Orchestration Manager > Policy Editor and click the View/Edit button corresponding to Configure IB policy.
Click the search icon next to the default environment name that is displayed in the Policy Conditions section and associate both the environments participating in the remote gateway with the policy definition.
Click the Parameters button on Policy Action Parameters field, corresponding to the policy action Configure IB Gateway.
Select Configure Remote Gateway as the Configuration Type.
Click the Activate button next to Configuration Template field, which is auto-populated when you select the configuration type. The Configuration Template page is displayed.
This example illustrates the fields on Configuration Template for Remote Gateway.

Use the attribute values provided in the Context Data section to replace the variables given in attributes in the YAML format.
Field or Control
Description
Context data for environments associated with policy action
This section provides context help for filling up the configuration template. The available environments and gateways are listed. There must be at least two participating environments listed for remote gateways.
Configuration Template (YAML Format)
The attributes for both the environments participating in the remote gateway are listed separately.
The following attribute values are listed in YAML format:
Environment Name: This value is pre-filled.
Remote Gateway Id:The user ID associated with remote gateway node. This value is pre-filled.
Remote Gateway (Host:Port): Enter an available gateway (host:port) from the context data section.
Remote Node Name (Default Local Node of Remote Env):Enter the name of the local node in the selected environment.
Remote Node App Server URL (//host name:jolt name): Enter an application server URL associated with the selected gateway from the context data section.
Remote Node User Id:The user ID associated with remote node. This value is pre-filled.
Remote Node Password:The password associated with remote node. This value is pre-filled.
Remote Gateway Keystore Password:This value is pre-filled for new environments provisioned through Cloud Manager. Enter the OCID vault secret if the value is not pre-filled. Plain text passwords do not work in this field.
Click Save.
Click Apply. The policy action parameters are validated.
Click Execute on the IB Gateway Configuration page. The policy to configure a remote gateway is triggered.
Configuring Load Balancer on Local Gateway
You can configure a Load Balancer(LB) as the local IB gateway URL for inbound calls to an environment by specifying an LB URL and then defining and configuring one or more physical gateways. Inbound calls that are made on the LB are delegated to one of the configured physical gateways.
To configure a load balancer on local gateway:
Click Configure on IB Gateway Configuration section. The IB Gateway Configuration page is displayed.
Alternatively, navigate to Orchestration Manager > Policy Editor and click the View/Edit button corresponding to Configure IB policy.
Ensure that the Environment Name field displays the environment where LB URL must be configured on the local IB gateway.
Click the Parameters button on Policy Action Parameters field, corresponding to the policy action Configure IB Gateway.
Select Configure Load Balancer as the Configuration Type.
Click the Activate button next to Configuration Template field, which is auto-populated when you select the configuration type. The Configuration Template page is displayed.
This example illustrates the fields on Configuration Template for Load Balancer.

Use the attribute values provided in the Context Data section to replace the variables given in attributes in the YAML format.
Field or Control
Description
Context data for environments associated with policy action
This section provides context help for filling up the configuration template. The available environments and gateways are listed.
Configuration Template (YAML Format)
The following attribute values are listed in YAML format:
Environment Name: This value is pre-filled.
Gateway Load Balancer URL (Host:Port):Enter a web domain that is displayed in the context data section.
Physical Gateway (Host:Port):Enter the name of a local node in the selected environment.
Physical Gateway NodeEnter an application server URL associated with the selected web domain.
Physical Gateway Node App Server URL (//Host: Jolt Port):The user ID associated with gateway node. This value is pre-filled.
Physical Gateway Node User Id:The user ID associated with physical gateway node. This value is pre-filled. The password associated with gateway node. This value is pre-filled.
Physical Gateway Node Password:The password associated with physical gateway node. This value is pre-filled.
Click Save.
Click Apply. The policy action parameters are validated.
Click Execute on the IB Gateway Configuration page. The policy to configure load balancer is triggered.