Configuring Sparse Hierarchy Details
Use the Sparse Hierarchy Details page (ECL_EXA_SPARSE_FL) to create test masters and manage their sparse clones using Cloud Manager.
Navigation:
Click the Sparse Hierarchy Details link available on the left panel of the Environment Details page. The Sparse Hierarchy Details page is displayed on the right panel.
Cloud Manager enables you to create and manage test masters and create environments with sparse cloned databases for Exadata Database systems. Sparse clones can only be performed on Test masters created in Exadata snapshot enabled clusters. Exadata Sparse Clone is a native feature of Exadata that enables the creation of thinly provisioned databases for non-production purposes like development and testing. All read operations to a sparse cloned database points to the parent database’s disk block, until a disk block is created in the sparse cloned database itself with a write operation. Sparse clones are quicker to create than full copies of databases and need much less storage because they track only the changes in data.
This example illustrates the high level architecture of sparse cloning process.
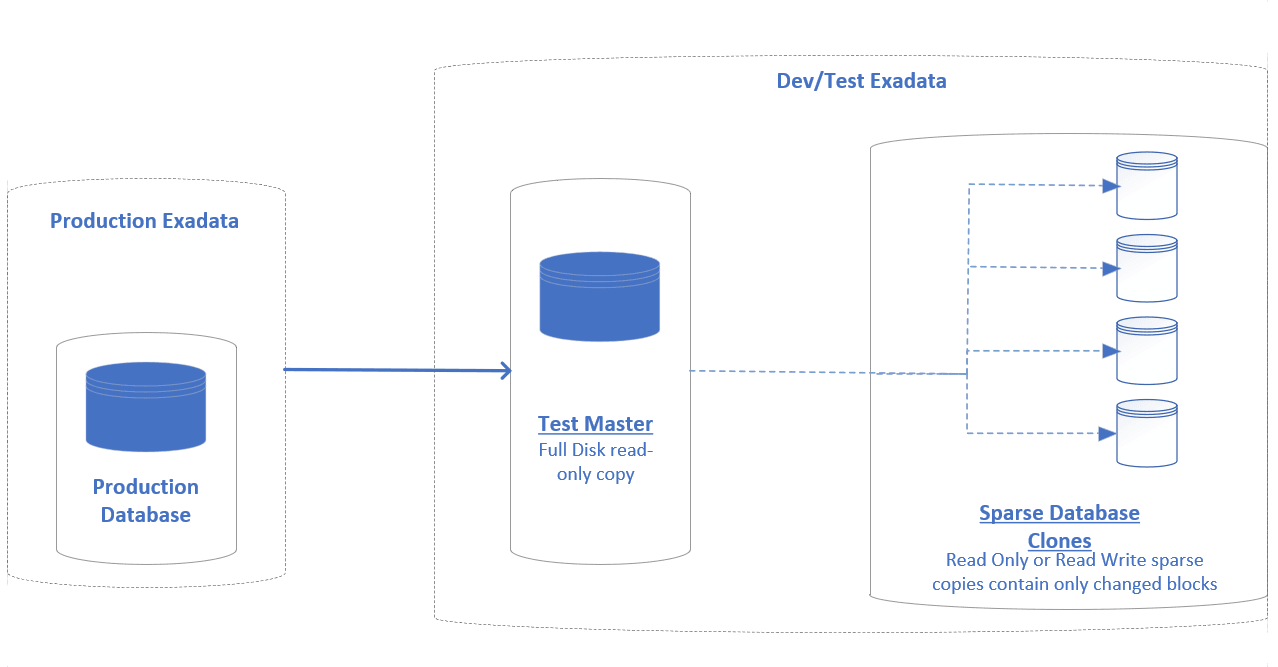
Before creating sparse clones, you must create a full disk clone of the environment from Exadata production database. Such a full read-only copy of the database is called a test master. Although the creation of a test master takes time, you can quickly create multiple space efficient development or test databases using sparse clones.
To create a test master:
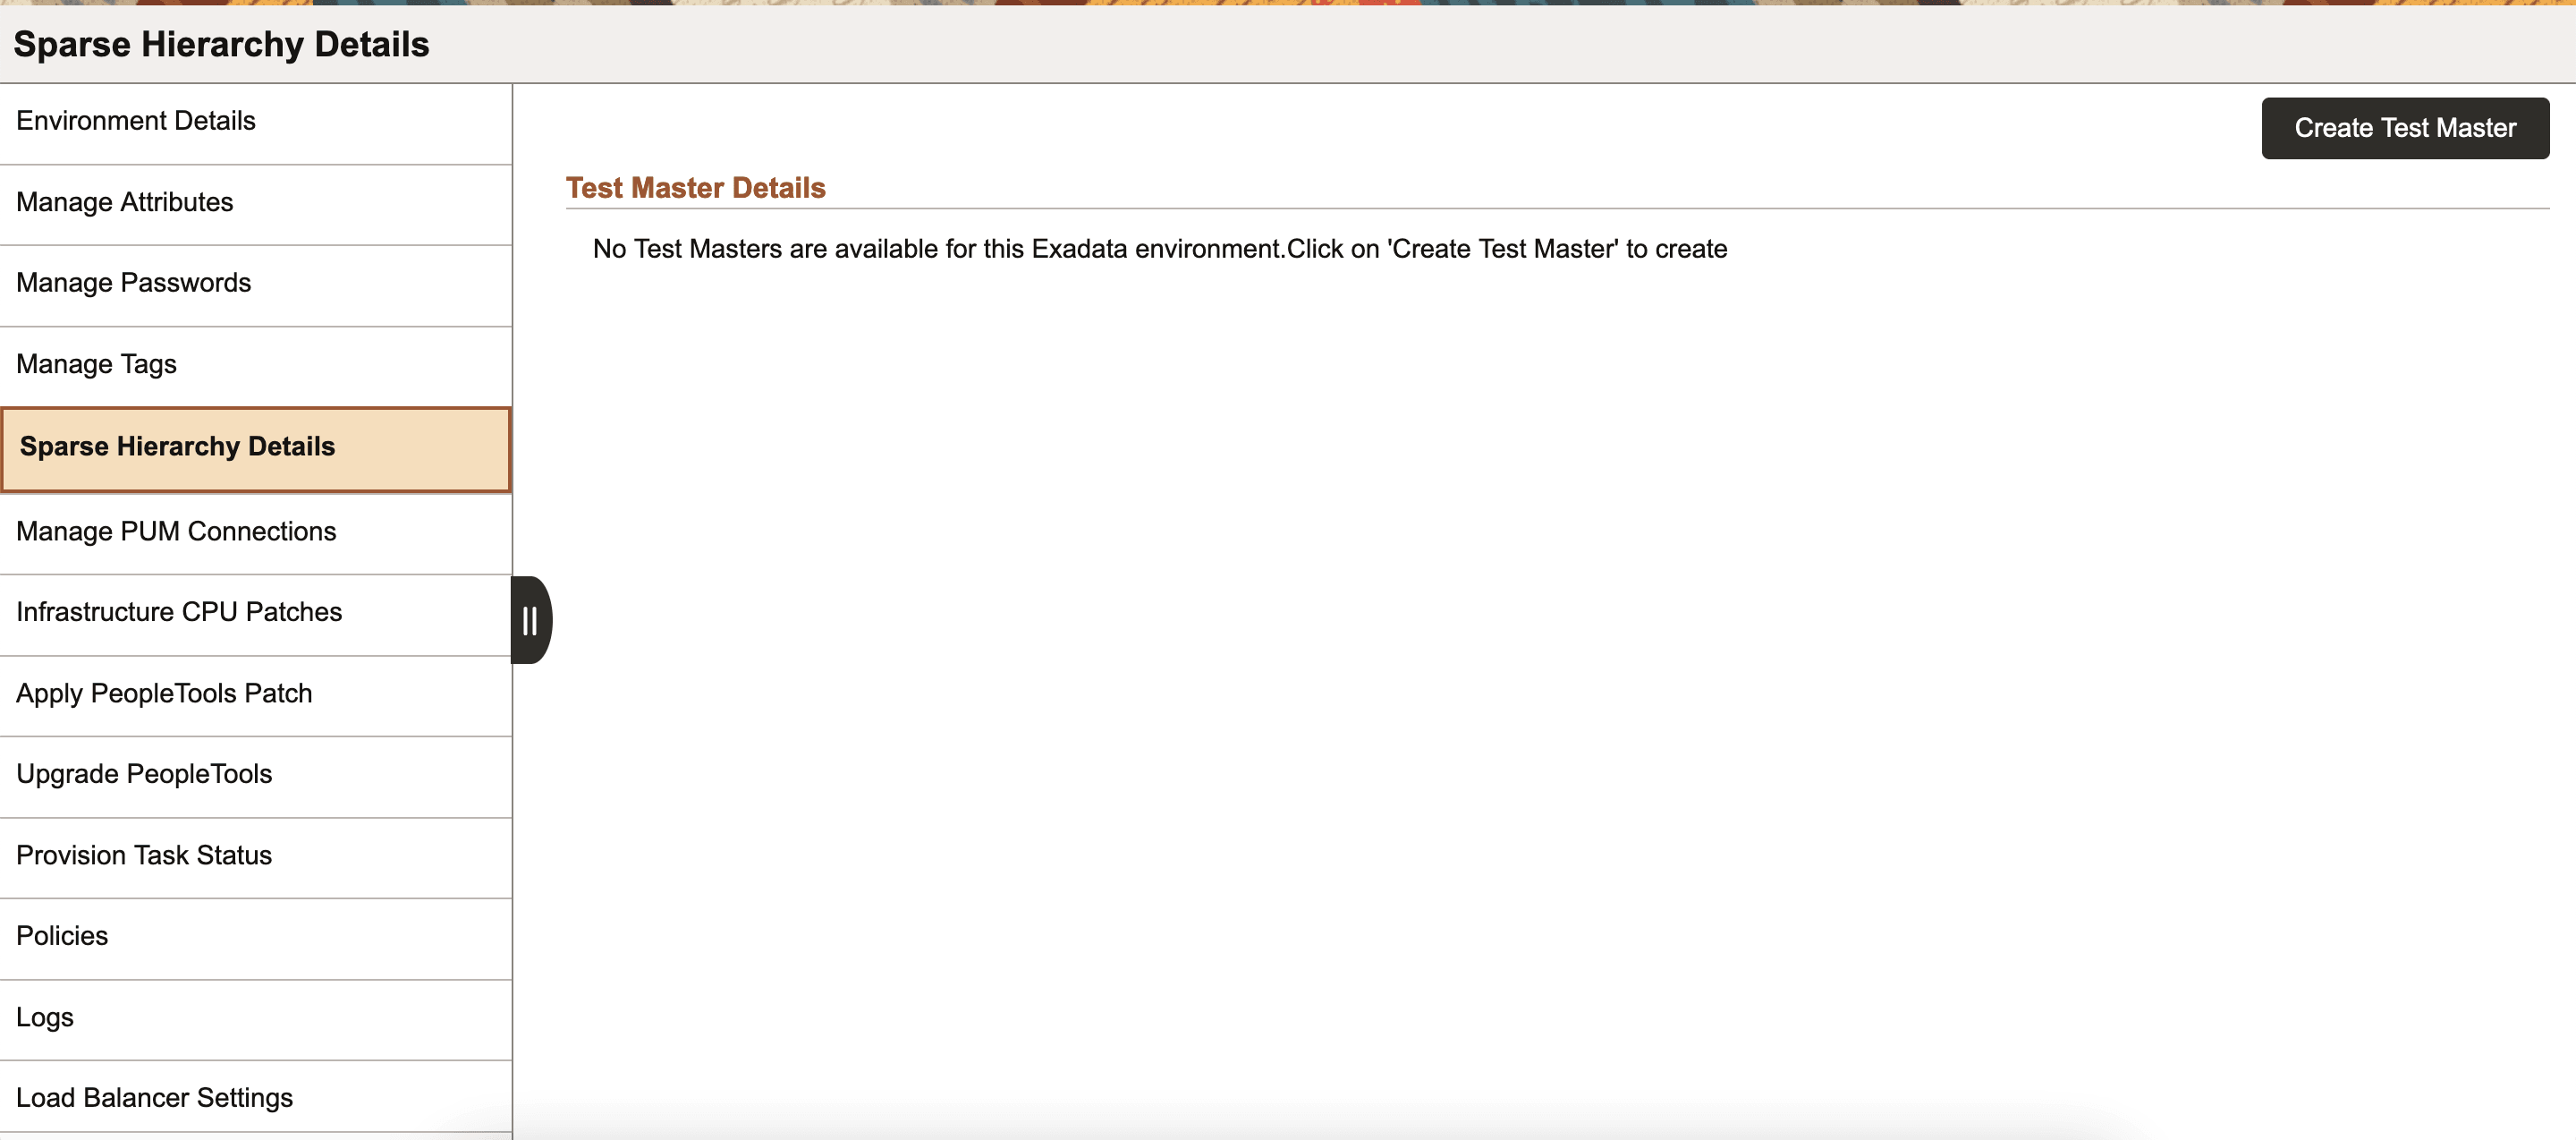
Click the Create Test Master button. The Create New Test Master page appears.
This example illustrates the Create Test Master button on Sparse Hierarchy Details page.
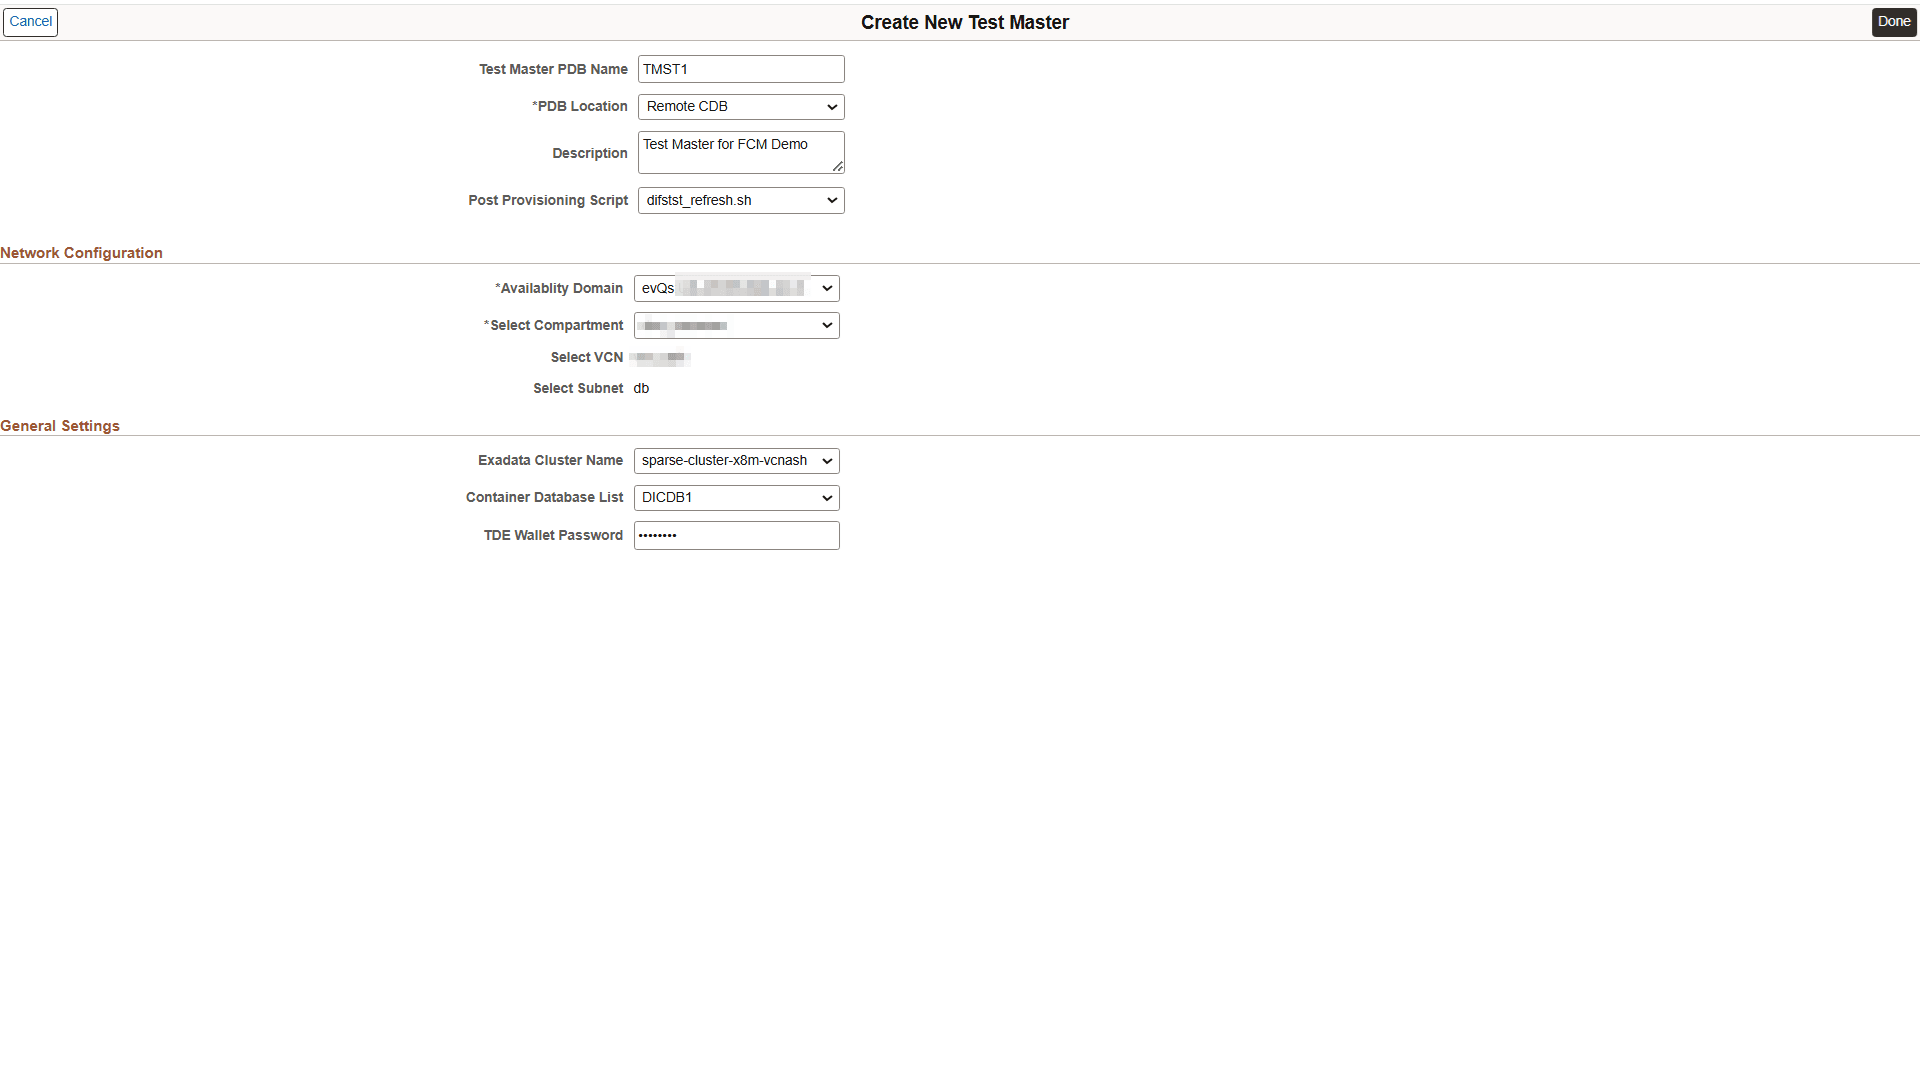
Make the necessary changes to the Network Configuration and General Settings for the new test master.
This is an example of the page used to create a new test master. You can find definitions for the fields and controls later on this page.
Field or Control
Description
Test Master PDB Name
Select the name for test master PDB, which is a clone of the source environment.
PDB Location
Select the location where test master PDB is to be created. The available options are Local CDB, New CDB, Remote CDB.
Post Provisioning Script
Select a post provisioning script for the Test Master.
Select Compartment
Select the compartment containing the VCN you want to use.
Select VCN
Select the VCN for the compute node.
Select Subnet
Select the subnet within VCN for the compute node.
Shape Name
Select Exadata as the shape name.
Container Database List/ Container Database Name
Select a CDB.
The list includes the CDBs in the Exadata cluster that hosts the source CDB. Container Database List is available only for Remote CDB and Container Database Name is available only for New CDB and Local CDB.
TDE Wallet Password
Specify a TDE Wallet password for the existing target CDB. This option is available only for Remote CDB.
Click Done to save the changes.
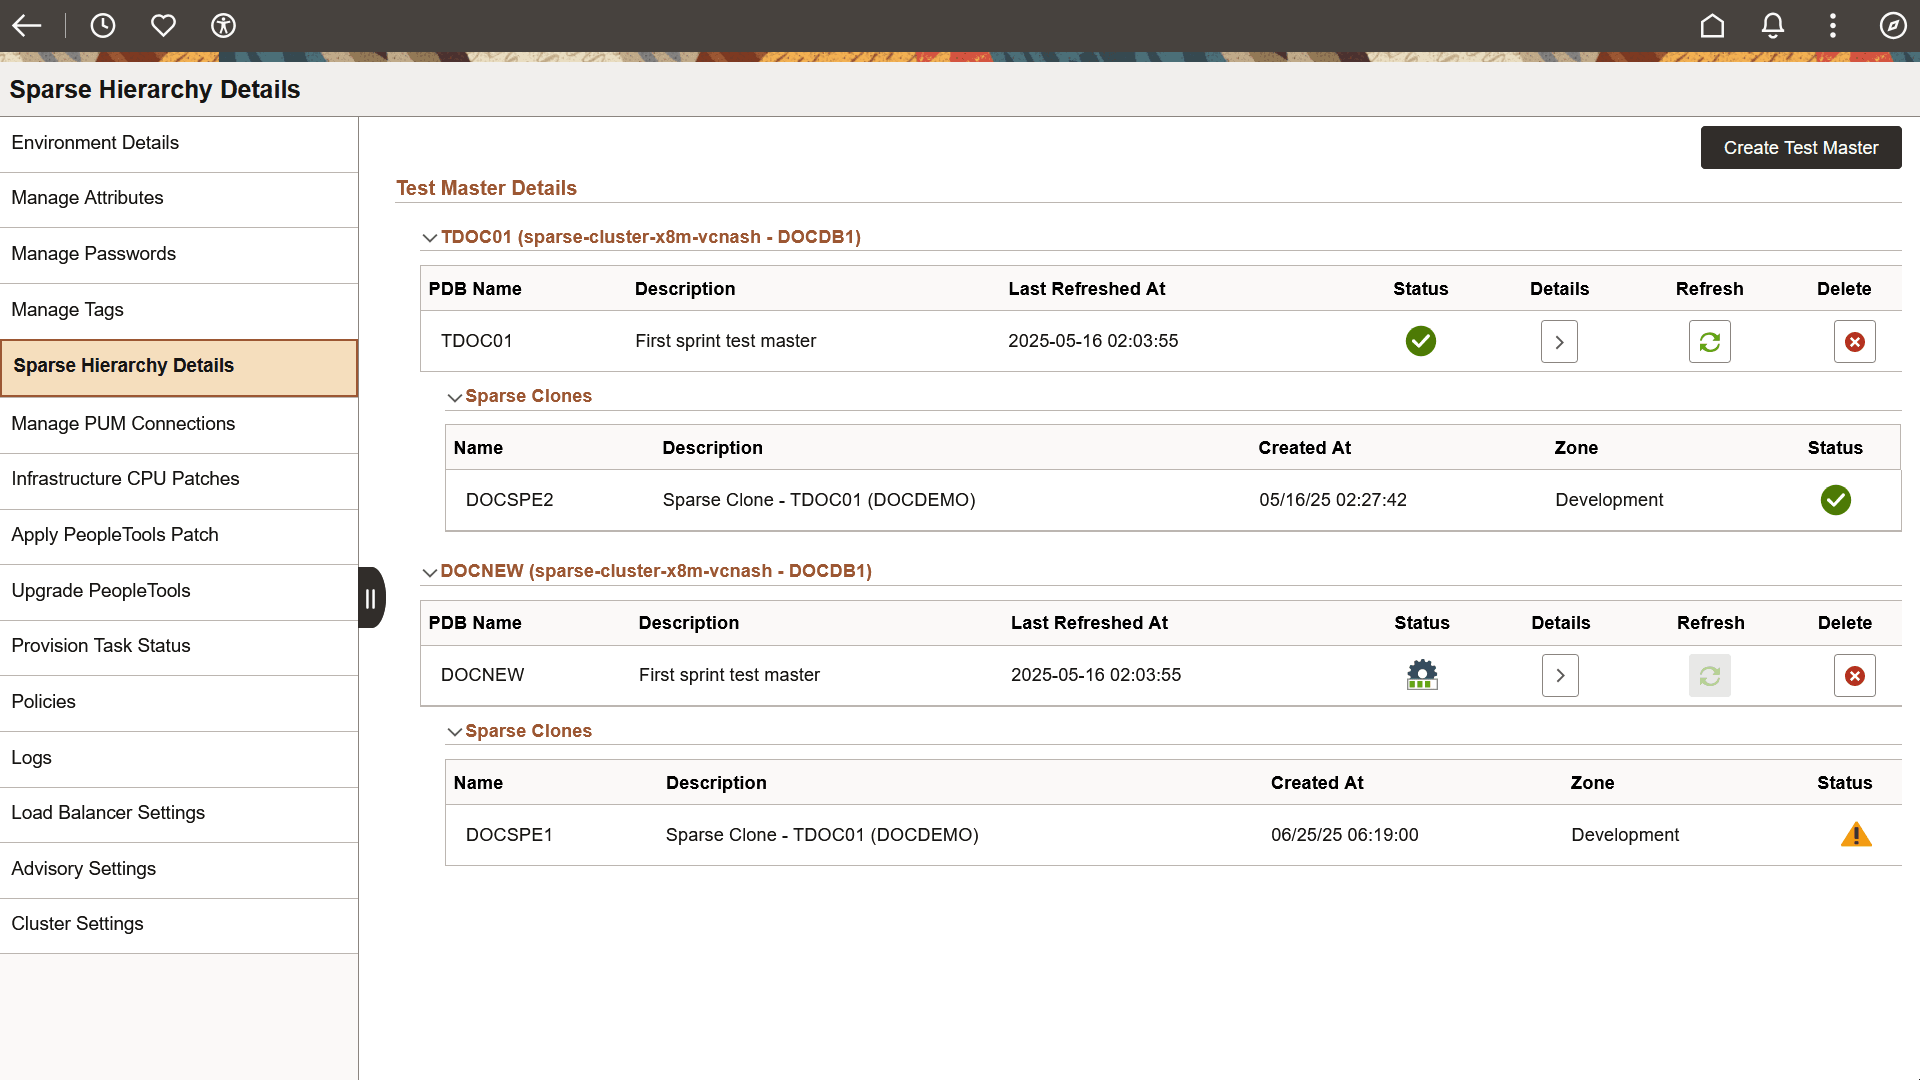
The Sparse Hierarchy Details page displays the test masters associated with the source environment. Sparse clones created using a specific test master are found within the collapsible panel of that test master.
This example illustrates the fields and controls on Sparse Hierarchy Details page.
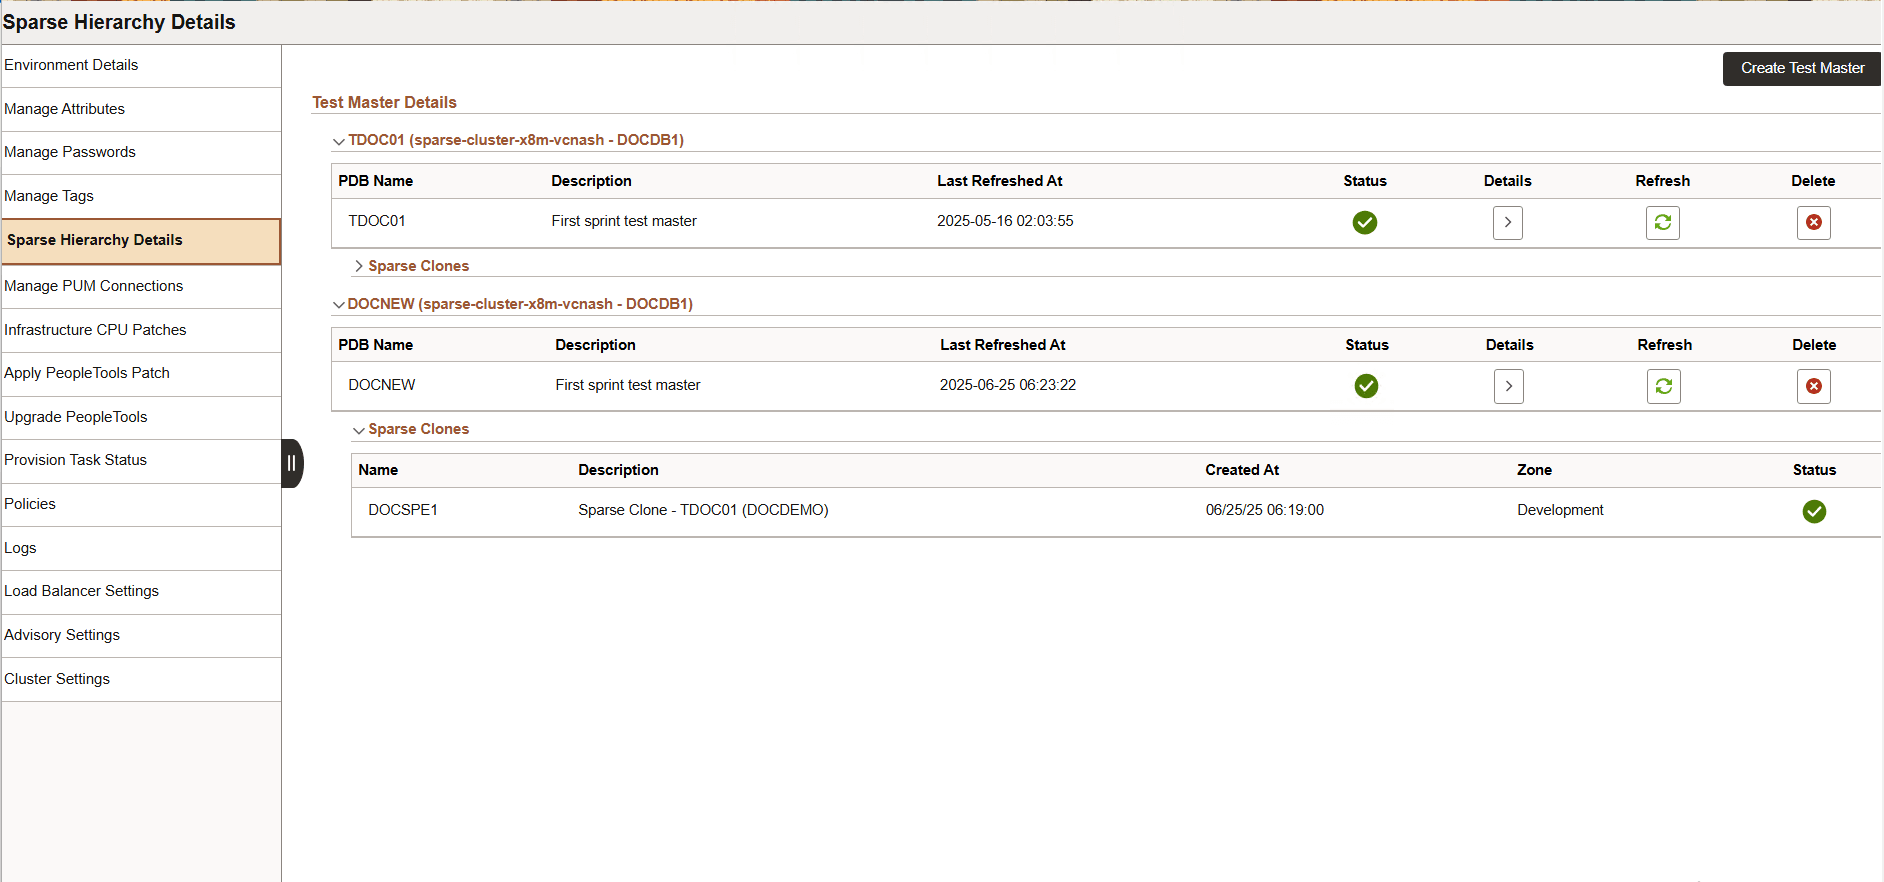
To view the details of a specific test master, click the Details button. The Test Master Details page appears.
This example illustrates the fields and controls on Test Master Details page.
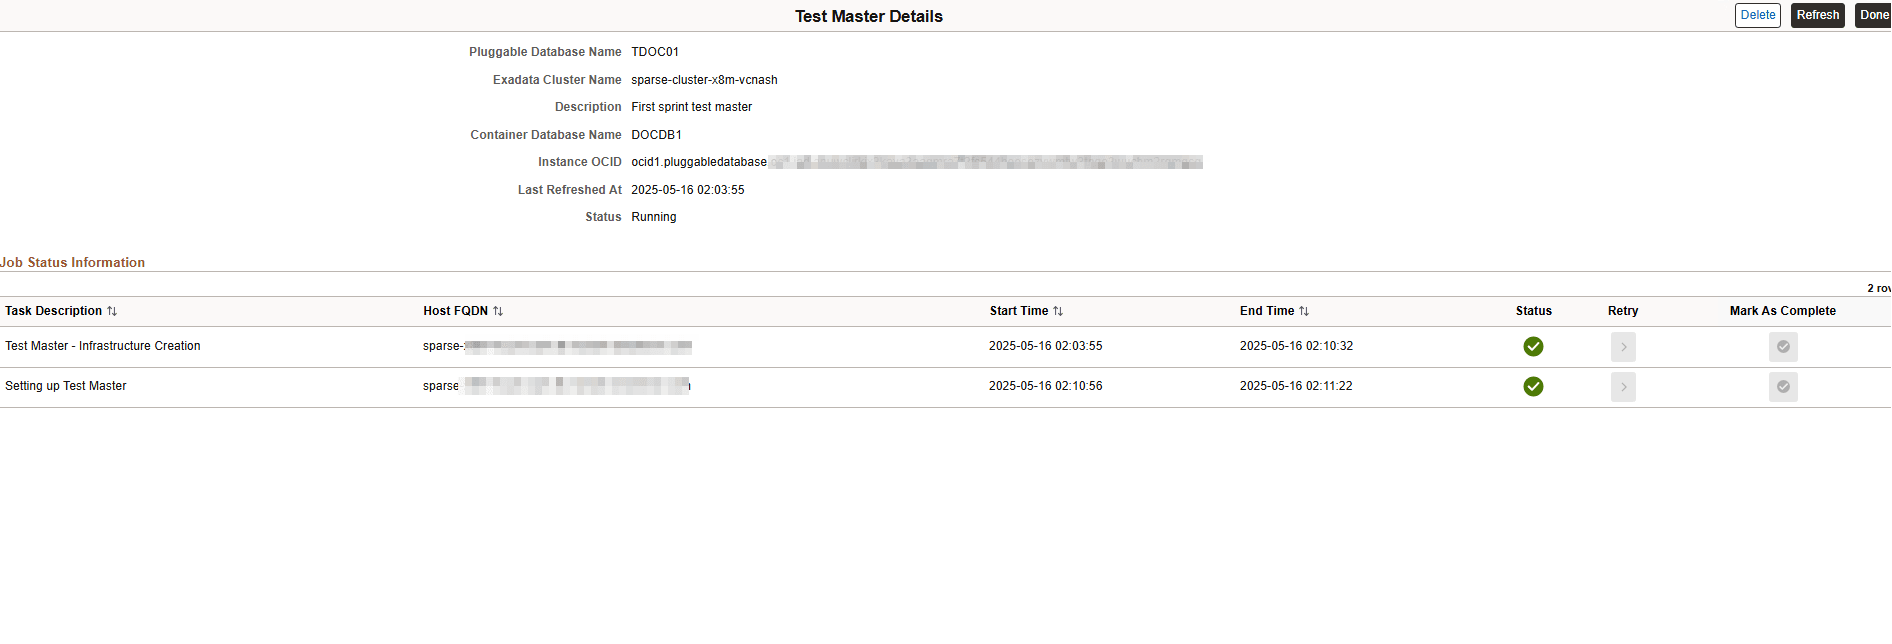
The Job Status Information section displays the latest tasks run in the lifecycle of the test master. When a task fails, the Status column displays a failure icon against the failed task. You can retry the failed task after debugging and fixing the error in the logs. Alternatively, it is possible to manually complete the step and mark the task as completed.
Click Refresh to refresh the test master with the source environment and click Delete to remove the test master. Before attempting either of these actions, ensure that all the child sparse clones of the test master are deleted.
To create sparse clones using the Clone Environment action on the Clone page, see Cloning an Environment With Database Running on Exadata and Other Nodes on Compute.
The refresh functionality in Sparse Hierarchy Details page enables you to get the latest version of a test master.
You can either refresh all the child sparse environments or exclude some sparse environments when you refresh the test master.
This example illustrates the scenario when all the child sparse environments are refreshed.
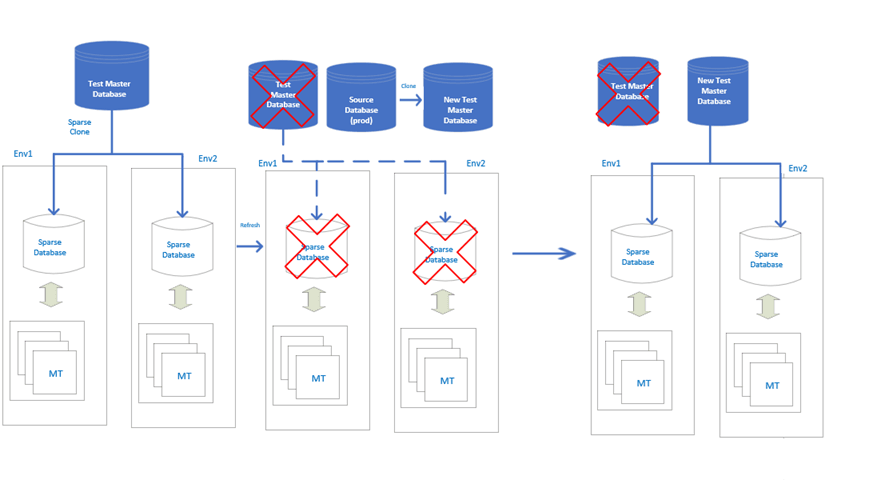
The following processes happen when you refresh the test master along with all its associated sparse environments:
Cloud Manager deletes all the existing sparse cloned databases and initiates the refresh of test master.
The existing test master is deleted.
Cloud Manager creates a new test master from the source database and then creates sparse clones from the new test master.
The middle tiers of sparse environment are reconfigured with the newly created sparse clones.
This example illustrates the scenario when certain child sparse environments are excluded from being refreshed.
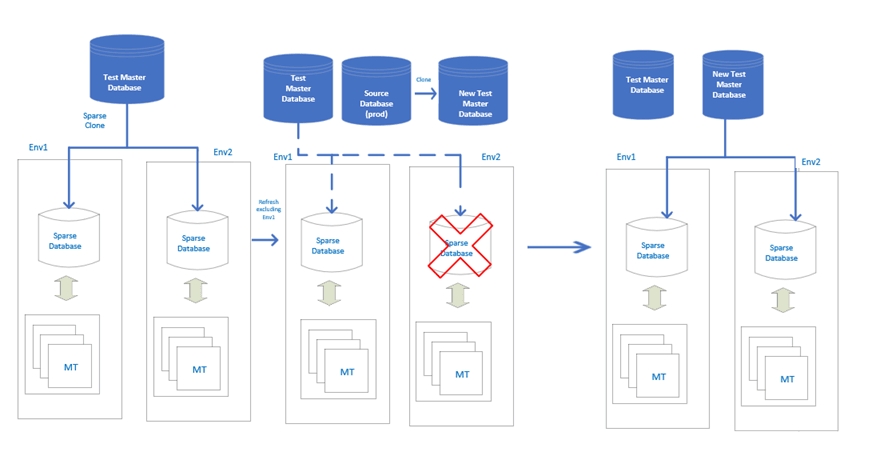
The following processes happen when you refresh the test master excluding certain sparse environments:
Cloud Manager deletes the sparse cloned database of the environment that is selected for refresh.
A new test master is created from the source database. The existing test master and its sparse environments that are excluded from refresh are not modified.
New sparse clones are created from the new test master for each of the sparse environments that are selected for refresh.
Cloud Manager reconfigures the middle tiers of sparse environments with the corresponding new sparse clone.
To refresh a test master:
Click Refresh on the Sparse Hierarchy Details page. Alternatively, you can click Refresh from the Test Master Details page. The Test Master Refresh page is displayed.
This example illustrates the fields and controls on Test Master Refresh page.
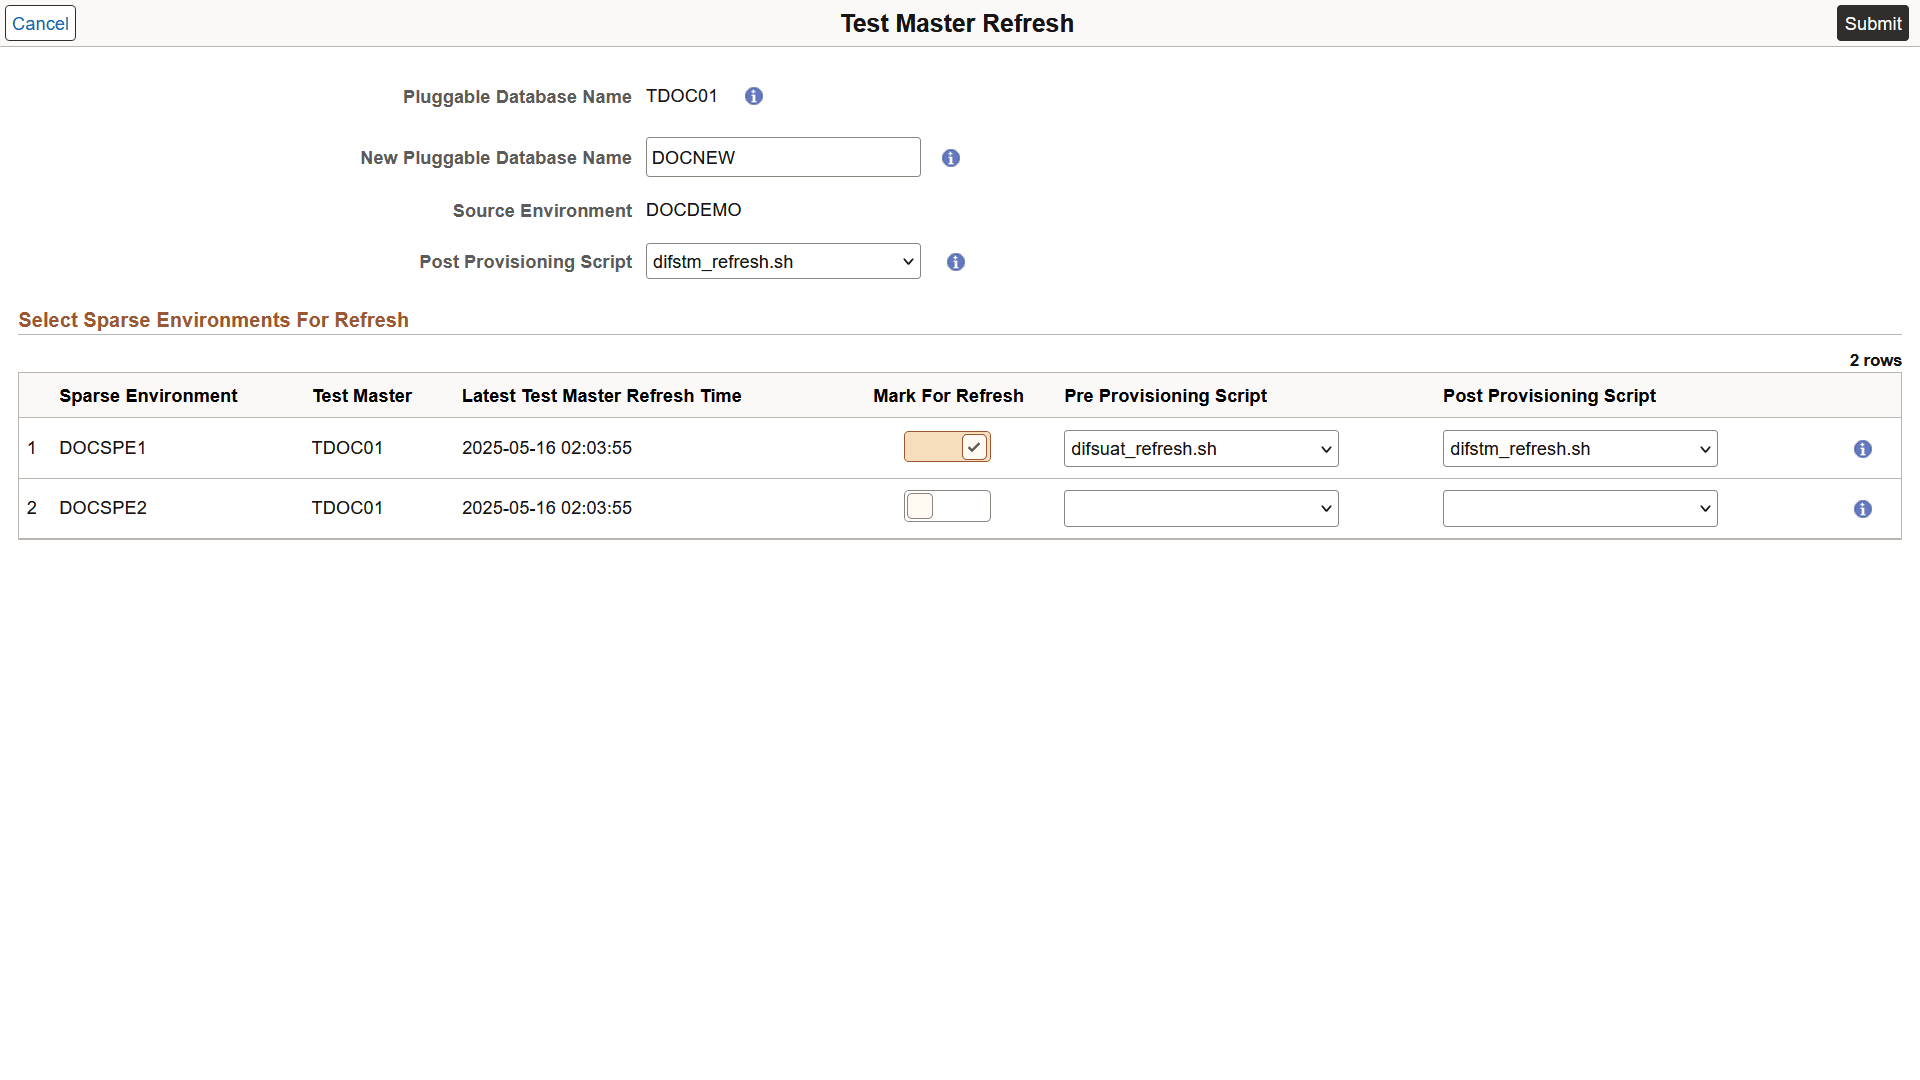
Mark the required sparse clones for refresh.
Note: You can also select sparse environments that are not part of the current test master, given that they were last refreshed earlier than the last refresh time of the current test master.
Select the Post Provisioning Script for the test master.
Select the Pre and Post Provisioning Scripts for sparse environments selected for refresh.
Click Submit. You must confirm the action when prompted. The refresh process gets initiated after the confirmation. You can view the status of the refresh process on the Sparse Hierarchy Details page.
This example illustrates the fields and controls on Sparse Hierarchy Details page.