- Oracle Content Managementでのサイトの構築
- サイトの開発
- レイアウトの開発
- コンテンツ・レイアウトの開発
- Oracle Content Managementを使用したコンテンツ・レイアウトの作成
Oracle Content Managementを使用したコンテンツ・レイアウトの作成
サイト・ページ上に表示するときにコンテンツ・アイテム内のフィールドをレイアウトするためのコンテンツ・レイアウトを作成します。 ページにコンテンツ・アイテムを追加すると、選択したコンテンツ・レイアウトが使用されます。
エンタープライズ・ユーザーは、開発者として提供するコンテンツ・タイプとレイアウトに基づいてコンテンツ・アイテムを作成および使用できます。 デフォルトのレイアウトから新しいコンテンツ・レイアウトを作成できます。 コンテンツ・タイプに関連付けられた複数のコンテンツ・レイアウトを使用すると、サイト・デザイナが、コンテンツを変更せずにコンテンツ・アイテムを様々なコンテキストで表示できるようになります。
コンテンツ・リストコンポーネント内でコンテンツ・レイアウトを使用する場合、コンテンツ・レイアウトはコンテンツ・アイテムごとに1回繰り返されます。 これにより、コンテンツ・レイアウトはセクション・レイアウトによって配置されます。
コンテンツ・レイアウトをエクスポートしてオフラインで変更し、その後インポートして既存のコンテンツ・レイアウトを置き換えることができます。
コンテンツ・レイアウトを作成するには:
- Oracle Oracle Content Managementホームページで、サイド・ナビゲーションの「開発者」をクリックします。「開発者」ページが表示されます。
- 「すべてのコンポーネントの表示」をクリックします。
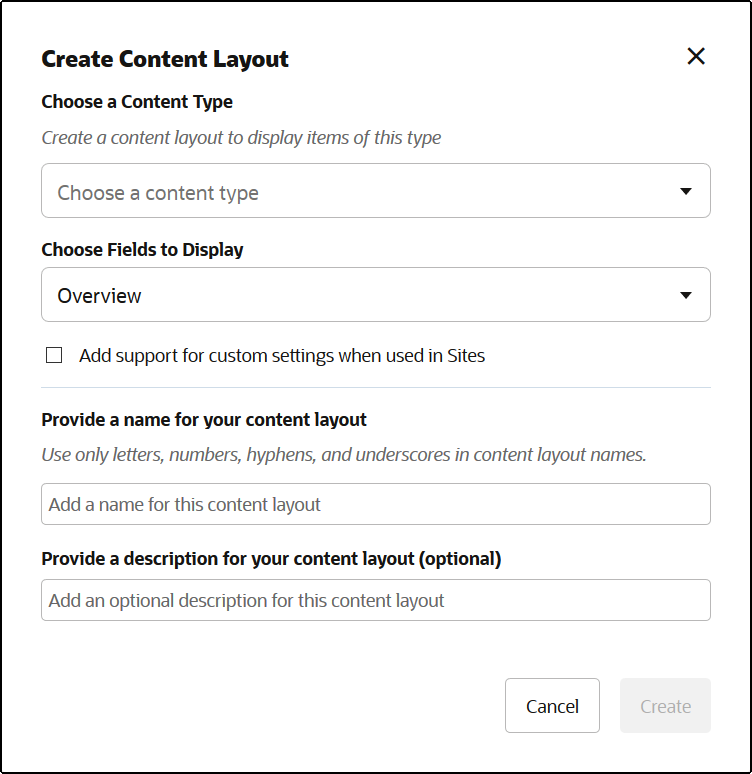
- 右側の「作成」ドロップダウン・メニューから、「コンテンツ・レイアウトの作成」を選択します。
- 「コンテンツ・レイアウトの作成」ダイアログ・ボックスで、レイアウトを使用するコンテンツ・タイプを選択し、表示するフィールドを選択します。また、コンテンツ・アイテムおよびコンテンツ・リスト・コンポーネントをページに追加する際にサイト作成者がカスタム設定およびスタイルを追加できるようにする場合は、サイトで使用される場合にカスタム設定のサポートを追加するを有効にします。

- コンテンツ・レイアウト・コンポーネントの名前と説明を指定し、「作成」をクリックします。
コンポーネントにコンテンツ・レイアウトが追加されます。
ノート:
コンテンツ・レイアウト・タイトルでは英数字、ハイフンおよびアンダースコアのみが有効です。 - 編集用にコンテンツ・レイアウトをエクスポートするには、コンテンツ・レイアウトを選択し、右クリック・メニューで「エクスポート」をクリックするか、アクション・バーの
 をクリックします。
- 既存のフォルダに移動するか、「作成」、「フォルダ」の順にクリックして新しいフォルダを作成し、名前、および必要に応じて説明を入力します。
- フォルダの横にあるチェック・ボックスを選択し、「OK」をクリックします。
- フォルダのアイコンまたは名前をクリックして開きます。
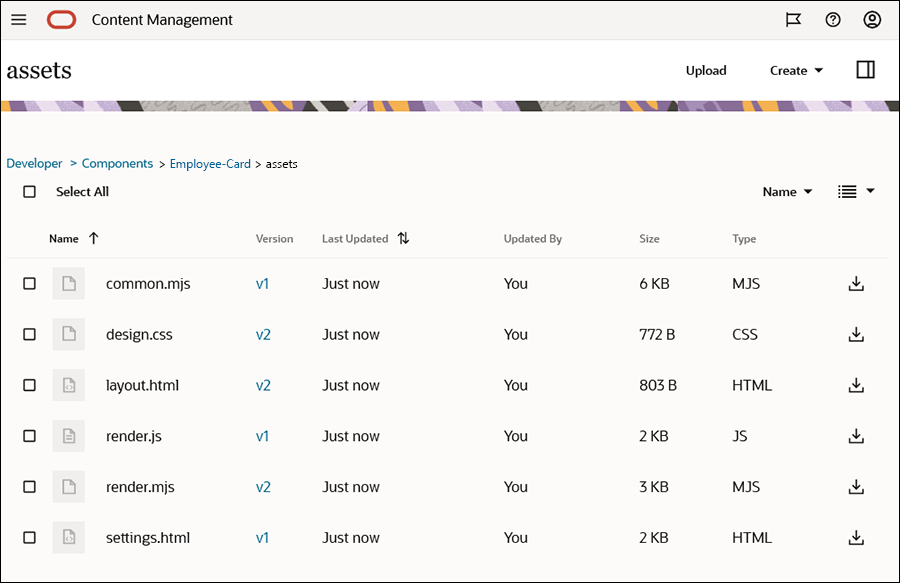
選択したフォルダに、コンテンツ・レイアウト名と
.zip拡張子のレイアウト・パッケージ・ファイルが作成されます。 ファイルを開発環境にダウンロードして編集します。
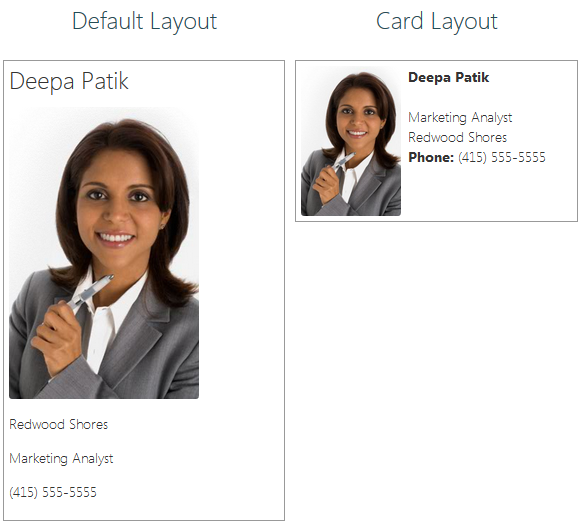
これらのファイルは、従業員カード・コンテンツ・レイアウトを使用するコンテンツ・アイテムのフィールドのレイアウトを制御します。 サイトで使用される場合にカスタム設定のサポートを追加するを有効にした場合は、単一のコンテンツ・アイテムのデフォルト・レンダリングを提供するsettings.htmlという名前の追加ファイルも作成されるため、それを表示できます。

「図layout_compare.pngの説明」
design.css、layout.htmlおよびrender.jsファイルを編集して、必要なコンテンツ・レイアウトを取得します。たとえば、次のファイルは従業員カード・コンテンツ・レイアウトを指定します:
design.cssファイルを編集します:.scs-tile-layout { font-family: 'Helvetica Neue', 'Segoe UI', sans-serif-regular, Helvetica, Arial; font-size: 16px; margin: 0px; padding: 0px; font-style: normal; color: #333; } .scs-tile-layout li { list-style: none; font-size: 14px; font-style: normal; font-variant-caps: normal; font-weight: 200; margin: 0px; } .scs-tile-layout-img-container { height: 150px; width: 100px; float: left; margin: 0em 0.5em 0em 0em; padding: 0px; border-radius: 3px; overflow: hidden; position: relative; } .scs-tile-layout-img { position: absolute; left: -100%; right: -100%; top: -100%; bottom: -100%; margin: auto; height: 100%; min-width: 100%; } .scs-tile-layout p { margin: 0px; }layout.htmlファイルを編集します:{{#data.employee_profile_pictureURL}} <div class="scs-tile-layout-img-container"> <img class="scs-tile-layout-img" src="{{data.employee_profile_pictureURL}}" /> </div> {{/data.employee_profile_pictureURL}} <ul class="scs-tile-layout"> <li> <p><b>{{name}}</b></p> </li> <li> </li> <li> <p>{{data.employee_job_title}}</p> <p>{{data.employee_location}}</p> <p><b>Phone: </b>{{data.employee_phone}}</p> </li> {{#scsData.detailPageLink}} <li> <a href="{{scsData.detailPageLink}}" title="Go to detail page"><span class="detail-page">Profile</span></a> </li> {{/scsData.detailPageLink}} </ul>render.mjsファイルを編集します:/* globals Mustache */ import CommonUtils from './common.mjs'; export default class { // class variables contentVersion = ">=1.0.0 <2.0.0" // Content Layout constructor constructor(params) { // store passed in values this.contentItemData = params.contentItemData || {}; this.scsData = params.scsData; this.contentClient = params.contentClient; this.libs = this.contentClient.getLibs() || {}; // store path to the "assets" folder this.assetsFolder = import.meta.url.replace('/render.mjs', ''); // access resources this.Mustache = params.Mustache || this.libs.Mustache || window.Mustache; } // Main rendering function: // - Updates the data to handle any required additional requests and support granular permissions // - Expand the Mustache template with the updated data // - Appends the expanded template HTML to the parentObj DOM element render(parentObj) { const contentClient = this.contentClient; const commonUtils = new CommonUtils(contentClient); const noPermissionToViewMsg = "You do not have permission to view this asset"; let contentType; let customSettings; let secureContent = false; // extract the content that will be used as the model this.content = Object.assign({}, this.contentItemData); // If used with CECS Sites, Sites will pass in context information via the scsData property. if (this.scsData) { this.content = Object.assign(this.content, { "scsData": this.scsData }); contentType = this.content.scsData.showPublishedContent === true ? "published" : "draft"; customSettings = this.content.scsData.customSettingsData || {}; } // // Handle fields specific to this content type. // // If displaying detail items, get the IDs of any referenced assets // we will do an additional query to retrieve these so we can render them as well. const referedFields = []; const referedIds = commonUtils.findReferenceFieldIds(referedFields, this.content.fields, noPermissionToViewMsg); // Handle expansion of URLs and check permissions for access to referenced digital asset const digitalAssetFields = ["starter-blog-author_avatar"]; commonUtils.updateDigitalAssetURLs(digitalAssetFields, this.content.fields, noPermissionToViewMsg); // Handle markdown expansion const markDownFields = ["starter-blog-author_bio"]; commonUtils.updateMarkdownFields(markDownFields, this.content.fields); // Handle richText expansion const richTextFields = []; commonUtils.updateRichTextFields(richTextFields, this.content.fields); // Handle date field formatting const dateTimeFields = []; commonUtils.updateDateTimeFields(dateTimeFields, this.content.fields); // // Fetch any referenced items and resources used to render the content layout // Promise.all([ commonUtils.getRefItems(referedIds), contentClient.importText(this.assetsFolder + '/layout.html'), contentClient.importCSS(this.assetsFolder + '/design.css') ]).then((resources) => { const results = resources[0]; const templateHtml = resources[1]; // Store the retrieved referenced items in the model used by the template. commonUtils.addReferencedItems(referedFields, results, this.content.fields); // apply the model to the template try { // Use Mustache to expand the HTML template with the data. const template = this.Mustache.render(templateHtml, this.content); // Insert the expanded template into the passed in container. if (template) { parentObj.insertAdjacentHTML('beforeend', template); } } catch (e) { console.error(e.stack); } }); } }render.jsファイルおよびその他のファイルの編集の詳細は、「コンポーネントの開発」を参照してください。
- 変更されたファイルをインポートして、既存のコンテンツ・レイアウトを置き換えます。
- ホーム・ページで、「ドキュメント」をクリックします。
- 変更されたコンテンツ・レイアウトを、.zip拡張子を持つファイルで、エクスポートした同じフォルダ名およびファイル名が含まれるフォルダにアップロードします。新しいコンテンツ・レイアウトとしてインポートする場合は、
_folder.jsonでコンテンツ・レイアウトのGUIDを変更する必要があります。 - ホーム・ページで、「開発者」をクリックします。「開発者」ページが表示されます。
- 「すべてのコンポーネントの表示」をクリックします。
- 「作成」メニューから、「コンポーネントのインポート」を選択します。
- 変更されたコンポーネントを含むアップロード済zipファイルの横にあるチェック・ボックスを選択し、OKをクリックします。
変更されたコンテンツ・レイアウトは「コンポーネント」にインポートされます。
コンテンツ・レイアウトをエクスポートして、それを別のOracle Content Managementインスタンスにコピーまたは移動し、そこにインポートすることもできます。