Creating a Profile Request
These topics provide an overview of profile requests and discuss how to:
Define basic profile information.
Add and edit profile fields.
Define field detail.
Modify active profiles.
|
Page Name |
Definition Name |
Usage |
|---|---|---|
|
Profiles |
RA_PROFILE_SUMM |
View summary information about all of your profiles and to access an existing profile or create a new profile. |
|
RA_PROFILE_DTL |
Define basic information about the profile. |
|
|
RA_ATTRIBUTE_SUMM |
Add new fields to a profile, or view existing profile fields. |
|
|
RA_ATTRIBUTE_DTL |
Define a new profile field or edit an existing profile field. |
|
|
RA_PROFILE_MKTCTR |
Secure a profile by Marketing Center. |
A profile request consists of instructions that you or a system administrator use to create a new database table and fields. Your request conveys the type of information that you need and how to use it. The profile is not available for use until you register and activate it. To assist with the communication process of marketer's requests and fulfillment or rejection of those requests by the system administrator, workflow is delivered. Marketing analysts can request profiles, and when they are set to a status of Requested, the person in the defined role of Dialog Administrator receives a worklist notification. When the request is either completed and activated, or rejected, the marketing administrator receives a worklist notification.
Creation of profiles should always follow thoughtful design of campaign objectives and strategy. Before beginning to define a profile request, determine who you want to contact (your target audience), what information you want to display, what new information you want to collect, and what existing information you want to update. Profile creation requires a thorough knowledge of your Customer Relationship Management database (to ensure that you are not creating a duplicate profile or profile field) and involves a collaboration between the marketer and the system administrator.
Note: If you have purchased PeopleSoft Online Marketing, you cannot use the following characters in profiles being used for Online Marketing documents: ampersand (&), apostrophe or single quote ('), double quote (“), greater than (>), less than (<), or period (.).
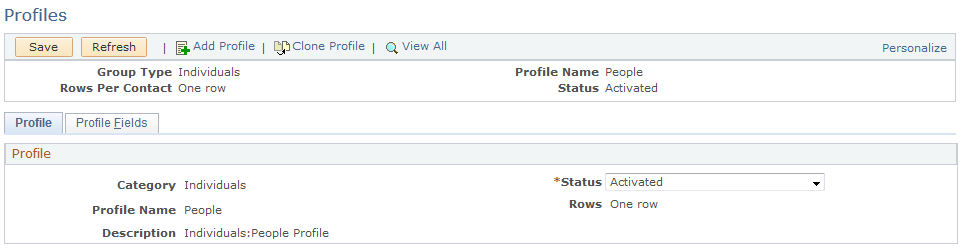
Use the Profile page (RA_PROFILE_DTL) to define basic information about the profile.
Navigation
Click the profile name on the Profiles page to edit an existing profile.
Click the Add Profile button on the Profiles page to define a new profile.
Image: Profile page
This example illustrates the fields and controls on the Profile page. You can find definitions for the fields and controls later on this page.
|
Field or Control |
Definition |
|---|---|
| Group Type |
Select Individuals when the profile information refers to persons. Select Organizations when the profile information refers to organizational data. |
| Category |
Shows the category to which the profile belongs. |
| Status |
Select In Design while you are defining your profile request. Select Requested to lock the profile design. Setting the status to Requested notifies your administrator that the profile design is complete. The administrator can manage approval and connect the profile to the database. Select Activated to indicate that the profile fields have been mapped and the required profile table has been created. Select Rejected to indicate that the profile design has been rejected by your system administrator. Select Update to edit an activated profile. Note: As long as the status of a profile is In Design, your ability to edit and make changes is unlimited. A status of Requested or Rejected allows you to delete any profile field that is in a status of In Design. When the profile status is set to Activated, your ability to change or edit the profile is limited. For example, when a profile is activated you cannot delete a field. Likewise, you cannot delete field choices, but you can inactivate them. |
| Profile Name |
Enter a name for the profile. Note: If you have purchased PeopleSoft Online Marketing, you cannot use the following characters in profile names used for Online Marketing documents: ampersand (&), apostrophe or single quote ('), double quote (“), greater than (>), less than (<), or period (.). |
| Rows |
Row selection determines how many unique rows of data you can enter into the profile table for each contact. You can define profiles as either one row or many rows. After a profile is requested, you cannot change the row selection. Select Many Rows to allow multiple rows of data per contact. Select One Row to allow only one row of data per contact. For example, suppose that you use a one-row table to store information about whether your customer is a pet owner and how many pets your customer owns. If you want to store the names of the pets, you must allow for the possibility that your customer has more than one dog or cat. To record the names of multiple pets, you must use a Many Row table. Note: Profiles defined as Many Rows can be used only for audience selection. They cannot be used in online documents by PeopleSoft Online Marketing. |
| Profile Can Be Updated |
Select this check box if the profile is available for update (for example, by customers changing their information on an Online Marketing web page form). If you mark profiles to not allow updates, the profile fields cannot be marked as questions. |
| Secured Profile |
Select this check box to designate a profile as secured. When performing a search for profiles, only those secured profiles that a user has permission to access (that is, that they are authorized for at least one of the Marketing Centers associated with the profile) will be displayed as part of the search results. |
Use the Profile Fields - Field Summary page (RA_ATTRIBUTE_SUMM) to add new fields to a profile, or view existing profile fields.
Navigation
Select the Profile Fields tab on the Profile page.
Image: Profile Fields - Field Summary page
This example illustrates the fields and controls on the Profile Fields - Field Summary page. You can find definitions for the fields and controls later on this page.
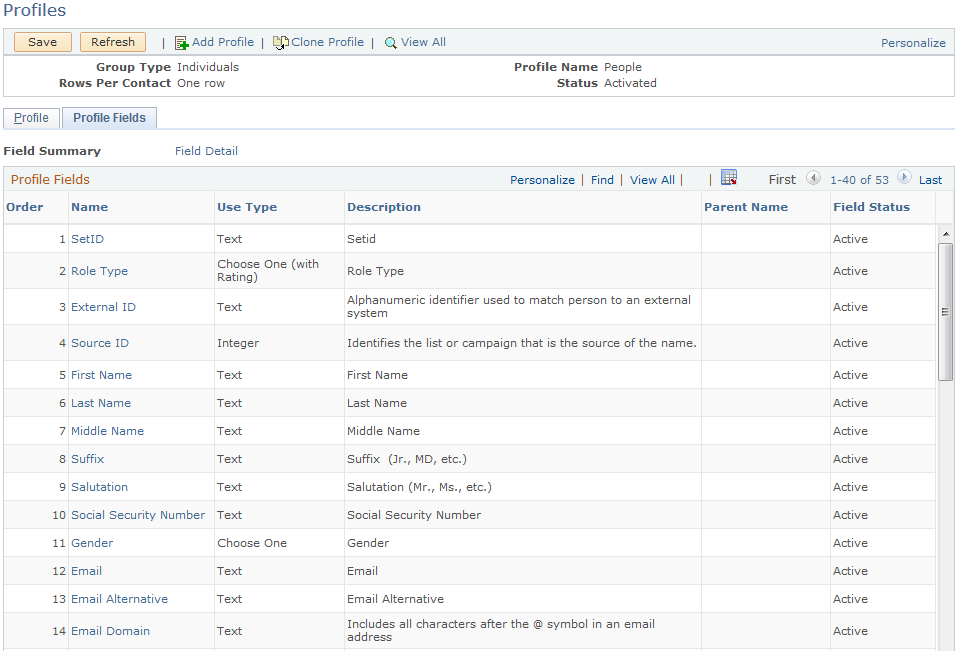
Note: Click a column heading to change the sort order of the column.
|
Field or Control |
Definition |
|---|---|
| Field Detail |
Click to access the Profile Fields - Field Detail page where you defined the field. |
| Order |
Displays the order in which profile fields appear when the profile is used. The order affects the display only, and users are free to select the fields in any order desired. |
| Name |
Click the field name to access the profile field detail. |
| Use Type |
Defines how to use the new fields. Values are:
|
| Parent Name |
Use this drop-down field to specify a relationship among field choices (for example, you could specify that a field named College is the parent of a Department field, and the Department field is in turn the parent of a field named Major). You can define three levels of hierarchy using this field; it appears only for fields of type Choose One and Choose One with Rating. Note: This dynamic enumeration functionality applies only to Basic and Custom profile fields used with Online Marketing. |
| Field Status |
Displays the current status of the profile field and always depends on the status of the profile. Values are In Design, Active, and Update. |
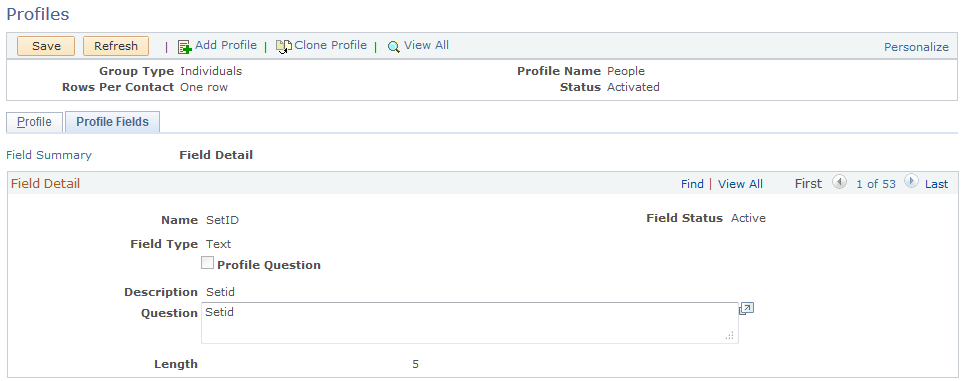
Use the Profile Fields - Field Detail page (RA_ATTRIBUTE_DTL) to define a new profile field or edit an existing profile field.
Navigation
Click the Field Detail link on the Profile Fields - Field Summary page.
Image: Profile Fields - Field Detail page
This example illustrates the fields and controls on the Profile Fields - Field Detail page. You can find definitions for the fields and controls later on this page.
|
Field or Control |
Definition |
|---|---|
| Name |
Enter a name for the field. |
| Field Status |
Displays the current status of the profile field and always depends on the status of the profile. Values are In Design, Active, and Update. You can alter the profile field value when the field status is In Design or Update. When a profile is activated, all profile field statuses change to Active. To alter a profile field value, change the status of the profile to Update, then change the profile field status to Update. |
| Use Type |
The use type value that you selected when you added the new field appears as the default value. Until the profile is activated, select a new option to change the field type. |
| Profile Question |
Select to make this field available for use in a web document or email blast. |
| Description |
Enter a description of the field. The description appears on the Profile Fields - Field Summary page. |
| Question |
If the profile field is specified as a profile question (the Profile Question check box is selected), enter a question that is designed to elicit a desired response. For example, if the value for the profile field is Number of Pets, your question might be: “How many pets are in your household?” |
The following fields appear only with certain use types.
|
Field or Control |
Definition |
|---|---|
| Order |
Indicates the order in which you want the response options to appear. Change the order by changing the number in this field. Save the page to make the changes effective. |
| Choices |
Enter the choice values for the profile field question. The value that you enter appears where the profile is used. |
| Rating |
When Choose One (with Rating) is selected as the use type, enter a rating value for each option. Rating values are measured from the smallest numerical value to the highest. For example, a rating of 1 is less than a rating of 5. |
| Map to Field |
When Map to Existing Field is selected as the use type, select the underlying prompt table. Note: If the prompt table is unknown or does not exist, this field can be left blank. If the prompt table does not exist, a system administrator must build it before the profile is activated. |
| Length |
When Text or Text Block is selected as the use type, enter a text field length. The maximum field length for the Text use type must be less than 254 characters. The maximum field length for the Text Block use type is less than 32,700 characters. |
You can make the following changes to activated profiles:
Modify a profile field question.
Change a profile field into a question field or change a question field into a non-question field.
Add or inactivate field choices.
Add a new profile field.
Note: After a profile is inserted into a PeopleSoft Online Marketing document, changes to the profile do not affect the document unless the profile is deleted from the document and then reinserted.
Profile changes are not required to be applied to all documents. In fact, situations will occur in which you will not want to change a document. For example, you can insert a profile into two or more documents if you intend to offer different choices to a particular question. By modifying the choices on the profile, you can insert the version with the appropriate choices into the different documents.
With the exception of adding a new profile field, you can easily modify active profiles without having to resubmit your profile request.
Making Changes That Do Not Require a New Request
Changes to existing fields do not affect the underlying profile table. Rather, these changes affect what is called the metadata.
To make changes that do not require a new request (changes to the metadata):
Change the status of the profile to Update.
On the Profile Fields - Field Summary page, click the field that you want to modify.
This enables you to access the Profile Fields - Field Detail page, where you must change the Status field to Update.
Make the change.
For example, to add a new choice to the Choose Many field value, click one of the Add buttons in the Choice column. To eliminate a choice, select the Inactivate check box beside the choice that you want to eliminate. You can also select or deselect the Profile Question check box to change whether a field appears as a question, or change the text of a question.
Return to the Profile page, change the profile status to Activated and save the profile.
Adding a New Profile Field
Adding a new profile field requires a change to the profile table and can be completed by you or by the administrator, depending on your organization's requirements.
To add a new profile field to an existing profile:
Change the status of the profile to Update.
On the Profile Fields - Field Summary page, select the use type for the field that you want to add and click the Add a New Field button.
Enter the field information and save the page.
Return to the Profile page, change the profile status to Requested, and save the profile.
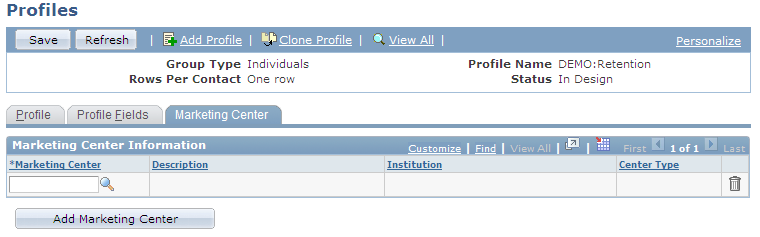
Use the Profile - Marketing Center page (RA_PROFILE_MKTCTR) to secure a profile by Marketing Center.
Navigation
Click the Marketing Center tab on the Profile page.
Image: Profile - Marketing Center page
This example illustrates the fields and controls on the Profile - Marketing Center page. You can find definitions for the fields and controls later on this page.
|
Field or Control |
Definition |
|---|---|
| Marketing Center |
Click the search icon and select a Marketing Center from the available list. Only those users or roles associated with the Marketing Center will be able to access the profile. |
| Add Marketing Center |
Click this button to add another Marketing Center row to the grid. |
When creating a profile, you can designate it as secure by selecting the Secured Profile check box on the Profile tab. When performing a search for profiles, only those secured profiles that a user has permission to access (that is, that they are authorized for at least one of the Marketing Centers associated with the profile) will be displayed as part of the search results. Profile definition functionality for documents and audiences will only display profiles that the user is authorized to access.
Note: Only custom profiles (that is, not AAF based profiles such as Case History and so forth) will be available for security. The People profile, because it should always be available for all users, does not include a Secured Profile check box.