Defining Data Import Templates
To define data import templates, use the Data Import (RB_IMP_DATA_CONFSR_GBL) component.
These topics discuss how to:
Access data import templates.
Define data import templates.
Define import files.
Map source fields to target fields.
Specify concatenation.
Define matching criteria.
Verify template creation.
|
Page Name |
Definition Name |
Usage |
|---|---|---|
|
RB_IMP_DATA_CONFSR |
Access a data import template to modify or add a new template. |
|
|
RB_IMP_HEADER |
Define general information and the role with which the imported data is associated. The role determines the target field tree that appears at mapping time. |
|
|
Audiences - Audience Details |
RA_LIST_MAIN |
Describe the audience for the imported data. For use in PeopleSoft Marketing, you must specify an audience of type Internal using Import. |
|
RB_IMP_FILESPEC |
Associate the flat file of data and load the header fields from the flat file to the import template. Optionally, assign user-friendly labels to the header fields. |
|
|
RB_IMPORT_MAP |
Map the source fields that are contained in the flat file to the target fields in the PeopleSoft CRM database and define the field requirements. |
|
|
Data Import - Select Target Field |
RB_SEL_MAP_IN_FLD |
View the target fields in a tree format to assist with target field selection in the mapping process. |
|
RB_MAP_CONCAT |
Specify the fields and values that are concatenated to form the target field. |
|
|
RB_IMP_MATCH_ADV |
Define the matching rules for the import data. For example, define which existing field or set of fields in the PeopleSoft CRM database you want to specify as constituting a match for an individual or organization record. |
|
|
Matching Secondary Page - Select Target Field page |
RB MATCH SEL FLD |
Select the database field where the import field is stored. |
|
RB_IMP_CONF_PG |
Verify import template creation. |
Use the Data Import page (RB_IMP_DATA_CONFSR) to access a data import template to modify or add a new template.
Navigation
Image: Data Import page
This example illustrates the fields and controls on the Data Import page. You can find definitions for the fields and controls later on this page.
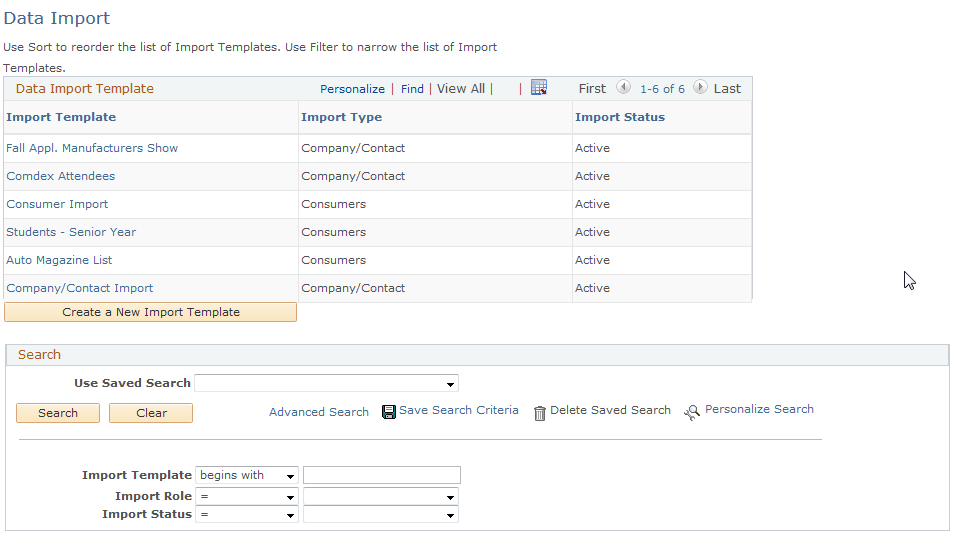
The appearance, behavior, and personalization options for this page are controlled by the search definition for the Data Import Template component.
|
Field or Control |
Definition |
|---|---|
| Create a New Import Template |
Click to access the Data Import - Step 1: Define Import Template page and create a new import template. |
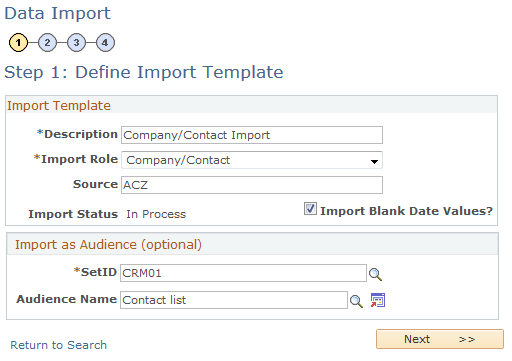
Use the Data Import - Step 1: Define Import Template page (RB_IMP_HEADER) to define general information and the role with which the imported data is associated.
The role determines the target field tree that appears at mapping time.
Navigation
Click the Create a New Import Template button on the Data Import Template Search page.
Select an existing template on the Data Import Template Search page.
Click the Go Back to Import Definition button on the Save Confirmation page.
Click the View Import Definition link on the Run Data Import page.
Image: Data Import - Step 1: Define Import Template page
This example illustrates the fields and controls on the Data Import - Step 1: Define Import Template page. You can find definitions for the fields and controls later on this page.
|
Field or Control |
Definition |
|---|---|
| Import Role |
Select the role to associate with the import template. All records that are in the file are imported into the CRM database with the selected role. Values are:
Note: The role that you select here determines the objects to which you can map. For example, if you select Consumer, the only fields that are available to map to are those that are defined for the Consumer role. |
| Source |
Enter the source of the information that is contained in the flat file. This field is associated with the template and not with individual records that are in the file. To associate a source with each record, create a text profile field that is called Source and use the Data Import - Step 3: Mapping page to map a constant value into the field. |
| Import Status |
Displays the import status that the system assigns when you begin to create an import template. Initially, the status is In Process. It stays as such until you complete the steps to define an import template, at which time it changes to Active. |
| Next |
Click to access the Data Import - Step 2: Define Import File page and proceed to the next page in the import definition process. |
Import as Audience
You can create audiences only for import data with the Consumer or Company/Contact role types.
The Data Import process imports only contact methods with the type of Home when creating audiences with the Consumer role. Other contact method types, such as Business, are ignored. This conforms to the requirements of the Marketing product.
|
Field or Control |
Definition |
|---|---|
| Audience Name |
Select an existing audience or click the Transfer to Audience button to define a new audience. The selected audience must have source of Internal Using Importand a status of either In Design or Designed to import the data into the PeopleSoft CRM database as a discrete audience. If you import the records as an Internal Using Import audience, you can use the audience immediately after import. However, you can't further segment the audience in the Audience Builder. If you want to do further segmentation rather than create an audience at the time of import, create a text profile field called Audience Source, and use the Mapping step to map a constant value in that field for all records. After import, create an internal audience by using the Audience Builder with the first condition all records that are equal to the constant value that is mapped into the profile field called Audience Source. |
Use the Data Import - Step 2: Define Import File page (RB_IMP_FILESPEC) to associate the flat file of data and load the header fields from the flat file to the import template.
Optionally, assign user-friendly labels to the header fields.
Navigation
Click the Next button on the Data Import - Step 1: Define Import Template page.
\
Image: Data Import - Step 2: Define Import File page
This example illustrates the fields and controls on the Data Import - Step 2: Define Import File page. You can find definitions for the fields and controls later on this page.
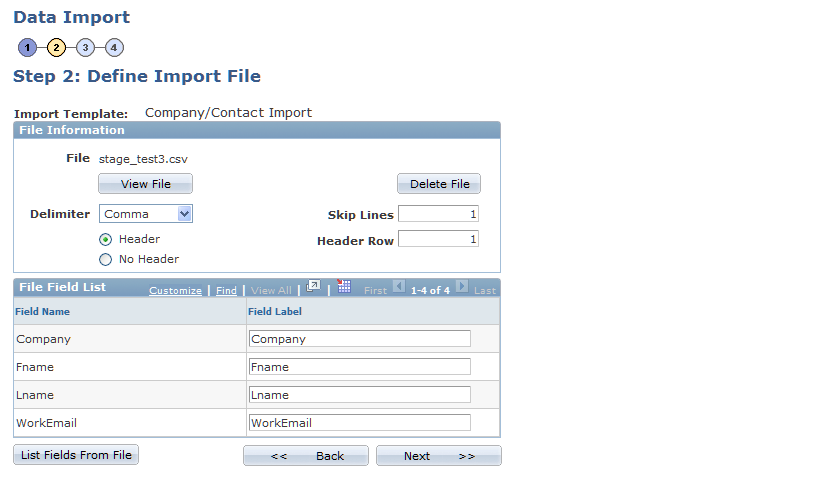
On initial access to this page when you are defining a new template, the Attach File button is available; the rest of the fields are empty. The Delete File and View File buttons are not available until you attach a file.
|
Field or Control |
Definition |
|---|---|
| Attach File and View File |
Click to browse for and upload a file that contains import data. The Attach File button appears when you first access the page to define a new template; after you upload a file, the button text changes to View File. |
| Delete File |
Click to delete the attached file. |
|
Field or Control |
Definition |
|---|---|
| Delimiter |
Select the flat file delimiter Comma, Semicolon, or Tab. |
| Header and No Header |
Select to indicate the presence or absence of a header row in the flat file. |
| Header Row |
Enter the header row location in the field. If you do not enter a header row number, the system supplies 1 as the default. |
| Skip Lines |
Enter the number of blank rows in the flat file. |
| List Fields From File |
Click to list the field names and labels from the flat file. If the flat file contains a header row, the system populates the Field Name column with the exact names of the fields (for example, lname and fname) that are contained in the header row of the flat file's header row. The system also populates the Field Label fields with the same information as shown in the field name fields. If the flat file doesn't contain a header row, the system populates these columns with FIELD1, FIELD2, and so on until all of the flat file fields are represented. Change the field labels to represent the names of the flat file fields in a more meaningful and understandable way. For example, you might change the lname field label to Last Name. |
Use the Data Import - Step 3: Mapping page (RB_IMPORT_MAP) to map the source fields that are contained in the flat file to the target fields in the PeopleSoft CRM database and define the field requirements.
Navigation
Click the Next button on the Data Import - Step 2: Define Import File page.
Image: Data Import - Step 3: Mapping page
This example illustrates the fields and controls on the Data Import - Step 3: Mapping page. You can find definitions for the fields and controls later on this page.
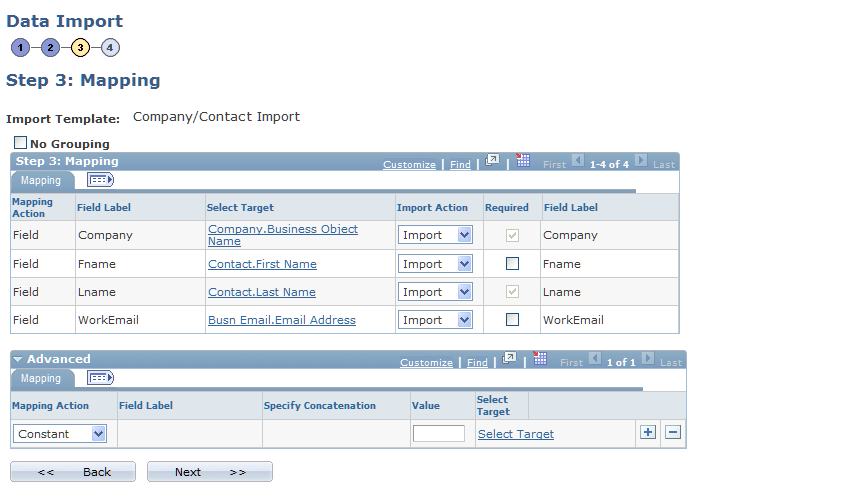
When you access this page, the source field labels appear in the Step 3: Mapping scroll area, and the Advanced scroll area is collapsed.
You must map at least one source field from the flat file to a target field in the CRM database and you must map all required fields (required fields have an asterisk at the end of the field name in the folder tree view).
If you can perform one-to-one mapping of the source fields to the target fields, use the Mapping scroll area only.
To use a default constant in a target field, concatenate source fields into one target field, or enter a source field into multiple target fields, use both the Mapping and Advanced scroll areas.
No Grouping
To give you more control over what fields Data Import considers unique when two or more continuous rows have the same data, PeopleSoft CRM added the No Grouping check box.
For example, assume that you are importing the following data:
|
FIRST NAME |
LAST NAME |
EMPLID |
|---|---|---|
|
Joe |
Smith |
123 |
|
Joe |
Smith |
124 |
Data Import considers First Name and Last Name unique, and therefore inserts only one row and updates the EMPLID to 124. If you, however, select the No Grouping check box, the system inserts or matches on every row.
Selecting Target Fields
|
Field or Control |
Definition |
|---|---|
| Select Target |
Click to select the database field that is updated by the input field or by an advanced mapping action. |
When you click this link, a hierarchical tree structure appears with required fields marked by an asterisk (*). The hierarchy differs depending on the role that you selected for the import template. Required fields are at each folder level. If any field in the folder is mapped, then you must map the required fields in that folder and in the folders above it. The required fields provide the concatenated key to the target fields.
In the following example, the import role is Company and the source file field is Work Email. The Business Object Name field in the Organization - Company folder is required.
Image: Data Import - Select Target Field page (1 of 2)
This example illustrates the Data Import - Select Target Field page (1 of 2).
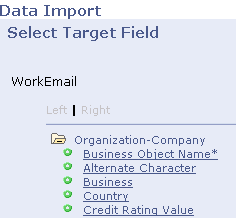
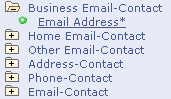
An intermediate level in the hierarchy, Contact, is not shown. The Lname field in the Contact folder is required and selected. The target field, Email Address, is defined in the lowest level folder,Business Email-Contact.
Image: Data Import - Select Target Field page (2 of 2)
This example illustrates the Data Import - Select Target Field page (2 of 2).
Mapping Source Fields to Target Fields
To map the source flat file fields to target fields, use the Step 3: Mapping region. Select a target for each field on the import file.
|
Field or Control |
Definition |
|---|---|
| Ignore |
Select to ignore this field and not import it when you perform the import process. This is useful for when you reuse import templates and want to import only a subset of the premapped fields. |
| Import |
Select to import this field when you perform the import process. |
Advanced Mapping Actions
The advanced mapping actions enable you to update database records when a one-to-one correspondence does not exist between database fields and fields in the import file.
|
Field or Control |
Definition |
|---|---|
| Mapping Action |
Select one of the following values:
|
| Value |
Enter the constant value with which to populate the target field. For example, if Country is a field in the database, and all input records are for France, you would enter a value of FRA. This field appears only if you select a mapping action of Value. To enter data, time, or date values, consult PeopleTools documentation to determine the correct formats. |
| Specify Concatenation |
Click to access the Specify Concatenation page, where you can select the fields and values that are concatenated to form the target field. |
| Field Label |
Select the field to be map to the target field from the available choices. |
Use the Specify Concatenation page (RB_MAP_CONCAT) to specify the fields and values that are concatenated to form the target field.
Navigation
Select a mapping action of Concatenate in the Advanced region of the Data Import - Step 3: Mapping page and click the Specify Concatenation link.
Image: Specify Concatenation page
This example illustrates the fields and controls on the Specify Concatenation page. You can find definitions for the fields and controls later on this page.

|
Field or Control |
Definition |
|---|---|
| Concatenation Type |
Select Value to specify a constant in the Value column and Field to select from the import field labels in the Field Label list. |
Use the Data Import - Step 4: Matching page (RB_IMP_MATCH_ADV) to define the matching rules for the import data.
For example, define which existing field or set of fields in the PeopleSoft CRM database you want to specify as constituting a match for an individual or organization record.
Navigation
Click the Next button on the Data Import - Step 3: Mapping page.
Image: Data Import - Step 4: Matching page
This example illustrates the fields and controls on the Data Import - Step 4: Matching page. You can find definitions for the fields and controls later on this page.
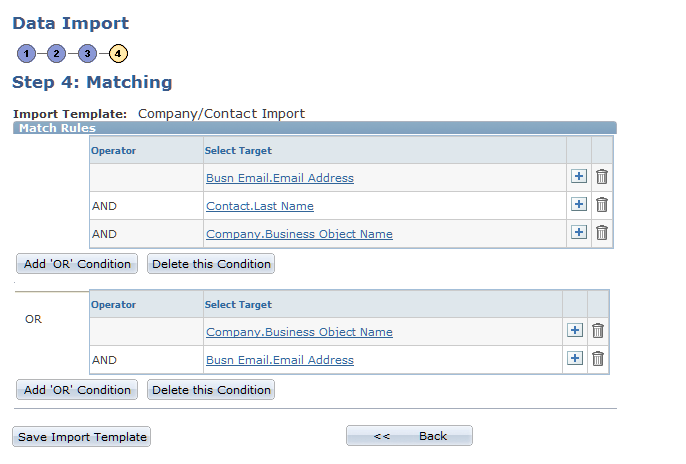
This page enables you to specify the database fields that must match fields in the import file to update the database from the import file. If no match is found, the system inserts the incoming row as a new record in the CRM database. If a match is found, the system updates the existing record with new information from the file. You can override the update by deselecting the Update Matched Records check box when running the import process. In that case only, the system writes matched records to the error file.
New data never overwrites or updates an existing record's contact method fields (phone, email, and address); the new fields are appended as additional contact methods. All other types of mapped fields are updated or overwritten by the new data for matched records.
Warning! All fields, including email address, are case-sensitive for matching. To avoid instances in which a match is not found due to case-sensitivity, you should convert fields such as email address to lowercase prior to import. For example, convert Joe_Smith@ABC.com to joe_smith@abc.com before importing the file.
Matching Logic
Each template's matching criteria consists of one or more OR conditions, each of which contains an AND condition or a single field that must match. For example, in the condition shown, either all three of the fields, Busn_Email.Email Address, Contact.Last Name, and Company.Business_Object_Name must match their corresponding database fields or both of the fields Company.Business_Object_Name and Busn_Email.Email Address must match the database fields.
Note: You cannot nest conditions.
|
Field or Control |
Definition |
|---|---|
| Add 'OR' Condition |
Click to add an OR condition to the statement. |
Note: You might see matching statements with conditions that are separated or nested using parentheses. These statements were developed in a previous version of PeopleSoft CRM. For upward compatibility, these statements act the same as they did in previous versions. However, if you make any changes to the statement, you must enter it in the new format
Use the Save Confirmation page (RB_IMP_CONF_PG) to verify import template creation.
Navigation
Click the Save Import Template button on the Data Import - Step 4: Matching page.
This page displays:
A message that indicates whether the template is saved successfully.
The Import status is set to Active.
The Run Data Import link.
Click this link to access the Run Data Import page and immediately run the import process.
The Go Back to Import Definition link.
Click this link to access the Data Import - Step 1: Define Import Template page, view the existing template, and make any necessary changes.