Registering a Profile
When a profile request is set to a status of Requested, it becomes available for registration and activation. Registration is the process of mapping the profile fields to a profile table (record) and then making the profile available for use. Registration is a simple matter of linking the profile to the profile table and activating the profile.
Note: Map to Existing Field field value types rely on an underlying prompt table for field values.
Choose Many field value types rely on a child table for field values.
If you have purchased PeopleSoft Online Marketing, the following characters cannot be used in profiles being used for Online Marketing documents: ampersand (&), apostrophe or single quote ('), double quote (“), greater than (>), less than (<), or period (.).
Critical Information for System Administrators
System administrators who are responsible for creating profile tables should become fully familiar with PeopleSoft Application Designer. To ensure proper interaction between PeopleSoft Marketing and Online Marketing, you must follow specific record and view design parameters.
See PeopleTools: PeopleSoft Application Designer Developer's Guide
This table lists information that applies to profile table fields that are created using PeopleSoft Application Designer:
|
Profile Field Type |
PeopleTools Field Type |
Notes |
|---|---|---|
|
Choose Many |
NA |
Separate child table is needed. No new fields are required for the profile record. |
|
Choose One |
Char (254) |
|
|
Choose One with Rating |
Number (18,0) |
Must be signed. |
|
Date |
Date |
|
|
Decimal |
Number (18,4) |
Must be signed. |
|
File |
Char (254) |
|
|
Integer |
Number (18,0) |
Must be signed. |
|
Map Field Choice to Prompt |
Char (x) |
Map Field Choice to Prompt fields cannot be included in profile tables with any other type of field. Oracle recommends that you create a view for this data rather than a profile table. The field that is referenced determines the PeopleTools field type. See the section related to building views in the PeopleSoft Application Designer documentation. |
|
Text |
Char (X) |
X represents the desired field length as defined in the profile definition request . |
|
Text Block |
Long Character |
|
|
Time |
Time |
|
|
Yes/No |
Char (1) |
The following information applies to profile tables (records) created using PeopleSoft Application Designer:
One Row profile records require the BO_ID field (as a key and search key field) and all other fields as defined in the profile request (as non-keys). At the end of the record, include the RB_AUDIT_SBR subrecord.
Many Rows profile records require the BO_ID and RA_ATTRIB_SEQ fields (as key and search key fields) and all other fields as defined in the profile request (as non-keys).
At the end of the record, include the RB_AUDIT_SBR subrecord. Also, you must create a new index. When you create the index, add comments and make sure that the clustered and unique check boxes are deselected. Add the BO_ID field to the index.
A record that includes a Choose Many use type must also have a child record to contain the choices that are selected by the respondent.
The child record requires the BO_ID and RA_ATTRIB_SEQ fields (as key fields), CHOICE (as a non-key field), and the RB_AUDIT_SBR subrecord. These are the only fields you should have on your Choose Many child record. Also, you must create a new index. When you create the index, add comments and ensure that the clustered and unique check boxes are deselected. Add the BO_ID field to the index.
A record that includes a Text Block use type must also have a child record to contain the choices that are selected by the respondent.
The child record requires the BO_ID and RA_ATTRIB_SEQ fields (as key fields), LONG_TEXT (as a non-key field), and the RB_AUDIT_SBR subrecord. These are the only fields you should have on your Text Block child record. Also, you must create a new index. When you create the index, add comments and ensure that the clustered and unique check boxes are deselected. Add the BO_ID field to the index.
Profile records must follow a standard naming convention (<recprefix>_<profileName>) that uses the record prefix that is designated on the Profile Setup page. For example, if the record prefix is OMP, and your profile record relates to pets, you might use the name OMP_PETS.
Note: Unless the system administrator decides to create a custom tablespace for profile tables, use the RALARGE tablespace.
|
Page Name |
Definition Name |
Usage |
|---|---|---|
|
RA_PROFILE_DTL |
View the profiles that are registered. |
|
|
Profile Registration - Profile Fields - Field Summary |
RA_ATTRIBUTE_SUMM |
Enter or view summary information about profile fields. |
|
Profile Registration - Profile Fields - Field Detail |
RA_ATTRIBUTE_DTL |
Enter or view detailed information about profile fields. |
Use the Profiles page (RA_PROFILE_DTL) to view the profiles that are registered.
Navigation
Image: Profiles page
This example illustrates the fields and controls on the Profiles page. You can find definitions for the fields and controls later on this page.
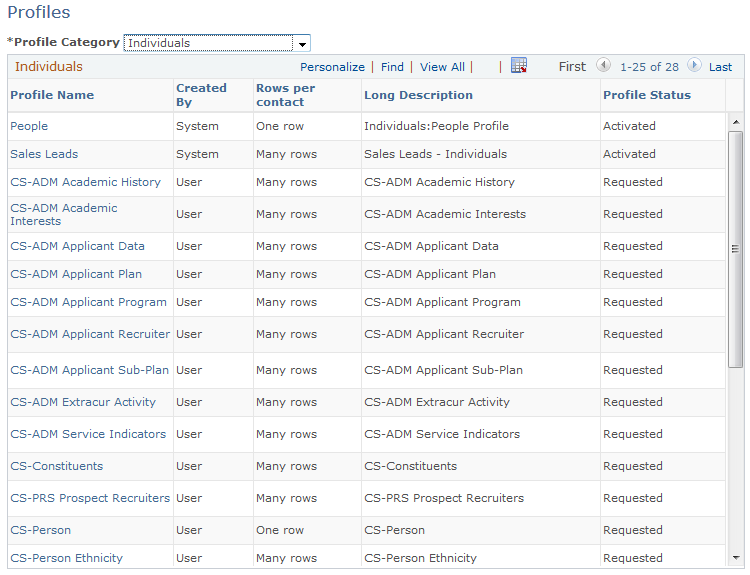
This page enables you to view all the profiles that are defined to the system. Click a profile name to view or modify profile detail.
Use the Profile Registration - Profile Fields - Field Summary page (RA_ATTRIBUTE_SUMM) to enter or view summary information about profile fields.
Navigation
Click a Profile Name link on the Profile page.
Click the Field Summary link on the Profile Fields - Field Detail page.
Image: Profile Registration - Profile page
This example illustrates the fields and controls on the Profile Registration - Profile page. You can find definitions for the fields and controls later on this page.
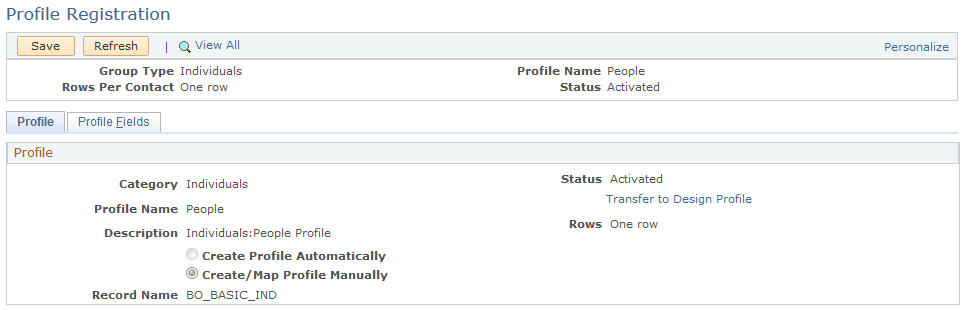
|
Field or Control |
Definition |
|---|---|
| Status |
Select Activated when the profile registration is complete. This makes the profile available for use. Select Rejected when the profile request is unacceptable and must be redefined or discarded. Select Requested when the profile has not been registered and activated. Note: If the profile was automatically created, and reactivation requires changes to the record (table), the profile status is changed to Activating until the necessary processing is complete. |
| Create Profile Automatically |
Select to generate the profile record to use to store the profile information automatically. |
| Create/Map profile Manually |
Select to map the profile and the record where the profile information is stored manually. The record must be created in the application designer in advance. If this option is selected, specify the record in the Record Name field. |
| Record Name |
Select the record (table) that was created for this profile. |
Use the Profile Registration - Profile Fields - Field Detail page (RA_ATTRIBUTE_DTL) to enter or view detailed information about profile fields.
Navigation
Click the Field Detail link on the Profile Fields - Field Summary page.
Note: The Profile Fields pages of profiles that were automatically created (and thus, automatically mapped) do not display the Record Name and Field Name columns on the Profile Fields grid.
Image: Profile Registration - Profile Fields page
This example illustrates the fields and controls on the Profile Registration - Profile Fields page. You can find definitions for the fields and controls later on this page.
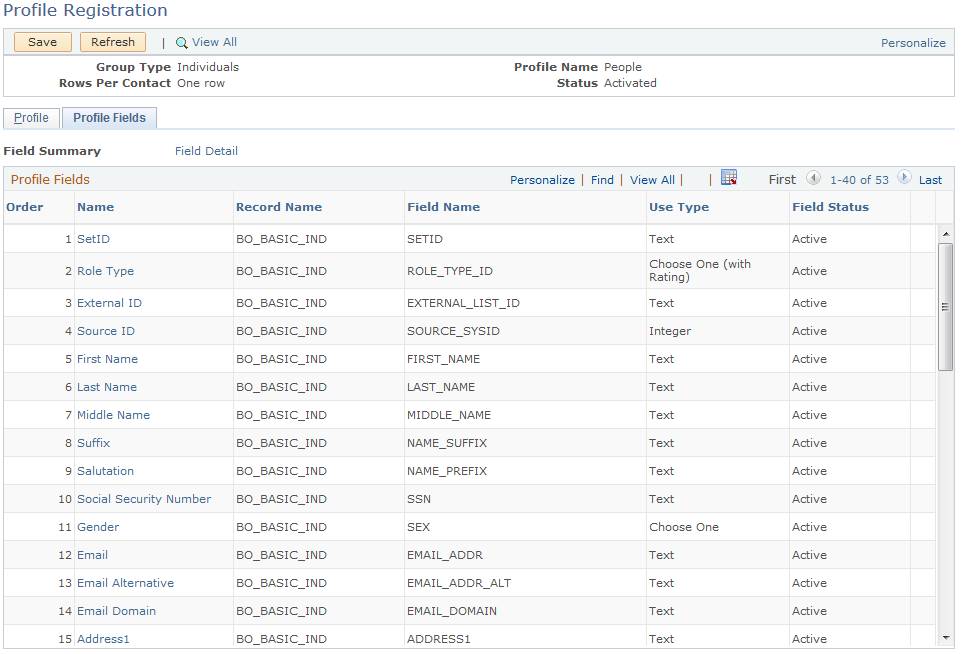
|
Field or Control |
Definition |
|---|---|
| Name |
Displays the profile field name. |
| Record Name |
Confirm the profile table record name. If the profile field is a Choose Many or Text Block use type, select the correct child record. If the profile field is a Map to Existing Field use type, confirm that the Map to Field field on the Profile Fields - Field Detail page is set to the appropriate prompt table record name. |
| Field Name |
Select the profile record field name that corresponds to the profile field name. |
| Delete |
Click to remove a profile field. Note: Fields cannot be deleted from an activated profile. After a profile is activated, you can update field details, but the changes affect profile use only from the time of the change forward. |
Completing the Activation Process
When the profile fields are matched to the profile table (registered), return to the Profile Registration - Profile page, set the profile status to Activated, and save the page to activate the profile.