Running the Data Import Application Engine Process (RBIMPORT)
This topic discusses how to run the Data Import process.
|
Page Name |
Definition Name |
Usage |
|---|---|---|
|
RB_IMP_RUN_CONFSRC |
Search for and view existing templates to use for the Data Import process. |
|
|
Data Import |
RB_IMP_RUN_DATA_PG |
Run the Data Import process. |
|
Import Multiple Files |
RB_IMP_MULTI_FILES |
Search for and upload additional files for data import. |
Use the Data Import page (RB_IMP_RUN_CONFSRC) to search for and view existing templates to use for the Data Import process.
Navigation
Image: Data Import page (1 of 2)
This example illustrates the fields and controls on the Data Import page (1 of 2). You can find definitions for the fields and controls later on this page.
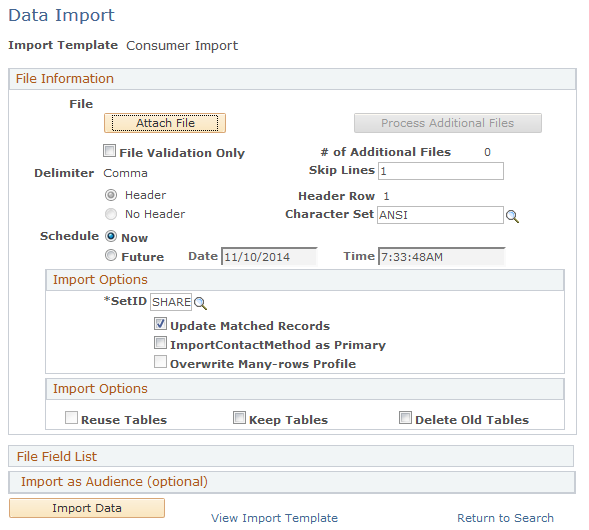
File Information
|
Field or Control |
Definition |
|---|---|
| Attach File and View File |
Click to access a page where you can search for and upload the import file. After you attach a file, the button text changes to View File. |
| Process Additional Files |
Click to upload one or more additional flat files. The system processes all attached flat files in parallel; this enables you to speed up the data import process by breaking up one large file into smaller files. |
| File Validation Only |
Select to perform data validation tests of the Data Import process before you actually perform the process. This is a preventive step that is useful for new files from unknown vendors. This option runs the Data Import process to validate data types that are within the file, but it doesn't perform the data update. For example, if a character string is mapped to a number field or a mapped date is not in the correct format, an error occurs. The process also checks whether mapped fields are longer than the target field. The end result is an error file that contains all of the input rows with detailed error messages so that you can make corrections. |
| Schedule |
Select Future and enter a date and time when the Data Import process is to run, or select Now. If you enter a past date, the system runs the process immediately. |
| Character Set |
Select the input data file type, for example, UTF8. All installed character sets are available for selection. |
| Update Matched Records |
Select to specify that target data be updated with source data from the flat file when a match exists between a source record and an existing target record in the database. The rules that you set up on the Data Import - Step 4: Matching page determine the match. If you do not select this check box, you must view the error file to see a list of the records that match but are not updated. See Data Import Page. Note: Contact method fields are never updated with imported data; instead, the new information is added to the database. |
| Import Contact Methods as Primary |
Select to enforce that an imported contact method is checked as Primary. This overwrites existing primary flags in the PeopleSoft CRM database. If you do not select this check box (which is deselected by default), the system still imports all mapped contact methods, but none are flagged as Primary. Every PeopleSoft CRM business object supports multiple contact methods of each type. For example, a contact or consumer who is named John Doe can have multiple business email addresses, multiple home phone numbers, and so on. However, John Doe can have only one primary home phone number. |
| Overwrite Many-Rows Profile |
Select to overwrite existing data if multiple rows of information can exist for a business object, for example, contact methods for a customer. If this check box is not selected, the Data Import process inserts new database records with the imported data. |
|
Field or Control |
Definition |
|---|---|
| Reuse Tables |
Select to use existing stage and matching SQL tables that were generated in a previous run of the template. |
| Keep Tables |
Select to retain the stage tables. This option is selected and disabled by default if the Reuse Tables option is selected. |
| Delete Old Tables |
Select to remove all previous versions of the stage and matching tables, but keep the current one. This option is selected by default if stage and matching tables exist from a previous run. |
| Import Data |
Click to run the Data Import process and open the Import Status group box, which displays the status of the Run Data Import process and contains a View Import Statistics link. |
File Field List
The File Field List region displays the fields that are associated with the import template. This enables you to verify whether the import works in the case where you access the Data Import process directly from the menu and use an existing template.
Import As Audience
The fields in this section function similarly to the identical fields on the Define Import Template page. Values that you enter override the value on the import template.
Import Status
The Import Status group box appears only after you click the Import Data button.
|
Field or Control |
Definition |
|---|---|
| View Import Statistics |
Click to access the View Import Statistics page. Note: New contacts who are imported for existing companies are reported as updates because this updates the company's contact data. |