Understanding Material Return Processing
If you integrate PeopleSoft Support with PeopleSoft Inventory and PeopleSoft Purchasing or a third-party inventory and purchasing system, call center agents can generate RMAs for customers returning stock for replacement, repair, or stock that was shipped in error.
This topic discusses:
RMA process flows.
RMA notifications.
We discuss this information in the documentation for understanding requisitions and understanding purchase orders.
See PeopleSoft FSCM: Purchasing
Note: This chapter is relevant to PeopleSoft Support only; PeopleSoft HelpDesk applications do not incorporate RMA functionality.
Agents using PeopleSoft Support can create four types of RMAs:
Advanced exchange
Return-and-replace
Repair-and-return
Return-to-stock
Basic RMA Processing
Regardless of RMA type, some processing steps are shared by all RMAs that are created in PeopleSoft Support:
A customer calls the agent and requests an RMA.
The agent opens a new or existing case for the customer and creates an RMA in PeopleSoft Support.
When the agent saves the RMA, the system uses the Return Material Authorization EIP (referred to as RMA Form EIP in the diagram) to stage the RMA for processing in the inventory business unit that has been defined on the RMA as the location to send the returned material.
The customer physically returns the material to the inventory business unit.
In PeopleSoft Inventory, or your third-party inventory system, receipt of the returned material is recorded and the RMA is closed in the inventory system.
Your inventory system handles the receipt status management for RMAs.
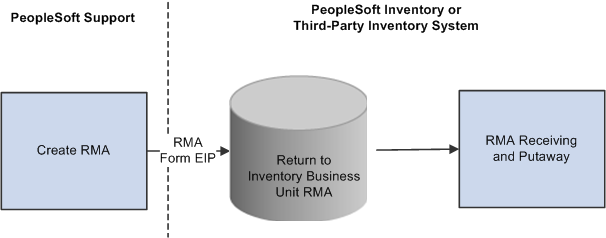
Image: Basic RMA processing flowBasic RMA processing flow process flowsBasic RMA
This diagram illustrates the basic RMA processing flow from PeopleSoft Support through PeopleSoft Inventory or a third-party inventory system.
We discuss this information in more detail in the Financials/Supply Chain Management documentation for defining general options.
See PeopleSoft FSCM: Application Fundamentals
Advanced Exchange RMAs
With the advanced exchange RMA type, you can create a replacement order for the customer at the time that you create the RMA. Specify the replacement item or items on the RMA line.
The replacement order can include any of the active items in your system. When you save the RMA form, the system stages the RMA in your inventory system using the Return Material Authorization EIP and creates a requisition request for the replacement order in your purchasing system using the Purchase Order Requisition EIP (referred to as PO Requisition EIP in the diagram).
The system obtains the ship to address for the customer's replacement order from the RMA form.
We discuss this information in more detail in the documentation for enterprise integration points, understanding the EIP catalog.
See PeopleTools: Integration Broker Service Operations Monitor and PeopleTools: Integration Broker Testing Utilities and Tools.
Image: Advanced exchange RMA processing flowAdvanced exchange RMA processing flowRMAsprocessing flow for advanced exchange RMA
This diagram illustrates the advanced exchange RMA processing flow.
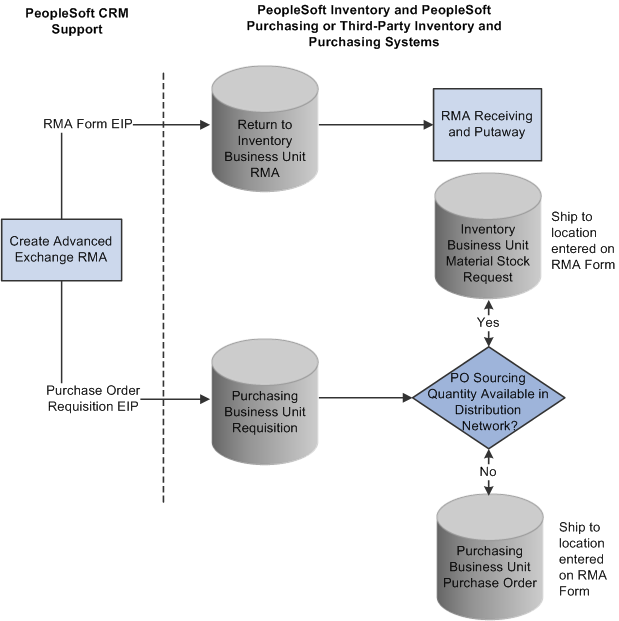
The Purchase Order Requisition EIP enables you to requisition a replacement for the customer at the time that the advanced exchange RMA is created.
Note: PeopleSoft Purchasing, or your third-party purchasing system, handles the processing of the requisitions that are staged by the Purchase Order Requisition EIP. In your purchasing system, you must set processing defaults for the staged requisitions and perform any required actions to complete the ordering process.
Return-and-Replace RMAs
Unlike the advanced exchange RMA, orders for return-and-replace RMAs are not created until the returned material has been physically received in the location specified as the return-to business unit. Follow these steps to process a return-and-replace RMA:
When a person records receipt of material on a return-and-replace RMA in your inventory system, the inventory system displays a message indicating that a replacement order is required.
Depending on your business process rules, the person manually enters a material stock request in your inventory system or a requisition in your purchasing system to replace the customer's returned material.
The person receiving the returned material uses the information on the RMA, such as the customer's address, information about the item, and quantity returned, to create the replacement order.
To facilitate tracking of the replacement order in your inventory or purchasing systems, the same ID as the RMA should be used when the person manually creates replacement requisitions or material stock requests.
Image: Return-and-replace RMA processing flowReturn-and-replace RMA processing flow process flowsReturn-and-replace RMA
This diagram illustrates the return-and-replace RMA processing flow.
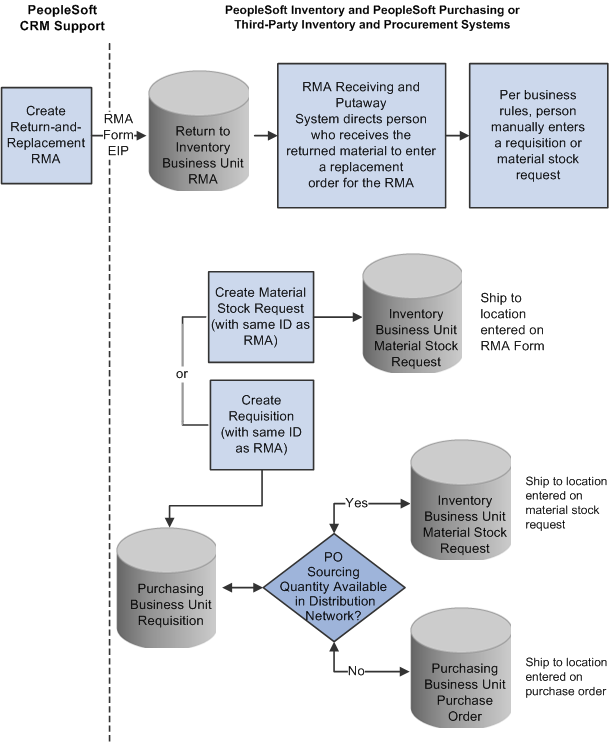
For return-and-replace RMAs, replacement orders are manually created in your inventory or purchasing systems after the returned material has been physically received from the customer.
Repair-and-Return RMAs
You create repair-and-return RMAs when a customer sends an item back to you for repair. As delivered, PeopleSoft CRM does not offer repair depot functions. However, if your business includes repair services, you can use the repair-and-return RMA option in conjunction with your business process rules. The repair-and-return RMA processing is similar to return-and-replace RMA processing:
A person creates an RMA for a customer in the specified return-to business unit in your inventory system.
A staff member, in the facility where the item needing repairs is sent, records the receipt of the RMA in your inventory system.
The staff member creates a work order for the repairs, according to your business rules, and delivers the item to the appropriate staff for repair work.
The work order should include the ship to address for the customer who appears on the RMA form and the RMA number (to facilitate RMA tracking across your enterprise).
The material is shipped back to the customer using the address information from the RMA when the repair work is complete.
Image: Repair-and-return RMA processing flowrepair-and-return RMA processing flow process flowsRepair-and-return RMA
This diagram illustrates the repair-and-return RMA processing flow.
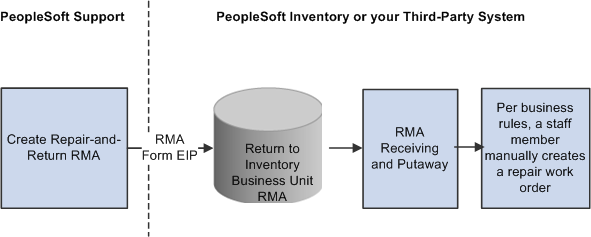
For repair-and-return RMAs, repair work orders are manually created per your business rules when the returned material is physically received from the customer.
Return-to-Stock RMAs
You create a return-to-stock RMA for a customer who is returning material with no need for a replacement. Typically, the customer has received the wrong shipment or been shipped too much quantity. The process flow for a return-to-stock RMA is identical to the basic RMA processing flow.
We discuss this information in more detail in the documentation for receiving and putting away stock and transferring stock between business units.
See PeopleSoft FSCM: Inventory
Note: You can create RMAs for customers who return stock for orders that they placed but then changed their minds about the order at the time of receipt. For billing purposes, use the RMA processes of your order management system to handle these cases.
As delivered, PeopleSoft Support offers the RMA receipt notification workflow. You can use this workflow to notify the receiving manager and receiving agent when an RMA shipment is expected from a customer. Once the workflow is set up, the system sends your receiving managers and receiving agents a notification each time that a new RMA is saved in PeopleSoft Support.
RMA Receipt Workflow Notifications Setup
To enable RMA notifications, you must define people in your system with receiving manager and receiving agent roles and establish their routing preferences and email addresses.
To set up RMA notification workflow:
Assign the receiving manager and receiving agent roles to the appropriate employees in your system.
When an RMA is created, the receiving managers and receiving agents receive notification that a receipt for returned material is expected. You associate the receiving manager or receiving agent role to a person in your system on the Roles page under User Profiles.
We discuss this procedure in the documentation for setting up user profiles.
Define notification routing preferences for the people assigned the receiving manager and receiving agent roles.
When an RMA is created, the notification is published as a worklist entry, an email, or both, depending on the routing preferences defined for the group member on the Workflow page accessible through User Profiles. On that page, indicate whether the person is a worklist user, an email user, or both.
Note: Note that if you select both the Worklist User and Email User check boxes for the person, two notices—an email and a worklist entry—are published each time the workflow process is triggered for an RMA that is created. Define an email address for each person with an email notification preference.
Define valid email addresses for the people who receive email notifications.
For each person with an email routing preference for RMA notifications, define a primary email address in the Worker component.
Note: Person IDs defined for the worker are associated with user IDs on the User Profile page under or the User Profile component under For workflow notifications to work as designed, link each person in your system to one user ID only.
(Optional) Associate worklist groups with the people who are assigned receiving manager and receiving agent roles.
When an RMA is created, a worklist entry can be created for the worklist group that is established for the people who are assigned receiving manager and receiving agent roles in your system. A worklist group must first be defined on the Group Worklist Setup page.
See the product documentation for PeopleTools: System and Server Administration.