Implementing Self-Service Security
To implement self-service security, use the Security Privilege (RB_SRTY_PRIV_DELTA), Role Privilege (RB_SRTY_PRIV_DFLT), Guest Registration (RX_GUEST_REG_TMPLT), Customer Registration (RX_CUST_REG_TABLE), Representative Registration Table (RX_REP_REG_TABLE), Security Privilege (RB_SRTY_PRIV), and Registration Text Setup (RX_REGTXT_SETUP), components.
This topic provides overviews of privilege codes and custom privilege codes.
|
Page Name |
Definition Name |
Usage |
|---|---|---|
|
RB_SRTY_PRIV |
Define the privileges that are associated with the privilege codes. |
|
|
RB_SRTY_PRIV_DELTA |
Assign user privileges. |
|
|
RB_SRTY_PRIV_DFLT |
Assign privileges to roles. |
|
|
RX_CUST_REG_TABLE |
Create templates of records and fields to be used on the User Registration Setup page. |
|
|
RX_REP_REG_TABLE |
Register business users. |
|
|
RX_GUEST_TEMPLATE |
Register guest users. |
|
|
RX_REGTXT_SETUP |
Set up terms and condition statements for users completing self-service registration. |
|
|
RX_TERMS_SETUP |
Set up terms of service statements for users completing self-service registration. |
|
|
RX_PRVACY_SETUP |
Set up privacy policy statements for users completing self-service registration. |
The self-service functionality within PeopleSoft CRM applications includes a predefined set of privilege codes. Assign these privilege codes to users or roles to provide security for particular types of transactions, as defined in the usage column in this table:
|
Privilege Code |
Description |
Usage |
Is Amount Associated? |
|---|---|---|---|
|
ORDERSAVE |
Save orders. |
Enable users to save orders. (The button is available or unavailable.) |
No. |
|
QUOTESAVE |
Save quotes. |
Enable users to save quotes. (The button is available or unavailable.) |
No. |
|
ADDRMAINT |
Maintain existing address. |
Enable users to update existing addresses. (The button is available or unavailable.) |
No. |
|
ADDRMAINTCNT |
Maintain existing contact. |
Enable users to update existing contacts. |
No. |
|
ADDRNEW |
Add new address. |
Enable users to add new addresses. (The button is available or unavailable.) |
No. |
|
ADDRNEWSITE |
Convert address to site. |
Enable users to convert the address to site. (The button is available or unavailable.) |
No. |
|
ADDRNEWCNTCT |
Add new contact person. |
Enable users to add a new contact person. (The button is available or unavailable.) |
No. |
|
NEWACCT |
Create new account. |
Enable users to create a new account. |
No. |
|
VIEWALLORDRS |
View all orders. |
Enable users to view all orders placed by others with an amount less than the amount specified. (The rows are available or unavailable.) |
Maybe. You can use the operator code for less than (<) or less than or equal to (<=) to include a dollar amount. |
|
VIEWALLQUOTS |
View all quotes. |
Enable users to view all quotes that were placed by others with an amount that is less than the amount specified. (The rows are available or unavailable.) |
You can use the operator code for less than (<) or less than or equal to (<=) to include a dollar amount. |
You can define your own privilege codes and associate them with transactions on the User Privileges page and Role Privileges page. After you define the privilege codes, you must add the custom code to the transaction that has the custom security level.
To define a privilege code that prevents consumers from ordering more than 100,000 USD worth of goods:
Define the Order Amount privilege code (CUSTORDAMT).
On the Role Privileges page, assign the privilege code to the individual consumer role and specify that the amount must be less than 100,000 USD.
On the FieldChange event of the Order Submit button, add the following code:
Declare Function IsTransactionAuthorized PeopleCode FUNCLIB_RB.SRTY_PRIV_CD FieldFormula;

Local number &output_msg_set_nbr, &output_msg_nbr;

If Not IsTransactionAuthorized(&roleType, &strPersonID, &numBOIDCustomer,
 CUSTORDAMT, &numAmount, &output_operator_cd, &output_amount_qty, &output_msg_set_nbr, &output_msg_nbr) Then
   If All(&output_msg_set_nbr, &output_msg_nbr) Then
      Error MsgGet(&output_msg_set_nbr, &output_msg_nbr, "Message Not Found.");
   End-If;
End-If;
In the preceding code example, pass &roleType as 9 (the Individual Consumer role). Pass &strPersonId as the person ID, and pass &numBOIDCustomer as the customer's business object ID. The privilege code is CUSTORDAMT, which is your defined custom privilege code. &numAmount is the amount of the customer's order. The remaining parameters are output parameters that you do not need to pass.
Use the delivered PeopleSoft CRM self-service code as an example to customize security of other transactions.
Use the Security Privilege Code Setup page (RB_SRTY_PRIV) to define the privileges that are associated with the privilege codes.
Navigation
Image: Security Privilege Code Setup page
This example illustrates the fields and controls on the Security Privilege Code Setup page.

Enter a description of the privilege code that you are adding.
Use the Assign User Privileges page (RB_SRTY_PRIV_DELTA) to assign user privileges.
Navigation
Image: Assign User Privileges page
This example illustrates the fields and controls on the Assign User Privileges page.
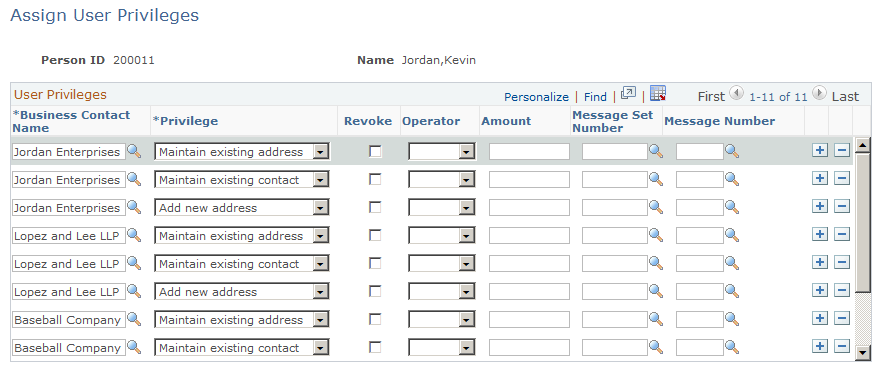
Define user privileges by associating a person with a business contact and assigning privilege codes. The business contact is typically a customer that the person represents. The user privileges enable you to define self-service security more specifically than the role privileges.
For example, suppose that a contact's role privileges do not enable the contact to update customer address information. If you need to enable a particular contact to update addresses, you could do that by assigning the user privilege to that contact. Conversely, suppose that a contact's role can submit a quote, but you want to revoke a particular contact's privilege to submit quotes. You do that by adding the privilege for submitting quotes and then selecting the Revoke check box.
|
Field or Control |
Definition |
|---|---|
| Business Contact Name and Privilege |
Select the business contact's name and the privilege code. |
| Revoke |
Select to revoke a privilege. |
| Operator and Amount |
For transactions that are dependent on an amount, you can define privileges that are associated with particular amounts. If the system authenticates the user for the amount, it displays the appropriate information. For the Amount field, only numeric values are relevant; the system does not take the currency into account. |
| Message Set Number and Message Number |
Associate a default message in case of authorization failure. If authorization fails, the transaction that failed can display the default message or its own message. |
PeopleSoft Order Capture Self Service is delivered with two privilege codes that are built to use privilege amounts: View All Orders (VIEWALLORDRS) and View All Quotes (VIEWALLQUOTS). These privileges are associated with an amount that further restricts access to order or quotes over a certain dollar amount.
Use the Assign Role Privileges page (RB_SRTY_PRIV_DFLT) to assign privileges to roles.
Navigation
Image: Assign Role Privileges page
This example illustrates the fields and controls on the Assign Role Privileges page.
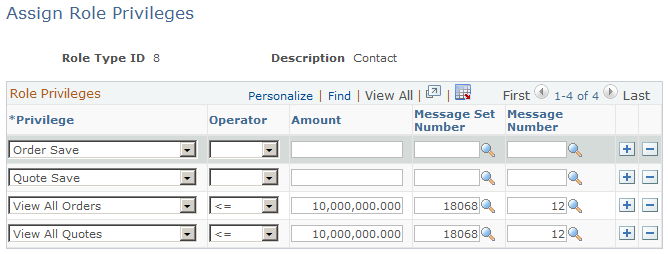
Only two business object roles (as defined in the Customer Data Model) are supported with PeopleSoft CRM self-service. These are consumer and contact. View the sample data for the role privileges and follow the sample as a guideline. If you have transactions for which data filtration is based on an amount, use the Amount field.
|
Field or Control |
Definition |
|---|---|
| Amount |
Use this field if you have transactions for which data filtration is based on an amount. |
| Message Set Number and Message Number |
Associate a default message in case of authorization failure. If authorization fails, the transaction that failed can display the default message or its own message. |
Use the Existing Customer User Registration Setup page (RX_CUST_REG_TABLE) to create templates of records and fields to be used on the User Registration Setup page.
Navigation
Image: Existing Customer User Registration Setup page
This example illustrates the fields and controls on the Existing Customer User Registration Setup page.
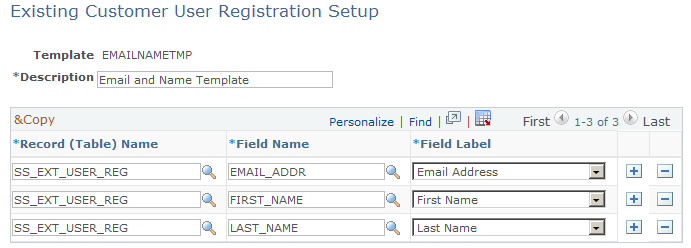
Use this page to set up templates for the fields and records that you want to use for customer registration. Once you save the template, you can select it from the Template field within the Customer Registration Fields group box on the User Registration Setup page.
When you set up existing customer user registration, you specify the information that customers enter to verify their status as existing customers. The system uses this as a template that appears for customers to enter the information
Note: For security reasons, set up at least two keys that are known only to the user.
Use the Business User Registration Setup page (RX_REP_REG_TABLE) to register business users.
Navigation
Image: Business User Registration Setup page
This example illustrates the fields and controls on the Business User Registration Setup page.
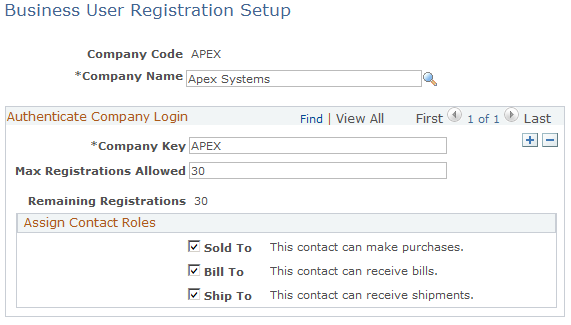
To administer self-registration as a business user (a contact of a company), use the Business User Registration Setup page to establish a company code and password (company key).
The company name is the company for whom you are setting up the registration keys. When a self service user or external company administrator uses the company key to register, the user that is created by the system is tied to the company defined on this page.
|
Field or Control |
Definition |
|---|---|
| Company Key |
Enter a value that you provide to a company administrator so that their users can self-register and gain access to the site. The company code and key are used to authenticate users who attempt to register at the self-service site. |
| Max Registrations Allowed (maximum registrations allowed) |
Enter the number of users that are permitted to register with this specific company code. |
| Assign contact Roles |
Select Sold To, Bill To, or Ship To to establish the capacity of the business users that represents the company. |
Use the User Registration Setup page (RX_GUEST_TEMPLATE) to register guest users.
Navigation
Image: User Registration Setup page (1 of 2)
This example illustrates the fields and controls on the User Registration Setup page (1 of 2).
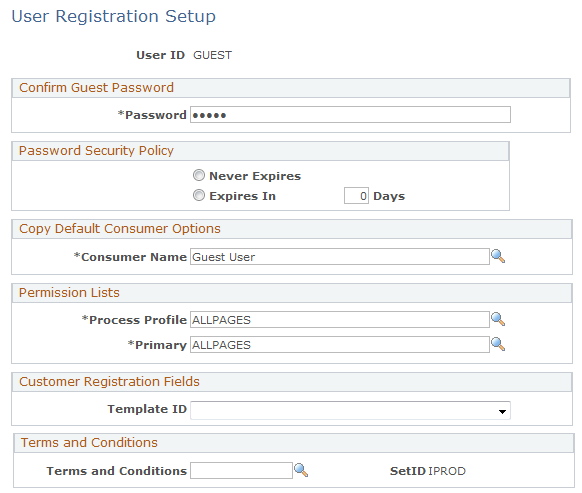
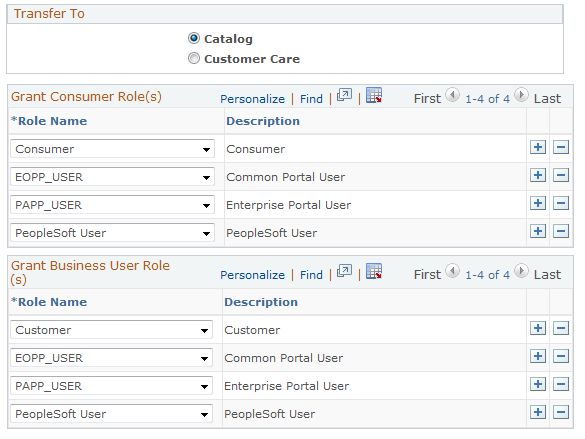
Image: User Registration Setup page (2 of 2)
This example illustrates the fields and controls on the User Registration Setup page (2 of 2).
Self-service security is controlled by privileges that you establish and assign to guest user IDs. When a user registers, the system clones the currently active guest ID, with all its access privileges, to create the new user ID, and then creates the necessary customer or consumer record in the CRM database.
See Setting Up Guest IDs to Access Self-Service Sites.
To administer registration through PeopleSoft CRM self-service, you must set up a guest user ID. The guest user acts as an administrator and provides the defaults that are necessary to establish new users.
|
Field or Control |
Definition |
|---|---|
| User ID |
Displays the guest user ID, which is used to make the self-service site available to anonymous users. You can add several guest users. Associate each guest user with a different business unit that is defined on the User Preferences page. By defining several guest users, you can provide access to different self-service sites that support different segments of the business. For example, suppose that the user ID GUEST is associated with business unit US001, which sells sporting good products. When you implement these sites, you can define both guest users, and users can access either site depending on the guest user ID that they supply. Similarly, you can make the language of a site dependent on the guest user ID. |
| Password |
Enter the exact password that authenticates the guest user. The user ID and password in combination are either appended to the URL string that provides direct access to the site or is placed in the config.properties file in PeopleTools installation. Refer to the installation instructions for more information about installing direct access to your website. |
| Password Never Expires and Password Expires in Days |
Select one of these values to indicate when the password expires. If you select Password Expires in Days, enter the number of days. |
| Consumer Name |
Select the template that you want to use for the consumer name. Guest users visiting the self-service site might create their own accounts but only provide minimal information, such as user ID, password, name, email, phone, and address information. The guest user does not enter other required information, such as currency, payment method, and carrier information, which appears by default from the template consumer. |
| Process Profile and Primary |
Assign an appropriate permission list that has access to run batch processes. This permission list is copied to the new user that is created through self-service. |
| Template |
Select the template that contains the fields and records that you want to use for guests using self-service registration. |
| Terms and Conditions |
Select the template that contains the terms and conditions, terms of service, and privacy statements that you want to use for guests using self-service registration. |
| Catalog and Customer Care |
Select the item to which you want to direct self-service users. |
| Role Name |
Grant roles for consumer and business users by selecting role names from the lists in the Grant Consumer Role(s) and Grant Business User Role(s) grids. You can add as many roles as you want. When a consumer is created, the consumer roles that you specify are assigned to the new consumer user; and when a business user is created, the business user roles that you specify are assigned to the new business user. To enable guest users to create their own user IDs, you must define the roles that a guest user can grant to create self-service users. For example, in the delivered sample data, the GUEST role and the PeopleTools role UPG_ALLPAGES can grant the consumer role. When the VP1 user signs in to set up the guest user registration, that user can select the consumer role. When the guest user or an anonymous user registers as a consumer, the system assigns the new user to the consumer role. |
Use the Terms and Conditions - Self Service Registration page (RX_REGTXT_SETUP) to set up terms and condition statements for users completing self-service registration.
Navigation
Image: Terms and Conditions - Self Service Registration page
This example illustrates the fields and controls on the Terms and Conditions - Self Service Registration page.
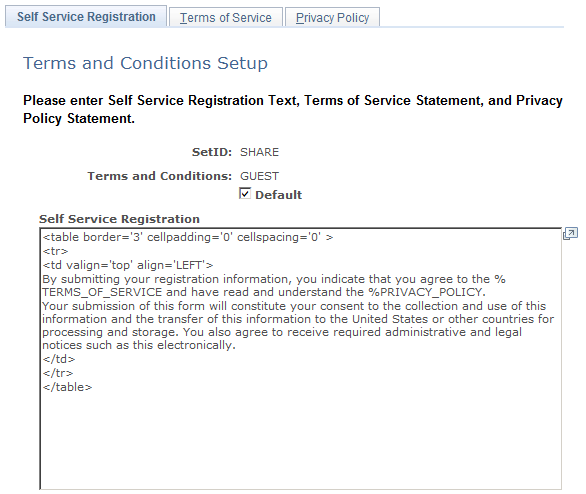
Enter the text for the terms and conditions that you want users to see during self-service registration.
Use the Terms and Conditions -Terms of Service page (RX_TERMS_SETUP) to set up terms of service statements for users completing self-service registration.
Navigation
Image: Terms and Conditions - Terms of Service page
This example illustrates the fields and controls on the Terms and Conditions - Terms of Service page.
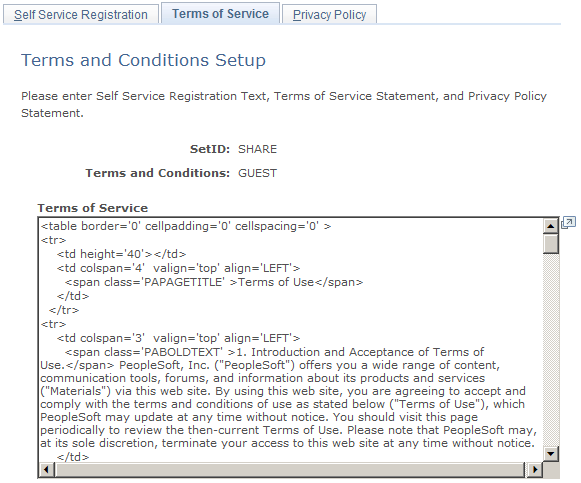
Enter the text for the terms of service that you want users to see during self-service registration.
Use the Terms and Conditions - Privacy Policy page (RX_PRVACY_SETUP) to set up privacy policy statements for users completing self-service registration.
Navigation
Image: Terms and Conditions - Privacy Policy page
This example illustrates the fields and controls on the Terms and Conditions - Privacy Policy page.
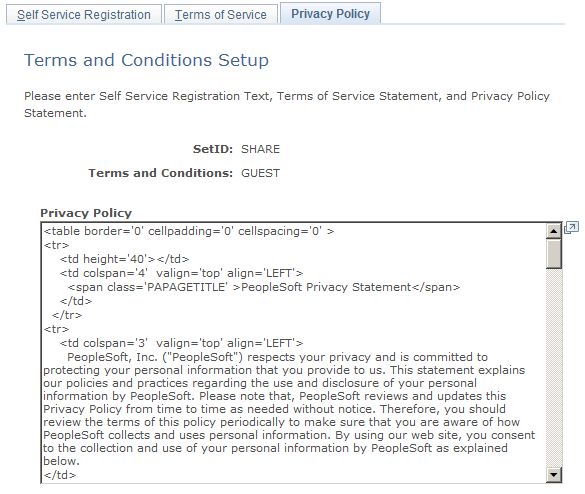
Enter the text for the privacy policy that you want users to see during self-service registration.