Setting Up Task Management
To set up task management, use the Task Priority (RB_TSK_PRIORITY) and Task Type (RB_TSK_TYPE) components.
This topic lists the pages used to set up task management.
Note: Your PeopleSoft Application Administrators can control and modify access to all PeopleSoft CRM pages, including those that are used for Task Management, through the standard PeopleTools security using roles, permission lists, and user IDs. Documentation for this security administration is provided in PeopleTools: Security Administration product documentation.
|
Page Name |
Definition Name |
Usage |
|---|---|---|
|
RB_TSK_TYPE |
Define task type codes that enable the user to categorize tasks. |
|
|
RB_TSK_PRIORITY |
Define task priority codes that enable the user to designate a priority for tasks. |
|
|
RB_TSK_GRP_TPL |
Define task group templates and task durations. |
|
|
Clone Template Page |
RB_CLONE_TXN_SEC |
Specify a new template name to be created from the current template. |
|
RB_TSK_SR |
Reset invalid sync IDs between tasks and their corresponding CRM transactions. |
Use the Task Type page (RB_TSK_TYPE) to define task type codes that enable the user to categorize tasks.
Navigation
Image: Task Type page (1 of 2)
This example illustrates the fields and controls on the Task Type page (1 of 2).
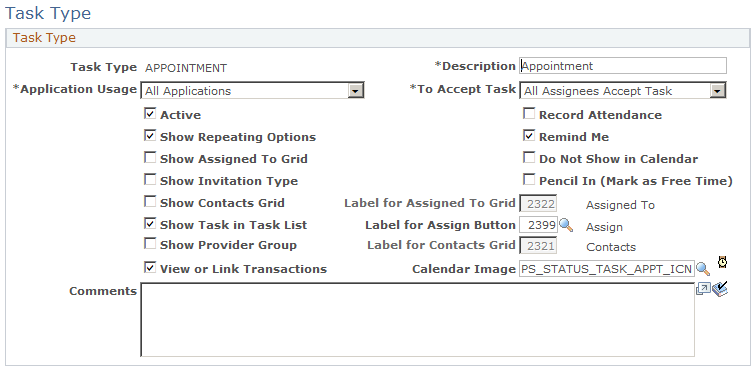
Image: Task Type page (2 of 2)
This example illustrates the fields and controls on the Task Type page (2 of 2).
Task Type
The options you select on this page control the options that are available on the Task Detail page.
|
Field or Control |
Definition |
|---|---|
| Task Type |
Enter the type of the task. |
| Application Usage |
Select the application where the task type is used. A value of All Applications indicates a universal type that is available to all applications. |
| Active |
Select to make the task type active. Users can only create tasks for active task types. |
| To Accept Task |
Select to indicate whether all of the assignees need to work on the task or only one assignee needs to work on the task when the task is assigned to multiple people. |
| Pencil In (Mark as free Time) |
Select to indicate that the task duration is not treated as busy time by the Assignment Engine. |
| Record Attendance |
Select to enable recording of attendance. If this is selected, the Task Details page shows a column of check boxes in the Invitee/Assignee grid for users to indicate whether the Invitee/Assignee attended the meeting. This check box is usually selected for meeting task types. |
| Show Repeating Options |
Select to enable the user to select the frequency and time period in which this task repeats. |
| Do not show in Calendar |
Select to suppress the task from the user's calendar. This option is cleared by default. Note: The task appears in the user's calendar only if this option is cleared and the user enters a start and end date and time for the task. |
| Show Assigned to Grid and Label for Assigned to Grid |
Select to have the assigned to grid appear on the Task Detail page. If you select Show Assigned to Grid, then the Label for Assigned to Grid field becomes enterable for you to change the grid label that appears on the Task Details page. By default, the system displays Assigned To. This value comes from the message catalog. |
| Show Invitation Type |
Select to have the Invitation Type column appear in the Invitees grid on the Task Detail page. |
| Show Contacts Grid and Label for Contacts Grid |
Select to have the contacts grid appear on the Task Detail page. If you select Show Contacts Grid, then the Label for Contacts Grid field becomes enterable for you to change the grid label that appears on the Task Details page. By default, the system displays Contacts. This value comes from the message catalog. |
| Label for Assign Button |
Select a value to change the label for the Assign Button that appears on the Task Details page. By default, the system displays Assign. This value comes from the message catalog. |
| Show Task in Task List |
Select to have the task appear in the task list for the task owner and all assigned users. Note: Do not select this option for the Task Type of Service Order, since Service Order activities should be viewed and updated directly from the Service Order component, not from the Task List. |
| Show Provider Group |
Select to have the Provider Group field appear in the Task Details page. |
| View or Link Transactions |
Select to have the View or Link Related Objects link appear on the Task Detail page when the user adds a task of this type. Note: Do not select this option for the Task Type of Service Order, since the link has not been designed to work on the Task Detail page for that Task Type. |
| Calendar Image |
Enter the name of the image that identifies the task type in the task list and calendar. |
See “Using PeopleTools Utilities” in PeopleTools: System and Server Administration product documentation.
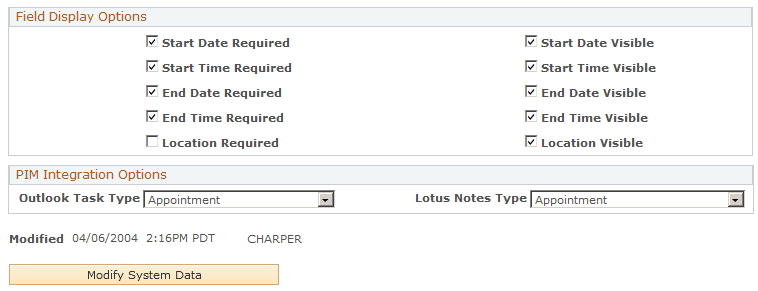
Field Display Options
|
Field or Control |
Definition |
|---|---|
| Start Date Required, End Date Required, Start Time Required, End Time Required, and Location Required |
Select the fields that are required for this task type. |
| Start Date Visible, End Date Visible, Start Time Visible, End Time Visible, and Location Visible |
Select the fields that are visible for this task type. If you indicate that a field is required, you must also indicate that it is visible. However, a field can be visible but not required. |
PIM Integration Options
This section is not used by the CRM system.
Use the Task Priority page (RB_TSK_PRIORITY) to define task priority codes that enable the user to designate a priority for tasks.
Navigation
Image: Task Priority page
This example illustrates the fields and controls on the Task Priority page.
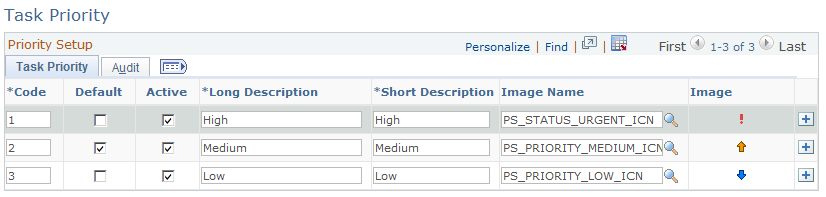
|
Field or Control |
Definition |
|---|---|
| Code |
Enter a code to identify the task priority. |
| Default |
Select one priority as the default for all tasks. |
| Active |
Select to indicate that this task priority is active. Only active priorities are available to assign to tasks. |
| Image Name |
Select the image that represents the priority visually. If defined for a task priority, the image appears on the My Tasks list for each task that has that priority. |
Use the Task Group Template page (RB_TSK_GRP_TPL) to define task group templates and task durations.
Navigation
Image: Task Group Template page: Type tab
This example illustrates the fields and controls on the Task Group Template page: Type tab.
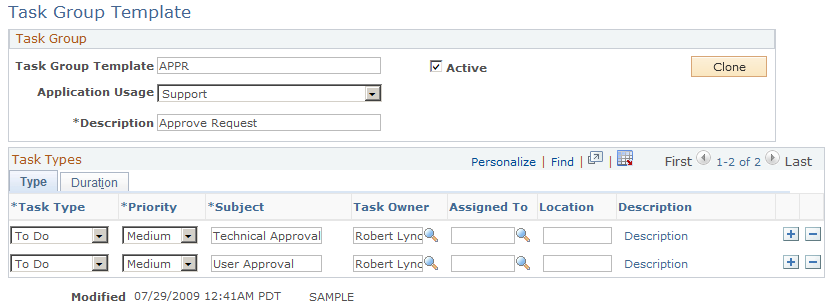
Task group templates ensure that all tasks that must be completed to accomplish the goal that is assigned. For example, the task group Install Hardware might consist of three tasks: Installation, Test Install, and Installation Acceptance. This is particularly useful when the tasks are performed by different people with different reporting relationships.
When a user schedules a task group, the task group template creates and assigns each task within the group.
Task Group
|
Field or Control |
Definition |
|---|---|
| Active |
Select to activate the group template. |
| Application Usage |
Select the application or component for which the group template can be used. Values are:
Note: If you select Change Management, HelpDesk, HR HelpDesk, or Support the system displays the Duration tab. You can use this page to enter offset days, duration days, and start and end times. For Change Management, you enter only days, hours and start use codes. |
Task Group Template - Type
Use this section to add tasks to the group template. For each task, specify default values that pertain to the selected usage: task type, priority, task name (subject), provider group, task owner, assignee, location, and task description (for Change Management, HR Helpdesk, HelpDesk and Support). These values appear as default when the corresponding group template is selected at runtime and are can be updated.
Note that the Provider Group column will only be visible and editable on a row if the corresponding Task Type definition has been configured to show this field.
Note: If the default task owner and assignee are not specified in the task group template, at runtime, the logged on user becomes the default task owner and no assignees are pre-populated. The owner can update task information, add and delete task entries as necessary.
Duration
Image: Task Group Template page: Duration tab
This example illustrates the fields and controls on the Task Group Template page: Duration tab.
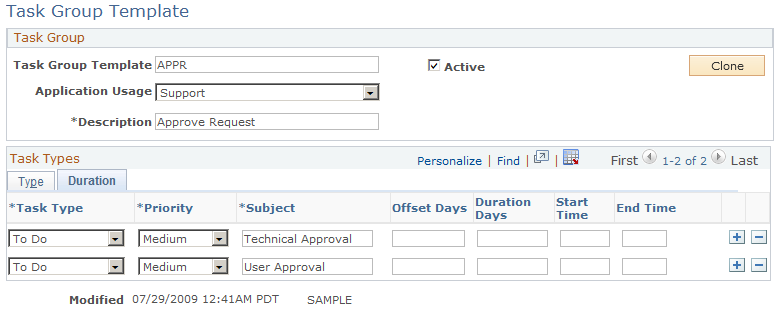
Use this tab on the Group Template page to specify a duration for each task. If the task type requires a start or end time (for example, meetings), you must enter these fields. The specific fields that appear on this page are dependent on the task type. This tab appears only when you select Change Management, HelpDesk, or Support from the Application Usage field.
|
Field or Control |
Definition |
|---|---|
| Offset Days |
This field appears only if you selected HelpDesk, or Support in the Application Usage field. Enter the number of days that are added to the plan start date to derive the task start date. The task end date is derived from adding the Duration Days to the task start date. |
| Duration Days, Start Time and End Time |
Enter the number of days a task should take as well as the start and end times for each task. |
| Start Use Code |
This field appears only if you selected Change Management in the Application Usage field. Select one of these values to indicate when a task should start:
|
Use the Reset SYNCIDs page (RB_TSK_SR) to reset invalid sync IDs between tasks and their corresponding CRM transactions.
Navigation
Image: Set SYNCIDs page
This example illustrates the fields and controls on the Set SYNCIDs page.
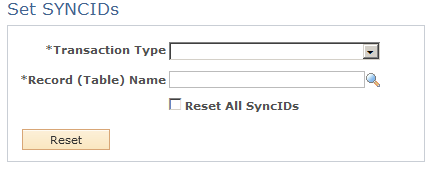
Use this page to reset invalid sync IDs of the specified type of transactions. Task management uses sync IDs to associate tasks and CRM components from which these tasks are created.
Warning! In PeopleSoft CRM, sync IDs are used as unique foreign key references to transactions. If you must reset sync IDs, use this page instead of the PeopleTools’ Set Sync IDs utility.
|
Field or Control |
Definition |
|---|---|
| Transaction Type |
Select the type of transactions you want to reset the sync IDs. |
| Record (Table) Name |
Enter the name of the record containing the sync IDs that you want reset for the specified transaction type. For example, if you select Lead as the transaction type, enter RSF_LEAD as the record (table) name. For the Opportunity transaction type, enter RSF_OPPORTUNITY as the record (table) name. |
| Reset All SyncIDs |
Select to assign a new sync ID (a value that is greater than zero) for each transaction of the selected transaction type, regardless of whether the transaction currently has a sync ID, or the sync ID is a valid one. If this option is clear, the system only resets invalid sync IDs, which are either null or zero in value. |
| Reset |
Click to start the sync ID reset process. |