Deploying Dialogs
Before you activate your dialog, there are three tasks that you should complete:
Check your dialog to ensure that there are no problems.
Test the dialog design to ensure that it performs as intended.
Generate the URLs of any web link promos in your dialog. This allows you to provide the URL to the person implementing the web link promo prior to deploying the dialog.
After you have performed these tasks, you can activate the dialog, which simply involves changing the state of your dialog to Live.
Before activating your dialog, you must first check your dialog’s integrity to ensure that there are no problems. Online Marketing includes the Dialog Check that checks for a variety of mistakes in a dialog. This tool helps you correct some basic problems that can prevent your dialog from running properly. The tool checks four areas of the dialog: target audiences, documents, and flow.
Image: Dialog Check page
This example illustrates the fields and controls on the Dialog Check page.
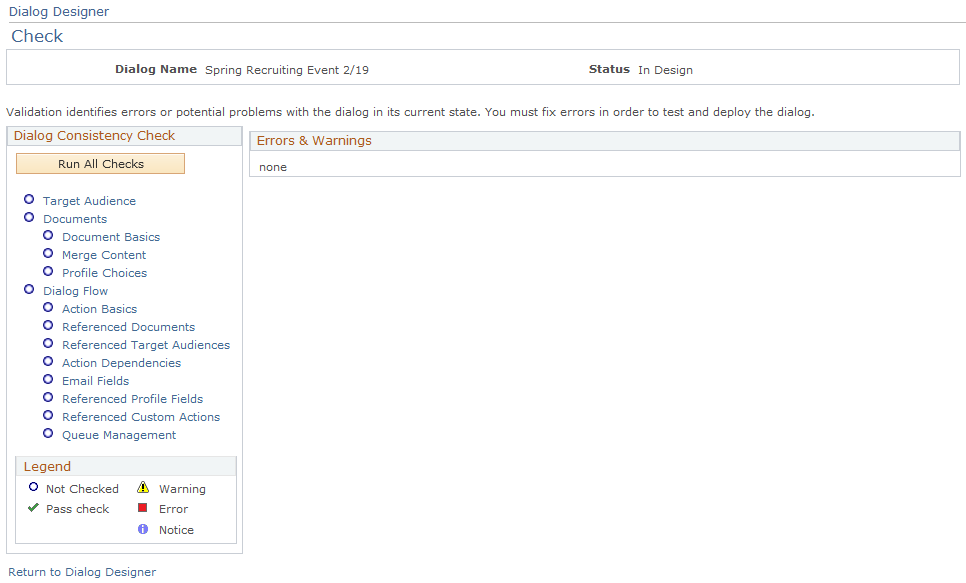
The results of the tests are indicated by four colors: green, yellow, blue, and red. Green indicates pass, Yellow indicates a warning, Blue indicates a notice, and Red indicates an error that will prevent your dialog from being activated.
When the tool indicates any warnings, notices or errors, it also creates a report that describes the problems found. Before activating your dialog, you must correct all errors indicated, and should ensure that the warnings are acceptable to you. Warnings indicate a potential problem, but do not prevent the dialog from running. Notices indicate that an email document’s individual frequency management actions have been modified.
The dialog check performs the following tests:
|
Field or Control |
Definition |
|---|---|
| Target Audience |
Checks whether all target audiences included in the dialog are actually used in the flow. |
| Document Basics |
Checks whether all documents have been used in the flow, that items within the documents have been properly defined, that web documents with entry fields also contain a submit button, and that templates exist and have appropriate tags. |
| Merge Content |
Checks whether all required data specified for the object is present. |
| Profile Choices |
Performs a comparison between a choice document element and the profile choice element that it was based upon. If a corresponding profile choice does not exist in the document choices, it is flagged as absent. If an inactive choice exists in the profile but not in the document’s version, it is flagged as active. |
| Action Basics |
Checks whether the flow is properly structured. |
| Referenced Documents |
Checks whether document references in a flow actually contain documents, and that each On Submit task contains a web document with a Submit button. |
| Referenced Target Audiences |
Checks whether a target audience is specified in the flow wherever it is needed (for broadcast email and web link promos). |
| Action Dependencies |
Checks whether there are any task dependencies in a flow, and, if so, checks whether the dependencies are met. |
| Email Fields |
Checks whether the format of any email addresses is correct. |
| Referenced Profile Fields |
Checks whether the appropriate condition fields are filled out. |
| Referenced Custom Actions |
Checks for required custom action keywords and also verifies that parameter/value pairs, if present, conform to proper format. |
|
Field or Control |
Definition |
|---|---|
| Queue Management |
Checks email queue management settings against the global default settings and displays a notice if they are different. |
To check a dialog:
From the Dialog tab of the dialog you want to check, click the Check button.
The Dialog Check page is displayed.
Click either Run All Checks or you can run an individual test by clicking the test's link.
The selected tests run, and the results are indicated by a colored icon:
Green indicates that the test was passed.
Yellow indicates a warning.
Red indicates an error that will prevent your dialog from being activated.
Blue indicates a notice that the email's queue management settings are different from the global settings.
If any warnings, notices or errors are indicated, they are displayed on the right side of the Dialog Check window, along with an explanation for each.
If desired, export this information to an Excel file by clicking the Export button.
Fix any problems indicated in the report. You must fix red errors. You are not required to fix yellow warnings to continue, but you should ensure that they are acceptable to you.
Run the tests again, and repeat the process if other problems appear.
Validation (with no errors, although warnings are permissible) is required before a dialog can be deployed.
If your dialog uses any Web Link Promo or External Event Trigger actions, you need to generate the URLs for these actions so that you can provide the URLs to the person implementing the web link promos on web sites or elsewhere.
This feature generates the special URLs that contain the location of the web page (Standalone Page or Landing Page) and identifies the target audience that all respondents using this URL will belong to. Online Marketing generates a different URL for each audience or trigger and web page combination. For example if a dialog uses one web link promo with two audiences, then Online Marketing generates two different URLs.
Since a dialog uses different audiences while being tested, the URLs generated from the Testing state will not access the web pages of a live dialog. The URLs to be used with a live dialog can be generated either before or after testing the dialog, from one of the following states: In Design, Broadcast Hold, Paused, or Live.
If you generate the URLs before testing the dialog, depending on the changes you make to the dialog after testing, you may need to regenerate the URLs. For example, you must regenerate the URLs if you change a target audience or Landing Page in the dialog.
Note: Placing a web link promo or external event trigger on a web site requires human interaction, such as a person placing a banner ad on a web site.
To generate the URLs for Web Link Promos and External Event Triggers, click the Link Report button in the Dialog Designer toolbar.
The Link Report for the dialog is displayed.
Image: Dialog Designer - Link Report
This example illustrates the fields and controls on the Dialog Designer - Link Report.
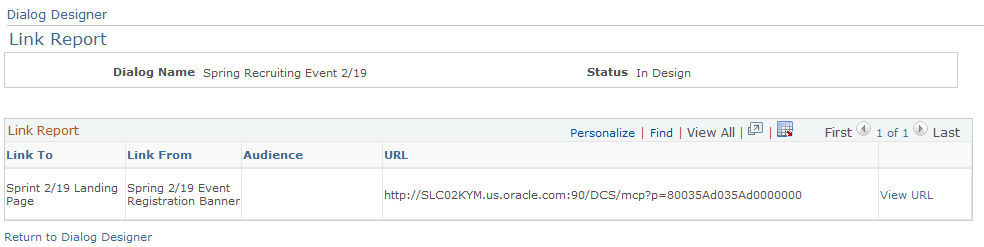
|
Field or Control |
Definition |
|---|---|
| Link To |
The action to which the URL points. |
| Link From |
The action in which the link is initiated. |
| Audience |
The audience to which the link is directed. |
| URL |
The URL link generated for the document. Each of the URLs specified must be provided to the person handling the placement of that web link promo or External Event Trigger. |
| View URL |
This hyperlink is available for External Event Triggers connected to Standalone Pages or Landing Pages, but not when connected to a Single Email action. |
You can export the Link Report to an Excel file by clicking the Download button.
Note: You cannot use the link generated in a testing report as a link in your live dialog.
You should test your dialog to ensure that it was properly designed and works as expected. Since dialogs often run over a period of several months, Online Marketing allows you to create a condensed version of your dialog so that you can test all of its components. By condensing the time period and reducing the size of your target audience, you may be able to test an entire dialog in a matter of hours.
Image: Dialog Designer - Test
This example illustrates the fields and controls on the Dialog Designer - Test.
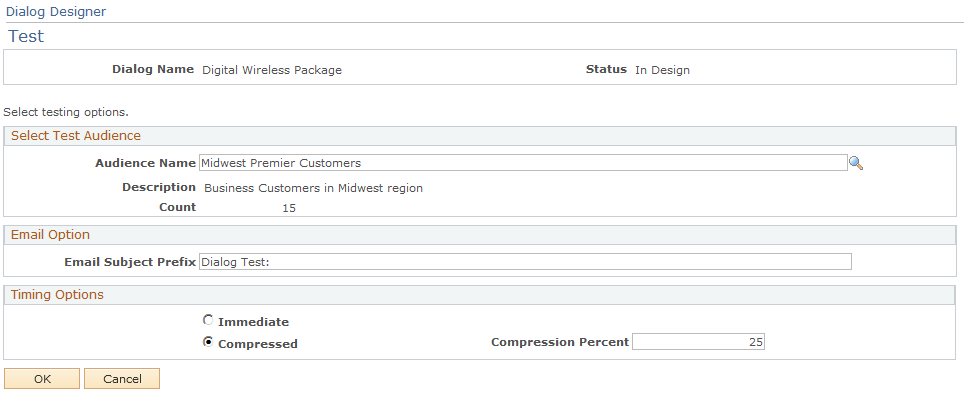
To test an online dialog:
In the Dialog Status Controller, click the Test button.
The Test Dialog page appears.
Select a test audience. (The Select Test Audience group box is only available if the dialog has one or more Date/Time Triggers.)
You can select from a list of internal audiences that have a status of Committed or Approved. A test audience can be fixed or dynamic, and must match the SetID associated with the dialog. Fixed audiences with counts greater than the error threshold are automatically excluded from the search list. In the case of dynamic audiences, the count is generated at the time the audience is selected, and if it exceeds the error threshold an error message is generated. If you select an audience with a count greater than the warning threshold, a warning displays and you can choose to continue or cancel and select another audience.
When testing, you only specify one testing audience, regardless of the number of audiences in your actual dialog. All broadcast emails are sent to the same testing audience
Note: Since people in your company may not normally be part of your profile database, you may need to have your Online Marketing Administrator help add these people to the database. Individuals entered via testing dialogs are not removed—you can include testing contacts the audience for your online dialog.
Choose a subject line prefix to be inserted in front of the subject for each broadcast email, so that your testing audience is not confused when they receive the broadcast email (for example, you could insert the words “Dialog Test:” in front of the subject). This step is optional, and only appears if the dialog contains emails.
Choose options for the timing of the test. If the dialog contains Date/Time Triggers, both the Immediate and Compressed timing options are available. If the dialog has only External Event Triggers and no single emails with delays, the Compressed timing option is not available.
If you choose Immediate, all activities and triggers kick off in five minutes, and delays are adjusted to five minutes. (You can modify the default minimum delay in the Global Options settings.)
If you choose Compressed, you must provide a compression percentage. The default is 25%. The Compressed option causes the dialog to execute within the chosen percentage of the original timeframe. (For example, if the duration of the dialog is 4 days and you choose 25%, the dialog's timeframes are compressed so it will finish executing in one day.)
After you select Compressed and click OK, a page is displayed to show you the approximate duration of the test.
Click OK to proceed with the test or click Cancel to go back and adjust the compression percentage.
Once the testing dialog is created, Online Marketing deploys the dialog immediately to the testing audience. Even in dialogs where you have set a date to send your first broadcast email, Online Marketing will reset that date to the current date and time, and send the first broadcast email to your testing audience immediately. This is true even when the first date in the dialog has already passed.
If the dialog uses a Web Link Promo action, you can still test your dialog from the Testing state. You must generate a URL for the Web Link Promo from the Testing state by creating a Link Report. Using this URL you can test the dialog.
If your dialog contains repeating triggers, you can set the minimum frequency in which the repeat iterations are executed. The default minimum frequency used for testing is 60 minutes; it can be modified in Global Options.
Note: Because a dialog uses different audiences while being tested, the URLs generated from the Testing state will not access the web pages of a live dialog.
See Going Live with an Online Dialog.
See Generating URLs for Web Link Promos and External Event Triggers.
You deploy an online dialog by changing the dialog’s state to Live. Before you do this, you must run the Online Dialog Check to ensure that the dialog does not have any errors. Once your dialog passes all the tests, you should place the dialog in the Test state to test that the dialog works as expected.
When you deploy a dialog, Online Marketing performs the following tasks:
Automatically checks the dialog for errors. If it finds any, the Dialog Check page is displayed with the errors. You will need to correct the problem before being able to deploy the dialog. The Dialog Check page only displays messages for errors; it does not automatically indicate warnings. Online Marketing only indicates warnings when you explicitly run the Online Dialog Check.
Creates the document data storage tables. These tables contain all the responses to the dialog web pages, and statistics associated with the dialog. This information is accessible through CRM Analytics, and exists in the database until the dialog is deleted.
Informs the Online Marketing Dialog Server to clear the server cache so that all new tables are available to the web server.
Once your dialog is Live, anyone can access its web pages. If your dialog uses both a broadcast email and a Web Link Promo action (such as a banner ad), anyone seeing the URL can access the dialog, even if it is weeks before the broadcast email is sent out. Depending on your dialog this may or may not be a problem.
If you have associated your dialog to an activity in a Marketing campaign, you will also want to change that activity’s status to executing.
To deploy a dialog, click the Live button in the Deployment Status controller. If there are errors in the dialog, you are prompted to run Dialog Check and fix the errors before you are able to activate the dialog.