Importing and Exporting Web Documents
This section describes how to import and export web documents.
Note: When importing and exporting documents, some fields such as the Language Code, Attach to Dialog, and Template will be disabled on the first page.
You can import an existing HTML document from a file to use as your web document. Once you have imported the HTML file, the only change the Document Designer will allow you to make to the web document is to rename it or change its description. If you need to make changes to the HTML, you must export the document, make the changes outside of the Document Designer, and then re-import the file.
Importing an external HTML file to use as your web document is useful if you have already created one or more web pages that you would like to use in your dialog, or if you simply prefer to use a certain web page design tool. However, these pages can serve only to display information because you cannot add document elements to an imported web document.
If the imported document was originally created in the Document Designer, all inserted document fields, profile fields, and merged content must still be in the document. Upon import, the Document Designer checks the document to verify that all inserted fields and content still exist.
If there is new merge content in the imported document, the Document Designer checks to see if they contain the required information for the corresponding merge content type. If the required information is present, then the merge tags are accepted; otherwise, an error is displayed.
When an imported document is copied and translated, no translation is performed on the imported contents; you will need to perform any language updates manually.
You can discard the imported document if you preview it and it does not have the desired appearance.
Note: Importing a file will override any previously imported file. Therefore, discarding the second imported file will not revert to the first import file, but rather to the last saved document prior to any imports.
To import an HTML file to use as a web document:
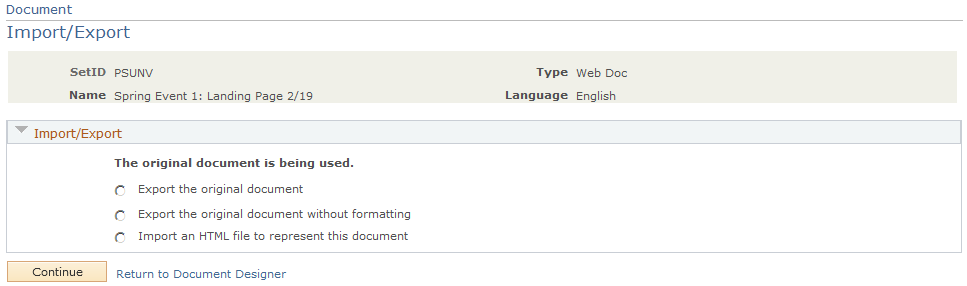
In a web document that has been attached to an Online Marketing dialog, click the Import/Export button.
Note: The Import/Export button does not appear in documents that are not attached to dialogs.
Select Import an HTML file to represent this document.
Browse to where the HTML document is located and select it.
Click the Import button to import the document.
Image: Import/Export page
This example illustrates the fields and controls on the Import/Export page.
After you have imported a document, you can choose to discard the imported document and revert to the original. To do this, choose the Discard previously imported/exported version and use the original document option. This option is only available after a document has been imported or exported.
Note: Any changes made to merge content syntax outside of Online Marketing are applied once the document is imported back into the system. These changes are permanent, and will not be removed if the imported contents are later discarded.
You can export the current web document to a file, allowing you to make cosmetic changes using a third-party tool. After making the changes, you can import the document back into the system, retaining any inserted document fields and profile fields intact in addition to adding the cosmetic HTML. When a document is exported, no changes can be made to the document from within Online Marketing. If changes are desired, then use the Import/Export button to discard the exported contents first.
There are three main export options:
|
Field or Control |
Definition |
|---|---|
| Export the original document |
Exports all fields and formatting to an HTML file. This option should be used as the first step in merging the web document with an HTML file, if you want the HTML generated for the web document to include the layout format. |
| Export the original document without formatting |
Exports all fields (but no formatting) to an HTML file. This option should be used as the first step if you want the HTML generated for the web document to not include any formatting. All text and items will remain intact, but the layout of the document will be discarded. |
| Export the original document without web template |
Documents associated with web templates can display duplicate content if they are exported with their web templates and then re-imported. Select this option to export the document without the web template and thus avoid content duplication. This option only appears for documents associated with web templates. Note: When you select this option and export the document, you will see the same message that displays when you export a document with its web template. However, this does not imply that the web template was exported in this case. |
Image: Import/Export page
This example illustrates the fields and controls on the Import/Export page.
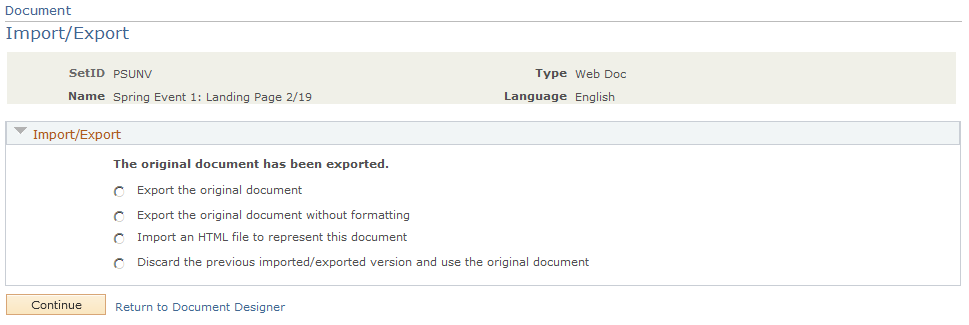
To export a document:
In a web document that has been attached to an Online Marketing dialog, click the Import/Export button.
Note: The Import/Export button does not appear in documents that are not attached to dialogs.
Select the appropriate option, depending on whether you want to export the document with or without formatting.
Click the Continue button.
The document is exported, and its new status is displayed.
After you have exported a document, you can choose to discard the exported document and revert to the original. To do this, choose the Discard previously imported/exported version and use the original document option. This option is only available after a document has been imported or exported.
If the document has a web template associated with it, the template will be exported only if you select the Export the original document option (to preserve the formatting).
When exporting a web document with data entry fields, validation libraries in JavaScript are included in the exported document. Some libraries may output language-specific validation messages, based on the language of the document.
If a copy of an imported web document with language-specific JavaScript messages is made, and the language association of the document is changed, you have two options to change the language-specific JavaScript. First, you can export the previously imported document and make changes outside of the system, then re-import. Secondly, you can embed a JavaScript merge content tag <pstag:javascript /> into the initial exported document as a placeholder for language-specific libraries. The tag will be replaced with language-specific libraries when the document is rendered.
Note: If you export a document and edit it using Notepad, be sure to save the document in ANSI format rather than UTF-8. If you save in UTF-8 format, Notepad adds a small string of characters to the top of the document that will be rendered as a '?' character on your web page.