Setting Up Workforce Surveys
To define dimension value groups, survey ratings, dimension mapping, and survey setup options, use the Dimension Value Groups, Survey Ratings, Role to Dimension Mapping, and Survey Setup Options components. Use the RSF_ASGN_RY_SVY_GROUP, RY_SVY_RATING, RY_SVY_ROLE_DIM, and RY_SVY_SETUP component interfaces to load data into the tables for these component.
|
Page Name |
Definition Name |
Usage |
|---|---|---|
|
RSF_TF_MAIN |
Model the Time dimension (quarters and years). |
|
|
RSF_TF_MAIN |
Specify that a survey is to be used for Workforce Communications. |
|
|
RY_SVY_SETUP |
Specify basic setup information for workforce surveys. |
|
|
RY_SVY_ROLE_DIM |
Map reporting dimensions to a role for a given survey type. |
|
|
RY_SVY_AGE |
Calculate Age Group dimension values. |
|
|
RY_SVY_YRS |
Calculate the Years Employed dimension value. |
Use the Time Frame Group – Period Definition page (RSF_TF_MAIN) to model the Time dimension (quarters and years).
Navigation
Image: Time Frame Group - Period Definition page
This example illustrates the fields and controls on the Time Frame Group - Period Definition page. You can find definitions for the fields and controls later on this page.
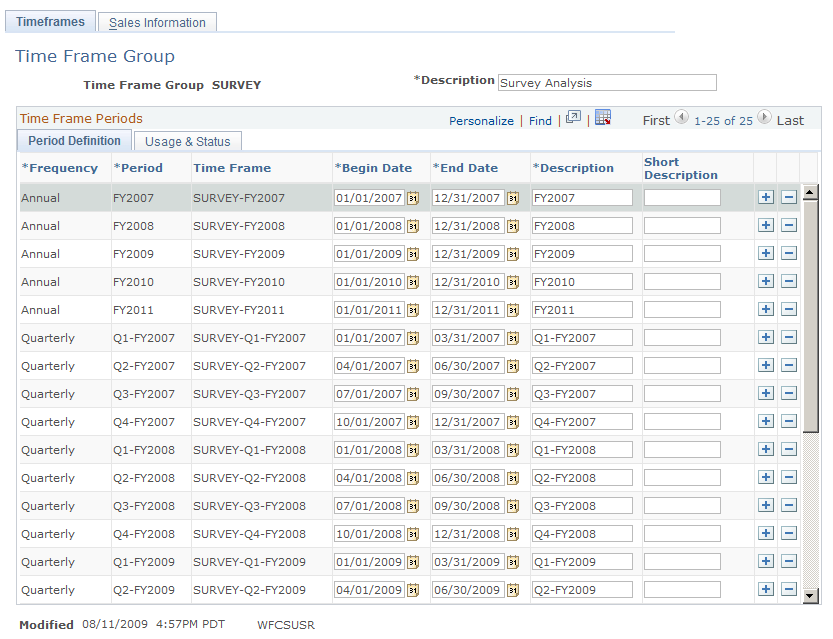
Time Frame Groups are set up by WFC System Administrator, and must be set up in order for the Survey Analysis Report to run. After they are created, Time Frame Groups are selected in the Setup Options page. They are used to specify which quarterly and yearly time frames will be used for the Survey Analysis Report.
|
Field or Control |
Definition |
|---|---|
| Time Frame Group |
The name of the time frame group. By default, this value is set to Survey Analysis, but the name is configurable. This ensures that other applications that use the Time Frame Group component (such as Sales) do not display Workforce Communications reporting time periods. |
| Period Definition |
In Workforce Communications analytics, the smallest unit of time (period) tracked for reporting is Quarter. Quarters roll up to the corresponding Annual (Year) period (though other time periods are available in CRM, onlyQuarter and Year are used with Workforce Communications). The administrator must set up Quarterly and Annual time periods in the Time Frames component so that the Interactive Reports can use them. The periods themselves can be based on the organization’s fiscal calendar, regular calendar, or any other calendar. All the time periods defined must have the usage of Survey and must be created within a single Time Frame Group; this Time Frame Group is then specified during setup as the group to be used for Workforce Communications reporting. The administrator should take care to set up time periods accurately so that every Survey Submitted date in the system falls into exactly one quarterly period and exactly one annual period in the specified Time Frame Group. Further, the administrator should ensure that no time periods other than Quarter and Year are defined in a Time Frame Group to be used for Workforce Communications. Note: Time period names must be 14 characters or fewer. |
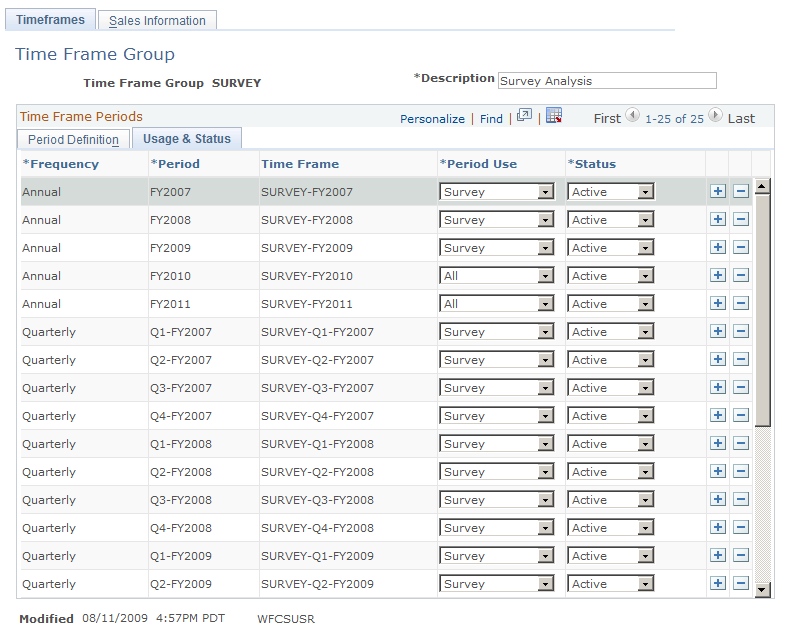
Use the Time Frame Group – Usage and Status page (RSF_TF_MAIN) to specify that a survey is to be used for Workforce Communications.
Navigation
Image: Time Frame Group - Usage and Status page
This example illustrates the fields and controls on the Time Frame Group - Usage and Status page. You can find definitions for the fields and controls later on this page.
|
Field or Control |
Definition |
|---|---|
| Period Use |
Select the Workforce Communications Time Frame Group from the available list. You can create a Time Frame Group with any name for Workforce Communications, but you should ensure that the name you choose does not conflict with other time frames (such as those used in the Sales component) so that these components do not use the Workforce Communications time frames. All Workforce Communications time periods must be created within a single Time Frame Group. |
Use the Setup Options page (RY_SVY_SETUP) to specify basic setup information for workforce surveys.
Navigation
Image: Setup Options page
This example illustrates the fields and controls on the Setup Options page. You can find definitions for the fields and controls later on this page.

This page allows administrators to associate a Time Frame Group and a list of marketing objectives to a survey type. The setup is performed by the administrator; for the Survey Type of Workforce, you specify the time frame group to be used for the report's time frame.
|
Field or Control |
Definition |
|---|---|
| Survey Type |
For the Workforce Survey Analysis Report in Workforce Communications, this value is set to Workforce. |
| Time Frame Group |
Specifies which Time Frame Group is to be used in the Survey Analysis report. Note: The Time Frame Group name must be 14 characters or fewer. |
| SetID |
The SetID to which the Objective is associated. |
| Objective |
When a new dialog is created in Online Marketing, a marketing objective can be assigned to it. Objectives are SetID-specific and can be user defined. For example, a user could create an objective called “Employee Satisfaction Survey” and assign it to all survey dialogs that are Employee Satisfaction related, and another user could create another objective called “New Hire Survey” and assign it to all survey dialogs that are meant to be sent to new hires. The Setup Option screen allows association of a survey type to a set of marketing objectives (for different Set IDs). This allows all dialogs belonging to a particular survey type to be identified. In the above example, the Employee Satisfaction Survey and New Hire Survey marketing objectives can be associated with the Workforce survey type. This would mean that the Workforce Survey List Pagelet and Workforce Survey Analysis Report that belong to the Workforce survey type will only report on dialogs assigned to either of these two objectives. You can assign as many Objectives as you like to be associated with Workforce Communications surveys, and any dialog that has an Objective that matches an Objective that you have defined on the Setup Options page will be visible in the Workforce Survey Analysis report for that dialog. At least one Objective must be associated with the Workforce survey type in order for the report to function correctly. By default, an Objective named Workforce Communications is delivered, but you can define more. Refer to the Online Marketing and Marketing Applications documentation for more information about defining Objectives. |
Use the Role to Dimension Mapping page (RY_SVY_ROLE_DIM) to map reporting dimensions to a role for a given survey type.
Navigation
Image: Role to Dimension Mapping page
This example illustrates the fields and controls on the Role to Dimension Mapping page. You can find definitions for the fields and controls later on this page.
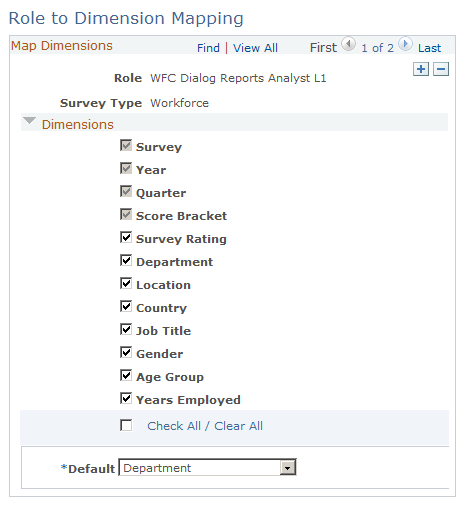
The Role to Dimension Mapping page is used to define which roles will able to see specified reporting dimensions in the Workforce Survey Analysis Interactive Report. For example, you might want to allow entry-level HR analysts to see results by location, but not by age group or gender.
|
Field or Control |
Definition |
|---|---|
| Survey Type |
For the purposes of Workforce Communications, the Survey Type is always set to Workforce. |
| Dimensions |
For the Survey Type of Workforce, the following dimensions are available for selection:
The following dimensions are mandatory and their check boxes cannot be cleared:
Hiding certain dimensions helps to make the report less cluttered for people who do not need to see particular dimensions (for example, an executive might not need to break down survey results by gender, but an analyst might). Also, hiding dimensions can be used to provide a simple security mechanism in case where breakdown of measures by certain dimensions should not be allowed. For example, a user can be prevented from slicing data by job title if there is no business need to do so. Note that if a user’s role does not have access to a particular dimension, that dimension will not be available for that user in the Survey Analysis Report. Further, if a user has more than one role used in Workforce Communications analytics, each with different Role to Dimension mappings, then the less restrictive setting takes precedence. For example, if a user belongs to two custom end user roles named Role 1 and Role 2, where Role 1 does not have permission to view the Job Title dimension but Role 2 does have permission, then the user will see the Job Title dimension in the Survey Analysis Report. Users assigned to custom roles that do not have Role to Dimension mappings created will only see the four mandatory dimensions (Quarter, Year, Survey, and Score Bracket). |
| Default |
Specify the default dimension that should appear on interactive grid on the Survey Analysis tab of the Workforce Survey Analysis Interactive Report for the user with specified role. Any one of the selected dimensions except Score Bracket and Survey Rating can be specified as the default dimension for the role. As delivered, Department is set as the default. Note: It is possible, though very unlikely, that a user can belong to two or more end user roles, with each assigned a different default dimension. If this occurs, the dimension name that appears first on the Role to Dimension Mapping page is chosen as the default dimension to display on the interactive grid. |
Use the Age Groups page (RY_SVY_AGE) to calculate Age Group dimension values.
Navigation
Image: Age Groups page
This example illustrates the fields and controls on the Age Groups page. You can find definitions for the fields and controls later on this page.
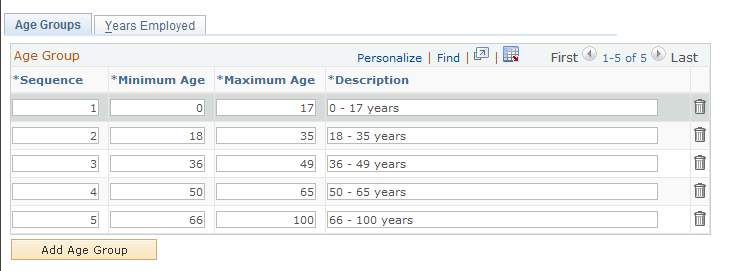
Age groups are a one-time setup, defined by the WFC System Administrator. Age group setup is used to specify the age group into which a particular survey respondent falls.
|
Field or Control |
Definition |
|---|---|
| Sequence |
Age groups are sorted by Sequence number by default. When a new row is added, the Sequence number for that row is calculated by incrementing the highest existing Sequence number on the page by 1. Users can change Sequence numbers, but they should have unique values and must be whole numbers (including 0). |
| Minimum Age |
The lower end of an age group. This value must be a whole number (including 0). |
| Maximum Age |
The higher end of an age group. This value must be a whole number and must be greater than the Minimum Age value. |
| Description |
The description of the Age Group—the value that is displayed in the Survey Analysis Report filter for Age Group. When Minimum Age andMaximum Age values are specified, theDescription field is automatically populated with the value Minimum Age – Maximum Age (for example, 18 – 20), but the user can change this (for example,18 to 20 years). |
| Add Age Group |
Click this button to add a new age group to the list. |
How Age Group is Computed
The system computes a respondent's Age Group by doing the following:
Calculate the age of the person in years by taking the date the person submitted the survey and subtracting the Date of Birth, then converting this value to years.
Using the defined age groups, determine the age group range into which the person should be placed.
Updating Age Groups
You can safely update age groups for a survey before it has any responses. However, if you want to update an age group (that is, update a row that already exists on the Age Groups page) and if any survey responses exist in the system, a warning message will display if you try to do any of the following:
Update the Minimum Age value.
Update the Maximum Age value.
Update the Description.
Delete the row.
The warning message will indicate that deleting or updating age groups can result in the generation of an incorrect Survey Analysis Report. In order to prevent this from happening, you should save changes on the Age Groups page and then run the Stage Data for Reporting Application Engine program with the Refresh Dimension References option selected.
Use the Years Employed page (RY_SVY_YRS) to calculate the Years Employed dimension value.
Navigation
Image: Years Employed page
This example illustrates the fields and controls on the Years Employed page. You can find definitions for the fields and controls later on this page.
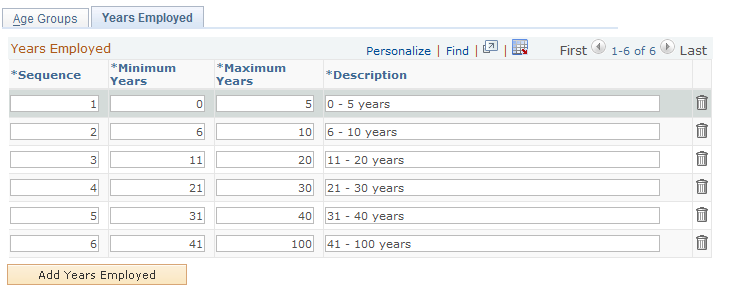
Years Employed is a one-time setup, defined by the WFC System Administrator. Years Employed setup is used to specify a range of years into which a particular survey respondent falls.
|
Field or Control |
Definition |
|---|---|
| Sequence |
Years Employed values are sorted by Sequence number by default. When a new row is added, the Sequence number for that row is calculated by incrementing the highest existing Sequence number on the page by 1. Users can change Sequence numbers, but they should have unique values and must be whole numbers (including 0). |
| Minimum Years |
The lower end of a Years Employed tier. This value must be a whole number (including 0). |
| Maximum Years |
The higher end of a Years Employed tier. This value must be a whole number and must be greater than the Minimum Years value. |
| Description |
The description of the Years Employed tier—the value that is displayed in the Survey Analysis Report filter for Years Employed. When Minimum Years andMaximum Years values are specified, theDescription field is automatically populated with the value Minimum Years– Maximum Years (for example, 1 – 5), but the user can change this (for example,1 to 5 years). |
| Years Employed |
Click this button to add a new Years Employed tier to the list. |
How Years Employed is Computed
The system computes a respondent's Years Employed tier by doing the following:
Calculate the number of years the person was employed by taking the date the person submitted the survey and subtracting the Hire Date, then converting this value to years.
Using the defined Years Employed tier, determine the tier into which the person should be placed.
Updating Years Employed
You can safely update Years Employed tiers for a survey before it has any responses. However, if you want to update a tier (that is, update a row that already exists on the Years Employed page) and any survey responses exist in the system, a warning message will display if you try to do any of the following:
Update the Minimum Years value.
Update the Maximum Years value.
Update the Description.
Delete the row.
The warning message will indicate that deleting or updating Years Employed tiers can result in the generation of incorrect interactive reports. In order to prevent this from happening, you should save changes on the Years Employed page and then run the Stage Data for Reporting Application Engine program with the Refresh Dimension References option enabled.