Setting Up Pagelets for My Work as a System Administrator
This topic discusses how to set up Pagelets for My Work as a System Administrator.
|
Page Name |
Definition Name |
Usage |
|---|---|---|
|
FSPC_ADMIN_MYWORK |
Set up My Work links for end users. |
|
|
FSPC_ADM_WRK_SEC |
Define the type of link that appears on the My Work pagelet. |
|
|
FSPC_MYWORK_PROMPT |
Import system defined My Work links. |
|
|
FSFB_FILTER_FIELDS |
Set up filter definitions. |
|
|
FSFB_FILTER_VALUES |
Set up filter values. |
|
|
RUN_FSFB_VALCLN |
Validate filters. |
|
|
FSFB_COPY_WIZARD1 |
Set filter values by role. |
|
|
FSFB_DEL_FLTRVALS |
Delete Filter values. |
To add a user-defined link to the My Work pagelet in WorkCenters, first create a new filter definition, then create a new Application Class, and finally, add the link to the pagelet.
A series of online help videos demonstrates how to do this by providing an example: how to add a link to the My Work pagelet in the General Ledger WorkCenter.
If your business requires a custom link, contact Oracle technical support for your product.
Use the Configure Pagelets – My Work page (FSPC_ADMIN_MYWORK) to set up My Work links for end users.
Navigation
Click the My Work tab.
Image: Configure Pagelets – My Work page
This example illustrates the fields and controls on the Configure Pagelets – My Work page.
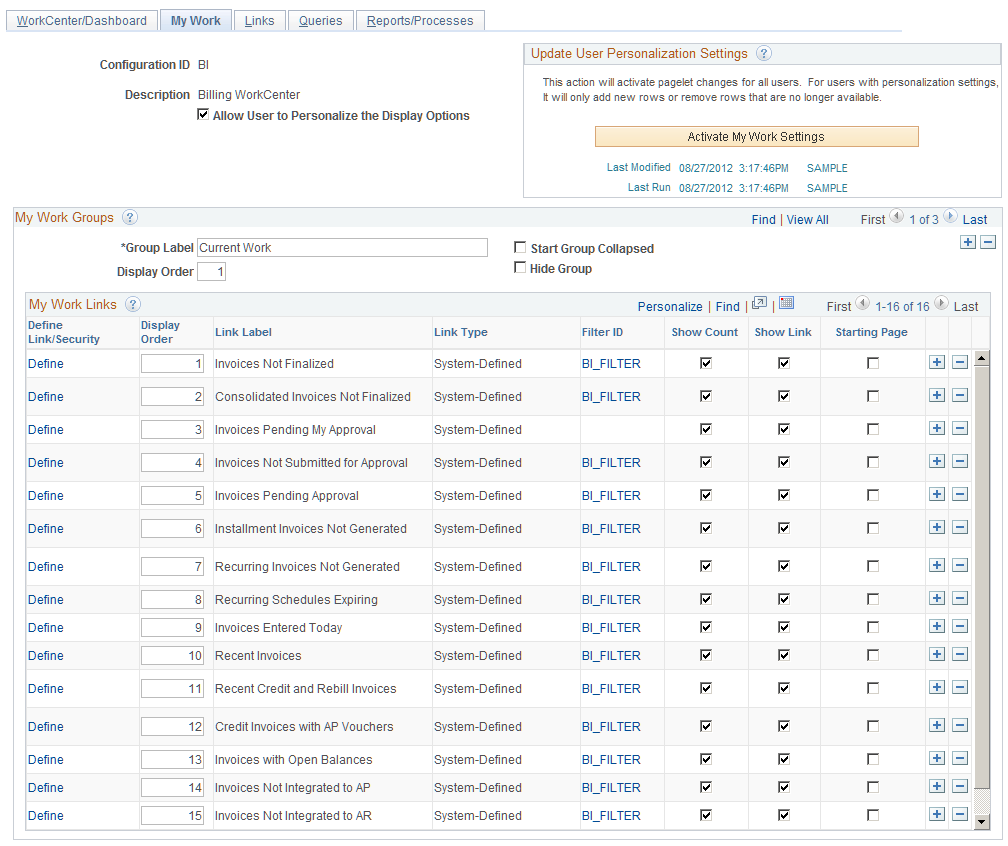
A system administrator can determine whether an end user can personalize their display options.
|
Field or Control |
Definition |
|---|---|
| Allow User to Personalize the Display Options |
Select to indicate that end users who have access to this pagelet can personalize their display options. If this option is selected, an end user has access to the Personalize page for the pagelet. If this option is not selected, an end user does not have access to the Personalize page for the pagelet. If an end user tries to access the Personalize page, they receive a message that the user personalization is not enabled for the pagelet. |
Update User Personalization Settings
|
Field or Control |
Definition |
|---|---|
| Activate My Work Settings |
Click to run the Application Engine process that adds and deletes changes to the user personalization records. This process moves the new configuration to the master record. The last modified and the last run dates and times are displayed so that you know that the process has run after changes have been made. |
My Work Groups
|
Field or Control |
Definition |
|---|---|
| Group Label |
Enter a label heading for the group of links that appear in the <pagelet> Links grid. Multiple group labels can be added to organize <pagelet> links into logical groups. This is not a required field, but should be used if more than five links are listed, and the links can be grouped. |
| Start Group Collapsed |
Select to indicate that this particular group of links should display as collapsed when users access this pagelet. The group label displays, and the user must click the group label to expand the group and access the links. If the Allow User to Personalize the Display Options check box is selected, this check box is also displayed on the Personalization page for the end user. |
| Display Order |
Enter an order in which this group of links should display within the <pagelet> section. If the Allow User to Personalize the Display Options check box is selected, this check box is also displayed on the Personalization page for the end user. |
| Hide Group |
Select to indicate that this group label, and associated links, should not display for an end user. If selected, the end user does not have access to the group label, and associated links, even if they have authorization to personalize their display options. |
My Work Links
|
Field or Control |
Definition |
|---|---|
| Display Order |
Enter the order in which you want the links to appear within the group. If the Allow User to Personalize the Display Options check box is selected, this check box is also displayed on the Personalization page for the end user. |
| Show Count |
Select to display a number in parenthesis at the end of the link. The value of the number indicates how many transactions apply to the link in which the user needs to act upon. Administrators should use caution when selecting this option because it could slow system performance. You should evaluate the show count option on a link by link basis. If you find that one link encounters a performance problem, then you should consider deselecting the Show Count check box for that link. You do not have to be consistent with the Show Count check box from link to link. If you deselect the Show Count check box for a link, then the link remains active if there are transactions to review. If the Allow User to Personalize the Display Options check box is selected, this check box is also displayed on the Personalization page for the end user. |
| Show Link |
Select to indicate that the link is displayed on the pagelet. PeopleSoft delivers some links that a system administrator may choose to hide from end users. If this is the case, then select this check box. This allows system administrators to preserve the link definition, if they decide to display the link at a later time. If the Allow User to Personalize the Display Options check box is selected, this check box is also displayed on the Personalization page for the end user. |
| Starting Page |
If the Allow User to Personalize the Display Options check box is selected, this check box is also displayed on the Personalization page for the end user. |
Use the Define My Work Link page (FSPC_ADM_WRK_SEC) to define link types and security for My Work Pagelets as a system administrator.
Navigation
Click the My Work tab and then click the Define link in the Define Link/Security column.
Image: Define My Work Link page
This example illustrates the fields and controls on the Define My Work Link page.

Use this page to define the type of link that appears on the My Work pagelet.
|
Field or Control |
Definition |
|---|---|
| Link Type |
Select the type of link. The fields in this window change depending on the option selected in this field. Options include:
|
Link Type is Events and Notifications Alert
|
Field or Control |
Definition |
|---|---|
| Process Name |
Select a process name that the system must run to display the results of an event or notification alert. |
| Process Category |
Select a process category within the process name selected in the previous field. |
| Link Label |
Displays from the alert and cannot be changed. |
| Public |
Select to indicate that this is a public link. |
Link Type is System-Defined
|
Field or Control |
Definition |
|---|---|
| Import Link |
Click to access the Import My Work Link page where you can import system-defined links. This button is displayed only when System-Defined is selected in the Link Type field. |
| Filter ID |
Select the Filter ID that will be used to filter the data for this link. |
| Add Filter |
Select to add filters if you don’t want to use what is already defined. |
| Public |
Displays whether the filter is public. This option is display only. |
| Public |
Select to indicate that this is a public link. |
Link Type is User-Defined
|
Field or Control |
Definition |
|---|---|
| Import Link |
Click to access the Import My Work Link page where you can import system-defined links. This button is displayed only when System-Defined is selected in the Link Type field. |
| Link Label |
Enter a label for the link, which appears on the My Work pagelet. (User defined only) |
| Record Based On |
Enter the view name that will be used for defining filter fields for this link. |
| Filter ID |
Select the Filter ID that will be used to filter the data for this link. |
| Add Filter |
Select to add filters if you don’t want to use what is already defined. |
| Public |
Displays whether the filter is public. This option is display only. |
| Public |
Select to indicate that this is a public link. |
Link Type is Workllist
|
Field or Control |
Definition |
|---|---|
| Worklist Name |
Select the Worklist to be displayed when the link is selected. |
| Link Label |
Enter a label for the link, which appears on the My Work pagelet. |
| Public |
Select to indicate that this is a public link. |
Use the Import My Work Link page (FSPC_MYWORK_PROMPT) to import system defined My Work links as a system administrator.
Navigation
Click the My Work tab and then click the Define link in the Define Link/Security column. Click the Import Link button.
Image: Import My Work Link page
This example illustrates the fields and controls on the Import My Work Link page.
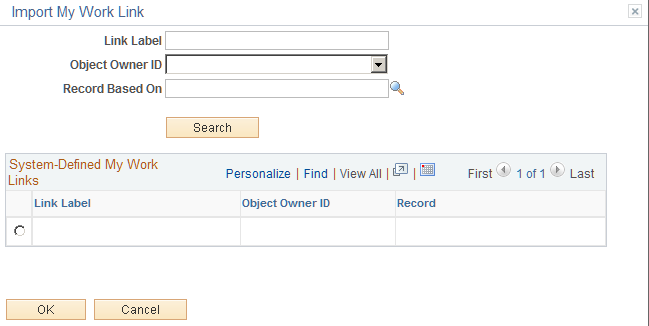
Use this page to select an Appclass link that is predefined by a source product (object owner ID).
When the user is importing a link, they can narrow their search by entering a part of the link label name, the Object Owner ID, and the record based on field, or all. Or, they don’t have to enter any search criteria.
|
Field or Control |
Definition |
|---|---|
| Link Label |
Enter a label for the link, which appears on the My Work pagelet. |
| Object Owner ID |
Select the application owner of the object. For example: Billling, Contracts, General Ledger, and so on. |
| Record Based On |
Select a table that is used for the link. |
| Search |
Click to search the PeopleSoft database for results based on your selection criteria. |
| (radio button) |
Select one radio button to indicate that you want the system to use that record for the My Work link. |
Use the Configure Filter Definition page (FSFB_FILTER_FIELDS) to set up filter definitions as a system administrator.
Navigation
Image: Configure Filter Definition page
This example illustrates the fields and controls on the Configure Filter Definition page.
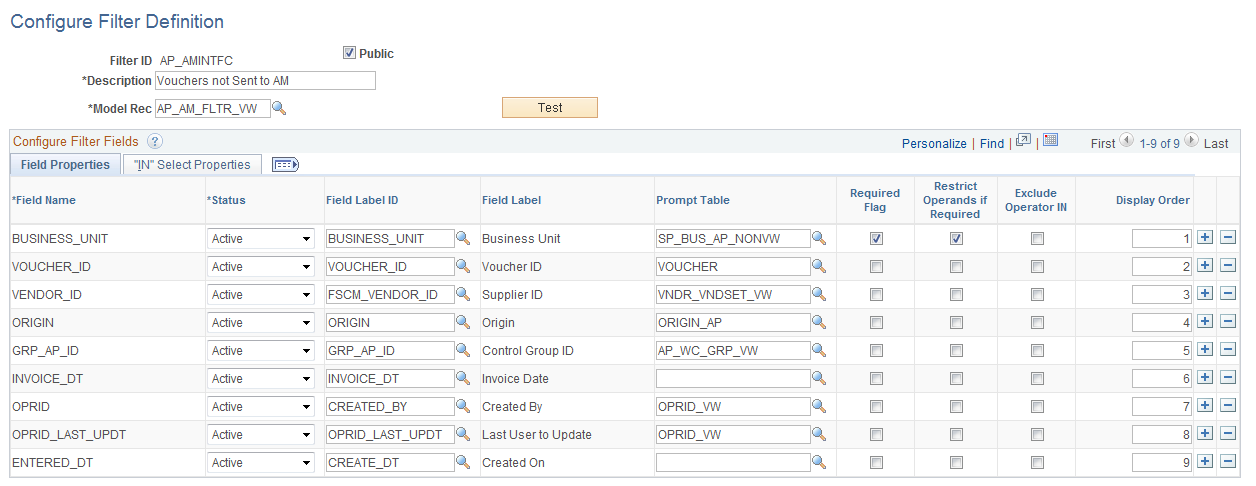
Use this page to define the filter data that is displayed in the My Work pagelet. Filters are used to specify the data that a user views when accessing a My Work pagelet.
|
Field or Control |
Definition |
|---|---|
| Model Rec (model record) |
Select a record name that provides the fields to which you will use to filter data. |
| Public |
Select to indicate that the criteria for the filter can be added or modified by end users |
| Test |
Click to view the Test Filter Criteria window. This window displays how the filter option appears to the end user. |
Configure Filter Fields
When you select a value in the Model Rec field, the record fields are displayed in this grid.
|
Field or Control |
Definition |
|---|---|
| Status |
Select a status for the field. Options are Active and Inactive. Active fields are available for editing on the Configure Filter Values page and are available to end users when filtering data. |
| Field Label ID |
Select an option that corresponds the field label. |
| Prompt Table |
Displays the prompt table that controls the valid values that can be entered on the Configure Filter Values page. For translate and yes or no fields, this value defaults from the prompt table that is defined on the record. You can choose to keep the default value or change it. For translate tables, this field is not available and can’t be changes. |
| Required Flag |
Select to indicate that this field must have a value on the Configure Filter Values page. |
| Restrict Operands if Required |
Select to indicate that you want to restrict the operands to “=” (equals) and “in”, on the Configure Filter Values page. Note: If a security controlled view is used, and security by user, role, and permission list are implemented, then you should select Restrict Operands if Required along with Required Flag fields. This enforces that only those values that are in the secured prompt view will be displayed. |
| Exclude Operator IN |
Select to remove the “IN” operator only from the operator drop-down list when setting up filter values on the Configure Filter Values page. |
| Display Order |
Enter a value that indicates the order in which the filter fields are displayed on the Configure Filter Values page. |
Filter Security
This section displays only when the Public check box is not selected.
|
Field or Control |
Definition |
|---|---|
| Permission Type |
Select an option that indicates whether user IDs, role names, and permission lists are used to restrict access to the filter criteria. |
| User/Role/Permission List |
Depending on the option selected in the Permission Type field, select user IDs, role names, or permission lists. Individual users that are associated to the option selected have access to edit the filter criteria. |
IN Select Properties Tab
The “IN” Select Properties tab enables you to select search field names and search field descriptions.
|
Field or Control |
Definition |
|---|---|
| Search Field Name |
Select a field that determines the name of the field that the system uses to retrieve field values. |
| Search Field Description |
Select the name of the field that the system uses to retrieve the value descriptions. |
Use the Configure Filter Values page (FSFB_FILTER_VALUES) to set up filter values as a system administrator.
Navigation
Image: Configure Filter Values page
This example illustrates the fields and controls on the Configure Filter Values page.
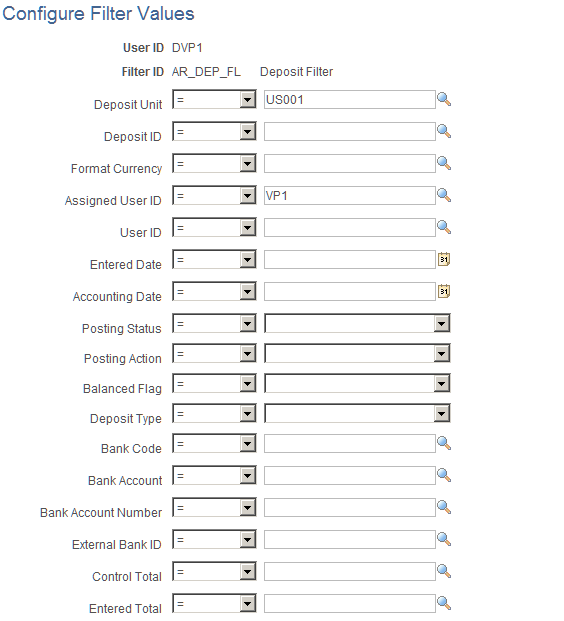
Use this page to select specific values that the system uses when displaying the My Work pagelet. The fields that appear on this page are the fields that have an active status on the Configure Filter Definition page.
Use the Validate Filters page (RUN_FSFB_VALCLN) to validate filters as a system administrator
Navigation
Image: Validate Filters page
This example illustrates the fields and controls on the Validate Filters page.
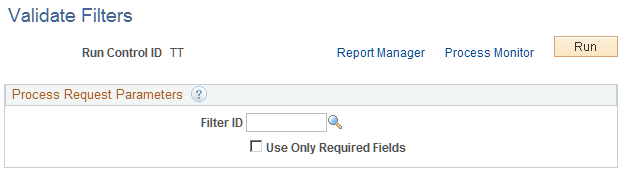
Use this page to validate specific filters. If the Filter ID field is blank, then the system tests all filters.
|
Field or Control |
Definition |
|---|---|
| Filter ID |
Select a filter ID to test. If you leave this field blank, the system tests all filters. |
| Use Only Required Fields |
Select to indicate that only the fields that are defined as required on the Configure Filter Definition page, are validated by the system. If this check box is not selected, then the system validates all applicable fields. |
Filter Value Copy Wizard provides the ability to the administrator to set filter values to users by role. Administrator can copy one user’s filter values to one or more users. The wizard follows three steps to accomplish this:
Select User/Filters to copy, using the Select Filters page
Select Role/Users who will be assigned to the filter values, using the Select Role/Users page.
Create filter values by reviewing and creating filters, using the Create Filter Values Page
Use the Select Filters page (FSFB_COPY_WIZARD1) to select filter values of a particular user for copying them to one or more users.
Navigation
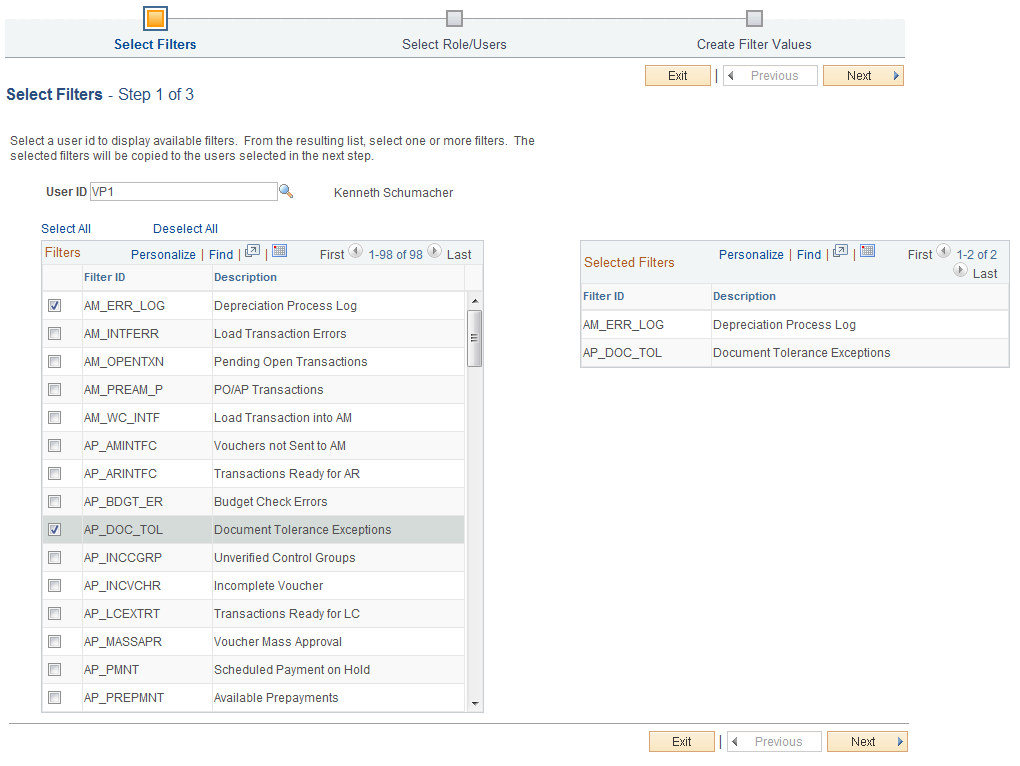
Image: Select Filters page
This example illustrates the fields and controls on the Select Filters page.
|
Field or Control |
Definition |
|---|---|
| User ID |
Select a user id to display available filter values for the user. |
| Filters |
Select one or more filter values to be copied to the user(s). |
| Selected Filters |
Displays the list of filter values selected. |
Use the Select Roles/Users page (FSFB_COPY_WIZARD2) to select a role and the corresponding users.
Navigation
. Select the desired filters on the Select Filters page and click Next.
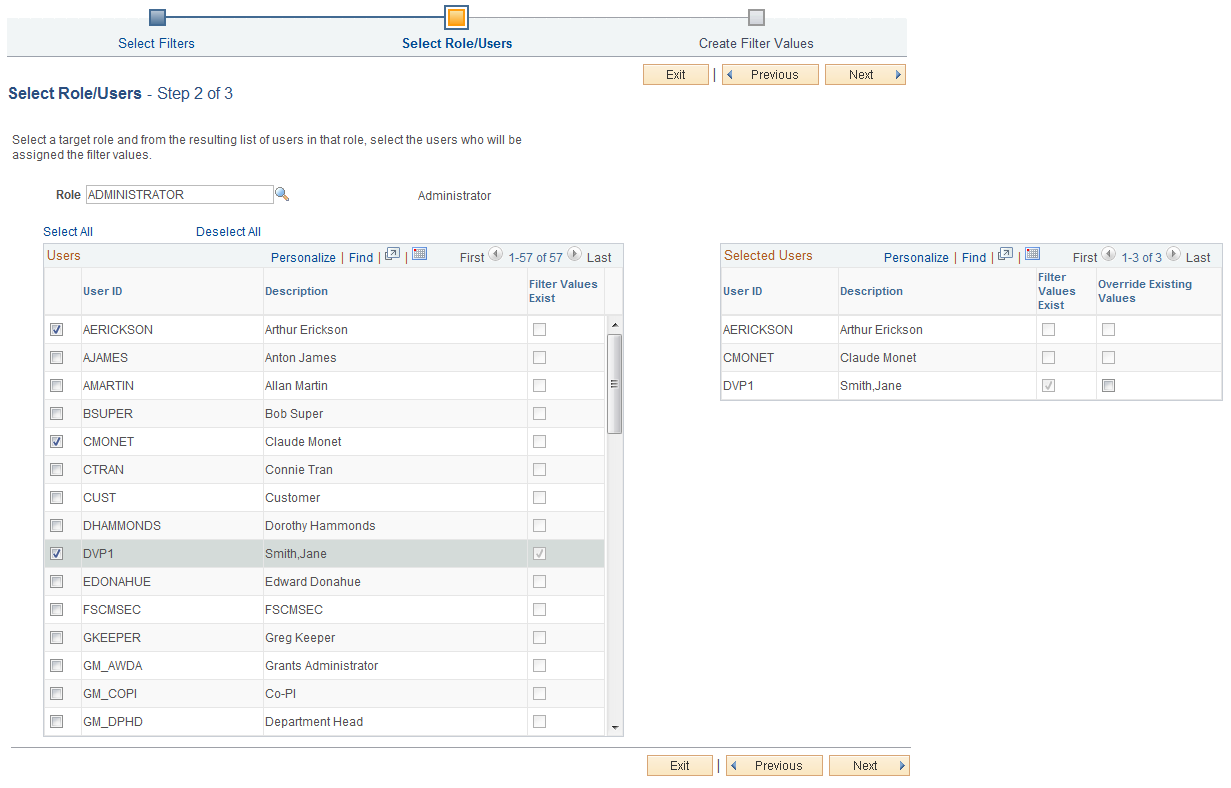
Image: Select Roles/Users page
This example illustrates the fields and controls on the Select Filters page.
|
Field or Control |
Definition |
|---|---|
| Role |
Select a role to display a list of users in that role. |
| User ID |
Select one or more user IDs that will be assigned the filter values selected in the Select Filters step. Selected user IDs are displayed in a grid on the right. |
| Filter Values Exist |
The system selects the field to indicate that the user ID has values for one or more of the filters selected in the previous step, Select Filters. |
| Override Existing Values |
Select to override one or more existing filter values for the user IDs that have values for the filters selected in the previous step. This field is disabled for the user IDs that do not have any filter values. |
Use the Create Filter Values page (FSFB_COPY_WIZARD3) to review the selected filters and users, and to create the filter values.
Navigation
. Select the desired users on the Select Roles/Users page and click Next.
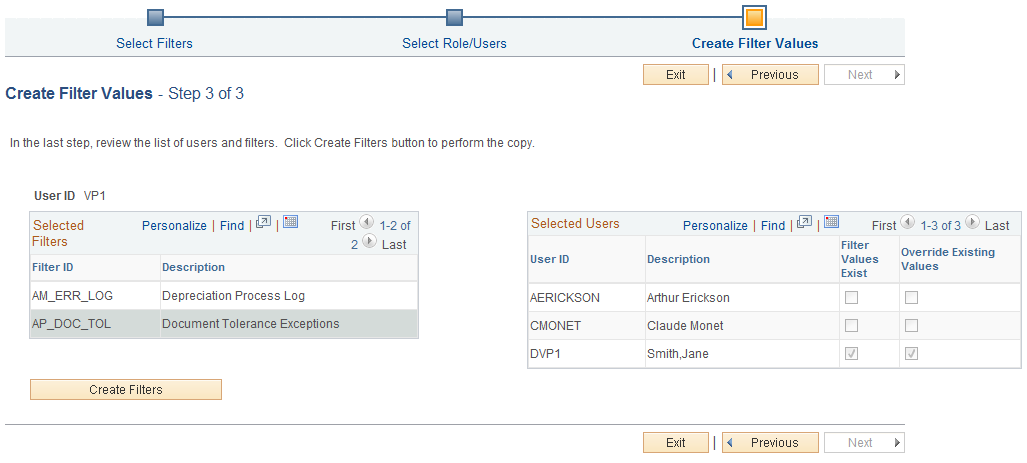
Image: Create Filter Values page
This example illustrates the fields and controls on the Select Filters page.
|
Field or Control |
Definition |
|---|---|
| Create Filters |
Click the button to copy filter values for the selected users. After creating, a confirmation page appears displaying successful creation of filter values. You can click the Copy More Filter Values link to go back to Filter Value Copy Wizard and copy more filter values. |
Use the Delete Filter Values page (FSFB_DEL_FLTRVALS) to select and delete filter values for a user.
Navigation
.
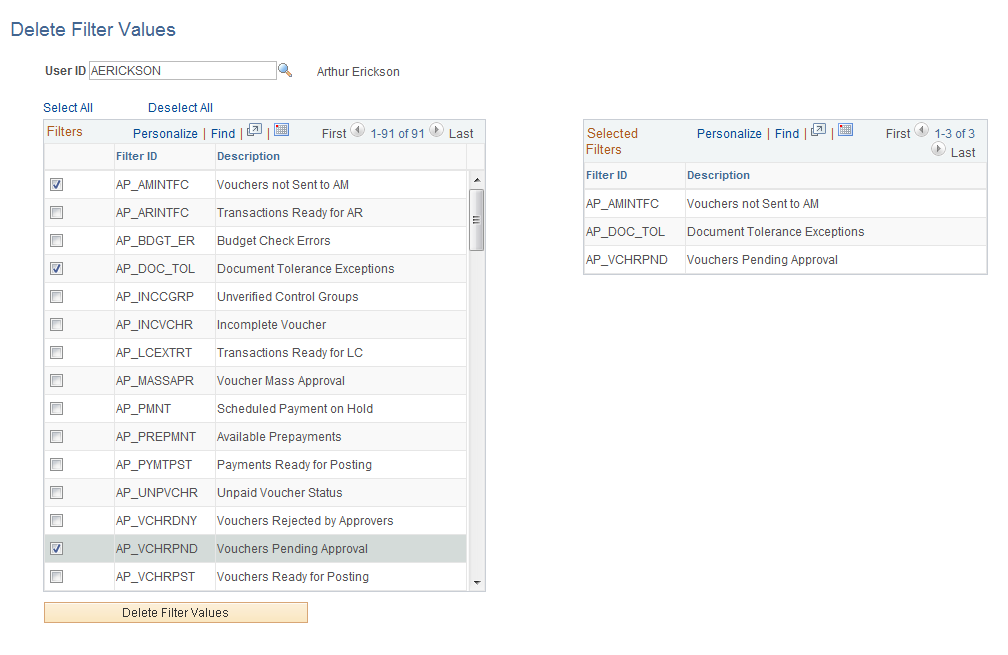
Image: Delete Filter Values page
This example illustrates the fields and controls on the Delete Filter Values page.
|
Field or Control |
Definition |
|---|---|
| User ID |
Select the user for which filter values are to be deleted. The page displays a list of filter values the user has. |
| Filters |
Select one or more filter values to be deleted. Selected filter values are displayed in a grid on the right. |
| Delete Filter Values |
Click the button to delete the selected filter values for the user. After deleting, a confirmation page appears displaying successful deletion of filter values. You can click the Delete More Filter values link to go back to Delete Filter values and delete more filter values. |