Defining Dynamic Displays
This section provides an overview of dynamic displays.
|
Page Name |
Definition Name |
Usage |
|---|---|---|
|
EODI_DYN |
Define general dynamic display options. |
|
|
EODI_DYN_DISPLAY |
Define display options. |
|
|
EODI_DYN_FIELDS |
Define field and layout options for dynamic displays. |
Dynamic Displays allow the display of information from your PeopleSoft system alongside items in Microsoft Office. You can use Dynamic Displays to show any information contained within the PeopleSoft system and those displays can optionally be shown automatically alongside the Microsoft Office items. The information contained within a Dynamic Display can also be driven contextually by the current item. For example, customer information from the PeopleSoft system can be displayed alongside an inbound customer email, or contact in an address book.
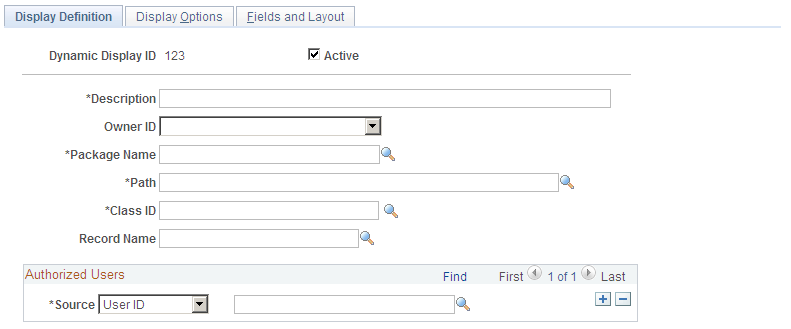
Use the Display Definition page (EODI_DYN) to define general dynamic display options.
Navigation
Image: Display Definition page
This example illustrates the fields and controls on the Display Definition page. You can find definitions for the fields and controls later on this page.
Dynamic Displays dynamically set up the form and format with the required action fields, and then pass the information back to the form.
|
Field or Control |
Definition |
|---|---|
| Dynamic Display ID |
The ID of the dynamic display is supplied as defined earlier. This must be a unique ID across your organization. |
| Description |
The name of the dynamic display. Enter a unique name for this display. |
| Package Name |
The name of the package that defines the PeopleSoft Application Layer for this process. This is unique for each process. The Application Class information and data here is where you point to the code that will be called for your specific PeopleSoft Application Layer functions. This is needed only if you are modifying or adding new integrations. PeopleSoft Applications deliver these defined for their delivered integrations. The package name, path and class ID are specific to the registration. For delivered registrations, the fields are populated with application specific data. When creating new registrations, these classes are defined beforehand in PeopleSoft Application Designer. This applies to all registrations. |
| Path |
The path of the dynamic display sample. Select the path where the dynamic display samples can be found. |
| Class ID |
Select a unique ID for the class. |
| Control Record Name |
Optional record name. Fields from this record name can be defined as defaults in the Fields and Layout information to quickly build a Dynamic Display. The properties of the record fields are also used. |
Authorized Users
|
Field or Control |
Definition |
|---|---|
| Source |
The source of the authorized user. Select from the drop-down list box. Values are:
You do not need to create a user ID for each; you can simply use the email address. The user ID does not need to match the email or PeopleSoft user ID. You can also create generic user IDs. The field to the right is automatically populated based on the source that you specify. |
| (the blank field to the right of the Source field) |
Depending on the Source that you select in the Authorized User section (User ID, Role Name, SQL User List), a corresponding list of options becomes available for selection. |
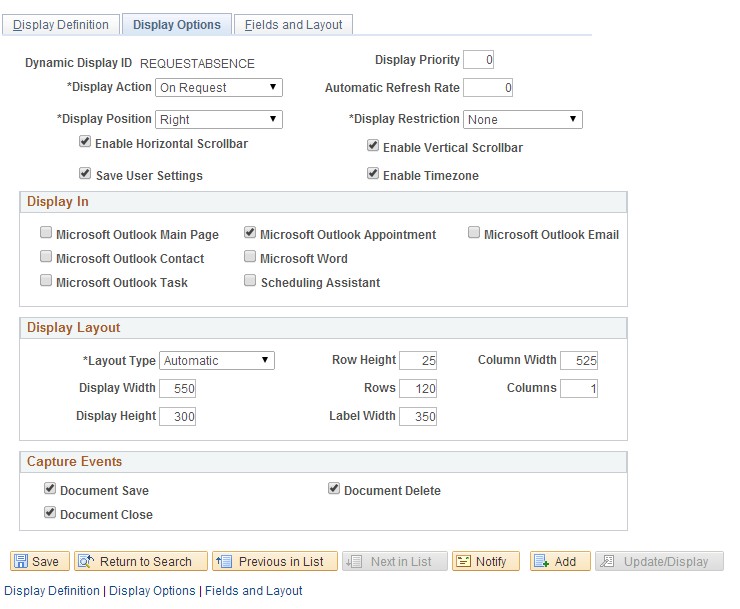
Use the Display Options page (EODI_DYN_DISPLAY) to define display options.
Navigation
Image: Display Options page
This example illustrates the fields and controls on the Display Options page. You can find definitions for the fields and controls later on this page.
|
Field or Control |
Definition |
|---|---|
| Display Action |
Select the display action. Values are:
|
| Display Position |
Select the initial position of the Dynamic Display. Values are:
|
| Display Restriction |
Used to restrict the position change of the Dynamic Display. This is useful if the display layout does not function well in a particular mode.
|
| Enable Horizontal Scrollbar |
Enables the horizontal scrollbar |
| Enable Vertical Scrollbar |
Enables the vertical scrollbar |
| Save User Settings |
Saves the user settings |
| Enable Timezone |
Enables timezone Note: Enable Timezone shoud be un-ticked if the Dynamic Display ID is REQUESTABSENCE |
| Display In |
Select the Microsoft Office application areas where the Dynamic Display is available. Values are:
|
| Layout Type |
Controls the layout method for the Dynamic Display. Values are:
|
| Display Width |
Width of the Dynamic Display. This will be ignored for Top or Bottom Display Positions. If a display is a LEFT or RIGHT display position, then it will always go from top to bottom of the current page (but you can control the width). |
| Display Height |
Height of the Dynamic Display. This will be ignored for Top or Bottom Display Positions. If a display is a TOP or BOTTOM display position, it will always go the entire width of the current page (but you can control the height). |
| Columns |
Number of columns for the display layout. |
| Column Width |
Width of columns for the display layout. |
| Rows |
Number of rows for the display layout. |
| Row Height |
Height of rows for the display layout. |
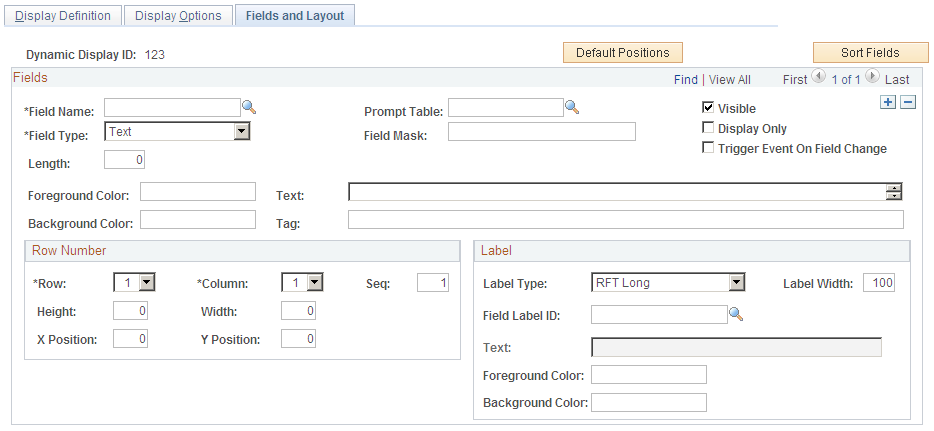
Use the Fields and Layout page (EODI_DYN_FIELDS) to define field and layout options for dynamic displays.
Navigation
Image: Dynamic Displays - Fields and Layout page
This example illustrates the fields and controls on the Dynamic Displays - Fields and Layout page. You can find definitions for the fields and controls later on this page.
|
Field or Control |
Definition |
|---|---|
| Default Position |
Click this button to set the default positions for the Row and Column numbers of all fields on the page. The system uses the row height and column width from the main page to calculate the X and Y position of the fields. This button is only visible when you select the Custom layout type on the Display Options page. |
| Sort Fields |
Click to sort the fields within the scroll by Row and Column number. |
| Refresh Fields |
Click to refresh all fields within the scroll with the fields from the Control record defined on the Display Definition page and Display Options page. |
| Field Name |
Enter or select a unique name (must be unique within this display). All code references to the field will use this name. |
| Field Type |
Select a value from the drop-down list box: Values are:
|
| Length |
Enter the length of the input data. This field is valid for Text and Number field types only. |
| Prompt Table |
Select a prompt table record name for the text field. Only valid for Text field types. When you select a Prompt Table record name for Text field types, a Prompt Table edit check box becomes available. This option asks Should Prompt Table be used as an edit table? This is only valid for Text field types where a Prompt Table has been defined. |
| Visible |
Select to define the control as visible. |
| Display Only |
Select to define the control as visible in the display only. |
| Trigger Event On Field Change |
Select to trigger a field change event on the server if the current field is changed. |
| Decimal Positions |
Enter the number of decimal positions in the number. This field is valid and enabled for Number field types only. |
| Button Action |
Select the action to be performed when the button is clicked. This field is valid and enabled for Button field types only. Values are:
|
Row Number
|
Field or Control |
Definition |
|---|---|
| Row |
Enter the number of rows for automatic layout. Instead, you can click the Default Positions button to set the default positions for the Row and Column numbers of all fields on the page. The system uses the row height and column width from the main page to calculate the X and Y position of the fields. This button is only visible when you select the Custom layout type on the Display Options page. |
| Column |
Enter the number of columns for automatic layout. Instead, you can click the Default Positions button to set the default positions for the Row and Column numbers of all fields on the page. The system uses the row height and column width from the main page to calculate the X and Y position of the fields. This button is only visible when you select the Custom layout type on the Display Options page. |
| Height |
Enter the height of the control. If you leave this value as 0, the system uses the current row height as the default. |
| Width |
Enter the height of the control. If this is a Display Only field and you leave the value as 0, the system will display the entire item. If this is an Input field, you must specify the display Width of the input field. |
| X Position |
Specify the absolute position for this control. This field is only visible when you select the Custom layout type on the Display Options page. |
| Y Position |
Specify the absolute position for this control. This field is only visible when you select the Custom layout type on the Display Options page. |
Label
|
Field or Control |
Definition |
|---|---|
| Label Type |
Select one of these options as the label type:
RTF Long and RTF Short are only valid options if the field name provided exists as a valid field without PeopleSoft Application Designer. |
| Field Label ID |
When you select either RTF Short or RTF Long for the label type, specify the Field Label ID. Field Label ID is only a valid option if the field name provided exists as a valid field without PeopleSoft Application Designer. |
| Label Width |
Specify the width reserved for the label for this item. To line up all items on a single Dynamic Display, keep this number consistent across all fields. |
| Text |
When you select Text for the Label Type, specify the label text. |