Setting Up Appointments
This section discusses how to set up appointments.
|
Page Name |
Definition Name |
Usage |
|---|---|---|
|
EODI_APT_REG |
Set up appointment registration and to define he defaults for the user's appointments, invitations, and calendar. |
|
|
EODI_APT_QUEUE |
Review the appointment queue, monitor integration transactions, or manually add or update meetings and appointments. |
|
|
EODI_APT_TIMES |
Specify the system parameters for scheduling meetings. |
|
|
EODI_APT_MEETINGS |
Specify criteria for your meeting invitations and attendees. |
Use the Appointment Registration page (EODI_APT_REG) to set up appointment registration and to define he defaults for the user's appointments, invitations, and calendar.
Navigation
Image: Appointment Registration page
This example illustrates the fields and controls on the Appointment Registration page. You can find definitions for the fields and controls later on this page.
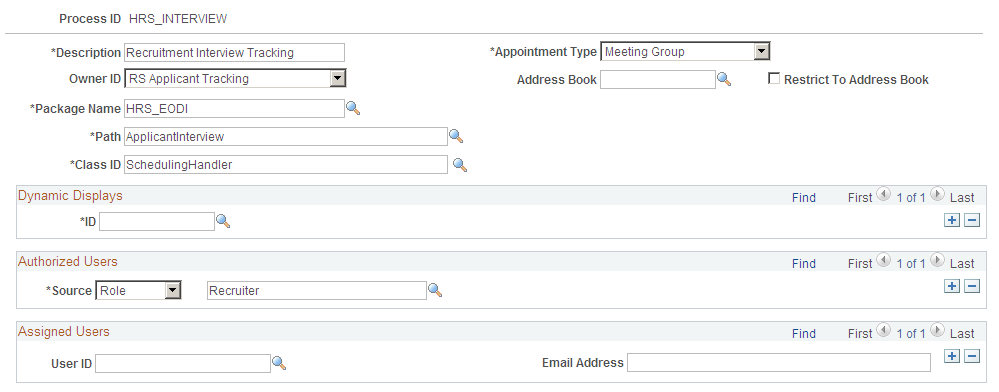
This information is supplied by the applications for delivered integrations. You define the Authorized Users section here. As with tasks, if creating custom integrations, you create data here.
|
Field or Control |
Definition |
|---|---|
| Process ID |
The ID is supplied beforehand for delivered integrations. |
| Description |
Description of the process. Enter a unique description. |
| Appointment Type |
Type of appointment. Appointments are anything on a calendar. Values are:
|
| Object Owner ID |
The application class that owns the object (for example, Enterprise Components). Select a value from the drop-down list box that contains all of the available applications. |
| Address Book |
Optionally, select a Desktop Integration address book to be available in the Outlook PeopleSoft Scheduler. |
| Restrict To Address Book |
Select to restrict the available email address options to the address Book entered. |
| Package Name |
The name of the package that defines the PeopleSoft Application Layer for this process. This is unique for each process. The Application Class information and data here is where you point to the code that will be called for your specific PeopleSoft Application Layer functions. This is needed only if you are modifying or adding new integrations. PeopleSoft Applications deliver these defined for their delivered integrations. The package name, path and class ID are specific to the registration. For delivered registrations, the fields are populated with application specific data. When creating new registrations, these classes are defined beforehand in PeopleSoft Application Designer. This applies to all registrations. |
| Path |
(Samples) Enter the path where Samples can be found. |
| Class ID |
(Address Samples) Enter a unique ID for the class. |
Dynamic Displays
|
Field or Control |
Definition |
|---|---|
| ID |
Things that are supplied by default to the appointment. Select the ID of the display that you want as the default. |
Authorized Users
|
Field or Control |
Definition |
|---|---|
| Source |
The source of the authorized user. Select from the drop-down list box. Values are:
You do not need to create a user ID for each; you can simply use the email address. The user ID does not need to match the email or PeopleSoft user ID. You can also create generic user IDs. |
| (the blank field to the right of the Source field) |
Depending on the Source that you select in the Authorized User section (User ID, Role Name, SQL User List), a corresponding list of options becomes available for selection. |
Assigned Users
|
Field or Control |
Definition |
|---|---|
| User ID |
Generally assigned when the task is put into the queue. You can also assign by email selection. |
| Email Address |
Alternatively, you can assign this field by email selection. |
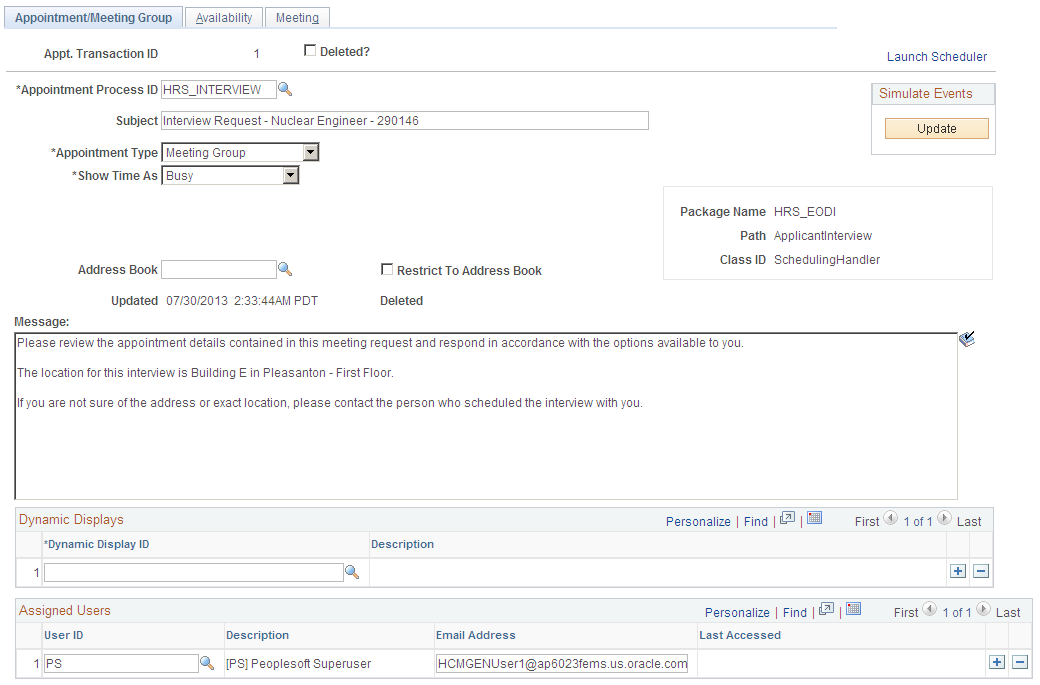
Use the Appointment Queue - Appointment/Meeting Group page (EODI_APT_QUEUE) to review the appointment queue, monitor integration transactions, or manually add or update meetings and appointments.
Navigation
Image: Appointment Queue - Appointment/Meeting Group page
This example illustrates the fields and controls on the Appointment Queue - Appointment/Meeting Group page. You can find definitions for the fields and controls later on this page.
|
Field or Control |
Definition |
|---|---|
| Appointment Process ID |
The appointment process associated with this appointment or meeting. |
| Subject |
|
| Appointment Type |
|
| Show Time As |
Status for the appointment. Values are:
|
| Start Date/Time |
Start date and time for the appointment. This is not visible for meetings. |
| End Date/Time |
End date and time for the appointment. This is not visible for meetings. |
| Address Book |
The address book for the default on new meetings. This is not available for appointments. |
| Restrict To Address Book |
Option supplied by default onto new meetings. |
| Message |
|
Dynamic Displays
|
Field or Control |
Definition |
|---|---|
| Dynamic Displays ID |
The ID of the dynamic display. Select the ID of the display that you want as the default in the user’s tasks. |
| Description |
The description of the dynamic display that the ID identifies. |
Assigned Users
|
Field or Control |
Definition |
|---|---|
| User ID |
This is generally assigned when the task is put into the queue. You can also assign by email selection. |
Use the Appointment Queue - Availability page (EODI_APT_TIMES) to specify the system parameters for scheduling meetings.
Navigation
Image: Appointment Queue - Availability page
This example illustrates the fields and controls on the Appointment Queue - Availability page. You can find definitions for the fields and controls later on this page.

Use this page to specify the system parameters that guide or restrict when you can schedule a meeting. This page is enabled for meetings only. The system considers meetings as a special type of appointment.
|
Field or Control |
Definition |
|---|---|
| Restrict Meeting Times |
When this option is enabled, meetings can be scheduled only within the meeting windows that you define. |
| Restrict to Single Day |
When this option is enabled, all meetings in a meeting group must occur on the same day. |
| Meeting Windows |
The start date and time, end date and time, and time zone. |
Use the Appointment Queue - Meeting page (EODI_APT_MEETINGS) to specify criteria for your meeting invitations and attendees.
Navigation
Image: Appointment Queue - Meeting page
This example illustrates the fields and controls on the Appointment Queue - Meeting page. You can find definitions for the fields and controls later on this page.
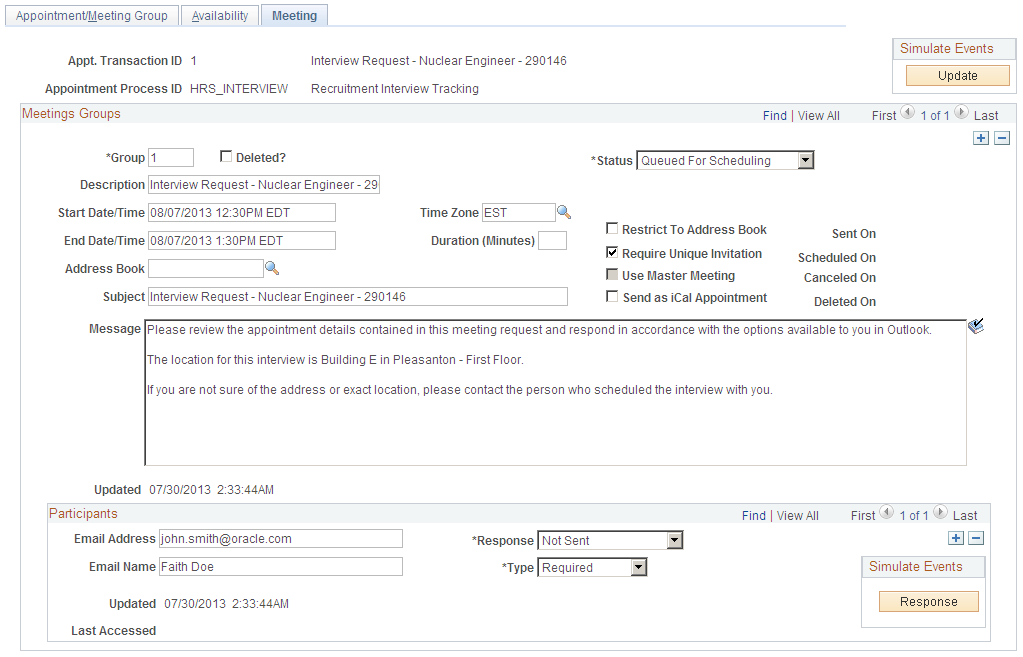
This page is enabled for meetings only.
|
Field or Control |
Definition |
|---|---|
| Update |
In the Simulated Events section, click the Update button to test your integration process without using Microsoft Outlook. This process updates all meeting groups. |
| Delete |
In the Simulated Events section, click the Delete button to test your integration process without using Microsoft Outlook. This process deletes the current meeting. |
| Status |
Select a value from the drop-down list box. Values are:
When you install the Microsoft Outlook Add-In program, the Status field is visible in your PeopleSoft application. |
| Start Date/Time |
Enter the first date that you want to consider within a particular time frame or known availability. From the drop-down list box, select the time that you want the meeting to begin. |
| Time Zone |
The attendee’s time zone. When you select a time zone from the drop-down list box, you are ensuring that the time you enter on your calendar appears correctly on the attendee’s invitation and calendar for his or her time zone. |
| End Date/Time |
Enter the last date that you want to consider within a particular time frame or known availability. From the drop-down list box, select the time that you want the meeting to end. This field is automatically populated when you specify a value in the Duration field. |
| Duration (Minutes) |
Duration of the meeting time in minutes. This field is automatically populated when you select the beginning and ending time. |
| Address Book |
Select from your available Desktop Integration address books. Selecting a Desktop Integration address book enables you to make available an email address book that is sourced from the PeopleSoft application. |
| Restrict To Address Book |
When you select this option, you can choose addresses only from the selected address book. |
| Subject |
Enter a subject line. This can be the topic of the meeting, the call-in number, or whatever information you want. |
| Require Unique Invitation |
Select to require a unique or custom invitation to a particular invitee or group. This option prevents the user from sending the Master Meeting invite information in the Outlook Scheduler. Note: Within the PeopleSoft Outlook Meeting Scheduler, the user can define a single meeting invite message for multiple meetings, individual meeting invite messages, or a combination of the two. The Master Meeting is a shared meeting invite that can be used and it’s body is supplied by default from the Message as defined on the Appointment/Meeting Group page. Each individual meeting can also have a message body that is defined on the Meeting page. This text is used if the user chooses not to use the Master Meeting invite, or if it’s use is restricted. |
| Use Master Meeting |
Select to use the content or text specified in the Master Meeting for everyone to whom you are sending an invitation. |
| Send as iCal Appointment (iCalendar appointment) |
Select to send to an external invitee who is using another calendaring system or application. |
| Deleted? |
Select to flag this meeting for deletion. |
| Message |
Enter the body of the invitation content or text into this pane for global visibility, unless otherwise specified. The system uses this message if the meeting is not using the Master Meeting (if you did not select the Master Meeting check box). |
| Updated |
This field is automatically populated with the date of the latest update. |
| Email Address |
In the Participants section, enter the email address or D-list of the people you want to invite. |
| Email Name |
Alternatively, you can enter the invitee name or group name. Select from the list of available types and participant types:
|
| Response |
This is the current response received from the user. Values are:
|
Simulate Events
|
Field or Control |
Definition |
|---|---|
| Response |
In the Simulate Events section, click the Response button to simulate the event and test your process without using Microsoft Outlook. |