Setting Up Application Status and Checklist Options
This topic discusses how you can control the display of the application status, checklist due date, and checklist contact using the classic and fluid user interfaces.
The Application Status self-service page, the Admissions section of the Student Center and Student Services Center pages, and the Campus Mobile admission application pages can display the application status using the classic user interface. The Application Status page and the Campus Mobile admission application pages can display the checklist due date and checklist contact.
You can customize the Fluid Applicant Self Service display around specific applicant groups for each of these elements—Institution, Academic Career, and Admit Term information.
|
Page Name |
Definition Name |
Navigation |
Usage |
|---|---|---|---|
|
Applicant Status Options |
SAD_APPL_STATUS |
|
On a classic interface, control the display of the application status, checklist item due date, and checklist item contact for an application based on the academic institution and academic career. |
|
Define Attributes |
SAD_FLSS_DEF_ATT |
Select the Define Attributes tab. |
Define attributes for an applicant group on a Fluid interface. An applicant’s complying with the attribute criteria at the sequence level depends on the other options defined in Self Service. |
|
Display Options |
SAD_FLSS_DISPLAY |
Select the Display Options tab. |
On a Fluid interface, define various display options for an applicant group which meets the attribute criteria on the Define Attributes tab. |
|
Additional Options |
SAD_FLSS_ACCDECC |
Select the Additional Options tab. |
On a Fluid interface, define additional options for display on the Application Status page if the applicant meets criteria on the Define Attributes page. |
Access the Applicant Status Options page ().
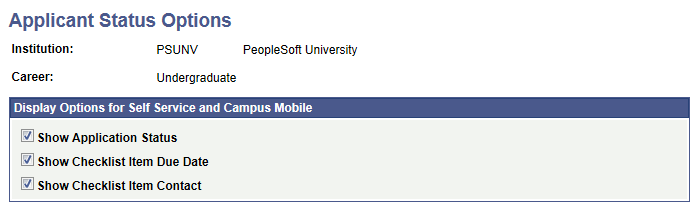
Image: Applicant Status Options page
This example illustrates the fields and controls on the Applicant Status Options page. You can find definitions for the fields and controls later on this page.
|
Field or Control |
Definition |
|---|---|
| Show Application Status |
Select to display the application status on the Application Status, Student Center and Student Services Center pages and the mobile admission application pages. The application statuses are complete, incomplete and admitted. Note: The status of the application is based on the Complete check box of the Application Data page (Student Admissions, Application Maintenance, Maintain Applications, Application Data). If the Show Application Status check box is selected and if you select the Complete check box for an application, then the system displays the application status as completed. If the Show Application Status check box is selected and the Complete check box for an application is deselected, then the system displays the application status as incomplete. The Complete check box (ADM_APPL_DATA.ADM_APPL_COMPLETE) setting can be updated manually or by using the delivered Population Update process for ADM_APPL_DATA. |
| Show Checklist Item Due Date |
Select to display the due date on the mobile admission application pages and the Outstanding Items for this Application section of the Application Status page. |
| Show Checklist Item Contact |
Select to display the checklist contact on the mobile admission application pages and the Outstanding Items for this Application section of the Application Status page. |
Examples
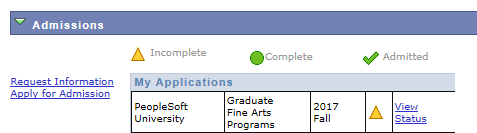
Suppose you have selected all the check boxes for PSUNV (PeopleSoft University) and Graduate on the Applicant Status Options page and the Complete check box has not been selected for a PSUNV- Fine Arts Graduate application. In such a case, the Admissions section in the Student Center displays the incomplete status for the application:
Image: Admissions section displaying application status
This is an example of Admissions section displaying the application status.
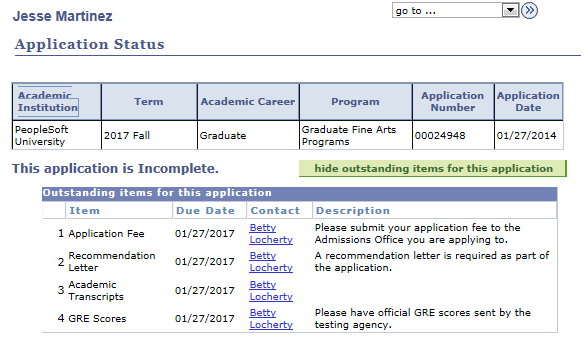
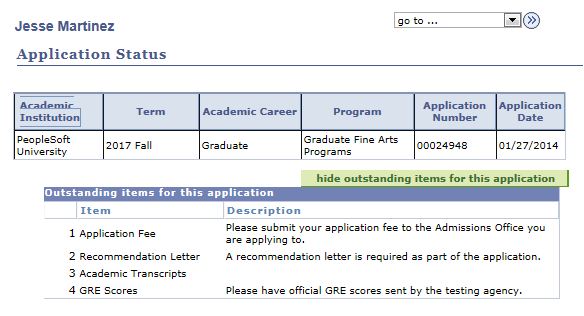
The applicant clicks the View Status link for Fine Arts Graduate application to navigate to the Application Status page. The system displays the Show outstanding items for this application button on the Application Status page. When the applicant clicks this button, she or he can view the outstanding checklist items with the due dates and contact names:
Image: Example of Applicant Status page displaying Due Date and Contact columns
This is an example of Applicant Status page displaying the Due Date and Contact columns.
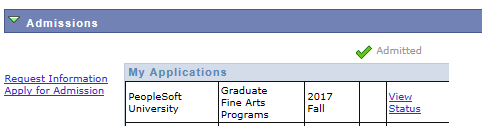
If you did not select the Show Application Status check box and the Complete check box has not been selected for the PSUNV- Fine Arts Graduate application, the Admissions section in the Student Center page does not display the incomplete status for the application.
Image: Example of Admissions section not displaying application status
This is an example of Admissions section not displaying the application status.
If you did not select the Show Checklist Item Due Date and Show Checklist Item Contact check boxes, the Outstanding Items for this Application section does not display the Due Date and Contact columns.
Image: Example of Applicant Status page not displaying Due Date and Contact columns
This is an example of Applicant Status page not displaying the Due Date and Contact columns.
Define a set of attributes for an applicant cohort. The Display and Additional options defined are accordingly applicable to the applicants meeting these attributes.
You can define one sequence to apply to all applicants or you can define multiple sequences under Institution, Academic Career and Admit Term to handle various applicant groups where you want to vary the display and timing of display to those groups.
Access the Define Attributes page ().
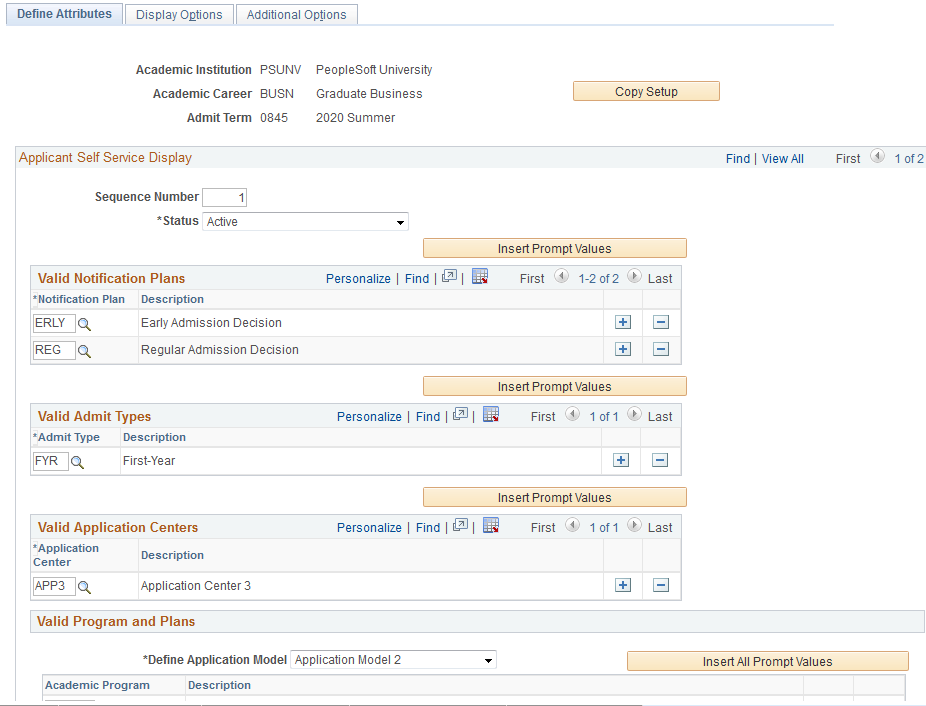
Image: Define Attributes page
This example illustrates the fields and controls on the Define Attributes page. You can find definitions for the fields and controls later on this page.
|
Field or Control |
Definition |
|---|---|
| Copy Setup |
Copy this setup to another Term under the same Institution and Career. |
Applicant Self Service Display
|
Field or Control |
Definition |
|---|---|
| Status |
Select the status for each row— active or inactive. |
| Valid Notification Plans |
Select the type of notification plan. Click the Insert Prompt Values button to insert all valid Notification Plans. |
| Valid Admit Types |
Select Admit Types which are valid under the Institution or Career. |
| Valid Application Centres |
Select an Application Center that is valid under a Career. Other non-Career specific Application Centres may be added as well. |
| Valid Program and Plans |
Select an Academic Program that is valid under a Career. and an Academic Plan that is valid under the associated Career or Program. |
| Define Application Model |
Define Application Model allows you to restrict setup only to the Program level, or to allow for a more granular setup to the Plan and sub-Plan level. |
Access the Display Options page ().
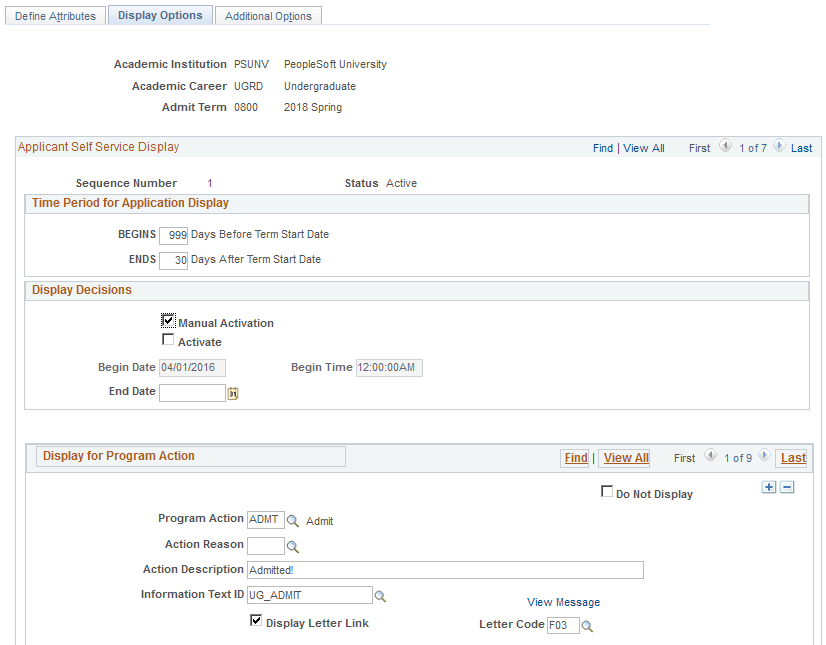
Image: Display Options page
This example illustrates the fields and controls on the Display Options page. You can find definitions for the fields and controls later on this page.
Note: Self Service setup uses the Text Catalog to provide content to the applicants. Campus Solutions delivers a Text Catalog Owner ID of SAD, and a Sub ID of SSFL. In order to return values in the setup component, be sure to create your text IDs under this hierarchy.
Time Period for Application Display
Use this group box to define the time period that the application remains active and viewable in Self Service. Start and end dates are calculated from the Term Start and End dates in the Term session table valid for the respective Institution and Career.
If no value is given for the Begin date, applicants meeting the set of attributes defined do not have their application available to them in Self Service. If no End date value is given, the application availability never expires in Self Service.
Display Decisions
Use this group box to define when decisions become available to applicants in Self Service for the cohort defined for this sequence.
|
Field or Control |
Definition |
|---|---|
| Manual Activation |
Select this check box to indicate that a user manually activates the display of decisions in Self Service. When Manual Activation is selected, the Begin Date is disabled and any value previously populated is ignored. Decisions are the Program Action values of ADMT, COND, WAIT, WAOF, DENY. |
| Activate |
This field is enabled only if you select Manual Activation. If Activate is selected, the decisions are immediately available to applicants in Self Service. |
| Begin Date |
Specify the date when you would like the decisions to be made available in Self Service. |
| Begin Time |
This field becomes available when you populate Begin Date. Specify an exact time on the Begin Date to display the decisions. |
| End Date |
Set the date when the decisions stop displaying. |
| Delay Days |
Use this option if you want decisions to display for a set number of days from the decision row effective date. For example, if a program action of ADMT is dated 04/01/2016, and you specify 7 delay days, then the decision becomes available in Self Service on 04/08/2016. This field is enabled only if Begin Date is blank. |
Display for Program Action
Use this group box to define which Program Actions and Action reason combinations appear in Applicant Self Service. The system obtains the Program Action and its corresponding reason from the current effective-dated row for the applicant or application. That Program Action and Action Reason combination is evaluated against the setup to determine whether that program action is set up for display. If the combination does not match the defined program action values, the system selects the next most current effective row from the application stack and applies the same evaluation logic to determine the Self Service display.
You can specify what appears for each Program Action/Action Reason row defined.
|
Field or Control |
Definition |
|---|---|
| Program Action |
Select values populated from the Admission Action Table. |
| Action Reason |
Select values that are valid for the selected Program Action. |
| Action Description |
Set a user-defined alternative text to use instead of the program action description. This appears for all program action values excluding APPL, Application. The text you define here appears to the applicant as the Status. |
| Information Text ID |
Select a Text Catalog message to display as the content on the Status Information page which renders from the information icon. |
| Complete Action Description |
User-defined alternative text to use instead of the program action description. Content specified here is displayed to the applicant as the Status. This field is available when the Program Action is APPL. This description will display when the application is marked complete. |
| Complete Text ID |
Select a Text Catalog message to display as the content on the Status Information page which renders from the information icon in Self Service. |
| Incomplete Action Description |
User-defined alternative text to use instead of the program action description. Content specified here is displayed to the applicant as the Status. This field is available when the Program Action is APPL. This description is displayed when the application has not been marked as complete. |
| Incomplete Text ID |
Select a Text Catalog message to display as the content on the Status Information page which renders from the information icon in Self Service. |
| Do Not Display |
Select this check box to prohibit the display of that program action in Self Service without needing to delete the row from the setup. |
| View Message |
Select to open a new window that displays the Maintain Text Catalog component. |
| Display Letter Link |
This is available when the program action is in ADMT, COND, DENY, WAIT, WAOF. When selected, the View Decision Letter link is displayed to the applicant in Self Service. |
| Letter Code |
This is available when the program action is in ADMT, COND, DENY, WAIT, WAOF. Select the Letter Code that is typically assigned to the applicant cohort defined for the associated program action. |
Access the Additional Options page ().
Image: Additional Options page
This example illustrates the fields and controls on the Additional Options page. You can find definitions for the fields and controls later on this page.
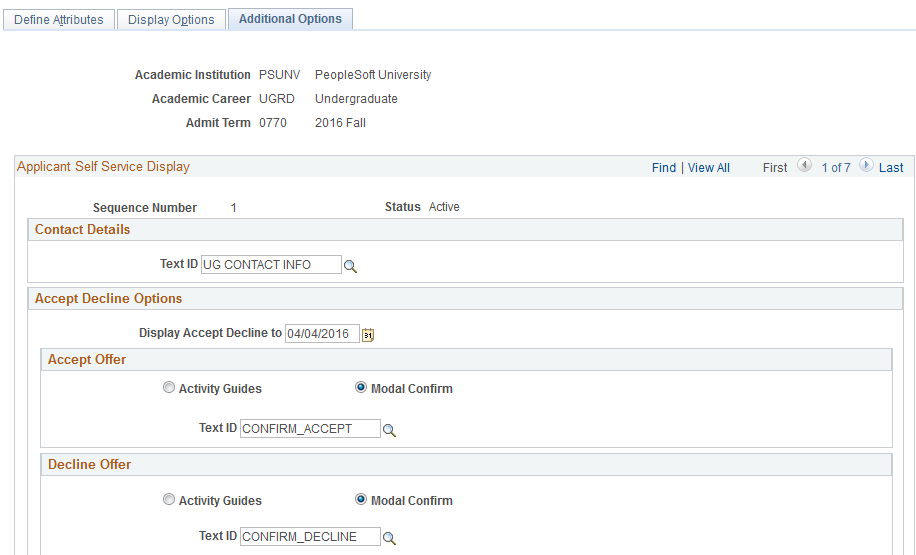
Contact Details
Select a Text ID from the Text Catalog to provide Content to the Contact Information page which renders from the Contact Us link in Self Service.
Accept Decline Options
|
Field or Control |
Definition |
|---|---|
| Display Accept Decline to |
While the applicant does not act on an Offer of Admission, use this field to specify the date by which the Accept and Decline buttons continue to appear on the Application Status page. If the date you set is greater than the current date, the Accept and Decline buttons are displayed until the date you specified is reached. Once the date you set is reached, the buttons do not appear on the Application Status page. If you do not set a value for this field, the buttons are always displayed. |
Accept Offer / Decline Offer
Use this group box to define whether a Modal Confirm or Activity Guide is used when an applicant clicks the Accept button on the Application Status page. Depending on what you select, either the Modal Confirm or Activity Guide label and fields are displayed.
If you use an Activity Guide, you can select which Activity Guide to launch. PeopleSoft Campus Solutions delivers activity guides for Accept (SAD_ACCPOC) and Decline (SAD_DECPOC) options. These are intended as proofs of concept to demonstrate how each activity can be configured. Oracle recommends that you clone and configure guides for your own content and business process requirements.
In the delivered example, the Accept Offer activity guide leads the applicant through the acceptance steps of understanding the terms of the offer of admission and confirmation. Upon exiting the activity guide, the applicant is returned to the Application Status page. At this point, a Pay Admissions Deposit button may display if a deposit is due. Selecting the button launches the Student Financials Make A Payment activity guide. The applicant is returned to the Applicant Home page after completing the payment process.
Note: An applicant is able to view and use the Pay Admissions Deposit button while using the modal confirm method.
If declining an offer, the activity guide leads the applicant through a confirmation and a survey, similar to existing Self-Service functionality. Responses are populated on the Application Student Response page in Application Maintenance. On submitting the survey, the applicant is returned to the Application Status page.
For more information, see: