Grids are tables that can contain data from external database connections. You can add a grid to your report, define its dimension layout, select members, and then format the grid. You can also insert an existing grid to reuse a preformatted grid design. You can use text, dimensions, members, and formulas to define the grid content. You can also hide a grid. For example, you might want to display a chart in a report, but not the grid associated with the chart.
You define the dimension layout for the grid by specifying a database connection, then dragging the available dimensions from the Point of View (POV) frame into the Rows, Columns, and Pages frames. The dimensions that are not placed in the Rows, Columns, or Pages frames are displayed in the user POV bar for that grid. You can layer multiple dimensions on a row, column, or page. For example, you might want to place the Scenario and Time dimensions on the same axis to show actual and budget data over a period of time.
The following figure shows the Dimension Layout dialog box. This is where you define the grid’s dimension layout by dragging the dimensions from the Point of View frame into the Pages, Rows, and Columns frames.
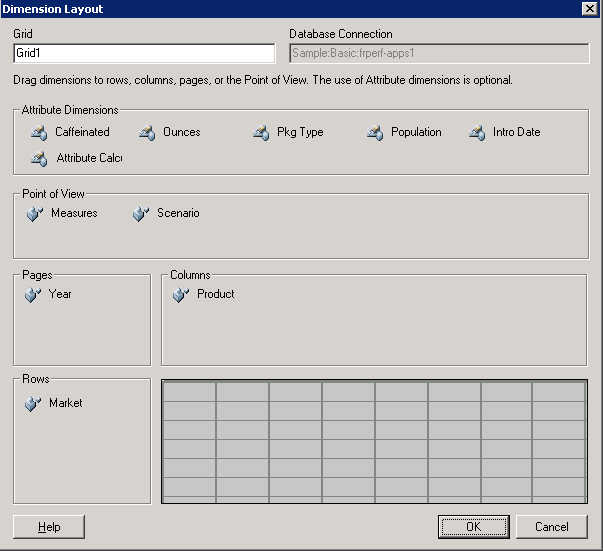
If the selected database connection for the grid contains attribute dimensions, they are displayed above the Point of View frame. Like the dimensions, you can drag attribute dimensions into the Point of View frame or the Rows, Columns, or Pages frames. |
The following table describes the Dimension Layout dialog box items:
Table 21. Dimension Layout Dialog Box Items
After you define the dimension layout, you can select the members to use for each dimension. For more information, see Assigning Members to Data Rows or Columns and Assigning Members to the Page Axis.
When you add a new grid, the system assigns a default name to the grid. You can rename the grid in the Dimension Layout dialog box or when you save it. The default name assigned is Gridn, where n is a system-assigned identification number. For example, if you save a grid that is the sixth system-named grid saved in the report, the default name is Grid6. The system uses the grid name when a function or chart references the grid. For example, if you design a chart to graphically display the data from a grid, the chart properties must reference the grid by its name.
 To add a new grid into your report:
Point to where you want to place the upper left corner of the grid and drag to the desired size, then release the mouse button.
In the Select a Database Connection dialog box, select a Database Connection.
Drag the dimension icons from the Attribute Dimensions frames, if they exist, and Point of View frames into the Pages, Rows, or Columns frames, then click OK.
To insert an existing grid into your report:
Select the directory where you want to search for the grid object, then select the desired grid object.
To use the grid object as a linked object, select Link to Source Object.
To use the grid object as an unlinked object, clear Link to Source Object. This is the default.
For a description of linked objects, see Using Linked and Local Objects.