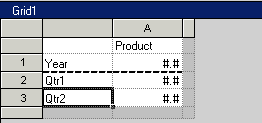
You can insert a page break before a row or column in a grid from the Row Properties and Column Properties sheets. This enables you to break your report data at a specified location within a grid while keeping required line items together.
Page Breaks are indicated with a heavy, dashed line. The following figure shows a page break before row 2. Page breaks are inserted above the selected row and to the left of the selected column.
 To insert a page break:
Select or highlight the row or column in which you want to insert a page break.
In Row or Column Properties sheet, select the Page Break Before option.
If Fit Length to Page is selected in Page Setup, you cannot apply page breaks to rows. If Fit Width to Page is selected in Page Setup, you cannot apply page breaks to columns. For more information on Page Set Up, see Working with Books and Snapshot Books.
Select Position at Top when selecting a row if you want the remaining part of your grid to be placed at the top of the new page or select Position at Left when selecting a column if you want the remaining part of your grid to be placed at the left margin of the new page.
Select Same Position if you want the grid to be placed in the same position as it is currently placed. For example, if a grid is placed half way down the page and you insert a page break with Same Position selected, the remaining part of the grid is displayed half way down on the second page.
