รันการดำเนินการกับข้อมูลที่มีเนื้อหาที่รวมอยู่
ทำตามข้อมูลที่อธิบายที่นี่เพื่อเรียนรู้เกี่ยวกับการรวมและการรันการดำเนินการของข้อมูลในการแสดงข้อมูลภายในคอนเทนเนอร์ภายนอก เช่น เป็นเพจ HTML หรือเว็บเพจของแอปพลิเคชัน
หมายเหตุ:
ตัวอย่างในส่วนนี้ใช้กับการดำเนินการกับข้อมูลที่รวมเมื่อแอปพลิเคชันที่รวมอยู่ไม่ได้ใช้เทคโนโลยี Oracle JET โปรดดู:การรันการดำเนินการกับข้อมูล
เมื่อคุณคลิกการดำเนินการกับข้อมูลแผยแพร่อีเวนต์ ระบบจะกำหนดข้อมูลคอนเท็กซ์สำหรับการแสดงข้อมูลและส่งข้อมูลนั้นไปยังบริการการดำเนินการนาวิเกตเพื่อประมวลผล การประมวลผลบริการสำหรับการดำเนินการนาวิเกตจะสร้างอีเวนต์ชื่อ “oracle.bitech.dataaction” พร้อมข้อมูลเพย์โหลดของคอนเท็กซ์ คุณสามารถสมัครอีเวนต์นี้และรับเพย์โหลดในการติดต่อกลับอีเวนต์ และคุณสามารถใช้ประโยชน์เพิ่มเติมจากเพย์โหลดตามที่ต้องการ
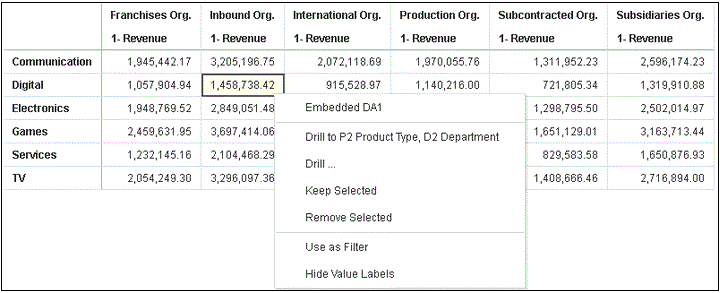
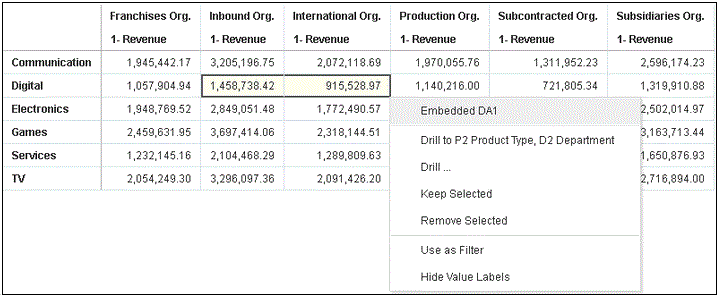
การแสดงข้อมูลต่อไปนี้จะแสดงรายรับเป็นดอลลาร์สำหรับรายการธุรกิจต่างๆ ตัวอย่างเช่น การสื่อสาร ดิจิตัล อิเล็กทรอนิกส์ ระหว่างหน่วยงานต่างๆ เช่น Franchises Org, Inbound Org, International Org
รูปแบบและคอนเท็กซ์ของอีเวนต์และเพย์โหลด
ตัวอย่างต่อไปนี้แสดงการเผยแพร่อีเวนต์เมื่อการดำเนินการกับข้อมูลที่กำหนดถูกเรียกใช้โดยเซลล์ข้อมูลอย่างน้อย 1 เซลล์ที่มีการคลิกขวา และการดำเนินการกับข้อมูลที่เลือกจากเมนูที่แสดงในเวิร์กบุคที่กำหนด
ตัวอย่างด้านล่างมาจากไฟล์ JSON ตัวอย่างเช่น obitech-cca/cca/component.json
รูปแบบอีเวนต์
"events": {
   "oracle.bitech.dataaction": {
      "description": "Generic DV Event published from an embedded data visualization.",
      "bubbles": true,
      "cancelable": false,
      "detail": {
         "eventName": {
         "description": "The name of the published BI Event",
         "type": "string"
      },
      "payload": {
         "description": "The payload contains context and related information to the event published",
         "type": "object"
      }
   }
}
รูปแบบเพย์โหลด
{"context":[
   "or": [
      "and":[
         {"contextParamValues":[...],
          "contextParamValuesKeys":[...],
          "colFormula":"...",
          "displayName":"...",
          "isDoubleColumn":true/false,
          "dataType":"..."
         }
      ]
   ]
 ]
}
การส่งค่าเดียวสำหรับคอลัมน์เดียวในส่งโดยคอนเท็กซ์
ในตัวอย่างนี้ เมื่อคุณคลิกที่เซลล์คอลัมน์ ระบบจะส่งออบเจกต์ที่มีข้อมูลคอนเท็กซ์เกี่ยวกับคอลัมน์ไปยังคอนเทนเนอร์ภายนอก ในกรณีนี้ ชื่อหน่วยงานจะถูกส่ง
{
   "context": [
      {
         "contextParamValues": [
            "Inbound Org."
         ],
         "contextParamValuesKeys": [
            "Inbound Org."
         ],
         "colFormula": "\"A - Sample Sales\".\"Offices\".\"D3  Organization\"",
         "displayName": "D3  Organization",
         "isDoubleColumn": false,
         "dataType": "varchar"
      }
   ]
}
การส่งค่าเดียวสำหรับแต่ละคอลัมน์ในส่งโดยคอนเท็กซ์
ในตัวอย่างนี้ เมื่อคุณคลิกที่เซลล์คอลัมน์ เช่น หน่วยงานขาเข้า และผลิตภัณฑ์ดิจิตัล สิ่งที่จะถูกส่งเมื่อคุณคลิกตัวเลือกเมนู DA1 ที่กำหนดเพื่อเลือกการดำเนินการที่กำหนดคือค่ารายรับเป็นดอลลาร์สำหรับสายธุรกิจและหน่วยงานที่เลือก ตัวอย่างเช่น รายรับของผลิตภัณฑ์ดิจิตัลจากหน่วยงานขาเข้าจะถูกส่ง ซึ่งในตัวอย่างนี้ได้แก่ $1, 458,738.42

.gif
{
   "context": [
      {
         "contextParamValues": [
            "Digital"
         ],
         "contextParamValuesKeys": [
            "Digital"
         ],
         "colFormula": "\"A - Sample Sales\".\"Products\".\"P3  LOB\"",
         "displayName": "P3  LOB",
         "isDoubleColumn": false,
         "dataType": "varchar"
      },
      {
         "contextParamValues": [
            "Inbound Org."
         ],
         "contextParamValuesKeys": [
            "Inbound Org."
         ],
         "colFormula": "\"A - Sample Sales\".\"Offices\".\"D3  Organization\"",
         "displayName": "D3  Organization",
         "isDoubleColumn": false,
         "dataType": "varchar"
      }
   ]
}
การส่งค่าหลายค่าในส่งโดยคอนเท็กซ์
ในตัวอย่างนี้ เมื่อคุณคลิกที่เซลล์ 2 แถว (เช่น หน่วยงานขาเข้าและหน่วยงานระหว่างประเทศสำหรับผลิตภัณฑ์ดิจิตัล) และคลิกตัวเลือกเมนู DA1 ที่กำหนดเพื่อเลือกการดำเนินการที่กำหนด สิ่งที่จะถูกส่งคือค่ารายรับเป็นดอลลาร์สำหรับเซลล์ที่เลือกไว้ 2 เซลล์สำหรับหน่วยงานและรายการธุรกิจ ตัวอย่างเช่น การคลิกรายรับสำหรับผลิตภัณฑ์ดิจิตัลจากหน่วยงานที่เลือกไว้ 2 หน่วยงาน (หน่วยงานขาเข้าและหน่วยงานระหว่างประเทศ) จะส่งค่า $1, 458,738.42 และ $915,528.97

.gif
{
   "context": [
      {
         "or": [
            {
               "and": [
                  {
                     "contextParamValues": [
                        "Digital"
                     ],
                     "contextParamValuesKeys": [
                        "Digital"
                     ],
                     "colFormula": "\"A - Sample Sales\".\"Products\".\"P3  LOB\"",
                     "displayName": "P3  LOB",
                     "isDoubleColumn": false,
                     "dataType": "varchar"
                  },
                  {
                     "contextParamValues": [
                        "Inbound Org."
                     ],
                     "contextParamValuesKeys": [
                        "Inbound Org."
                     ],
                     "colFormula": "\"A - Sample Sales\".\"Offices\".\"D3  Organization\"",
                     "displayName": "D3  Organization",
                     "isDoubleColumn": false,
                     "dataType": "varchar"
                  }
               ]
            },
            {
               "and": [
                  {
                     "contextParamValues": [
                        "Digital"
                     ],
                     "contextParamValuesKeys": [
                        "Digital"
                     ],
                     "colFormula": "\"A - Sample Sales\".\"Products\".\"P3  LOB\"",
                     "displayName": "P3  LOB",
                     "isDoubleColumn": false,
                     "dataType": "varchar"
                  },
                  {
                     "contextParamValues": [
                        "International Org."
                     ],
                     "contextParamValuesKeys": [
                        "International Org."
                     ],
                     "colFormula": "\"A - Sample Sales\".\"Offices\".\"D3  Organization\"",
                     "displayName": "D3  Organization",
                     "isDoubleColumn": false,
                     "dataType": "varchar"
                  }
               ]
            }
         ]
      }
   ]
}
ใช้ขั้นตอนเหล่านี้เพื่อดูเพย์โหลดของอีเวนต์โดยใช้เครื่องมือเบราเซอร์ Chrome
- ใน Chrome ให้คลิกขวาและเลือก ตรวจสอบที่มา
- ในแท็บ ที่มา ให้คลิกขวาที่บรรทัด
console.log("To view the payload, add a breakpoint on this line and use the browser tools debugger") ;แล้วเลือก เพิ่มจุดพักเมื่อเรียกใช้การดำเนินการกับข้อมูลอีเวนต์จากแคนวาสที่รวมอยู่ รายการเพย์โหลดจะปรากฏในส่วน ขอบเขต ทางช่องด้านขวาของเครื่องมือเบราเซอร์
- คลิกขวาที่รายการเพย์โหลด แล้วเลือก จัดเก็บเป็นตัวแปรร่วม
คุณสามารถดูตัวแปรร่วมภายในแท็บ คอนโซล และขยายเพื่อดูรายละเอียดของเพย์โหลดได้
ตัวอย่างเพจ HTML ที่มีการแสดงข้อมูลซึ่งรับอีเวนต์
รหัสตัวอย่างต่อไปนี้แสดงให้เห็นวิธีการกำหนดลิสเทนเนอร์ของอีเวนต์ สำหรับการดำเนินการกับข้อมูลอีเวนต์การวิเคราะห์ คุณต้องอัปเดตอินสแตนซ์การวิเคราะห์และพาธที่รวมอยู่ไปยังเวิร์กบุคในตัวอย่างรหัสนี้ เวิร์กบุคต้องมีการกำหนดการดำเนินการกับข้อมูลอีเวนต์ อีเวนต์ที่กำลังรับข้อมูลอยู่ชื่อ oracle.bitech.dataaction เมื่ออีเวนต์เริ่มต้น ระบบจะส่งข้อความไปยังคอนโซล
<!DOCTYPE HTML>
<html dir="ltr">
   <head>
      <meta http-equiv="Content-Type" content="text/html; charset=utf-8">
      <title>Oracle Analytics embed example to view data action event payload</title>
      <meta id="viewport" name="viewport" content="width=device-width, initial-scale=1, minimum-scale=1.0, maximum-scale=1.0, user-scalable=no"/>
      <script src="https://<OAC-INSTANCE>.analytics.ocp.oraclecloud.com/public/dv/v1/embedding/standalone/embedding.js" type="application/javascript">
      </script>

   </head>
   <body>
      <h1>Oracle Analytics embed example to view data action event payload</h1>

      <div id="mydiv" style="position: absolute; width: calc(100% - 40px); height: calc(100% - 120px)" >
         <oracle-dv project-path='<WORKBOOK-PATH-TO-EMBED>'
          active-page='insight'
          active-tab-id='snapshot!canvas!1'>
         </oracle-dv>
      </div>

      <script>
         requirejs(['knockout', 'ojs/ojcore', 'ojs/ojknockout', 'ojs/ojcomposite', 'jet-composites/oracle-dv/loader'], function(ko) {
          ko.applyBindings();
         });

      </script>
      <script>
         var eventName = 'oracle.bitech.dataaction';
         var element = document.getElementById("mydiv");
         if (element) {
         var oEventListener = element.addEventListener(eventName, function (e) {
         console.log("***** Payload from DV sent ***** ");
         console.log("eventName = " + e.detail.eventName);
         console.log("To view the payload, add a breakpoint on this line and use the browser tools debugger") ;
         console.log("******************************** ");
         }, true);
         }
      </script>
   </body>
</html>
นอกจากนี้ คุณยังสามารถแก้ไขส่วน <script> ในตัวอย่างรหัสก่อนหน้า เพื่อส่งคืนค่าที่เรียกใช้การดำเนินการกับข้อมูล ดังนี้
<script>
         var eventName = 'oracle.bitech.dataaction';
         var element = document.getElementById("mydiv");
         if (element) {
         var oEventListener = element.addEventListener(eventName, function (e) {
         console.log("***** Payload from DV sent ***** ");
         console.log("eventName = " + e.detail.eventName);
         console.log("To view the payload, add a breakpoint on this line and use the browser tools debugger") ;
         console.log("******************************** ");

         var res = " Data Received from DV Content:    ";

       // Get the values of the row from where data action was invoked
           Object.keys(e.detail.payload.context).forEach(function(key) {
            res = res.concat(key);
            res = res.concat(" : ");
            var temp = e.detail.payload.context[key]["oValueMap"];
            var temp1 = Object.keys(temp)[0];
            res = res.concat(temp1);
            res = res.concat(" | ");
           });

          console.log("Data Action Row Context : " + res);

         }, true);
         }
      </script>
