198/368
使用 Oracle Content Management 建立內容版面配置
您可以建立內容版面配置,用於編排內容項目中的欄位在網站頁面上顯示時的版面配置。當內容項目新增至頁面時,它將會使用選擇的內容版面配置。
企業使用者可以依據開發人員提供的內容類型和版面配置,建立及使用內容項目。您可以從預設版面配置建立新的內容版面配置。內容類型若有多個關聯的內容版面配置,網站設計者不需要變更內容,就可以顯示不同相關資訊環境中的內容項目。
如果您在某個內容清單元件中使用內容版面配置,此內容版面配置會在每個內容項目重複出現一次。內容版面配置接著便由區段版面配置來編排。
您可以將內容版面配置匯出進行離線修改,然後再將它匯入並取代現有的內容版面配置。
建立內容版面配置:
- 在 Oracle Oracle Content Management 首頁中,按一下側邊導覽中的開發人員。
開發人員頁面便會顯示。
- 按一下檢視所有元件。
- 從右邊的建立下拉式功能表中選擇建立內容版面配置。
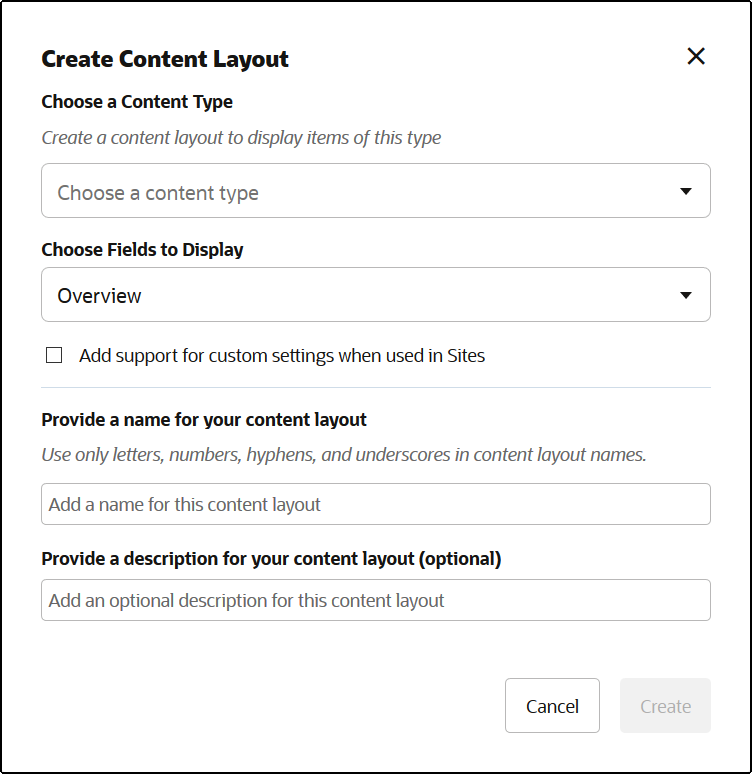
- 在建立內容版面配置對話方塊中,選取將使用該版面配置的內容類型,選擇要顯示的欄位,以及如果您希望網站建立者在頁面中增加內容項目和內容清單元件時能夠加入自訂設定值與樣式,請啟用在網站中使用時新增對自訂設定值的支援。

- 提供內容版面配置元件的名稱和描述,然後按一下建立。
此內容版面配置就會新增至您的元件。
註:
內容版面配置標題中只能使用文數字字元、連字號以及底線。 - 若要匯出內容版面配置進行編輯,請選取該內容版面配置,然後從滑鼠右鍵功能表中選擇匯出,或按一下動作列中的
 。
。
- 瀏覽至現有資料夾,或依序選取建立和資料夾以建立新資料夾並提供名稱,以及視需要提供描述。
- 選取資料夾旁邊的核取方塊,然後按一下確定。
- 按一下資料夾的圖示或名稱,以開啟該資料夾。
系統就會在選取的資料夾中,以內容版面配置名稱加
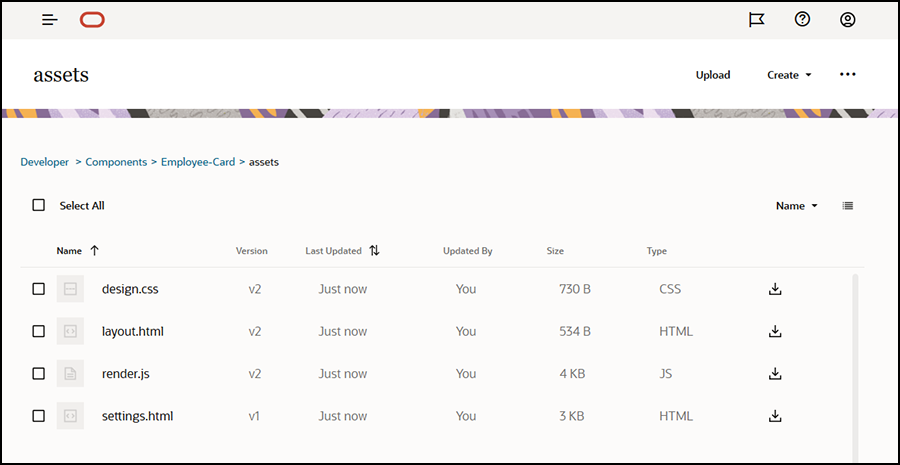
.zip副檔名,建立一個版面配置套件檔案。請將此檔案下載至您的開發環境以編輯其中的檔案。
這些檔案主要控制使用員工證內容版面配置之內容項目中欄位的版面配置。如果已啟用在網站中使用時新增對自訂設定值的支援,則系統還會另外建立一個名稱為 settings.html 的檔案,用來提供單一內容項目的預設呈現,以顯示該內容項目。

插圖說明 GUID-1B7C7C81-7057-4E9C-B98C-C982CC483961-default.png - 編輯
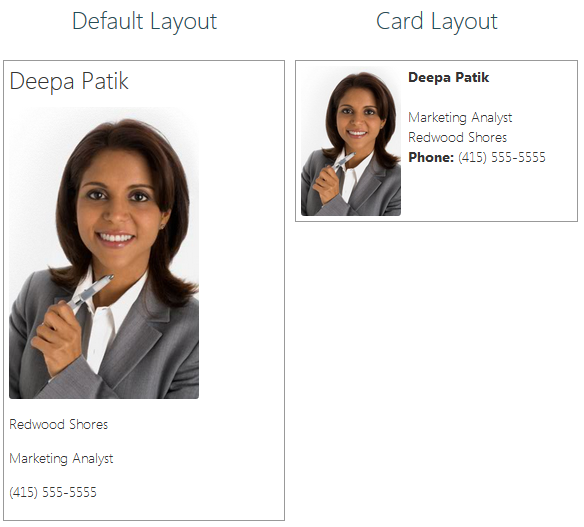
design.css、layout.html以及render.js檔案,以獲取想要的內容版面配置。例如,下列檔案指定員工證的內容版面配置:
- 編輯
design.css檔案:.scs-tile-layout { font-family: 'Helvetica Neue', 'Segoe UI', sans-serif-regular, Helvetica, Arial; font-size: 16px; margin: 0px; padding: 0px; font-style: normal; color: #333; } .scs-tile-layout li { list-style: none; font-size: 14px; font-style: normal; font-variant-caps: normal; font-weight: 200; margin: 0px; } .scs-tile-layout-img-container { height: 150px; width: 100px; float: left; margin: 0em 0.5em 0em 0em; padding: 0px; border-radius: 3px; overflow: hidden; position: relative; } .scs-tile-layout-img { position: absolute; left: -100%; right: -100%; top: -100%; bottom: -100%; margin: auto; height: 100%; min-width: 100%; } .scs-tile-layout p { margin: 0px; } - 編輯
layout.html檔案:{{#data.employee_profile_pictureURL}} <div class="scs-tile-layout-img-container"> <img class="scs-tile-layout-img" src="{{data.employee_profile_pictureURL}}" /> </div> {{/data.employee_profile_pictureURL}} <ul class="scs-tile-layout"> <li> <p><b>{{name}}</b></p> </li> <li> </li> <li> <p>{{data.employee_job_title}}</p> <p>{{data.employee_location}}</p> <p><b>Phone: </b>{{data.employee_phone}}</p> </li> {{#scsData.detailPageLink}} <li> <a href="{{scsData.detailPageLink}}" title="Go to detail page"><span class="detail-page">Profile</span></a> </li> {{/scsData.detailPageLink}} </ul> - 編輯
render.js檔案:/* globals define */ define([ 'jquery', 'mustache', 'text!./layout.html', 'css!./design.css' ], function($, Mustache, templateHtml, css) { 'use strict'; function ContentLayout(params) { this.contentItemData = params.contentItemData || {}; this.scsData = params.scsData; this.contentClient = params.contentClient || (params.scsData ? params.scsData.contentClient : null); // retrieve the custom settings this.customSettiings = this.scsData.customSettingsData || {}; } ContentLayout.prototype = { render: function(parentObj) { var template, content = $.extend({}, this.contentItemData), contentClient = this.contentClient, contentType, secureContent = false; if (this.scsData) { content = $.extend(content, { 'scsData': this.scsData }); contentType = content.scsData.showPublishedContent === true ? 'published' : 'draft'; secureContent = content.scsData.secureContent; } if (contentClient) { var params = { 'itemGUID': typeof content.data.employee_profile_picture === 'string' ? content.data.employee_profile_picture : content.data.employee_profile_picture.id, 'contentType': contentType, 'secureContent': secureContent }; content.data.employee_profile_pictureURL = contentClient.getRenditionURL(params); } console.log(content); try { // Mustache template = Mustache.render(templateHtml, content); if (template) { $(parentObj).append(template); } } catch (e) { console.error(e.stack); } } }; return ContentLayout; });如需有關編輯 render.js 和其他檔案的資訊,請參閱開發元件。
- 編輯
- 匯入修改過的檔案以取代現有內容版面配置。
- 在首頁中,按一下文件。
- 將修改過的內容版面配置以 .zip 的檔案格式 (包含與匯出相同的資料夾和檔案名稱) 上傳到資料夾。
若要將它匯入為新的內容版面配置,您需要變更該內容版面配置在
_folder.json中的 GUID。 - 在首頁中,按一下開發人員。
開發人員頁面便會顯示。
- 按一下檢視所有元件。
- 從建立功能表中選擇匯入元件。
- 選取已上傳壓縮檔 (包含修改過的元件) 旁邊的核取方塊,然後按一下確定。
修改過的內容版面配置便會匯入元件中。
您也可以匯出內容版面配置,並將它複製或移到另一個 Oracle Content Management 執行處理,然後在該處匯入。