Assigning project roles

You can grant access to a project by assigning project roles to users and user groups. Sharing settings are accessible from the Project Settings page or from the project details panel in the Catalog.

You must have Project Author permissions for a project in order to assign roles.

You can assign Project Restricted User or Project Author access to individual users or to user groups. Users gain the greater permissions of either their group permissions or their individually assigned permissions. For details on permission levels, see Project and User Roles.

To share a project:

  1. Navigate to the sharing settings:
    1. From the Catalog, select the project to modify and click the edit link beside the project Access level:
      The Sharing menu option.
      The Sharing Setup pane displays.
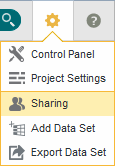
    2. From within a project, click Configuration Options in the top right corner of the page and select Share:
      The Sharing menu option.
      The Project Settings screen opens to the Sharing page.
  2. To add or remove individual users:
    1. Click +User.
      The Add Users dialog appears.
    2. To add users, drag user names from the Available Users list to the Selected Users list.
      Optionally, use the Search field to filter the Available Users list.
    3. To remove users, click the x next to a user name in the Selected Users list or click Clear All to remove all selected users.
      You can also remove users from the User access table on the Sharing page by clicking the x in the right side column.
    4. Click Save.
  3. Click the drop down in the Access column to set a user's permissions for the project.
  4. To add or remove groups:
    1. Click +Group.
      The Add Groups dialog appears.
    2. To add groups, drag group names from the Available User Groups list to the Selected User Groups list.
      Optionally, use the Search field to filter the Available User Groups list.
    3. To remove groups, click the x next to a group name in the Selected User Groups list or click Clear All to remove all selected groups.
      You can also remove groups from the Group access table on the Sharing page by clicking the x in the right side column.

      Note:

      You cannot remove or modify permissions for the All Big Data Discovery admins group, and you cannot remove the All Big Data Discovery users group.
    4. Click Save.
  5. Click the drop down in the Access column to set a group's permissions for the project.
  6. Click Save.