Creating signature rules
With signature rules, the sender is dynamically defined based on the recipients of the message. Rules link a specific sender to a contact based on the field values in that contact's record or custom object.
Before you begin:
-
Setup user accounts for the possible senders. For example, set up user accounts for your sales reps. The sender must be a user account in Oracle Eloqua but the user account does not need to be active nor does the person associated to the user account need to have access to Oracle Eloqua. The user account will be used to determine sender information and dynamically populate sender information where applicable.
-
You can also perform a bulk mapping upload, which allows companies with large sales teams to easily manage their signature rules without any manual mapping. See Uploading and exporting mappings for signature rules for more information.
To create a new signature rule:
- Navigate to Assets
 > Email Setup, then click Signature Rules.
 - Click New in the upper-right corner.
- Configure the new rule's settings:

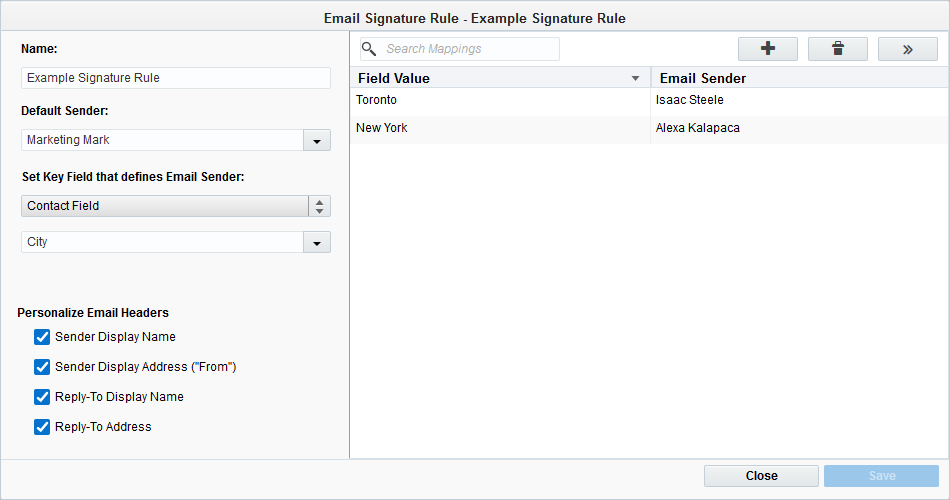
- Name: Provide a name for the rule.
- Default Sender: Select a default sender from the list of users. This is the sender (and sender information) that Oracle Eloqua uses when there are no matches for the rule key field.
- Set Key Field that defines Email Sender: Select the specific field that defines which contacts will be mapped with which users. Select either Contact Field, Custom Object Field, or Event Registration Field as the field type, then select the specific field by name.
- Personalize Email Headers: If selected, the signature rule uses the sender's signature field information to dynamically populate the email header when the email is sent to the recipient. Each selected check box modifies the email header in the following ways:
- Sender Display Name: The sender name matches the user's Email Sender Display Name signature field.
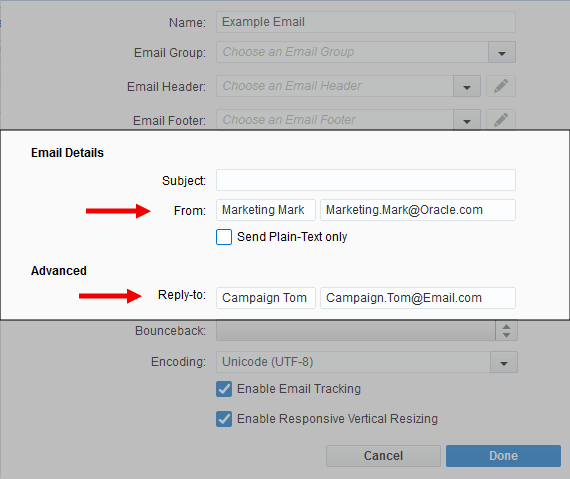
- Sender Display Address ("From'): The "From" address enables the use of the address in the Email Sender Address box, which is located in your user settings under General Info (Signature fields). If you enable this option, confirm that you have the desired address in your user settings.
- Reply-To Display Name: The reply-to name enables the uses of the name specified in Email Sender Display Name which is located in your user settings under General Info (Signature fields). If you enable this option, confirm that you have the desired name in your user settings.
- Reply-To Address: The reply-to address matches the address in the Email Reply-To Address signature field.
If any check box is deselected, the email header instead uses default information in the email settings of the email asset (file). See step 5 of creating an email for more information on these settings.

- Click Save.
- If you want to control access to the signature rule, click Actions
 , then select Permissions and set the permissions. See Setting component permissions for more information.
 - Add the field values and email sender information for the signature rule. There are two ways to do this.
- Manually add values: Click Add
 in the upper-right to add field values. Double-click each field to fill in the appropriate values, then press Enter.
Example: One user is mapped as the sender for any contacts from "Toronto", while the other user is mapped as the sender for "New York" contacts.

- Auto-fill values: Click Actions , then select Auto-fill Values. Your field values are automatically populated based on Oracle Eloqua contact data.
Note: The Auto-fill values option is only available when you choose a contact field as the key value; it is not available for custom object fields or event registration fields.
The auto-fill option looks at your contact database, and based on the Key Field that you defined in the rule, maps those contact field values to existing Oracle Eloqua users.
Tip: Using auto-fill values is ideal for companies that have an exact match between the salesperson and the user field. For example, when using the Salesperson contact field, auto-fill values only maps direct matches. This can result in the need to manually edit numerous mappings when the match is not perfect.
- Manually remove values: Click on a value, then click the
 to remove that value.
- Manually add values: Click Add
- Click Save.

After you finish:
- If you need to edit the rule, see Managing signature rules.
- Use the signature rule in multi-step campaigns and simple email campaigns.