Uploading registrants
Within a custom object, you have the option to upload custom object record information. A custom object record upload wizard will walk you through the steps.
Note: On the first pass through the wizard, you can save your settings in the final step, then use them again to upload more information later to ensure consistent uploads. However, you can only use saved settings for the same custom object because the fields used vary from one custom object to the next. Saved settings cannot be shared between different custom objects, and will not appear as an option until you have saved at least one set of settings for that specific custom object.
To use the Custom Object Record Upload Wizard
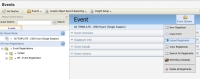
- Navigate to Orchestration
 > Tools, then click Events.
- Open an existing event, or create a new one.
- Click Event Options in the right panel, then click Upload Registrants.
The Registrant Upload Wizard opens.
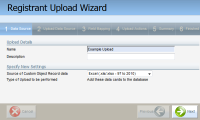
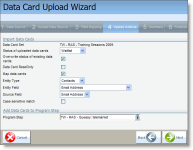
- Configure the details in Step 1 Data Source:
- Type a name for the upload into the Name field.
- (Optional) Type a description into the Description field.
- Select the type of source file to be uploaded. Your options are:
- Microsoft Excel .xls/.xlsx 97-2010
- Delimited file (tab, file, semi-colon)
- Remote File over SFTP
Note: Uploads to Oracle Eloqua from an SFTP server cannot exceed 5 GB.
- Click Next.
Note: Settings may change in subsequent steps depending on what you select. The assumption for this example procedure is that you are uploading data from an Excel file.
- Select the data file in Step 2 Upload Data Source:
- Click Browse, locate the desired file, then click Open.
- Click Upload and Preview Data. The file is uploaded, and a preview of the data in the file is displayed under Transferred Data.
- Click Next.
- Match fields from your data source to the fields in Eloqua in Step 3 Field Mapping:
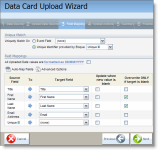
- Under Unique Match area, you must select one of two options:
- Select Uniquely Match On, then select a field from the Event Field drop-down.
- Select to generate a Unique Identifier provided by Eloqua to be applied to a specific field (selected from the adjacent field drop-down).
Note: If you select the Unique Identifier option, then you can, at a late point in time, export the custom object records, change the data, and re-upload them based on the Unique ID. If you want to do this, then you must include the header for a Unique ID column in your upload file; the values can be blank because they'll be generated in Eloqua.
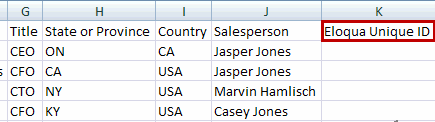
You must also not map this field to a target field in Eloqua if doing this method. - For every field in the Source Field column, click the corresponding drop-down box in the Target Field column, then select the appropriate field.
- (Optional) Click Auto-Map Fields. Eloqua will select the best possible matching fields, and you can manually fix any mistakes.
- (Optional) Click Advanced Options to display advanced options for handling imported data such as constant values, and per field overwrite options.
- Click Next.
- Under Unique Match area, you must select one of two options:
- Set specific upload parameters in Step 4 Upload Actions:
- Custom Object: This name is read-only and is the same as the Event.
- You can set the Status of uploaded Custom Object Records (Registered, In Progress, On Hold, Cancelled, or Waitlist) for all the custom object records you are currently uploading for your event.
- Overwrite status of existing data cards: To use uploading data to change the status of custom object records already in the system.
- Set the new custom object records (Data Card) to ReadOnly to prevent another user from deleting these custom object records.
- Select Map Custom Object Records to automatically map fields between existing data entities (contacts, prospects, companies) and the custom object record. When you look up the contact, you can see all the custom object records it is mapped to, including the current custom object record.
- Select the Entity Type (contacts, prospects, or companies), then make sure that the Entity Field is set to the correct field for unique matches.
- Set the Source Field to a unique field value such as email address if you are mapping contacts. If you are mapping Companies or Prospects, you can set the Source Field to something else such as Lead ID or Company ID to map by a unique identification code.
- Select Case sensitive match to ensure that the same capitalization is used as part of the match.
- If you want to add the uploaded custom object records to a Program Step, click the
 button to select a program step in the Program Step Search dialog box. You can search by program or step name, select and Edit a Program, create a New Program, or View All available program steps. Once you have a list of Steps, click one to select it, then click OK to associate it with the uploaded custom object records.
- Click Next.
- Review and finalize your upload in Step 5 Summary:
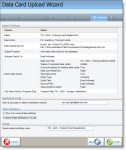
- View the Upload Settings. You can also set a Notification Email address where you will be notified when the upload is completed. Finally, you can choose to use the settings for your upload only once by choosing Run once using these settings, or save a reusable template of your selected settings by choosing Save these settings for re-use and providing a name in the field that appears.
- Click Finish.


Registrants are uploaded to the selected program. An email is sent to the specified email address confirming whether or not the upload was a success.