Creating new landing pages and templates using the HTML upload wizard
Note: We're updating our help center to reflect the new Redwood experience. During the transition, some content reflects the previous version of the UI.
With Eloqua, you are able to upload HTML landing pages that were created outside of the application, after uploading the content you can edit the code using the Source Editor. The content can be uploaded as a new landing page that can be used directly, or as a template that can be reused within the application to create new landing pages.
Important: When creating an HTML landing page outside of Eloqua, you should make sure that your code adheres to the code requirements.
Before you begin:
- Make sure your code adheres to the code requirements.
- You can upload an HTML file or a ZIP file. If you upload a ZIP, Oracle Eloqua will extract the files during the upload process.
- The maximum file size you can upload is 10 MB.
- Files uploaded will be scanned for malware before the upload process will complete. Any files with malware detected will not be uploaded.
To create a landing page or template using the HTML upload wizard:
-
Navigate to Assets
 , then click Landing Pages.
 -
Choose the upload action:
-
In the classic UI, click Upload an Landing Page. In the wizard, choose if you are uploading a landing page or a template.
-
In the Redwood experience, click Actions > Upload a Landing Page. If you are uploading a template, choose Templates from the page selection, and then click Upload Template.
-
-
On the Upload HTML or Zip choose the file you want to upload. You can upload an HTML file or ZIP.
Classic UI
Redwood experience

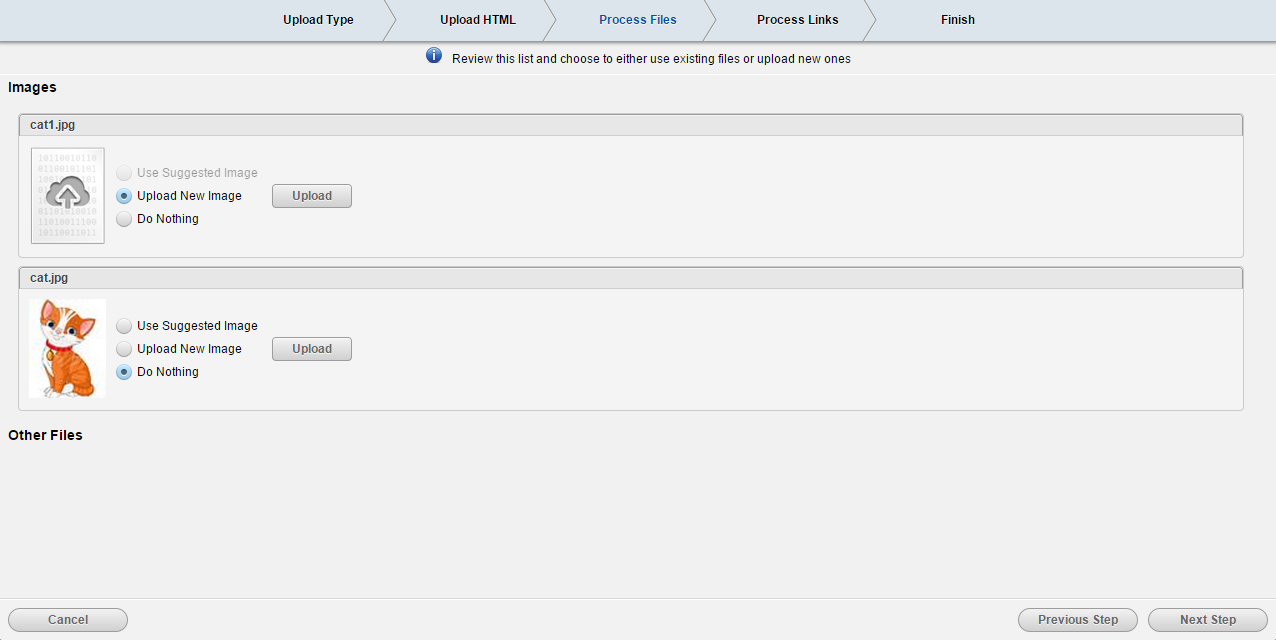
- On the Process files step, review the list of images and other files and choose to either use existing files or upload new ones.
- Use Suggested Image: Choose this option if the image is already in the image library. If an image is available that matches the title of the image file in the HTML code, the application will automatically suggest that file as the correct mapping.
- Upload New Image: Choose this option if the image is not in the library. Click the Upload New button, then navigate to the designated file (often in a subfolder of the HTML file), double-click on the file name, then click Upload to upload the image to Eloqua. Once uploaded, a thumbnail of the image is shown.
- Do Nothing: Choose this option if you do not wish to change the image shown in the thumbnail, select for that image.
-
In the Process Links step
Classic UI

Redwood experience

-
In the classic UI, all hyperlinks in the uploaded landing page are listed. If you want to track these hyperlinks and ensure that clickthroughs are reported in Eloqua, select the Track Link check box next to each hyperlink. If you wish to track visits to all links in the landing page, click the Track All button in the upper-left hand corner. Repeat as required, then click Next Step
-
In the Redwood Experience, all hyperlinks in the uploaded landing page are listed. If you want to track these hyperlinks and ensure that clickthroughs are reported in Eloqua, select the Redirect Tracking for Untracked Pages. If you wish to track visits to all links in the landing page, click the Track All button in the upper-left hand corner. Repeat as required, then click Next.
-
-
In the Finish step, give the final details about the landing page or template.
Classic UI

Redwood experience

Name your HTML document and, if needed, change the destination folder where you want it to be stored. This is an optional step, the location can be changed at a later date if required.
If you are uploading a template, you also have the option to add a description, and choose the image that will represent this template in the Template Chooser.
Select the Use Thumbnail check box if you want a thumbnail image of your template to be shown in the Template Chooser. If you clear this check box, you are presented with the option to select either a generic (blue) icon, or by clicking Change Icon, you can choose one of the available icon designs shown below.
Classic UI - Landing Page Template

Redwood experience - Landing Page Template

- Click Finish in the classic UI or Process in the Redwood experience to complete the upload process.
Classic UI
Redwood experience

Choose one of the options listed beside each image. These options are the same in both the classic UI and the Redwood Experience:
Click Next Step in the classic UI or Next in the Redwood Experience, when you are finished.