Importing Profile Data
Important: This topic is for users of the latest version of Connect . If your account still uses Classic Connect, download the Classic Connect User Guide.
Learn more by watching the video!
You can use Connect to import data into a Profile List or Profile Extension Table (PET) in Oracle Responsys.
After an import job runs, the upload file is archived on the server. If the job is successful, the upload file is deleted. If the job fails, the upload file is deleted only in the following circumstances:
- The file is empty
- The file has data issues, such as invalid data format
- The upload file and the count file have different number of records.
Note: Connect imports data into both a Profile List and its Profile Extension Tables. Classic Connect only supported only list data.
To create an Import Profile Data job:
- Click
 Data on the side navigation bar, and select Connect.
 - Click Create Job on the Manage Connect page.
- Select Import Profile Data from the drop-down list and provide a name and description of the import job.
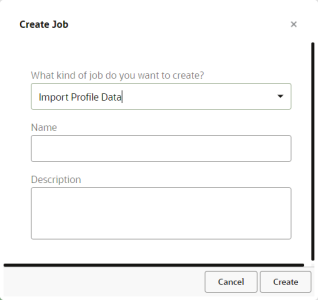
A job name cannot be longer than 100 characters and can include only the following characters: A-Z a-z 0-9 space ! - = @ _ [ ] { }
- Click Done.
The Connect wizard opens. You may complete the steps in any order, and can save your changes and continue at a later time.

- Complete the steps:
- After you configure all the steps, click Save. To save and activate the job, click Activate.
Important: Before you can save or activate the job, you must either set an expiration date, or set the job to never expire. To set an expiration date, click Edit
 next to Expiration. When the job expires, it is deleted and cannot be recovered. Learn more about managing the expiration date.


After you finish:
- After you save your job, you can use the Manage Connect page to manage the job. Learn more about managing jobs.
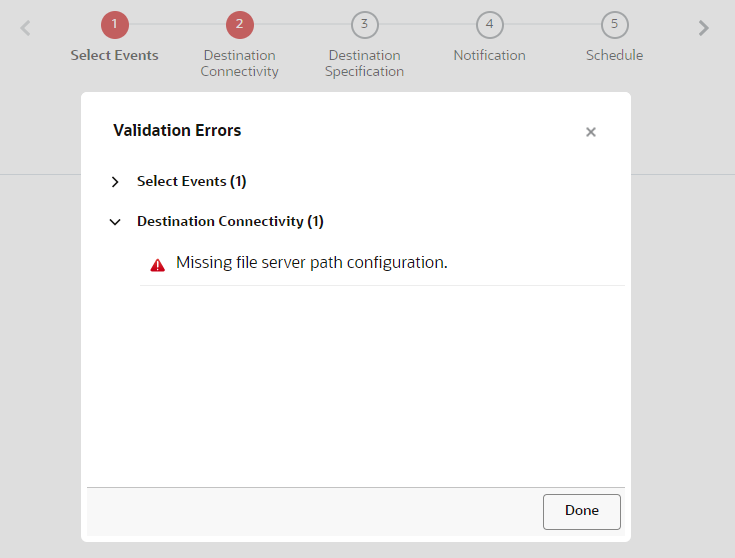
- When you save your job, Connect may return errors. Click Show Errors to review the errors and quickly jump to the page that needs fixing. You must resolve all errors before you can activate the job.

Step 1: Source Connectivity
In this step, you provide file server specifications for retrieving your source file.
Select one of the following options:
- Responsys File Server:
Connect jobs can import data via your Responsys SCP (Secure Copy Protocol) account file server.
This account includes three directories: upload, download, and archive.
Important: If not already established, Oracle Responsys Support and your IT team will need to work together to generate an SSH-2 public/private key pair. This ensures secure access to your SCP account via an SSH/SCP client. You may also create your own directories using an SSH (Secure Shell) client.
- If you select this option, click Change to specify the directory where your files are located.
- External server by SFTP:
If you select this option, provide the following information:
- Hostname: Select the hostname from the drop-down list.
- Directory Path: Enter the pathname of the associated directory.
- Username: Enter the username for accessing your SFTP connection.
- Authentication: Depending on the way your server is set up, select either Password or Key.
If this is your first job using key authorization, click Access or Generate Key Information, and enter the email address to receive the public key and instructions for adding the key to your SFTP account. After installing the public key, click Test Connection to confirm that your SFTP connection configuration is valid.
Tip: For information about key authentication, see Selecting, Importing or Generating Public Keys.
Step 2: Source Specification
In this step, you provide information about the file to be imported.

- File to upload: The full name and file extension of the file to import. You can add the file creation date as a prefix or suffix.
- Audience scope file to be uploaded: This option is available when importing profile data and only if Organizational Access Control and Targeting by Organization are enabled for your account. Learn more about the required file format.
- Character set: The character set of the file. If your file contains emojis, you will need to select Unicode (UTF-8) as your character set.
- Field delimiter: The delimiter that divides the fields (columns) in the file.
- Field enclosure: Specify whether text columns and values are enclosed in single or double quotation marks.
- Date format: Select the date format of the import file. For information about supported date formats, see Supported Date Formats in Connect.
- First line contains column names: Select this checkbox if the first line in the file contains field names.
- File is encrypted with PGP/GPG key: Select this checkbox if the file is encrypted using a key and needs to be decrypted before uploading.
- File is signed with PGP/GPG key: Select this checkbox if the file is signed with a key.
- File to confirm expected record count: Optionally, select this checkbox and specify a file to use for comparing the record count to the number of imported records. For example, if the expected record count in this file is 300, but your imported file only contains 100 records, a transfer error is noted and the upload process is abandoned
Step 3: Target Definition
In this step, you select the profile list and PET into which to import data.
Note: You'll also need to select target tables while mapping fields in Step 4.

To add a target definition:
- On the Target Definition step, select the profile list or PET from the Profile list if prompted, or if you want to use a different list than the one selected. This is the list into which to import.
- If the target list has an associated App Channel List with a PET, you can import data into the App Channel List PET. To do this, select the Use App Channel List checkbox.
- Specify the target table for the import data.
- Click + and select the table into which to import data.
If you are importing into a PET, you can select only one. If importing into a list, you can import
into a list and one PET.
If you use the App Channel List, the Target Table list shows only PETs from that list. Otherwise, the Target Tables list includes the profile list and any PETs associated with it.
TIP: You can create a new PET using an existing one as a template. See Creating a PET
Specify the options for the target table.
 For lists
Match new records to existing records using profile list fields: Select the list field for matching new to existing records, for example RIID_.
If match, overwrite existing record: Select this checkbox to replace existing records with new data when a record matches. If you do not select this checkbox, the incoming record is ignored.
If no match, import new record: Select this checkbox to import records if there is no match. If you do not select this checkbox, the incoming record is ignored.
Reject record if field is empty: Check whether to reject records with empty email address or mobile number values.
Default permission status for newly added channel: Select the default permission status for a newly added channel, either Opt in or Opt out.
Opt-in/Opt-out status values in the source file: Specify the value used in the source file for Opt in and Opt out status.
Email Format Values in the incoming file: Select the email format values in the source file, H for HTML and T for Text.
Mobile number upload format: Select the mobile number format in the source file.
Oracle Responsys validates the format of inbound mobile numbers according to the format selected for your account. The mobile number upload format you select here overrides the account setting for this job, unless the upload format you select is incompatible with the account format. The following restrictions on import format at the job level help prevent invalid and duplicate mobile number values:
- When your account settings are E.164 or Local, you can't select No Format Enforced for the mobile number upload format.
- When your account settings are No Format Enforced, you can't select E.164 or Local for the mobile number upload format.
Enable filtering against the latest load of this name: Select this checkbox to enable filtering against the latest load with the same name. NOTE: When selected, you can specify the criteria (via the Filter Designer) for selecting customers within this load to receive a campaign or be exported into a .CSV file.
For PETs
Remove all records before inserting new: Select this checkbox to replace the existing table records with the newly uploaded records.
Match new records to existing records using profile list fields: Select the list field for matching new to existing records, for example RIID_.
If match, overwrite existing record: Select this checkbox to replace existing records with new data when a record matches. If you do not select this checkbox, the incoming record is ignored.
If no match, import new record: Select this checkbox to import records if there is no match. If you do not select this checkbox, the incoming record is ignored.
Source file has final targeting and personalization data: Select this checkbox to use the data from external campaigns without joining with existing records.
Include opted-out records: For external campaigns, select this checkbox to send communication to opted out users only for transactional messages.
- Click + and select the table into which to import data.
If you are importing into a PET, you can select only one. If importing into a list, you can import
into a list and one PET.
Creating a PET
You create a new PET into which to import data. When you create a new table, it will have the same column layout as the one you are using as the template. You will be able to specify other options for the new file.
To create a new PET to import data to:
- On the Target Definition step, select the profile list or PET from the Profile List if prompted, or if you want to use a different list than the one selected. This is the list into which to import.
- Click +. In the Select target tables dialog, click Create new table.
The new table is added to the Target Tables list.
- Click the new table in the Target Tables list.
- In the Configuration section, click Select and select the table to use as a template.

-
In the Configuration section, specify the following options:
- Create profile extensions for multiple source files: Select this checkbox to create one PET for each source file.
- Naming: Specify whether to use the source table name, or specify a different name for the new table.
- Folder: Select the folder for the new table, if prompted to do so or if you want to use a different folder.
- Set expiration: Specify the number of days after which the table expires. Connect will automatically delete the table after it expires.
- Match new records to existing records using profile list fields: Select the fields to use for matching new to existing records. To match on two fields, click Add to add a second field.
- If match, overwrite existing record: Select this checkbox to replace existing records with new data when a record matches. If you do not select this checkbox, the incoming record is ignored.
- If no match, import new record: Select this checkbox to import records if there is no match. If you do not select this checkbox, the incoming record is ignored.
- Source file has final targeting and personalization data: Select this checkbox to use the data from external campaigns without joining with existing records.
- Include opted-out records: For external campaigns, select this checkbox to send communication to opted out users only for transactional messages.

Step 4: Field Mapping
In this step, you map columns from the source file to fields in the target profile list or PET. Mapping fields specifies which column corresponds to which field.
You can manually map the fields or use an upload file for the mapping.

Note the following:
- Long field names are truncated to 30 characters.
- Field names must begin with a letter or number and may contain only letters, digits, and _ (underscore).
- When created, field names are not case-sensitive, but are later translated to all uppercase.
- If any changes result in duplicate field names, you will need to manually rename them.
- All system field names (defined and reserved by Oracle Responsys) end with an underscore character, for example EMAIL_ADDRESS_. As a best practice, uploaded field names should not end with an underscore character since these are reserved for system fields.
- When possible, match like-named incoming fields with existing fields, for example, match CUST_ID to CUSTOMER_ID_.
For more details about data type and field name requirements, see Data Types and Field Names.
To upload a mapping file:
- On the Field Mapping step, click Upload File.
- Select the mapping file and complete the details.
- Fields are delimited by: Select the delimiter (typically a tab or comma) that divides the columns in the file.
- Fields are enclosed by: Specify whether text columns and values are enclosed in single or double quotation marks.
- First line contains column names: Select this checkbox if the first line contains field names.
To map fields manually:
- On the Field Mapping step, click Add +.
- Type the name of the incoming field in the space provided.
- Select the target table for that field.
- Select the matching field name in the target table.
If you do not want to match a field, select skip this field.

- Click Update.

Note: To update the profile list, select the match field from the Profile List section. To update the PET, select the match field from the Profile Extension section. For example, to match on CUSTOMER_ID_ in both the profile list and PET, select 1, then 2.
Step 5: Post Processing
In this step, you select the actions to take after a successful job run.

- Raise an event: Select this checkbox to make the completed job available to Program. If selected, the job will be available as a Connect event in Program.
- Raise custom event Select this checkbox to raise the specified custom event after the job completes successfully. You select the event to raise from the Select custom event drop-down list.
- Launch campaigns Select this checkbox to launch the selected campaigns after the job completes successfully. You may select up to 40 campaigns. To receive progress notifications about campaigns launches, ensure that each campaign's settings specify one or more email addresses to receive progress notifications.
Step 6: Notification
In this step, you set up email notifications for the job. You can choose to send notifications after the success or failure of a job.

Step 7: Schedule
In this step, you schedule the job. The job can run once on a specified date and time, or on a recurring schedule. To run the job on demand, use the Do not schedule option.

IMPORTANT: To ensure that leap years and months with 31 days do not cause issues, you cannot schedule a recurring monthly run on the 29th, 30th or 31st day of a month. You can schedule the job to run on a day of the week that is the last in the month, for example the last Friday of the month.
When setting the start time of a job, select one of four time slots within the hour: 0-14, 15-29, 30-44, 45-59. For each scheduled job, the system picks a random minute (for example, 12 within the 0-14 segment). This distributes the start times of jobs more evenly.
The job will start at random times within the chosen time slot. If you try to set up a new job in a slot that overlaps with the current time, an error message may be issued that states that the time selected occurs in the past. Therefore, as best practice, choose the time slot that is after the current time slot.