You can manually create dimensions and edit existing dimensions. You can create dimensions in several ways, but only in the Dimension Library.
|
Note: |
When creating dimensions in the Dimension Library, you may be able to deviate from product naming rules. However, within product applications, naming rules must be followed. For Planning dimensions, see Naming Restrictions for Dimensions, Members, and Aliases, for Financial Management dimensions, see Working with Financial Management Dimensions, and for Essbase dimensions, see Working with Essbase Properties. |
-
See Table 11, Dimension Types.
Note:
Dimension names cannot begin with an exclamation point (!). You may be able to enter different characters when creating a dimension in the Dimension Library, but when the dimension is brought into an application, the application's naming rules are applied.
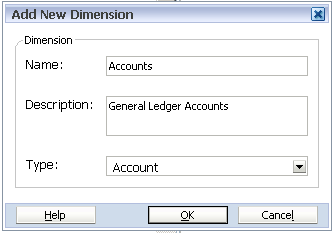
The dimension is added to the Dimension Library. You can add members to the dimension by right-clicking on the dimension and selecting to create, add, or insert members. See Creating Members.
Each dimension type is represented in the Shared Library with an icon. For a list of Performance Management Architect dimension types, see Table 11, Dimension Types.
|
Note: |
You cannot rename dimensions later. If you need to rename a dimension, you must copy the dimension and give the dimension a new name. Then, you can add the new dimension to applications and remove any associations for the old dimension. Then, if necessary you can delete the old unused dimension. However, in Consolidation and Planning applications, you can change the alias, or dimension name, in order to see a different name in the deployed application. See Setting the Dimension Alias. |