The Audience Management Platform allows users to publish simultaneously to multiple accounts on WordPress, Facebook, Open Graph, and Twitter, schedule posts for later publication, add tags to track the traffic and retweeting of posts, and save drafts in WordPress and other outlets.

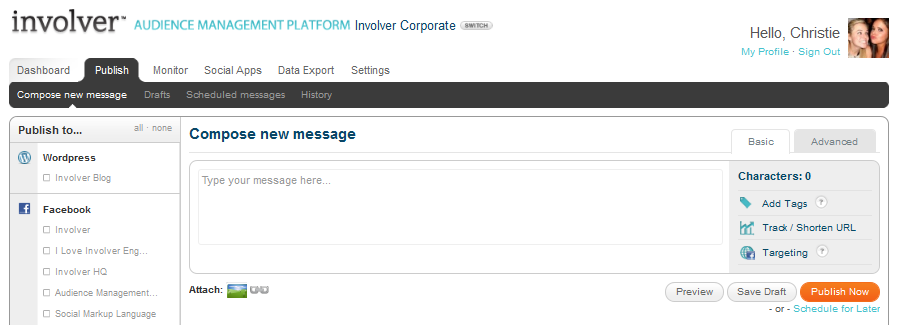
The publishing tab is divided into four sections: Compose new message, Drafts, Scheduled messages, and History.
Compose new message: When you first click “Publish” after setting up your accounts, you should see all your outlets on the left. If you have not yet set up your outlets, you can do so in the "Settings" menu under "Outlets". Instructions on how to add Facebook Fan pages, Open Graph web sites, Twitter accounts, and WordPress blogs are in the "Setup" section under Adding publishing outlets. All outlets that are visible in the Publish tab are active and can be published to at any time. Please note, anyone with access to your Audience Management Platform campaign that has publishing permission will also have the ability to publish to these outlets.
"Compose new message" has two different sections: Basic and Advanced. From Basic you can publish a single message simultaneously to multiple outlets. Advanced settings allow you to publish simultaneously, with the further ability to add modifications as appropriate to different platforms, e.g. hashtags to Twitter posts or geo-targeting for Facebook messages. WordPress publishing is only accessible through Advanced settings.
Type your message into the text box, then add photos, tags, links, and targeting info as follows:
- Attach photos: Click on the photo icon below the message box to attach a picture to your message. Locate the file on your computer using the popup. Note: you can embed videos in your WordPress posts by clicking the HTML button in the header and pasting the embed code where you want the video to appear.
- Add tags: Tags enable you to track the traffic and retweeting of your blog posts, tweets and other social messaging. Simply type in a word or phrase and click “add tag”. Once you’ve published you’ll be able to use these terms as filters to see how your message is being shared.
- Attach a link: Click on the link icon below the text box. Paste a URL into the message box at the top and add a title and description (for Facebook messages). Hit tab or click in one of the fields to view the source content (Facebook only) in the form of a title, a description, and a choice of thumbnail images. Edit this information as needed. Versions of this linked content can be adjusted to be published simultaneously to your WordPress and Twitter accounts as well.
Check out this screen capture by Involver Director of Product Marketing Roland Smart to see how simple it is:
- Attach flash: Create a Flash-based coupon or a game that works flawlessly where your fans spend the most time - the stream! First, click on the flash icon below the compose box under "attach". From here you can choose to either attach the flash file by locating it on your desktop, or attach it by entering it's URL. Next, you can choose to add an image to be displayed before the flash by locating it on your desktop or by entering it's URL under "preview image". Finally, add a title and a description, and select "attach link". Please note, flash attachments can be a maximum of 259px high and 398px wide.
Check out this video demonstrating flash publishing:
- Track/shorten URL: You can also paste links directly into the text box, which will enable you to use the “Track/shorten URL” to shorten any link to a bit.ly code by clicking the Track/Shorten URLs button to the right. This can also provide tracking which you can access later in the history section. If you have added a custom bit.ly in the tracking section, it will shorten to your personalized link.
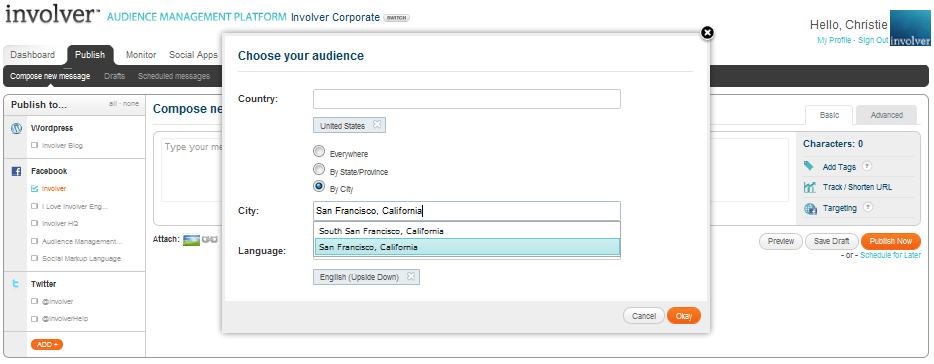
- Targeting: Geo targeting enables you to create Facebook messaging specifically by country and language, as well as city/state and province for certain individual countries. Click Targeting in the right hand portion of the screen. Type in a known country then select for region below, when those choices are available. You may also choose a known language in the box below. Your selections will appear with an X that enables you to remove them at any time. When you publish to Facebook your message will be limited to the selections you’ve made.
-
- Please note that targeted posts will, like all other messages made from the Audience Management Platform, be published based on your time zone settings. To make sure you are set to the right time zone, please see the Setting up your Profile section. This means if you are in PST and are composing a post to only New York City residents that you want to be published at 4 PM NYC time, you would schedule this post for 1 PM. That way, the post will be published at 4 EST/1 PST.
Watch this video by Involver Director of Product Marketing Roland Smart to get a better idea how our geotargeting feature works:
Once you are done composing your message, there are a few final options:
- Preview: Select “Preview” to see what your post will look like on each outlet. The "Basic" setting gives you one preview per outlet type (Twitter, Facebook, etc.); "Advanced" provides a preview for each individual post.
- Save Draft: Select “Save Draft” to save a copy of your messages inside the “Drafts” tab. If you are drafting a WordPress message, it will also save your draft on wordpress.com.
- Publish Now: Select “Publish Now” to immediately publish your messages.
- Schedule for Later: Select “Schedule Now” and choose your preferred time to schedule your messages for publication for any time now through 2016.
Drafts: Review all your saved drafts with options to edit or delete. "Edit publication" at the right side of the message takes you back to the "Compose message" section, where you can fully customize or update your message(s). "Delete publication" below "Edit" requires you to confirm your decision, and then removes the message permanently.
Scheduled messages: This window shows all the messages you have scheduled to be published going forward, time stamped with the date and time at which the messages will be published. By navigating to the right side you have two options for each message: Publish Now or Cancel. Selecting “Publish Now” immediately publishes your messages. “Cancel” requires you to confirm your decision and then removes the message permanently.
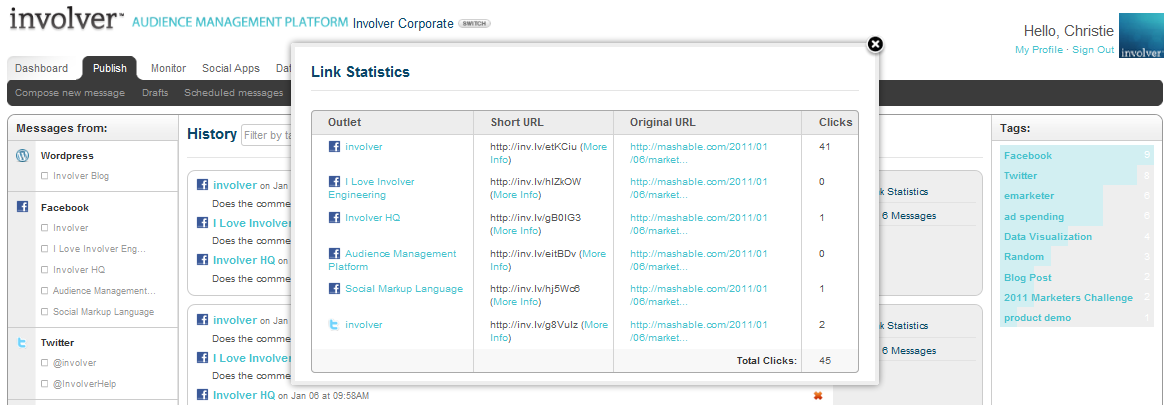
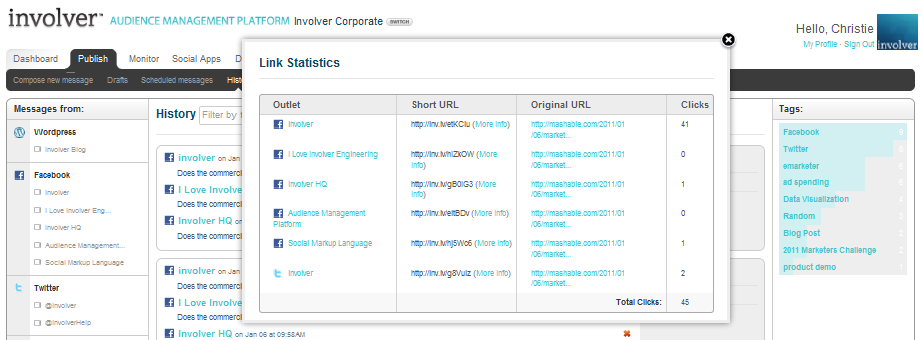
History: Shows all your published posts and the outlets to which they were published. Click on “Link Statistics" at the right, on posts that contained a link, to get a report on how many times people clicked on the link. To filter by keyword, type a word into in the “filter by tags” box at the top. You can input multiple keywords to search for messages that include both tags. Only items which were published via the AMP will appear in the history. Items published directly on Facebook, without using the AMP, will not be reflected here.
Have questions? Visit our Support Site to browse our Knowledge Base for specific publishing use cases, or submit a support request for any unexpected behavior. Our Support Team is happy to help!