18 Extending the ATE and PTE for Your Communication Services
The chapter describes how to generate and build virtual communication services, clients, and simulators for the Application Test Environment (ATE) and the Platform Test Environment (PTE) in Oracle Communications Services Gatekeeper.
For complementary information, see ”Adding and Testing Custom Client Modules” in Services Gatekeeper Platform Test Environment User's Guide.
Understanding ATE and PTE Extensions
You use the ATE to create virtual communication services, and interact with and extend to the network simulator. The ATE uses these extension points:
-
Virtual communication services
-
The network simulator part of the ATE
You use the PTE to create client modules that act as applications, and simulator modules that act as network elements and present results and statistics in the PTE user interface. The PTE uses these extension points:
-
Clients
-
Network protocol simulators
-
The network simulator part of the PTE
Figure 18-1 shows how the PTE and ATE work with Services Gatekeeper
Figure 18-1 Extensions to the ATE and PTE
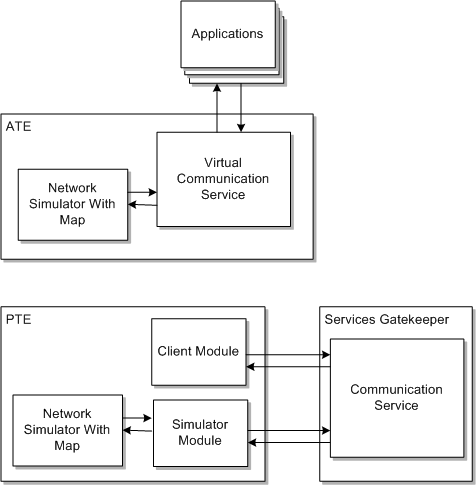
Description of ''Figure 18-1 Extensions to the ATE and PTE''
After you create a communication service, you can:
-
Create a module that simulates the communication service and deploys it to the ATE. This provides application developers access to an Application Test Environment that simulates the behavior of the communication service with which you have extended Services Gatekeeper.
-
Use the PTE to test the communication service from an application perspective. You do this by creating a module that acts as a client application to the new communication service and deploys it to the PTE.
-
Use the PTE to test the communication service from a network perspective. You do this by creating a module that acts as a simulator to the new communication service and deploys it to the PTE.
The base for a virtual communication service project, a client project, and a network protocol simulator project is one or more WSDL files defining the application-facing interfaces exposed by the ATE or used by the PTE.
You use Platform Development Studio Eclipse tools to generate source code, deployment descriptors, and build files for modules that use these extension points.
Your implementation can use a set of interfaces to interact with the statistics and presentation facilities provided by the ATE and the PTE. You can interact with the network simulator map and add new elements to the map. Refer to the ”All Classes” section of the Services Gatekeeper Java API Reference for the interface documentation..
Generating a Custom Module Project Using the PDS Wizard
See "Generating a Platform Test Environment Custom Module" for instructions about using the PDS Wizard to create a custom PTE module.
Understanding the Generated Project
The PDS (Eclipse) Wizard generates:
-
A build file for the project: build.xml
-
A deployment descriptor: pte-extensions.xml
-
Depending on the type of project you generate, the project may also include:
-
Interface classes for a Virtual communication service.
-
Deployment class for a Virtual communication service.
-
Application client classes.
-
Network protocol simulator skeleton class.
-
The directory structure is described below:
<Eclipse_project>
+- build.xml
+- pte-extensions.xml
+- <Identifier given in Ecplise Wizard>
|  +- clients
|  +- simulators
|  +- vcs
|  |  +- <Identifier given in Eclipse Wizard>ModuleVCS.java
|  |  +- <Interface Name>Impl.java // One per interface
                                   // defined in the
                                   // Service WSDL files.
Understanding the Generated Project Build File
A generated Apache Ant build file is created in the directory:
Eclipse_project/build.xml
Where Eclipse_project is the directory where the project was generated by the PDS Wizard.
The build file defines the following targets:
-
generate
Generates source code.
-
compile
Compiles the generated source code.
-
jar
Packages the modules in JAR files.
-
clean
Removes all generated artifacts.
-
dist
Generates the source code, compiles it, and generates JAR files that you can deploy.
Understanding the Generated Project Deployment Descriptor
A deployment descriptor is created when the project is generated. The deployment descriptor file name is pte-extensions.xml. It is created in the Eclipse_project directory, where Eclipse_project is the directory where the project is generated by the PDS Wizard.
The deployment descriptor describes how the virtual communication service is deployed in the Application Test Environment.
The deployment descriptor is an XML file with the following structure:
<module>
   <data>
      <parameter>
      </parameter>
   </data>
</module>
The module element has these attributes:
-
name
The name of the module given in the Name field in the PDS Wizard. The suffix VCS is added for virtual communication services. The suffix Simulator is added for simulators.
-
type
The type of module. vcs for a Virtual Communications Service module, client for a client module, and sim for a simulator module.
-
class
The fully qualified class name for the module. The first part of the package name is the name given in the Package name field in the PDS wizard. The name of the class is the name given in the Name field in the PDS wizard.
For simulators, the last part of the package name is .simulators.. The class name has the suffix Simulator.
For virtual communication services, the last part of the package name is .vcs. The class name has the suffix VCS.
-
version
The version of the module, given in the Version field in the PDS Wizard.
-
depends
The name of the module that this module depends on. In most cases, it is the Session module. Not used for Virtual Communications Services.
-
uiPanel
Describes in which panel in the user interface of the ATE or the PTE the module presents it's user interface. For PTE clients is clients, for PTE simulators it is simulators, and for ATE virtual communication services it is vcs.
-
uiTabsDescribes in which tab in the GUI the module is presented. A comma-separated list describes the hierarchy.
The <data> element encapsulates zero or more parameter elements.
The <parameter> element describes fields in the user interface. It has the following attributes:
-
name
The label of the parameter in the user interface. Mandatory.
-
class
The class that defines the parameters in the user interface. Reflection is used to present the fields in the user interface. The parameters are presented as a hierarchy of description-only fields, and the parameters that have simple data types are presented with an input field. Optional.
-
default
The default value for the input field.
-
occurs
The number of occurrences of the parameter. Default value is 1.
Example 18-1 illustrates a deployment descriptor example for a client module.
Example 18-1 Example of a Client Module Deployment Descriptor
      <module name="SendSmsModule"
              type="client"
              class="my.company.sm.clients.SendSmsModule"
              version="1.0"
              depends="session"
              uiPanel="client"
              uiTabs="Other,ate_pte_sm,sendSms"
              >

        <data>
          <parameter name="Parameters"
                     class="my.company.sm.clients.SendSmsModuleData"
                     occurs="1">

            <parameter name="facade"/>

            <parameter name="url"
                       default="http://${at.host}:${at.port}/SendSmsModule"/>

            <parameter name="vcsUrl"
                       default="http://${localhost}:13444/jaxws/SendSmsModule"/>

            <parameter name="restUrl"
                       default="http://${at.host}:${at.port}/rest/SendSmsModule"/>

            <parameter name="restVcsUrl"
                       default="http://${localhost}:13444/rest/SendSmsModule"/>

          </parameter>
        </data>
      </module>
Example 18-2 illustrates a deployment descriptor example for a simulator module.
Example 18-2 Example of a Simulator Module Deployment Descriptor
      <module name="Ate_pte_smSimulator"
              type="sim"
              class="my.company.sm.simulators.Ate_pte_smSimulator"
              version="1.0"
              uiPanel="simulator"
              uiTabs="ate_pte_sm"
              >

        <data>
          <parameter name="Parameters"
                     class="parameterClassName"
                     occurs="1">
          </parameter>
          -->
        </data>
      </module>
Example 18-3 illustrates a deployment descriptor example for a virtual communication service.
Building and Deploying the Module
Run the Ant target dist to create a deployable module for the ATE or the PTE.
The deployable module is a JAR file named Name.jar, where Name is the name of module given in the Project Name field in the PDS Wizard. The file is created in the dist subdirectory in the Eclipse project directory.
Deploying the module:
-
ATE: Copy the deployable module to SDK_Homelib/modules, where SDK_Home is the installation directory for the SDK.
-
PTE: Copy the deployable module to Service_Gatekeeper_Home/ocsg_pds/lib/modules, where Service_Gatekeeper_Home is the installation directory for Services Gatekeeper
Restart the ATE or PTE after deploying the new module.
Virtual Communication Service Module for the ATE
Skeletons of Java classes for a Virtual Communications Service for the ATE are created by the PDS Wizard. The classes are generated in the Project_home/src/Package_hierarchy/vcs directory.
The class Module_nameVCS deploys all the port implementations for the virtual communication service. Module_name is given in the PDS Wizard.
The class implements the oracle.ocsg.pte.api.vcs.VCSModule interface.
The methods are:
-
getName()
Returns the name of the module as a String. The name was given in the Name field in the PDS Wizard.
-
initialize(...)
Initializes the module. If the module is exposing MBeans, register them here.
-
start(...)
Deploys the module in the web services container. All generated implementation classes are deployed.
-
stop(...)
Undeploys the module from the web services container.
A separate class is generated for each port defined in the WSDL that the project defines. The classes are named Port_nameImpl, where Port_name is defined in the WSDL.
Each of the implementation classes defines the web service using the annotation @WebService. Example 18-4 gives an example of the @WebService annotation.
Example 18-4 Example of an @WebService Annotation
@WebService(name = "SendSms", targetNamespace = "http://www.csapi.org/wsdl/parlayx/sms/send/v2_2/interface")
Each implementation class also defines a handler chain using the annotation @HandlerChain. This handler chain is necessary to leverage the security and SLA enforcement in the ATE and PTE. Example 18-5 illustrates the @HandlerChain annotation.
Each method defined in the WSDL has a skeleton implementation. Each method is defined with the annotations:
-
@WebMethod
-
@WebResult
-
@RequestWrapper
-
@ResponseWrapper
Each method has an empty implementation where you add the custom code for the virtual communication service.
Client Module for the PTE
If you generated the project by using WSDL files, Platform Development Studio Wizard creates skeletons of Java classes for a client module for the Platform Test Environment.
The classes are generated in the Project_home/src/Package_hierarchy/clients directory.
For each method defined in the WDSL file the following classes are generated:
-
Method_NameModule
-
ResourceEndpoint
-
Method_NameModuleData
The class Method_NameModule deploys all the port implementations for the virtual communication service. Method_Name is given in the WSDL file.
The class extends oracle.ocsg.pte.api.module.AbstractRestClientModule and implements oracle.ocsg.pte.api.module.CustomStatelessModule.
The following methods are defined:
-
execute(...)
-
prepare(...)
The execute(...) method is called when you click the Send button for the client method in the Platform Test Environment GUI or, once, at the beginning of a duration test. The skeleton for the method retrieves the data to use in the method call from the CustomModuleContext. This context is passed in as a parameter to execute(...). CustomModule is cast to the corresponding Method_NameModuleData object for the method.
The prepare(...) method fetches the URL from the field in the GUI and checks if the client shall use the SOAP interface or the RESTful interface by calling isRestFacade() on the CustomModuleContext. If the RESTful interface is used, the method getRestClient(...) defined by Method_NameModuleData object is fetched.
If the client shall use the SOAP facade, JAXWSServiceFactory is used to create the Web Service, a port is derived from the service and the local stub is set on the RequestContext.
The class ResourceEndpoint is instantiated if you are using the RESTful facade in the client. This class defines the methods:
-
getHttpMethod()
-
getResourceURI()
The method getHttpMethod shall return the HTTP request type as a String; POST or GET.
The method getresourceURI() shall return the URI to the RESTful method as a String.
The class Method_NameModule is used to hold the data about the request.
Simulator Module for the PTE
Skeletons of a Java classes for a simulator module for the Platform Test Environment are created by the PDS Wizard. The class is generated in the directory Project_home/src/Package_hierarchy/simulators.
The class is named Project_NameSimulator, where Project_Name is fetched from the Name field in the PDS Wizard.
The class implements the oracle.ocsg.pte.api.module.CustomStatefulModule interface. It defines these methods:
-
prepare(....)
-
start(...)
-
stop(...)
All the methods sends in the CustomModuleContext as a parameter.
When the prepare(....) method is called, you can set up anything that is necessary for the simulator.
The start(...) method is called when you click the Start button in the GUI for the simulator.
The stop(...) method is called when you click the Stop button in the GUI for the simulator.
Virtual Communication Service Example
An example of a virtual communication service is provided in the Middleware_home/ocsg_pds/example/pte_vcs directory.
Client Module Example
An example of a client module is provided in the Middleware_home/ocsg_pds/example/pte_module directory.
Simulator Module Example
An example of a simulator module is provided in the Middleware_home/ocsg_pds/example/pte_module directory.
Stateless and Stateful Modules
A stateless module implements the oracle.ocsg.pte.api.module.CustomStatelessModule interface. This interface defines the methods prepare(...) and execute(...).
A stateful module implements the oracle.ocsg.pte.api.module.CustomStatefulModule interface. This interface defines the methods prepare(...), start(...), and stop(...).
All these methods provide oracle.ocsg.pte.api.module.CustomModuleContext as a parameter.
Presenting Results
You present results in the Platform Test Environment GUI by implementing the oracle.ocsg.pte.api.module.CustomResultsProvider<T> interface.
The results are presented in a table with columns and rows. Specify the name, or title, of each column by returning the names when java.lang.String[] getResultsColumns() is called.
When java.lang.Object getResultsContent(int column, T object) is called, return the value of the object in the column with index column. The index is the same as the position in the results from java.lang.String[] getResultsColumns().
The method java.util.Map<java.lang.String,java.lang.Object> getResultsDetails(T object) can be used to return additional result data than returned by getResultsContent(...). Return null if there are no additional details.
When java.util.List<T> getResultsObjects() is called, you return a list of objects to be presented. Each object is presented in its' own row.
When void clearResults() is called, clear all result objects.
Presenting Statistics
You present statistics in the Platform Test Environment GUI by implementing the oracle.ocsg.pte.api.module.CustomStatisticsProvider interface.
To clear the statistics, call void clearStatistics().
To return the statistics as a java.util.Map<java.lang.String,java.lang.String>, call getStatistics(). Each key in the map represents a specific statistics counter and the value is the value of the statistic counter.
Interacting With the Network Simulator Map
You use the simulator module and the virtual communication service to interact with the network simulator map and elements in the map.
Use oracle.ocsg.pte.api.network.Network to interact with the network simulator map.
Use oracle.ocsg.pte.api.network.factory.NetworkFactory to get a handle to the network simulator map:
oracle.ocsg.pte.api.network network = NetworkFactory.getInstance().getNetwork();
Define a new network element by defining a class that extends the abstract class oracle.ocsg.pte.api.network.element.AbstractNetworkElement.
Create the network element using a class that implements the oracle.ocsg.pte.api.network.factory.NetworkElementFactory<T extends NetworkElement> interface. For example:
public class ExampleTruckFactory implements NetworkElementFactory<ExampleTruck>
Register the network element with the network simulator map:
NetworkFactory.getInstance().register(ExampleTruck.class, new ExampleTruckFactory());
Define the message that can be sent to and from a network element by defining a class that extends the abstract class oracle.ocsg.pte.api.network.message.AbstractNetworkMessage. Register the message, For example:
NetworkFactory.getInstance().register(ExampleMessage.class, new ExampleMessageFactory());
There are a set of classes that describes messages that already defined. The classes are defined in the package oracle.ocsg.pte.api.network.message. The messages include SMS, MMS, and MLP update messages.
To send a message to the network use sendMessage(NetworkSource source, NetworkMessage message) in the oracle.ocsg.pte.api.network.Network interface. For example:
final ExampleMessage msg = new ExampleMessage(null, address, data);
NetworkFactory.getInstance().getNetwork().sendMessage(this, msg);
The network element class receives a call to public boolean processMessage(NetworkMessage message defined in the oracle.ocsg.pte.api.network.element.NetworkElement interface. For example:
public boolean processMessage(NetworkMessage message) throws Exception {
    if(message instanceof SmsMessage) {
      final SmsMessage sms = (SmsMessage) message;
      if(AbstractNetworkMessage.isAddressesMatching(sms.getDestinationAddress(), getAddress())) {
        storeIncomingMessage(message);
        return true;
      }
    }
    return false;
  }
When the message is processed, the type of the message is checked and there is a check to see if the message is addressed to the network element by comparing the destination address in the message with the address of the element.
If you move around a network element on the map, the coordinates for it is updated. Use the methods public double getLatitude() and public double getLongitude() defined by the NetworkElement interface to get the location of the element.