1 About Extending and Replacing Portal Graphical User Interfaces
Oracle Communications Services Gatekeeper offers you both RESTful and SOAP based APIs that you can use to incorporate functionality from the Partner Portal and API Management Portal, Partner Portal, and Network Service Supplier Portal into your API management, customer relationship management (CRM)/partner relationship management (PRM) systems, intranets and extranets.
Integrating the PRM Portals with External Systems
Administering service provider and application accounts for Services Gatekeeper can be a work-intensive task for operators. Using CRM/PRM applications that are built using the Partner Relationship module can allow operators to shift some of that work to the service providers themselves. This gives those service provides a defined and structured channel both to communicate any changes they want and to monitor their own usage statistics. The operator's task is reduced to simply approving the pre-entered changes, dramatically reducing administration overhead. Using simple Web Service calls, the integrated PRM application can manage a wide range of Services Gatekeeper service provider account services.
The PRM interfaces support Services Gatekeeper's service provider and application administration model, which is described more fully in "Understanding the API Management Model".
Note:
Users, both operator-based and service-provider-based, who have been given appropriate permissions can also interact with Services Gatekeeper management systems using JMX-based solutions. For information on the MBeans available for use and the attributes and operations they expose, see ”Managing SLAs” in Services Gatekeeper Accounts and SLAs Guide.Securing the PRM API
This section explains how to secure the PRM API.
Securing PRM Web Services
The PRM Web Services module uses WS-Security to ensure the security of the Web Services based interaction between the PRM and its CRM/PRM application clients. Each request is authenticated using a username token or X.509 certificate that is included in the Simple Object Access Protocol (SOAP) header. For more information on how this works, see ”SOAP Header Elements for Authentication” in Services Gatekeeper Application Developer's Guide. Although the context in that section is the SOAP headers of traffic requests, the mechanism described is identical to the one used in with the PRM module.
Note:
For backward compatibility purposes, a session ID-based login mode is also supported.Deployment Example
The Partner Relationship Management module consists of two parts:
-
The Web Service interfaces that are used by the CRM/PRM application
-
The implementation of these Web Services
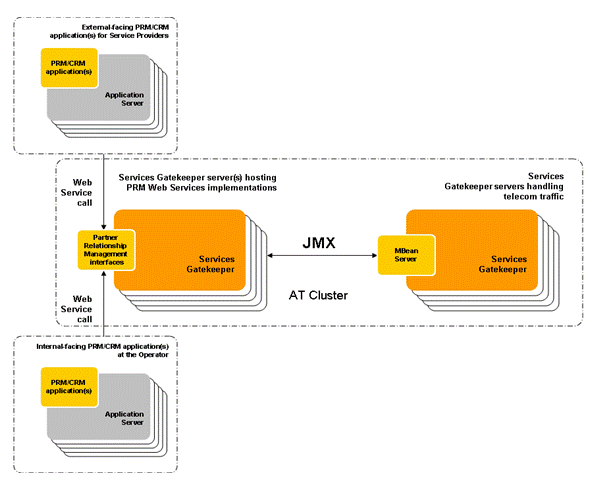
Figure 1-1 shows that there are two CRM/PRM applications, one supporting the Service Provider set of interfaces and the other supporting the more comprehensive Operator set of interfaces. Each of these applications uses Web Service calls to communicate with the host(s) running the PRM Web Services. The PRM Web Services module is deployed by default on the application tier (AT) Tier cluster. The PRM server(s) in turn use Java Management Extensions (JMX) to communicate with the Services Gatekeeper servers that actually handles the telecom traffic.
Managing APIs, Partners, and Network Service Suppliers Using the Services Gatekeeper Portals
Services Gatekeeper provides you with a trio of Web-based portal applications. The API and Partner Manager Portal along with the companion application, Partner Portal act as ”front-office” offering to speed up the development and management of telecom applications. A third application, the Network Service Supplier Portal, can be used to provide network service interfaces configured from network resources for use in the creation of telecom applications.
About the API and Partner Manager Portal
The Partner Manager Portal is a private, internal portal hosted within a telecommunication firewall.
You use the Partner Manager Portal to manage the following:
-
Service Provider Accounts
-
Service Provider Groups
-
APIs created in Network Service Supplier portal and communication service APIs and Web service APIs provided by Services Gatekeeper
-
Contracts, service level agreements and services
-
Application Instances
Menu selections and/or input fields on well-defined pages of the Partner Manager Portal application create a friendlier workflow, insulating you from the intricacies of OCSG administration and the complexity of the Services Gatekeeper environment.
For more information on how to use Partner Manager Portal, see Services Gatekeeper Partner Manager Portal Online Help.
About the Network Service Supplier Portal
Network service suppliers use the Network Service Supplier portal to configure network service interface APIs from their network resources. These network service interface APIs are published on the Partner Manager portal for use by the partner manager.
For more information on Network Service Supplier Portal, see Services Gatekeeper API Management Guide and Services Gatekeeper Network Service Supplier Portal Online Help.
About the Partner Portal
Partners who use the Partner portal are assigned to service provider groups and use Partner Portal to create applications.
Note:
About partners and partner groups:-
Partner Manager Portal and Partner Portal use the term ”partner” for the term ”service provider” found in Services Gatekeeper.
-
Partner Manager Portal and Partner Portal use the term ”partner group” for the term ”service provider group” found in Services Gatekeeper.
All applications created in the Partner portal require approval from within the API and Partner Manager portal before they are available to be marketed. Additionally, all subsequent changes made to an application when it is in use also require approval from within Partner Manager.
For more information on Partner Portal, see Services Gatekeeper Partner Portal Online Help.
Extending Portals
Services Gatekeeper allows you to extend the Partner and API Management Portal and Partner Portal by adding new functionality.
Note:
To extend Partner and API Management Portal and Partner Portal, you must have:-
A valid partner manager account. Partner and network service supplier accounts do not have the necessary privileges to extend the portals.
-
Access to Partner and API Management Portal.
You can extend Partner and API Management Portal and Partner Portal in the following ways:
About the Default Modules and Pages
The Services Gatekeeper portals include the following default modules:
-
Partner and API Management Portal: Home, APIs, Partners, Applications, and Statistics
-
Partner Portal: Home, Applications, and Statistics
Each module includes one or more default pages. For example, the following list shows the default pages provided with the Partner and API Management Portal modules:
-
Home module: Overview and Workflow.
-
APIs module: Summary and Create
-
Partners module: Summary and Groups
-
Applications module: Summary
-
Statistics module: API Usage, API Response, API Failure, API Adoption, API Parameter, App Usage, App Response, App Failure, and Sub Usage
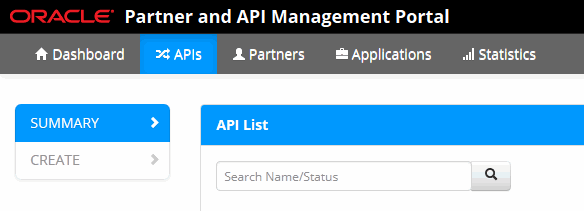
Figure 1-2 shows the Partner and API Management Portal GUI. The default modules are listed horizontally along the top of the screen, and the default pages for the APIs module are listed vertically in the navigation menu.
Points to Consider When Extending the Portals
When you extend Partner and API Management Portal and Partner Portal, keep in mind the following:
-
Plan your extensions thoroughly before you implement them.
-
Before you make changes, copy and store all important files, such as the ocsgString.js and WAR files.
-
Test your extensions on a development environment before you apply it to a production environment.
-
Preserve your users' data. It is a good idea to inform users when you plan to deploy changes to the production environment. This ensures that, before you update the portal application in your production environment, all users of the specific portal application have logged off.
-
Maintain a uniform look and feel for your application. Your additions blend better with the existing portal application if you maintain the application's look and formatting. Maintain one default style sheet language.
-
Ensure that the online help for any additional page or module can be integrated into the existing help.
About the Naming Conventions for Help Files
Online help files must adhere to the following naming conventions:
portalIdentifier_moduleName_fileName.html
Where:
-
portalIdentifier identifies the portal application:
-
Use pmp for Partner and API Management Portal
-
Use ppg for Partner Portal
-
-
moduleName identifies the module, such as Home, Applications, or Statistics
-
fileName identifies the help file
For example, the help file name for a new page in the Statistics module of Partner Portal could be ppg_statistics_pagehelp.html.
About the Naming Conventions for Help IDs
Online help IDs must adhere to the following naming conventions:
portalIdentifier_moduleName_menusequenceNumber
Where:
-
portalIdentifier identifies the portal application:
-
Use pm for Partner and API Management Portal
-
Use pp for Partner Portal
-
-
moduleName identifies the module, such as Home, Applications, or Statistics
-
sequenceNumber identifies the position in the sequence.
For example, the help ID for a new help page in the Statistics module of Partner Portal could be pp_statistics_menu2.
About the Extension Example
The subsequent sections cite an example for a simple new feature, which requires the following changes to the Partner and API Management Portal:
-
Adding a new module named asdfg.
-
Adding a new page named hello to the asdfg module.
-
Adding a new help page for the asdfg module and hello page.
Figure 1-3 shows the new asdfg module and hello page added to the Partner and API Management Portal application.
Figure 1-3 Example of a Module Extended in Partner and API Management Portal
Description of ''Figure 1-3 Example of a Module Extended in Partner and API Management Portal''
Adding a Page to a Portal Module
You can add a page to an existing module or to a new module in the portal applications.
To add a page to a portal module, you perform the following general steps:
Deploying the New Page
To deploy a new page:
-
Prepare the web content for the new page. This step is performed outside of Services Gatekeeper.
Create an HTML file for the new page using your preferred tool. Ensure that you include all required user interface elements.
-
Deploy the new page in the Administration Console.
Deploy your new HTML page as part of a web application (WAR archive) in WebLogic Server. For instructions on how to install a web application in your Oracle WebLogic Server instance, see Oracle Fusion Middleware Oracle WebLogic Server Administration Console Online Help here:
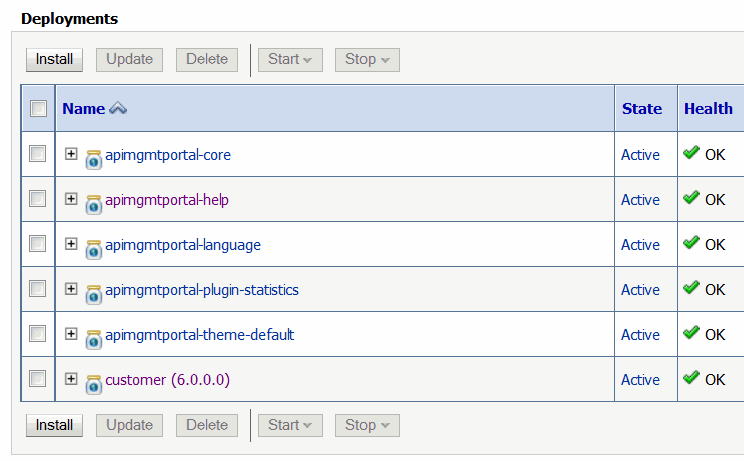
http://docs.oracle.com/middleware/1213/wls/WLACH/core/index.htmlFigure 1-4 shows the sample customer web application deployed in a sample WebLogic Server instance which houses the Penguin Partner and API Management Portal application shown in Figure 1-3.
The customer.war file contains the example hello.html file.
Providing the Help Content for the New Page
To create online help for the new page:
-
Create your online help content and save it in an HTML file. This step is performed outside of Services Gatekeeper.
Create an HTML file with all of the help content that you require for the new page using your preferred tool. Save the file using the naming convention described in "About the Naming Conventions for Help Files".
For example, the help file for the hello page is saved as pm_asdg_helloWorld.html.
-
Create the help ID
Create the help ID that the portal application uses to reference the online help you created in step 1.
For example, the help ID for the hello page is set to pm_asdfg_menu2.
Updating the Help WAR File for the Portal Application
At this point, you have successfully added the content page to provide the new logic feature in your portal application. You now need to support that logic by providing online help for the users who visit and use that page.
You do this by updating the WAR archive file for the appropriate help JAR file using these steps:
-
Getting a Working Copy of the Help JAR File for the Portal Application
-
Adding the New Help HTML File to the Working Copy of the Help JAR File
-
Updating the map.xml File to Include the Target and URL for the Help HTML File
-
Updating the Navigation List for the Help to Include the New Topic
Getting a Working Copy of the Portal Help File
The apimgmntportal-help WAR file contains the help JAR file for the Portal application. Extract the files from the WAR file so you can update the help JAR file inside it.
To get a working copy of the Portal Help file:
-
Login to the Administration Console where your portal applications are deployed.
-
If you have not already done so, in the Change Center of the Administration Console, click Lock & Edit.In the left pane of the Console, select Deployments.
-
In the Deployments table, click apimgmntportal-help.
It is the second entry shown in Figure 1-4.
-
In the Overview tab of Settings for apimgmtportal-help, locate the entry for Path.
-
Right-click the URL and select Copy.
-
Save this file in a different location.
Getting a Working Copy of the Help JAR File for the Portal Application
Services Gatekeeper names the help JAR files as:
-
sgpmp_help.jar for Partner and API Management Portal
-
sgppg_help.jar for Partner Portal
To extract the JAR file for the Portal application:
-
Go to the location where you stored the WAR file for apimgmntportal-help.
-
Extract all of the files from apimgmntportal-help to a temporary directory.
-
Go to the temporary directory and locate the appropriate portal help JAR file:
-
sgpmp_help.jar for Partner and API Management Portal
-
sgppg_help.jar for Partner Portal
-
-
Right-click the appropriate portal help JAR entry and select Copy.
-
Save the copy of the portal help JAR file to a different location.
Adding the New Help HTML File to the Working Copy of the Help JAR File
To add the help HTML file you created to the working copy of the portal help JAR file:
-
Go to the location where you stored the portal help JAR file.
-
Extract all the files that are compressed in the portal help .jar file.
-
Go to the location where you stored the help .htm file.
-
Right-click the file and select Copy.
In our example, pm_asdfg_helloWorld.htm is copied.
-
Go to the location where you extracted the contents of portal help .jar file.
-
Paste the help HTML file.
pm_asdfg_helloWorld.htm is added to the set of extracted files.
The next steps are completed in this directory.
Updating the map.xml File to Include the Target and URL for the Help HTML File
At this point you have added to the contents of the portal help JAR file and are in that directory. You now need to add the mapping to refer to the help contents for the new application page. You do this by updating the map.xml file.
To update the map.xml file:
Note:
Verify that you are in the directory which contains the extracted HTML files of the appropriate portal help JAR file.-
In the directory which contains the extracted HTML files of the portal help JAR file, locate the map.xml file.
-
Open the map.xml file to edit it.
-
Scroll down to the final entry (</map>).
-
Input the following line above the </map> entry.
<mapID target="Your_New_HelpID " url="Your_Help_HTML_FileName" />
In our example, the entry would read as:
<mapID target="pm_asdfg_menu2 " url="pm_asdfg_helloWorld.htm" />
-
Save the map.xml file.
The next steps are completed in this directory.
Updating the Navigation List for the Help to Include the New Topic
You now need to update the bookmarks for the help page to display this entry. You do this by updating the toc.xml file.
To update the toc.xml file:
Note:
Verify that you are in the directory which contains the extracted HTML files of the appropriate portal help JAR file.-
In the directory which contains the extracted HTML files of the portal help JAR file, locate the toc.xml file.
-
Open the toc.xml file to edit it.
-
Scroll down to the final entry (</toc>).
-
Enter the following line above the </toc> entry.
<tocitem target="Your_Help_HTML_FileName " text="Heading_for_the Topic" />
In our example, the entry would read as:
<tocitem target="pm_asdfg_helloWorld.htm" /> " url="How to Say Hello" />
-
Save the toc.xml file.
Readying the Help WAR File for Redeployment
Use the appropriate file compression tool, such as 7-zip, to ready the help WAR file:
-
Compress the updated contents for the help JAR for the portal application.
In this example, the user compresses the extracted (and updated) set of the application help .htm files as the sgpmp-help.jar file.
-
Replace the help JAR file in the apimgmntportal-help.war file.
In this example, the user uses the newer sgpmp-help.jar to replace the older sgpmp-help.jar in the directory where the user extracted the contents of the apimgmntportal-help.war file.
-
Compress the updated contents of the apimgmntportal-help.war file.
In this example, the user compresses the extracted (and updated) set of the apimgmntportal-help.war file.
Redeploying the WAR File in Your WebLogic Server Domain
To redeploy the apimgmntportal-help.war file in your WebLogic Server domain:
-
If you have not already done so, in the Change Center of the Administration Console, click Lock & Edit.
-
In the left pane of the Administration Console, click Deployments.
-
In the Deployments section, select the check box for apimgmntportal-help.
-
Click Stop, and then click Force Stop Now.
The entry in the State column for apimgmntportal-help changes to display Prepared.
-
When the State column for apimgmntportal-help displays Prepared, click Update.
The Update Application Assistant (no bold) dialog box appears.
-
For the Source Path field in the Update Application Assistant dialog, select Change Path.
-
In Update Application Assistant, select or enter the file path that represents the updated apimgmntportal-help.war file.
-
Click Finish.
Adding a Custom Module to a Portal Application
You can add custom modules to both portals. When you add a custom module to Partner API Management Portal or Partner Portal, the custom module is displayed to the right of Statistics, the last default module in the respective portal. Each custom module is displayed in the order in which it was added.
For each custom module:
-
Use a unique name. Do not include special characters.
-
Provide a valid plugin.
-
Set up at least one page to display.
-
Set up the help content for the page.
Caution:
The online help that Services Gatekeeper supplies with your Partner and API Management Portal provides support for the default configuration only.
Adding Custom Modules
To add a module to either portal:
-
Access the portal application to which you are adding a page.
-
For Partner and API management Portal, the default location is:
http://IP_address:port/portal/partner-manager/index/login.html
-
For Partner Portal, the default location is:
http://IP_address:port/portal/partner/index/partnerLogin.html
Where, IP_address is the host system running Services Gatekeeper. The default port is 8001.
-
-
Click CUSTOMIZATION in the navigation list of the Settings module.
-
Scroll down to the Module field for the appropriate portal (Partner and API management Portal or Partner Portal section.
-
Click Add New Plugin.
-
In the Name field, enter a unique name for the module.
-
Select the Visible check box below the Pages table.
-
At this point, add at least one page for your module. Complete the steps described in "Adding a Page to the Portal Application".
-
Click Submit.
Adding a Page to the Portal Application
You can add a page to an existing module or to a custom module.
To add a page to a portal application:
-
Access the portal application to which you are adding a page.
-
For Partner and API management Portal, the default location is:
http://IP_address/portal/partner-manager/index/login.html
-
For Partner Portal, the default location is:
http://address:port/portal/partner/index/partnerLogin.html
Where, IP_address is the host system running Services Gatekeeper. The default port is 8001.
-
-
Click CUSTOMIZATION in the navigation list of the Settings module.
-
Scroll down to the Module field for the appropriate portal (Partner and API management Portal or Partner Portal section.
-
Locate the module from the displayed modules.
-
Click the module to access its fields.
-
Click Add Page.
A row is added to the Page table for the module you selected.
-
In the new row added to the table, enter the details for the new page:
-
In the Name column, the name to display for this page. For example hello.
-
In the Location column, the location for the URL for this page.
The customer.war file contains the example hello.html file. The location entry reads:
/customer/hello.html
-
In the Visible column, click the check box.
-
-
Click Add.
-
Click Submit in this section.
Figure 1-5 shows the completed entries.
Figure 1-5 Details Entered for the New Page
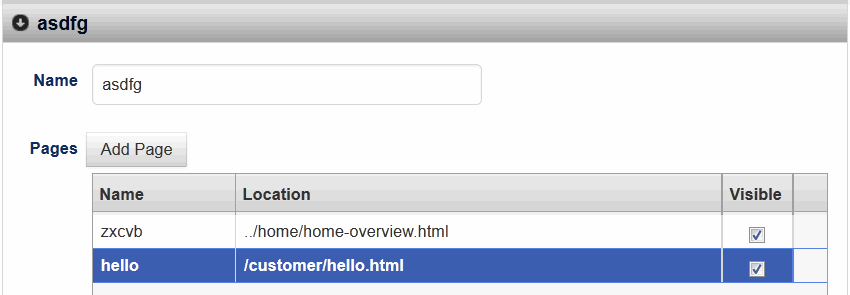
Description of ''Figure 1-5 Details Entered for the New Page''
Verifying the Addition in the Portal Application
To verify the extensions to the portal application:
-
Do one of the following:
-
If you have logged out of the updated portal application, sign in to the portal application.
-
If you are still signed in to the extended portal application, refresh the application. (Click F5 on your keyboard).
-
-
In the Header bar, click the tab for the module to which you added the page.
-
In the vertical navigation menu list, select the new entry.
In the example case, the user clicks the asdfg module and then the hello menu entry in Partner and API Management Portal.
-
To verify the help support for the updates to your portal application, Click Help on the Header bar. The help document should appear.
-
In the vertical navigation menu list, select the new entry.