6 Working with Reports
This chapter provides information about reports. It provides an overview of Oracle Communications Design Studio reporting, explains how to create your own report designs in Design Studio, and provides information about packaging, testing, and distributing reports. This chapter also provides information about extending the Design Studio reporting functionality.
About Design Studio Reports
Design Studio enables you to create and generate reports that include information about an implemented solution at a specific point in time. For example, a report can summarize the structure of the solution by listing projects and dependencies, or a report can summarize the composition of a service. Reports can capture the names, types, descriptions, and relationships of projects, entities, and data elements.
You can use reports to facilitate activities in a solution life cycle. For example, you can generate reports to facilitate an approval process or you can use reports as supporting documentation. Report output formats use standard file formats (such as PDF and HTML) familiar to and usable by team members who may not have a Design Studio installation.
Design Studio reports are comprised of data, data transformations, business logic, and data presentation.
-
Design Studio reports include data that you model in Design Studio.
-
Data transformation features enable you to sort, summarize, and filter Design Studio data. For example, you can perform operations such as grouping sums, calculating percentages of overall totals, and so forth.
-
Business logic features enable you to convert raw data to information required by a user.
-
Data presentation features enable you to present the data in specific ways, such as in tables, charts, or as text.
About the Design Studio Reporting Architecture
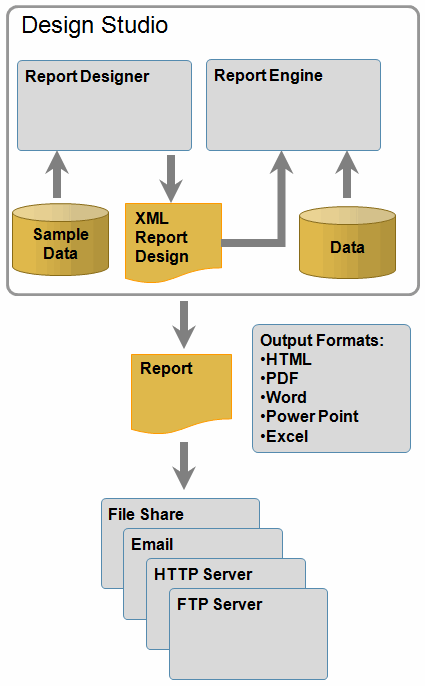
The Design Studio reporting architecture includes a Report Designer and a Reporting Engine.
-
You use the Report Designer to create new reports, customize existing reports, and test reports (using static sample data from an XML file). The Report Designer provides a complete environment for designing and testing reports, and includes a report design perspective and a set of views and editors. The Report Designer is installed with Design Studio but is also available as a stand-alone application. You access the tools included in the Report Designer by switching to the Report Design perspective in Design Studio.
-
You use the Report Engine when generating reports. You use a Design Studio wizard that enables you to communicate to the Report Engine which design and layout to use, the data to include in the report, and the format in which to generate the report output.
Figure 6-1 illustrates the Design Studio reporting architecture:
About the Design Studio Reporting Life Cycle
A Design Studio reporting life cycle includes the following phases: design, generation, and distribution. The tasks in the design phase (defining the content and styling the presentation of the reports) are typically completed by a solution designer or by a developer. The tasks in the report generation phase (producing the report and selecting a report format) and in the distribution phase (viewing, saving, and sharing reports) can be completed by any Design Studio user.
A solution designer or a developer performs the following reporting tasks:
-
Adds the Design Studio Report Design examples to the workspace.
These examples are included in the Design Studio installation and include content useful for designing reports.
-
Creates a plug-in project to contain the reports.
-
Customizes existing Design Studio reports or creates new reports to meet reporting requirements.
Design Studio includes reference reports that provide a base set of capabilities. You can use these reports as delivered or as a starting point for customizing your own reports. For example, you can customize the delivered report designs for content, layout, or branding. You can also create new reports using the Report Designer. When creating new reports, you define the content of the report and you design the presentation and layout of the report.
-
Tests reports in Design Studio.
During testing, developers can identify a file that contains static sample data that the reporting engine can use to generate test reports.
-
Packages the plug-in project into a feature and installs the feature to an update site.
Installing the feature to an update site ensures that other team members can install the feature and gain access to the report.
A Design Studio user performs the following tasks:
-
Installs the features that include reports from an update site into Design Studio.
-
Contributes content to reports.
You can contribute content to Design Studio reports by writing documentation about entities and data elements in Design Studio editors and views. You can format the documentation using plain text or simple HTML markup.
-
Generates the reports using a Design Studio wizard.
Most reports can be generated in a number of different output formats, which appear as options in the wizard. Report content may be better suited to one format over another.
-
Shares reports among team members.
You can share generated reports with team members using email, servers, or other methods of file sharing.
System administrators can integrate report generation into an automated build system to automatically generate reports that all team members can reference when developing solutions. See Design Studio System Administrator's Guide for more information.
About Report Designs
Each report that you can generate in Design Studio is backed by a report design XML file. A report design file is a template that describes the layout and style of the report. It also includes information about how to obtain the required reporting data and how to filter the available reporting data.
The report design includes information that the Report Engine can use to connect to the source of the report data. The report design also includes information that specifies which subsets of data to include in the report. Queries obtain the data from the data source and the Report Engine maps the data to a table.
When developing report designs, consider that report layouts and styles may not be suitable for some output formats. Also, users generating reports may select an output format that is not best-suited for a particular report design. In these cases, aspects of the report design may be ignored or adapted to fit the output format presentation capabilities. Test the presentation properties of your output formats to ensure that you understand the report design layout nuances.
During report development and testing, you can save report designs to a local directory, and generate reports from a locally saved report design file. Report design files use the file extension .rptdesign.
If you require a report design to display in a free-flowing output, such as HTML, and to paginated output, such as PDF, considering creating two distinct report designs. When designing for free-flow output, use percentage-based proportions in the design (for example, for column width). Use specific sizes when designing for paginated output formats.
About the Report Designer
You create new report designs using the Business Intelligence and Reporting Tools (BIRT) Report Designer. BIRT is an open source Eclipse project that provides a complete environment for designing and testing reports. You access the tools included in the BIRT Report Designer by switching to the Report Design perspective in Design Studio. See Design Studio Help for information about switching perspectives.
The Report Design perspective includes editors, views, and tools to build reports quickly. Some of these are listed below:
-
The Layout editor, which enables drag and drop creation of your report presentation.
-
The Data Explorer view, which you use to manage information about your report data, such as how to connect to the source and how to filter for only the data that is relevant to your report.
-
The Palette view, which includes report elements such as Data, Image, and Table, which you can drag to the Layout editor to design the structure of reports.
-
The Resource Explorer view, which you use to view all libraries and shared content, such as images and script files. The libraries store reporting objects and enable you to reuse existing report objects, such as tables and styles.
For more information about the Report Design perspective, see the BIRT Documentation page:
http://www.eclipse.org/birt/documentation/
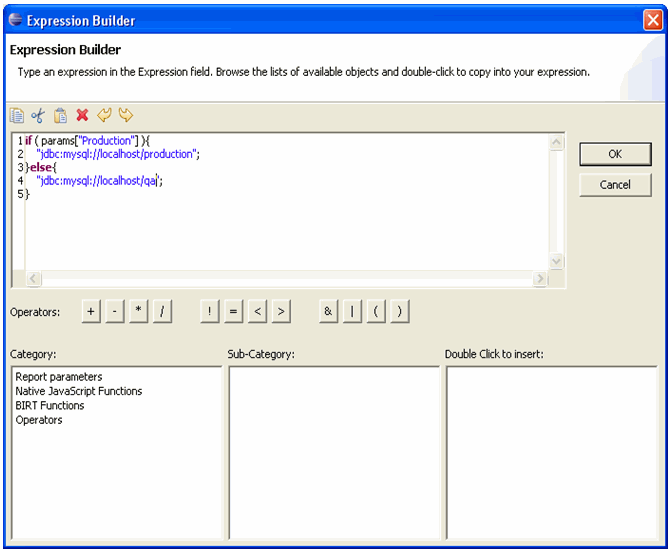
About the Expression Builder
The BIRT Expression Builder is an editor that you can use to create complex expressions. These expressions can include functions, data, conditions, and operations.
You can use the Expression Builder when:
-
Creating the display value for a report item
-
Creating a computed field in the Data Explorer view
-
Specifying a data series for charts
-
Specifying filter conditions
-
Specifying mapping conditions
-
Specifying highlight conditions
-
Specifying group keys
-
Specifying hyperlinks
-
Specifying URIs for images
-
Specifying dynamic data in text controls
About Report Generation
You can generate reports on-demand using a Design Studio wizard or you can automate report generation using an automated script in a continuous integration framework.
Report generation is a long-running task, and the time required to compose and render a report can vary from report to report. Processing time is dependent on a number of factors, including the amount of data supporting the report, the complexity of the report, and design of data sets and presentation.
Automated reports can be distributed to web servers, file shares, email, FTP sites, and by other methods by using Ant tasks to perform actions after report generation. These tasks are not explicitly provided by Design Studio but are a supported by Ant. For example, you can publish reports to a shared location or to website; you can email the report to a distribution list, and so forth. See Apache Ant Project website for more information.
See Design Studio System Administrator's Guide for more information about using Ant tasks in automated builds.
About Data Sources
A data source is a place from which a report obtains information. The information required to connect to the data source is defined in a Data Source entity. For example, you can create a Data Source entity if your reports use information defined in a database, a text file, an XML file, or a web service.
You can create multiple data sources for a single report. Each type of data source requires different connection information. For example, a report might require data from a database and data from a file. The data source information required to retrieve data from the database is different than the data source information required to retrieve data from a file.
To access the Design Studio data that you require for generating reports, you create a Data Source entity for Design Studio. You create an XML Data Source entity for Design Studio because Design Studio provides the data in XML format.
When defining Design Studio as a data source, you specify:
-
An XML data schema that describes the structure of the Design Studio data.
-
A sample XML file that the reporting framework can use when you are testing report designs. The sample XML file should include data that is representative of the type of data that you intend to include in finished reports. You may need to create and reference multiple sample XML files, depending on the kinds of reports you are testing and generating.
-
A reporting parameter that dynamically identifies the location of the Design Studio XML file that contains the requested reporting data. During report generation, Design Studio generates an XML file and saves it to a temporary location on the file system. This XML file includes all of the requested reporting data. The reporting framework uses this parameter to obtain the location of the XML file and to access the reporting data.
Figure 6-3 shows an XML Data Source entity and a report parameter:
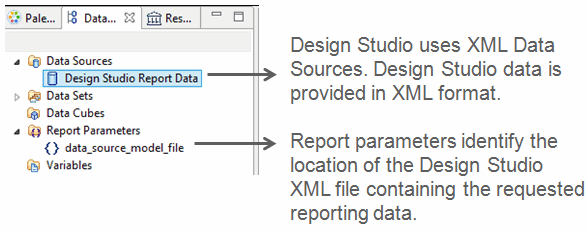
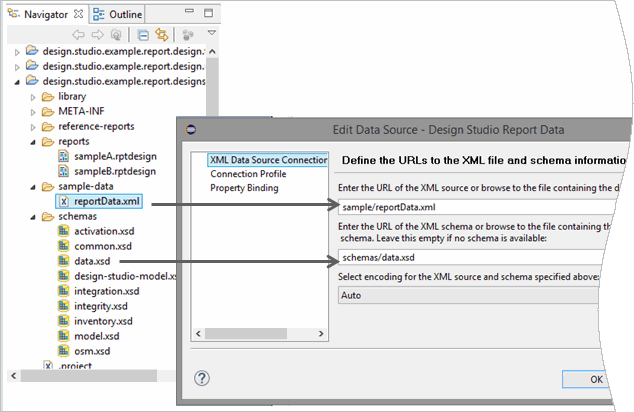
Figure 6-4 shows the Edit Data Source dialog box, where you define a sample XML file that the reporting framework can use when you are testing report designs, and the XML data schema that describes the structure of the Design Studio data:
See "Creating the Design Studio Data Source Entity" for more information.
About Data Sets
A data set defines the data that is available to a report. Data sources typically contain more data fields than are needed for a report. When defining a data set, you select the data that you want to retrieve from the data source and determine how to process that data. For example, you can change column names, create computed columns, and filter the data that appears in the report. You may require multiple data sets for a single report.
Before you can create a data set for Design Studio reports, you must first create the Data Source entity that defines how to obtain reporting information from Design Studio.
See "Creating Data Set Entities" for more information.
Adding the Report Design Example to the Workspace
Design Studio includes a report design example that you can use as a reference or as a starting point for creating your own custom report designs. This example is included in the Design Studio installation and can be added to your workspace. See "Working with the Design Studio Report Examples" for more information.
To add the report design example to the workspace:
-
From the Design Studio File menu select New, and then select Example.
The New Example wizard appears.
-
Expand the Design Studio Examples folder and select Design Studio Report Design Example.
-
Click Next.
The Example Projects page appears, listing each of the projects that will be added to the workspace.
-
Click an example project to view its description:
-
design.studio.example.report.update.site creates a project to demonstrate how to export installable features into an update site.
-
design.studio.example.report.design.feature creates a project to demonstrate how report designs can be packaged into a feature for installation into Design Studio.
-
design.studio.example.report.designs creates a project that contains a sample report design, an XML Schema, a report design library, and other supporting content.
-
-
Click Finish.
The projects are added to the current workspace.
Customizing Existing Design Studio Reports
Design Studio includes reference reports that provide a base set of capabilities. You can use these existing Design Studio reference reports as a starting point for customizing your own reports. Design Studio also includes sample report designs that you can use as a starting point for customization.
When customizing existing reports, you might begin by selecting a report design and determining what changes you require to the presentation of the report data. For example, you may need to customize an existing report design for layout or branding.
You might determine that you also need to change the data captured in the report. For example, you may need to edit report column headings or add additional reporting fields. You may need to add additional filters so that the report data is more specific to your needs. Changes to the data, of course, impact the presentation of the data in the report.
To customize an existing report:
-
Add the Design Studio Report Design Example to your workspace.
See "Adding the Report Design Example to the Workspace" for more information.
-
In Design Studio, from the Project Explorer view, right-click the design.studio.example.report.designs folder and select Copy.
-
Right-click in the Project Explorer view white space and select Paste.
The Copy Project dialog box appears.
-
In the Project Name field, edit the project name.
The name must be unique in the workspace.
-
Click OK.
The project appears in the Package Explorer view.
-
Expand the design.studio.example.report.designs folder.
-
Select a report design file to customize.
You can customize:
-
A Design Studio reference report design file, such as the ProjectSummary.rptdesign file. The Design Studio reference report design files are located in the reference-reports folder.
-
A sample report design. The sampleA.rptdesign and sampleB.rptdesign files are located in the reports folder. The sample report designs are more simplistic than the reference report designs, but include packaging configuration that you can customize to install your reports into Design Studio.
-
-
Double-click a report design file to open the file in the Report Design editor.
-
Edit the file, as needed.
See "Defining Data Presentation in Reports" and "Adding Additional Report Design Elements" for more information.
-
Click Save.
-
Test the edited report designs.
See "Testing Report Designs" for more information.
-
Add your edited reports to the Generate Report wizard.
See "Adding Reports and Report Categories to the Generate Report Wizard" for more information.
-
Package the edited report designs.
See "Packaging Plug-in Projects" for more information.
-
Distribute the edited report designs.
See "Distributing Plug-in Projects" for more information.
Developing Custom Report Designs
You develop custom report designs in Eclipse plug-in projects and plug-in projects are associated with feature projects. An Eclipse plug-in project can include any number of custom report designs. For example, you will likely include all of your custom report designs in a single plug-in project.
An Eclipse feature project can be associated with any number of plug-in projects. Feature projects are associated with update site projects. Solution designers install the features from update sites to gain access to the custom report designs that are included in the features.
See "Creating, Packaging, and Distributing Plug-in Projects" for more information about plug-in projects and features.
Note:
Design Studio documentation complements the existing BIRT project documentation and provides guidance for designing reports specific to Design Studio.Before creating your own custom Design Studio reports, Oracle recommends that you review the following material available from the BIRT project website:
-
The tutorials, available on the Tutorial page:
-
The demos, available on the Demo page:
-
The documentation, available on the Documentation page:
You develop custom report designs by performing the following tasks:
-
Add the Design Studio Report Design Example to your workspace.
See "Adding the Report Design Example to the Workspace" for more information.
-
Create a plug-in project.
See "Creating Plug-in Projects" for more information.
-
Create a report design file.
See "Creating Report Design Files" for more information.
-
Create the Design Studio report parameter.
See "Creating Design Studio Report Parameters" for more information.
-
Create a Design Studio Data Source entity.
See "Creating the Design Studio Data Source Entity" for more information.
-
Create a data set for the Design Studio Data Source entity.
See "Creating Data Set Entities" for more information.
-
Define the data to be added to the report.
See "Defining the Data to Add to Reports" for more information.
-
Define the data presentation to be used in the report.
See "Defining Data Presentation in Reports" for more information.
-
Add additional report design elements.
See "Adding Additional Report Design Elements" for more information.
-
Test the report designs.
See "Testing Report Designs" for more information.
-
Add your custom reports to the Generate Report wizard.
See "Adding Reports and Report Categories to the Generate Report Wizard" for more information.
-
Package the report designs.
See "Packaging Plug-in Projects" for more information.
-
Distribute the report designs.
See "Distributing Plug-in Projects" for more information.
Note:
Test custom reports before packaging them and during various stages of report development. When developing custom report designs, test frequently and use iterative implementations to reduce issues.Creating Report Design Files
A report design is an XML file that defines all of the information required to generate a report.
To create a report design:
-
From the Report Design perspective, select File, then select New, and then select Other.
-
Expand the Business Intelligence and Reporting Tools folder, and then select Report.
-
Click Next.
-
Select the folder in which to save the report design file.
You must save the report design file in the plug-in project that you created for your reports. For example:
plug-inProject/reports
Note:
Do not save report designs in Java source folders. -
In the File Name field, enter the name of the new report design.
The file name extension must be .rptdesign.
-
Click Next.
-
Select a report template.
You can review selected template layouts in the Preview field.
-
(Optional) To get help designing reports, select Show Report Creation Cheat Sheet.
The Cheat Sheet view provides design guidance after the wizard completes. This option is available only for a subset of reports.
-
Click Finish.
Design Studio opens the report in the Layout editor.
Creating Design Studio Report Parameters
Design Studio report designs require at least one report parameter to identify the location of the XML file to be used as an XML data source. You can add additional report parameters to support custom processors.
To create a Design Studio report parameter:
-
In the Report Design perspective, open a report design in the Layout editor.
-
Click the Data Explorer tab.
The Data Explorer view appears.
-
Right click Report Parameters and select New Parameter.
The New Parameter dialog box appears.
-
In the Name field, enter data_source_model_file.
When using Design Studio as the data source, you must name the parameter data_source_model_file.
-
In the Data Type field, select String.
-
Ensure that the Is Required option is selected.
-
Click OK.
-
If you intend to create custom report processors, define additional report parameters.
When defining additional report parameters, you must deselect Is Required and you must provide a default value for the custom report processor parameter.
Creating the Design Studio Data Source Entity
You create a Data Source entity to define how the reporting engine obtains reporting data from Design Studio. See "About Data Sources" for more information.
Note:
Add the Design Studio Report Design Example to your workspace before you begin this procedure. See "Adding the Report Design Example to the Workspace" for more information.To create a Design Studio Data Source entity:
-
In the Design Studio perspective, click Package Explorer tab.
-
Expand the design.studio.example.report.designs folder.
-
Expand the sample-data folder.
-
Copy the reportData.xml file to your report plug-in project.
For example, you might create a sample data folder in the plug-in project:
plug-inProject/sampleData/
-
Expand the schemas folder.
-
Copy the schemas folder and all of schema .xsd files in the schemas folder to your report plug-in project.
For example, copy the contents of the schemas folder to the following location:
plug-inProject/schemas/
-
Switch to the Report Design perspective and open a report design in the Layout editor.
-
Click the Data Explorer tab.
The Data Explorer view appears.
-
Right click Data Sources and select New Data Source.
The New Data Source wizard appears.
-
Select Create from a data source type in the following list.
-
From the list, select XML Data Source.
-
In the Data Source Name, enter a name for the data source.
-
Click Next.
-
Enter a URL or browse to select a sample XML file.
You specify a sample XML file that the reporting framework can use when you are testing report designs. The sample XML file should include data that is representative of the type of data that you intend to include in finished reports. You can:
-
Enter the path to the reportData.xml file that is included in the Design Studio Report Design Example. See "Adding the Report Design Example to the Workspace" for more information.
-
Run the Design Studio Model in XML report to create a new sample XML file. See "Working with the Design Studio Report Examples" for more information.
-
-
Enter a URL to or browse to select an XML schema file.
This sample schema file, with the sample XML file, provide the reporting engine with the Design Studio model format details that the engine required during testing.
If you haven't yet identified an XML schema, select the design-studio-model.xsd file that you copied to your plug-in project.
-
Click Test Connection.
A dialog box appears that displays the results of the test.
-
Click OK and then click Finish.
-
In the Data Explorer view, right-click the new Data Source entity and select Edit.
The Edit Data Source dialog box appears.
-
Select Property Binding.
-
In the XML Data Source File field, enter:
params["data_source_model_file"].value
This value binds the Design Studio data source to the file that is defined by the Design Studio report parameter. See "Creating Design Studio Report Parameters" for more information.
-
Click OK.
Creating Data Set Entities
Data sets specify the data to retrieve from the Design Studio Data Source entity. See "About Data Sets" for more information.
Before you create a Data Set entity, you must first create the Design Studio Data Source entity. See "Creating the Design Studio Data Source Entity" for more information.
To create a Data Set entity:
-
From the Report Design perspective, in the Data Explorer view, right-click Data Sets and select New Data Set.
The New Data Set dialog box appears.
-
In the Data Source Selection area, expand XML Data Source and select the Design Studio Data Source entity to associate with the data set.
-
In the Data Set Type field, ensure that XML Data Set is selected.
-
In the Data Set Name field, enter a name for the data set.
-
Click Next.
The Sample XML Settings page appears.
-
Select a sample XML source file that contains the type of content you expect from the data set.
For example, select a file that includes the types of data that you can use to validate query logic for the data set. You can use the reportData.xml sample XML file defined in the Data Source entity (and included in the Design Studio report design example) or browse for a different file.
-
Click Next.
-
Create data set row mapping by selecting elements in the XML structure and by clicking the arrow button.
Each instance of the selected XML element in the XML document is mapped to a data set row. Use the wizard instructions to define data set row mappings. For more information about the XPath syntax applicable to Design Studio, see "About XPath Expression Patterns for Row Mapping".
The installed Design Studio examples include data set row mapping examples. See "Working with the Design Studio Report Examples" for more information.
Note:
In the Select or edit the XPath Expression dialog box, select the Custom XPath Expression option and define the path for the XML element. -
Create data set column mappings by selecting elements and attributes in the XML structure and by clicking the arrow button.
Use the wizard instructions to define data set column mappings. For more information about the XPath syntax applicable to Design Studio, see "About XPath Expression Patterns for Column Mapping".
The installed Design Studio examples include data set column mapping examples. See "Working with the Design Studio Report Examples" for more information.
-
(Optional) To test new row and column mappings against the sample XML file, click Show Sample Data.
You can test mappings to ensure that the XPath expressions include no typing or syntax errors.
-
Click Finish.
The Edit Data Set dialog box appears. You can define additional information about the data set, edit row mapping and column mapping, preview the results, and so forth.
-
Click OK.
Defining the Data to Add to Reports
The BIRT Report Designer includes tools for designing, debugging, and previewing report designs. This section includes a small subset of procedures that help you create and design reports for use in Design Studio. For additional documentation, tutorials, and examples, see the BIRT project website:
Defining Computed Columns for Data Sets
You define computed columns to generate report data from expressions of the data in other columns in the data set (rather than retrieving the data directly from a data source).
To define computed columns for a data set:
-
From the Report Design perspective, in the Data Explorer view, right click a Data Set entity and select Edit.
The Edit Data Set dialog box appears.
-
Select Computed Columns.
-
Click New.
-
In the Column Name field, enter a name for the computed field.
-
In the Data Type field, select the type of data to be returned by the computed field.
-
In the Expression field, enter an expression that calculates the value.
You can click the Fx button to build the expression in the Expression Builder dialog box.
Note:
Computed column expressions can refer only to column data that you mapped in the data source. Use a naming convention to distinguish columns intended to appear in reports from columns intended for computing values. For example, you can pre-pend column names with an underscore (for example, _columnX) to identify columns to be used only for filtering and for supporting computed columns. -
Click OK.
See BIRT Report Developer Guide for more information.
Defining Filtering Conditions for Data Sets
You can limit the data included in reports by defining filtering conditions. A filter condition is an expression with a value that resolves to true or false. Design Studio applies the filter to each row of the data set. If the expression resolves to true, the row is included in the report. If you define multiple filters, the expressions of all filters must resolve to true for a row to be included in the report. See "Working with Report Data Filters" for more information.
-
From the Report Design perspective, in the Data Explorer view, right click a data set and select Edit.
The Edit Data Set dialog box appears.
-
Select Filters.
-
Click New.
-
Enter a filter condition.
Note:
For best performance, order the expressions from most likely to exclude content to least likely to exclude content. -
(Optional) To test the mappings and computed columns, click Preview Results.
Check filter expressions to ensure that the data is filtered correctly.
-
Click OK.
Merging Data Sets
You can combine data from two data sources into a single data set. For example, you can combine data from an XML file and from a text file (you must first create the XML data set and the text file data set).
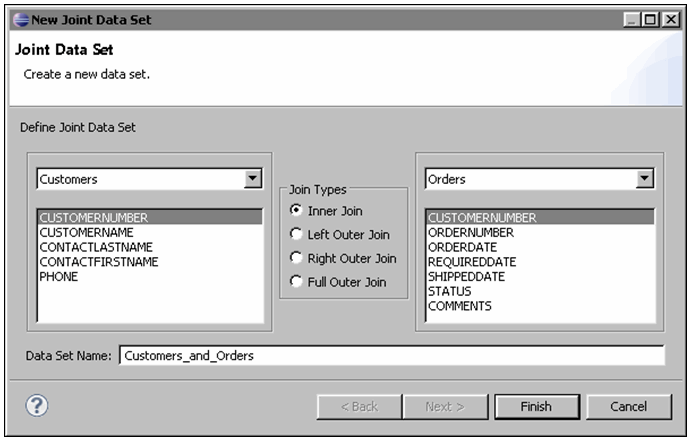
When you merge, or join, two data sets, you create a joint data set. You can add computed columns and filters to a joint data set and preview the results. You can also merge joint data sets together to combine more than two data sets into a single joint data set. Figure 6-5 shows two data sets, Customers and Orders, merged into a single data set.
If you want to join an aggregated column, add a computed column to the source data set. See "Defining Computed Columns for Data Sets" for more information.
To merge data sets:
-
In the Report Design perspective, open a report design in the Layout editor.
-
Click the Data Explorer tab.
The Data Explorer view appears.
-
Right-click Data Sets and select New Joint Data Set.
The Join Data Set wizard appears.
-
In the Define Joint Data Set area, select the data sets to join.
The columns of the data sets appear.
-
Select one column from each data set to join the columns.
-
For each join, select one of the following join types:
-
Inner Join: Returns rows from both data sets when the column values match.
-
Left Outer Join: Returns all rows from the left data set and all matched rows from the right data set.
-
Right Outer Join: Returns all rows from the right data set and matched rows from the left data set.
-
Full Outer Join: Returns all rows from both data sets even when the column values do not match.
-
-
In the Data Set Name field, enter a name for the merged data set.
-
Click Finish.
The Edit Data Set dialog box appears.
-
(Optional) Review and edit the data set.
For example, click Output Columns to review the full set of columns being joined and to customize the column names.
-
(Optional) To review the rows returned by the joint data set, click Preview Results.
-
Click OK.
Filtering Data Sets for Tables
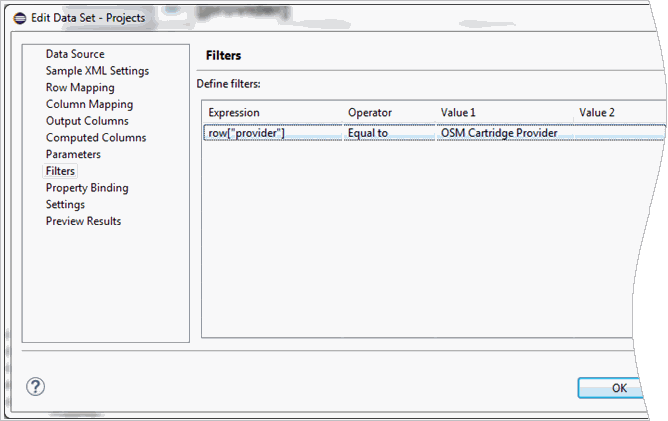
You use data binding filters to filter a data set for a specific table. Filtering data sets for tables is useful when a data set is used in multiple contexts, each with different filtering criteria. The data binding filter is applied against each instance of the table, rather than once during data set creation. In Figure 6-6, the data set provider row is filtered for the value OSM Cartridge Provider:
To filter data sets for tables:
-
In the Report Design perspective, open a report design in the Layout editor and select a table in a report design file.
The Property Editor view appears.
-
In Property Editor view, click the Filters tab.
The Filter By page appears.
-
Click Add.
The New Filter Condition dialog box appears.
-
Enter a filter condition.
You can enter a condition directly into the first field or you can click the Fx button to open the Expression Builder and create a more complex expression. See "Working with XPath Expression Patterns" for more information.
-
Select an operator from the drop-down list.
-
Specify the value on which to search.
Enter the value directly, select from the list of values, or use the Expression Builder to create a more complex value expression. For some operators, a value is not required.
-
Click OK.
-
Click Save.
Nesting Tables
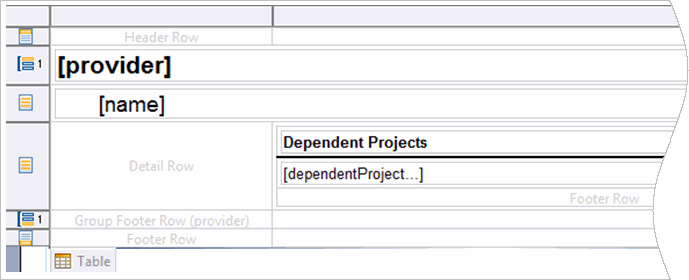
You can nest one table inside of another table. For example, a nested table can represent a filtered data set that is based on the current row of the parent table. The filter is applied to the child table for each row of the parent table.
Figure 6-7 shows one table nested in another in the Layout editor:
Note:
Nested tables can impact performance. Use nested tables for small data sets. If the data sets are large enough to adversely impact performance, join the data sets instead of nesting the tables.To nest tables:
-
In the Report Design perspective, open a report design in the Layout editor.
-
Create a parent table and bind the table to a data set.
-
Create a child table in a row of the parent table and bind the table to a second data set.
The child table is repeated for each row of the parent table. To ensure that the child table displays content appropriate for the current row of the parent table, you must apply a data filter to the child table.
To apply a data filter to the child table:
-
Select the child table.
The Property Editor view appears.
-
Click the Filters tab.
-
Click Add.
The New Filter Condition dialog box appears.
-
Select the child table column that you want to compare to the key value in the parent table.
-
Select Equal to as the operator.
-
Click the menu and select Build expression.
The Expression Builder appears.
-
From the Category list, select Available Column Bindings.
-
From the Sub-Category list, select the child table.
The set of columns available in the parent table appear.
-
Double-click the parent table column to which you want to match the selected child table column.
-
Click OK.
-
-
Click OK.
The new filter is added to the child table.
Concatenating Rows into Comma-Separated Values
You can concatenate values in separate rows into a list of comma-separated values. The comma-separated values appear in the table footer. For example, you might want to display a list of comma-separated action codes in a report.
Note:
BIRT provides many functions that perform aggregate calculations, such as SUM, AVERAGE, and COUNT. See the BIRT project page documentation for more information.To concatenate rows into a list of comma-separated values:
-
In the Report Design perspective, open a report design in the Layout editor.
-
Right-click in a table footer cell, select Insert, and then select Aggregation.
The Aggregation Builder dialog box appears.
-
In the Column Binding Name field, enter a name for the concatenation.
For example, describe the value that is returned by the column binding, such as ActionCodes. Column binding names must be unique in a report.
-
Select a data type.
-
In the Function field, select Concatenate.
-
In the Expression field, enter an expression that composes the value for each row of the table.
For example, row["toName"].
-
In the Separator field, enter the following:
", "
-
Click OK.
Defining Data Presentation in Reports
The BIRT Report Designer includes tools for designing, debugging, and previewing report designs. This section includes a small subset of procedures that help you create and design reports for use in Design Studio. For additional documentation, tutorials, and example, see the BIRT project website:
Note:
You can also use Cascading Style Sheets to enable more complex report formatting. You can apply styles globally (to affect the entire report) or to individual report elements. Style sheets enable you to style once and use those styles multiple times. You can use a style library to improve consistency across a suite of report designs.For more information, see the Using Styles and Cascading Styles tutorials on the BIRT Project page.
Hiding Content Based on Output Format
Report elements can include conditions that control the visibility of the element in the report. Conditions can be used to:
-
Hide content in specific output formats
-
Display contextual values only when appropriate
-
Expand or reduce report content based on a report parameter (for example, avoiding duplicate report designs when the report content varies only by level of detail)
-
Toggle a set of layouts based on report data (for example, switch between a table format or an in-line list based on the row count)
To hide content based on a report output format:
-
From a report design file, right-click the report element to hide and select Properties.
The Property Editor view opens.
-
Click the Visibility tab.
-
Select Hide Element.
-
Select the For specific outputs option.
-
Select the check box for each output format in which the content should not appear.
-
(Optional) In the Expression field, modify the conditional expression for an output format.
The default value is true, which always hides the content for that specific output format.
-
Click Save.
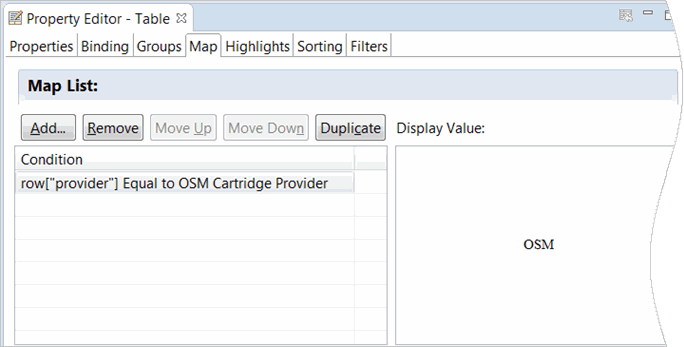
Defining Value Mapping Rules
You can define rules that map values from a database column to values in a report column. For example, you might define rules that map the database status codes S and F to the display values Success and Fail respectively. When defining value mapping rules, you define a conditional expression and a display value that appears in a report when the expression evaluates to true.
For example, in Figure 6-8, the conditional expression states that if the data set provider row contains the value OSM Cartridge Provider, the value OSM appears in the report:
To define value mapping rules:
-
Open a report design in the Layout editor and select a data field.
The Property Editor view appears.
-
In Property Editor, click the Map tab.
The Map List page appears.
-
Click the Add button.
-
Define the condition that must evaluate to true.
-
Define the display value that appears in the report.
-
Click OK.
Defining Value Highlighting Rules
You can define rules that map values from a database column to specific formatting options when those values appear in a report. When defining highlighting mapping rules, you define a conditional expression and the formatting that is applied to the display value when the expression evaluates to true.
To define value highlighting rules:
-
Open a report design in the Layout editor and select a data field.
The Property Editor view appears.
-
In Property Editor, click the Highlights tab.
The Highlight page appears.
-
Click the Add button.
-
Define the condition that must evaluate to true.
-
Define the formatting that will be applied to the value when it appears in the report.
-
Click OK.
Adding Additional Report Design Elements
The BIRT Report Designer includes a tools for designing, debugging, and previewing report designs. This section includes a small subset of procedures that help you create and design reports for use in Design Studio.
See the BIRT Report Developer Guide for more information about the procedures in this section, and for the full BIRT Report Designer documentation set.
Adding the Current Date to a Report
BIRT includes functions for manipulating content values. For example, you can use the BirtDateTime class to manipulate date and time values. You can use the now() function to display the current date and time. And, you can use the Formatter class (which includes a single format function similar to Java MessageFormat) to format a date by providing a date and format string.
To add the current date to a report:
-
From a report design file, right-click and select Insert, and then select Dynamic Text.
The Expression Builder dialog box appears.
-
In the Expression field, enter the following:
Formatter.format(BirtDateTime.now(), "date_format")
For example:
Formatter.format(BirtDateTime.now(), "MMMM dd, yy h:mm a")
-
Click OK.
Adding Page Numbers
You can add page numbers to a master page and to a report layout.
Note:
You can suppress page numbering for specific output types, such as for non-paginated HTML output. See "Hiding Content Based on Output Format" for more information.To add page numbers to a report design:
-
From a report design file, right-click and select Insert, and then select Text.
The Edit Text Item dialog box appears.
-
Change the formatting type from Auto to HTML.
-
Change the content type to Dynamic Text.
This enables you to embed an expression in the text.
-
Do one of the following:
-
To add page numbering to a master page, paste the following value into the open text area:
<value-of>pageNumber</value-of> / <value-of>totalPage</value-of>
-
To add page number to a layout, paste the following value into the open text area:
Page <viewtime-value-of> pageNumber </viewtime-value-of> of <value-of> totalPage </value-of>
-
-
Click OK.
Dynamically Selecting Images
You can create XPath expression conditions that determine which image to use in a report. The BIRT Report Developer supports many URI schemes that enable you to retrieve content. For example, you might use the http scheme to interact with web resources or XML namespaces. BIRT also enables you to embed images into a report, or to dynamically select images from a data set.
You can use the Eclipse URI platform scheme to retrieve content from an installed Eclipse plug-in. See the Eclipse documentation for more information.
Note:
If a report resource does not resolve, the report may include an error message that states that the resource of the report item is not reachable.To dynamically select images:
-
From a report design file, right-click and select Insert, and then select Image.
The Edit Text Item dialog box appears.
-
In the Select Image from field, select the URI option.
-
In the Enter URI field, click the down-drop menu and select JavaScript Syntax.
The Expression Builder dialog box appears.
-
Enter a conditional expression that represents the image options.
The following is a simple example that shows a selection between two images based on the typeId value:
if (row["typeId" ] == "type1") { "platform:/plugin/my.report.design.plugin.id/icons/type1.png" ; } else { "platform:/plugin/my.report.design.plugin.id/icons/type2.png" ; } -
Click OK.
Creating Internal Links Between Report Items
You can create links between two related report items in a report design. Most report readers support standard linking functionality. Design Studio does not validate links during report creation.
You create internal links in a report using bookmarks. A bookmark is an identifier used as an anchor point for hyperlink navigation in a report. If a report contains multiple bookmark identifiers, each bookmark identifier must be unique.
Note:
You can also define links using:-
URIs, to reference standard URI protocols. For example, you can create links using HTTP or FTP URI schemes.
-
Drill-through parameters, to enable interactive report features most commonly used with HTML output and a web server that generates reports on-demand.
If you define links with drill-through parameters, you link to a different report using the following report parameter syntax in the link expression:
params["data_source_model_file"].value
See the BIRT project page for information about creating links using URI schemes or drill-through parameters.
To create an internal link using a bookmark:
-
Select a data, label, or image element in a report design file.
The Property Editor view appears.
-
In Property Editor, click the Properties tab and then click the Hyperlink option.
The Hyperlink page appears.
-
Click Edit.
The Hyperlink Options dialog box appears.
-
Select Internal Bookmark.
-
Do one of the following:
-
From the Bookmark list, select a bookmark identifier.
-
In the Linked Expression field, click the Fx button and define an expression that resolves to a value that matches a bookmark identifier defined in the report.
-
-
Click Save.
Creating Table of Contents Entries
You add table of contents (TOC) entries in various places in a report design to identify the types of information to be included in a TOC. The TOC is not directly represented in the report, and may not appear in some output formats. In some output format viewers the TOC appears in a separate panel of the reader and not in the report directly.
When designing reports, you pair TOC entries with bookmarks, and define a TOC expression to retrieve the text to be included in the generated TOC. You can also define TOC expressions for table groups and on specific rows in a table.
To create TOC entries:
-
In a report design file, select a data, label, or image element that you want to appear in the TOC.
The Property Editor view appears.
-
In the Property Editor view, click the Properties tab and then click the Table of Contents option.
The Table of Contents page appears.
-
In the Table of Contents field, enter a TOC entry for the report element.
You can define the entry directly in the field or by using the Expression Builder.
-
Click Save.
Defining Text as HTML
Data sets can include simple text or text annotated with a markup language. You can use a markup language to embed simple formatting data definition. For example, you can format text with paragraph breaks, bullets, or emphasis.
To format text in a report, you must set up the text column to enable BIRT to interpret the string value in a data set as HTML. This set up enables you to embed HTML tags for report formatting.
Note:
Invalid markup can cause exceptions during report generation.To define text as HTML:
-
From a report design file, right-click and select Insert, and then select Text.
The Edit Text Item dialog box appears.
-
Select HTML as the formatting type.
-
Select Dynamic Text as the content type.
-
Enter the following text content:
<VALUE-OF format="HTML">row["myColumn"]</VALUE-OF>
where
myColumn is the name of the column that contains the formatted text.
-
Click OK.
Example 6-1 includes text annotated with a markup language:
Example 6-1 HTML Markup Example
<p><b>BIRT HTML Markup</b></p>
<p>Allows textual markup which is <i>interpreted</i> and <u>rendered</u>.</p>
<p>Supports:
<ul>
  <li>Bullets</li>
  <li>Numbering</li>
  <li><a href=”http://www.oracle.com/”>Anchors</a></li>
  <li>Other simple markup</li>
</ul>
</p>
<p>Use the <b>HTML Dynamic Text</b> option within a Text Item.</p>
Figure 6-9 illustrates how the text in Example 6-1 appears in a report:

Working with XPath Expression Patterns
Design Studio reports use data sets that are structured as table rows and columns. When defining data sets, you map a top-level XML element as a data set row, and other XML elements or attributes as data set columns. You use XPath expressions to define the paths to elements and attributes.
This section describe common XPath expression modeling patterns that you can use to create expressional conditions.
About XPath Expression Patterns for Row Mapping
To improve processing performance, reduce the size of an initial data set by defining specific row mapping XPath expressions. For example, filter the row mapping to include only the information required for a report, and consider using multiple data sets instead of using a single data set when applying a filter in a data binding.
You can apply an attribute filter to only one XML element. You cannot, for example, apply an entity type filter and an element type filter in an XPath expression. You can apply multiple data set filters to any data set to include additional filtering.
If you map to a specific subtype of an abstract XML element, the Data Set wizard generates a warning message that states that the table mapping XPath does not exist. The XPath expression may be valid, but BIRT is not able to reconcile the use of a concrete subtype against an abstract (or otherwise extensible) XML element. If you cannot verify an XPath expression, use a test query on sample data and ensure that the query returns the expected data.
When using XPath predicates, you cannot use excludes operations. See the BIRT Project page for information about using data set filters to apply excludes logic.
Table 6-1 provides a list of common XPath expressions for row mapping:
Table 6-1 Row Mapping XPath Expression Patterns
| To Do This | Use this Syntax |
|---|---|
|
Map to a Design Studio root element |
/* |
|
Include the entity element in the path name |
/*/entity |
|
Select all instances of an element |
/*/entity//element |
|
Use a predicate to select an element based on its typeId attribute |
/*/entity//element[@typeId='abc'] |
|
Select all instances of a first-level child element |
/*/entity/*/element |
|
Select all instances of a second-level child element |
/*/entity/*/element/*/element |
|
Use a predicate to select a first-level child element based on its typeId attribute |
/*/entity/*/element[@typeId='abc'] |
|
Select a container of elements at any level |
/*/entity//container/element |
|
Use a predicate to select a container of elements at any level based on its typeId attribute |
/*/entity[@typeId='abc']//container/element |
|
Select an element under a parent container |
/*/entity/container/element |
|
Use a predicate to select an element in a parent container based on its typeId attribute |
/*/entity[@typeId='abc']/container/element or /*/entity/container/element[@typeId='abc'] |
|
Select all instances of entity relations |
/*/entity//relation |
|
Select all entity project relations |
/*/entity/project/relation |
|
Select all element relations |
/*/entity//element//relation |
|
Select specific element relations |
/*/entity//element/relationListName/relation |
About XPath Expression Patterns for Column Mapping
XPath expressions for column mapping identify the column value in a data set. The column mapping expressions are relative to the row mapping selection.
When creating column mappings, the target child or attribute value is not required for every subtype of the selected element. For example, you can create a query that applies to a mixed set of elements to which you want to map the aggregated set of columns available across all element types. Reducing the number of distinct queries required for a report improves performance.
Many of the domain-specific fields in the Design Studio model are contained in subtypes of the base entity and element model. Reference the XML schema (included in the Design Studio Report Design Example) when creating data set column mappings to fields of a subtype. See "About the Design Studio Report Design Example" for more information about Design Studio XML schema.
Row selection XPath expressions select abstract entities and elements. Therefore, the attributes that are available for column mapping should be concrete attributes and children of those elements (BIRT can recognize the children and attributes defined directly on the base model). The column mapper does not display the concrete subtypes of the entity and elements as options for mapping. If you define a row mapping to select an abstract entity or element, the column mapper recommends column maps that select the base attributes and that select the children in the column mapping. When mapping to a value in a subtype, BIRT returns a warning that states that the table mapping XPath does not exist. Ignore this warning if you have verified that the mapped path does reflect a valid selection from a subtype of the row mapping element.
To map concrete subtypes, you add column mappings directly by specifying the relative path, or you can set the row mapping to select the specific entity or element that your final row mapping generates. Setting the row mapping to select the specific entity or element enables column mapping from the XML structure on the Column Mapping page of the Edit Data Set dialog box.
Test data set mappings with sample XML to ensure that all mappings are correct. You can create sample XML files by using the Design Studio Generate Report wizard to generate the Design Studio Model in XML report.
Table 6-2 displays common column mapping XPath expression patterns:
Table 6-2 Column Mapping XPath Expression Patterns
| Name | XPath | Description |
|---|---|---|
|
id |
/@id |
Get the global ID of the selected element. |
|
type |
/@type |
Get the entity or element type of the selected element. |
|
parentId |
../../@id |
Get the global ID of the selected element's parent. This expression resolves to a null value for entities because entities have no parent. |
|
field1 |
/field1 |
Get the field1 value, where field1 is a child of the selected element. This expression resolves to a null value if there is no child element. |
|
attribute1 |
/attribute1 |
Get the attribute1 value, where attribute1 is an attribute of the selected element. This expression resolves to a null value if there is no child element. |
|
localizedString |
localizedString[@lang='default'] |
Get the default value of a localizedString. This expression resolves to a null value if the localizedString does not have a default value. |
Table 6-3 displays column mappings that are typical for data sets with row mappings that map to relations. These data sets are often used by a nested table with a filter to match global identifiers with the outer row's entity or element identifier.
Table 6-3 Column Mappings for Data Sets with Row Mappings to Relations
| Name | Path | Description |
|---|---|---|
|
name |
/@name |
Name of the relation. |
|
type |
/@type |
Type of the relation. |
|
fromId |
../../@id |
Global identifier of the relation source element. |
|
fromName |
../../@name |
Name of the source element. |
|
fromTypeName |
../../@type |
Name of the source element type. |
|
toId |
/@ref |
Reference representing the target global identifier. |
|
toName |
/target/@name |
Name of the target element. |
|
toTypeName |
/target/@typeName |
Name of the target element type. |
About XPath Expression Parameters
You can add parameters to data set row mapping and to data set column mapping expressions. For example, you can add a report parameter to the predicate of a row-selection expression to filter based on the parameter's value.
To add a parameter to an XPath expression, use the following syntax:
{?parameterName?}
where parameterName is the name of the parameter whose value you want to use.
For example, you can write an XPath expression to retrieve all library books with a category defined as mystery:
library/book/[@category="{?mystery?}"]
Consider that you would now need to define an input parameter that stores the category value that a user enters during a search. The following XPath expression searches for books defined with a category value that is stored in the bookCategory parameter:
library/book/[@category="{?bookCategory?}"]
You can link data set parameters to a report parameter that is defined as a constant, or you can populate a parameter using an expression. Parameters created with expressions can include conditions and functions (such as date manipulation). However, parameters cannot use columns from the data set.
Working with Report Data Filters
The manner in which you filter report data can impact reporting performance. Some filters are applied multiple times during report generation. For example, a data binding filter is applied multiple times if the binding includes a reference to an outer binding, such as when tables are nested.
Rather than creating nested, normalized data sets, consider creating data sets that are non-normalized, where you join nested data sets. Consider this approach when the nested filtered content is a small subset of the bound data set and the outer data set contains multiple rows.
Data retrieved from a data source can be filtered at a number of points during report generation. You can apply filters to:
-
Data set row mappings
-
Data sets
-
Data bindings
-
Groups
-
A chart series
Testing Report Designs
Testing report designs directly in Design Studio shortens the design-test cycles by eliminating the need to package the custom report design.
You can test report designs using the following methods:
Testing Custom Report Designs Using the Report Designer
You use a sample XML document to test report designs using the Report Designer. You can create a sample XML document by generating the XML Model report, which produces the Design Studio XML format used by the Report Designer. To test custom report designs using the Report Designer:
-
From the Design Studio Window menu, select Open Perspective, then select Other, and then select Report Design.
-
Click OK.
The Report Design perspective appears.
-
Click the Resource Explorer tab.
-
Double-click a .rptdesign file.
The report design opens in the Report Designer editor.
-
From the Run menu, select View Report and then select the output format.
The default Internet browser opens and displays the Parameters dialog box.
-
Enter the fully qualified path to a sample XML file.
The sample XML file should include data that is representative of the type of data that you intend to include in finished reports. You can:
-
Enter the path to the reportData.xml file that is included in the Design Studio Report Design Example. See "Adding the Report Design Example to the Workspace" for more information.
-
Run the Design Studio Model in XML report to create a new sample XML file. See "Working with the Design Studio Report Examples" for more information.
-
Testing Custom Report Designs Using the Generate Report Wizard
To test custom report designs using the Generate Report wizard:
-
In Design Studio, from the Studio menu, select Generate Report.
The Generate Report wizard appears.
-
Select the Select a report design from a file option.
-
Click Browse and locate and select the report design that you want to test.
-
Click Next and navigate through the wizard to ensure that the report design works as intended.
For example, select to generate the report content by project or by entity, based on the data that you want to appear in the test report.
-
Review the generated report, the Eclipse Console view, and the error log.
Use this information to debug reports that are not generated as expected.
Working with the Design Studio Report Examples
Design Studio includes the following example report projects and example reports that support the reporting features.
-
The Design Studio Report Design Example includes an update site project, a feature project, and a project that contains sample report designs. See "About the Design Studio Report Design Example" for more information.
-
The Design Studio Report Processor Example is an advanced example that demonstrates how to extend the processing logic of the Design Studio report generation framework. See "About the Design Studio Report Processor Example" for more information.
-
The Design Studio Model in XML report enables you to create a sample XML file that you can use in the BIRT Report Designer when testing your report design. For example, you can run this report and direct the reporting engine to use the static data defined in the generated XML file to test your column mapping and row mapping against the sample XML file.
When generating this report, use an existing project or generate a new project that includes enough content to adequately test your report design. See "About the Design Studio Report Design Example" for information about the sample XML delivered with Design Studio.
-
The Entity and Element Type Reference report enables you to view the IDs assigned to all Design Studio model entity and element types. You can reference the IDs in this report when you need to write XPath expressions that filter for a specific value, such as when filtering and when row mapping during report design.
For example, when writing a query, you may need to select for Product entities only. You can run the Entity and Element Type Reference report to obtain the ID for the Product entity type. See "Working with XPath Expression Patterns" and "Working with Report Data Filters" for more information.
For more information about adding examples to the workspace, see "Adding the Report Design Example to the Workspace". For more information about generating reports, see the Design Studio Help.
About the Design Studio Report Design Example
The Design Studio Report Design Example is included in the Design Studio installation. The Design Studio Report Design Example includes projects that you can use as a reference or as a starting point for creating your own custom report designs.
This example includes the following projects:
-
design.studio.example.report.design.update.site, which contains an example of a standard Eclipse update site project.
-
design.studio.example.report.design.feature, which contains an example of a standard Eclipse feature project.
-
design.studio.example.report.designs, which contains an Eclipse plug-in project with report designs and content useful for designing reports.
This example includes the following:
-
Sample report designs
-
A sample that demonstrates a simple report design. This sample report design includes the Design Studio data source setup and the required data_source_model_file report parameter. The layout includes a basic report header and a sample heading.
-
A sample that demonstrates a complete report design. This sample report design includes a list of Design Studio entities and their relationships. The sample demonstrates how to define a data set to retrieve data from a data source, and demonstrates common design patterns such as nested tables, grouping, hyperlinks, bookmarks, and styling options.
-
-
The .rptdesign files for all of the Design Studio reference reports
-
XML schemas that describe the Design Studio Exchange Format
See "Working with the Design Studio Exchange Format" for more information.
-
A sample XML file
You can use this file to test your report designs.
-
A Design Studio report library
This library stores reporting objects, and enables you to reuse existing report objects, such as tables, data sources, and styles. For example, you can copy into a report design the data source and the data source report parameter that is contained in the library. You can use the Resource Explorer view to review the library and objects that exist in your workspace.
-
Extension point declarations for sample report designs
Troubleshooting Report Designs
Use the following tips and guidelines to help troubleshoot common issues.
-
Some report design aspects may be ignored in certain output formats. Ensure that a report design is optimized for the output format. See "About Report Designs" for more information.
-
Alignment issues are typically caused by the inconsistent use of padding and margins in the report structure. Nested grids contribute to the padding and margins of a container and can cause misalignments. Use adjustment strategies consistently to avoid additive padding and margins.
Adding Reports and Report Categories to the Generate Report Wizard
If you intend for Design Studio users to install your custom reports from an update site, you must add your custom reports to the Design Studio Generate Report wizard. Adding the new custom reports to the Generate Report wizard ensures that your reports are available for selection on the first page of the wizard.
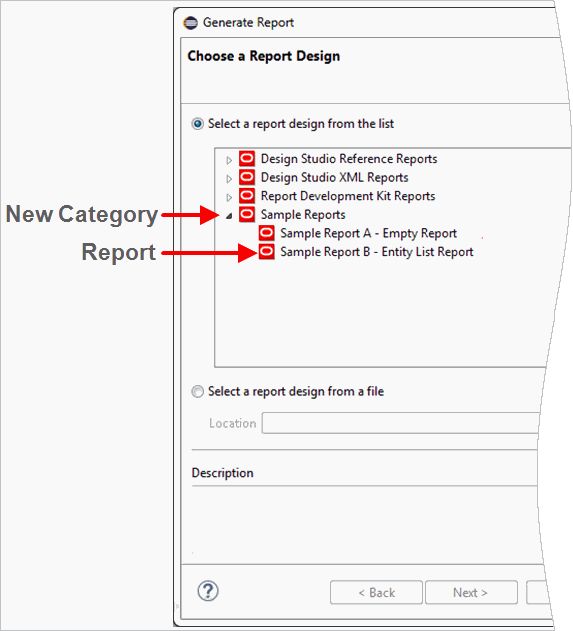
You can create categories in the Generate Report wizard and organize your reports under these categories. Users can expand a category folder on the first page of the wizard to access custom reports. Figure 6-10 shows a new report category called Sample Reports:
Note:
If the report design will always be selected from a file (for example, by selecting the Select a report design from a file option in the Generate Report wizard), you are not required to add your reports to the wizard.The plugin.xml project file that contains the sampleA.rptdesign and sampleB.rptdesign files, located at the root directory of the design.studio.example.report.designs project, includes an example of the configuration required to add your custom reports to the Design Studio Generate Report wizard.
To add your custom reports to the Design Studio Generate Report wizard:
-
From the Design Studio Package Explorer view, expand your plug-in project folder.
-
Double-click the plugin.xml file.
The file opens in the Plug-in Manifest editor.
-
Click the Extensions tab.
-
Click Add.
The Extension Point Selection dialog box appears.
-
On the Extensions Point tab, select oracle.communications.studio.report.type from the list.
If the Report Type extension does not appear in the list, deselect the Show only extension points from the required plug-ins option.
-
Click Finish.
If prompted to add the oracle.communications.studio.report.core plug-in to the list of plug-in dependencies, click Yes.
The Report Type extension point is added to the plug-in project.
-
In the All Extensions area, right-click the extension and select New, and then select category.
A new category appears under the extension.
-
Select the category.
-
In the Extension Element Details area, enter a unique ID for the category.
-
In the Name field, enter the category name.
The name that you define here is the label that appears for the category in the Generate Reports wizard.
-
(Optional) To associate the category with an icon in the Generate Report wizard, click the icon field Browse button and select an icon.
-
(Optional) In the All Extensions area, expand the category folder and then select description.
In the Extension Element Details area, enter a description for the category.
-
In the All Extensions area, right-click the extension and select New, and then select report-type.
A new report type appears under the extension.
-
Select the report type.
-
In the Extension Element Details area, enter a unique ID for the category.
-
In the Name field, enter the category name.
The name that you define here is the label that appears for the report type in the Generate Reports wizard.
-
(Optional) To associate the report type with an icon in the Generate Report wizard, click the icon field Browse button and select an icon.
-
In the reportDesign field, enter the relative path of the report design file or click Browse to select the file from a list.
-
(Optional) In the generatorTypeId field, enter the relative path to your custom report generator.
Leave this field blank if you don't have a custom report generator. Design Studio users the default BIRT report generator if no other report generator is specified.
-
(Optional) In the categoryId field, associate the report type with an existing category.
-
(Optional) In the All Extensions area, expand the report type folder and then select description.
In the Extension Element Details area, enter a description for the category.
-
(Optional) To view additional information about the extension point, click the Show extension point description link.
-
Click the Build tab.
The Build page contains information required to build, package, and export the plug-in project.
-
In the Binary Build area, select the report design files that you want to include in the plug-in packaging, or select the folders that contain the report designs.
For example, if you organized all of your report design files under a reports folder, select this folder in the Binary Build area.
-
Click Save.
For more information about the Plug-in Manifest editor and extensions, see the Eclipse Plug-in Development Environment Guide.
Extending Design Studio Reporting
You can extend the Design Studio reporting engine by creating report processors. You can create processors that:
-
Perform actions before the report is generated, such as:
-
Create images to be used in the report, such as a diagram
-
Generate additional data source content
-
Send or log notifications
-
-
Perform actions after the report is generated, such as:
-
Email a report
-
Post a report to a website
-
Clean-up report files
-
Note:
-
Use Ant tasks for post-generation tasks whenever possible. See the Design Studio System Administrator's Guide for more information.
-
Report processors run during command-line report generation and do not support user input. Ensure that your report processors include no references to Eclipse UI plug-ins.
About the Design Studio Report Processor Example
The Design Studio Report Processor Example is an advanced example project that demonstrates how to extend the processing logic of the Design Studio report generation framework. You can extend the reporting functionality, for example, to dynamically produce graphs, charts, or images. You can use the example project as a reference or as a starting point for your own project.
The Design Studio Report Processor Example includes the basic components needed to produce a custom report processor. The example demonstrates how to define and register a custom report processor. The report processor is paired with a sample report that demonstrates how information provided by the custom report processor appears in a report.
The Design Studio Report Processor Example contains:
-
Java code for implementing the sample report processor
-
AbstractProcessor.java, which includes boilerplate code for implementing the required IReportProcessor interface
-
SampleProcessor.java, which is the class that provides the logic for the sample report processor
-
SampleProcessorLogger.java, which provides functions for logging to the Eclipse error log
-
SampleProcessorPlugin.java, which is an implementation of a BundleActivator interface required for Eclipse plug-ins, and which includes useful utility methods
-
Extension point declarations for the sample report processor
Note:
The BIRT framework is also extensible. You can extend the BIRT controls, BIRT functions library, and supported data source technologies. See the BIRT project web page for information about extending BIRT.Extending Reporting Tasks by Adding Report Processors
You can extend reporting tasks by creating an implementation of the following IReportProcessor interface: oracle.communications.studio.report.core.generator.processor.IReportProcessor.
This processor extends the processing logic of the Design Studio report generation framework. For example, you can generate graphs, incorporate document signing, or add other features not directly supported by the report generation framework.
Note:
This task is intended for advanced users who are familiar with Eclipse plug-in development and Java coding. The Design Studio Report Processor Example project includes a simple implementation. See "About the Design Studio Report Processor Example" for more information.To extend reporting tasks by adding report processors:
-
Create a plug-in project.
For example, you can use a report design plug-in project. See "Creating Plug-in Projects" for more information. The plug-in project plugin.xml file is added to the Package Explorer view.
-
Double-click the plug-in project plugin.xml file.
The file opens in the Plug-in Manifest editor.
-
Click the Extensions tab.
-
Click Add.
The New Extension dialog box appears.
-
Locate and select oracle.communications.studio.report.generator.
If you don't see the oracle.communications.studio.report.generator value, deselect the Show only extension points from the required plug-ins option. If prompted to add dependencies, select Yes.
-
Click Finish.
The extension appears in the Extension area.
-
Select the extension.
-
In the Extension Details area, click Show extension point description.
The Oracle Communications Design Studio Report Generator documentation page appears. Use this documentation to finish creating an implementation of the IReportProcessor interface.