2 Finding Orders
This chapter explains the search features of the Oracle Communications Order and Service Management (OSM) Order Management web client. It includes information about performing searches and about viewing search results.
About Searching for Orders
The Order Management web client includes features that enable you to find orders by using a variety of criteria. When you first open it, the application displays the Order Search page.
You can select predefined search or create a customized search by changing the criteria and adding or removing fields. You can save customized searches so that you can use them again. See "Saving a Search."
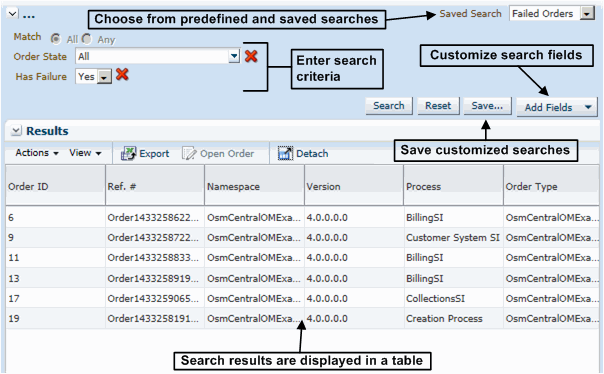
Figure 2-1 illustrates the Search page and some of its features.
Searching for Orders
To search for orders:
-
Click Manage Orders in the Orders area if the search screen is not already displayed.
-
If you want to use a predefined or saved search other than the default, from the Saved Search list, select the search you want to use. The following predefined searches are provided:
-
Minimal Fields: Includes search criteria for a limited set of fields, including order ID, reference number, namespace, and type.
-
Failed Orders: Finds all orders in the Failed state. This is the default search until you specify another as the default. See "Saving a Search" for more information.
-
All Fields: Includes search criteria for all available fields, including the standard fields applicable to all orders with orchestration plans as well as any custom fields defined for a particular orchestration plan.
If the search you selected is configured to run automatically, it runs automatically when you select it, and you are finished searching unless you want to customize the search.
-
-
If you would like to change the fields used as search criteria, do any of the following:
-
To add a field, from the Add Fields list in the Search area, select a field that you want to include.
The field is displayed in the Search area, along with one or more search operators.
-
To remove a field, in the Search area, click the red X to the right of the field you want to remove.
The field and its operator are removed.
-
To reset the fields to the way they are in the saved search, in the Search area, click the Reset button.
The Search area is restored to its last-saved arrangement of fields and operators.
For more information about the available fields, see "Available Search Fields."
-
-
If you would to enter search criteria in any of the fields, enter the data and select the appropriate operators. See "Entering Search Criteria" for more information.
-
Click the Search button.
The Order Management web client displays the orders that match your search in the Results area.
Note that when the expected start date for an order is in bold, this indicates that the order is a future-dated order. A future-dated order is an order that will be processed at a future date. OSM displays regular orders in normal font.
Available Search Fields
There is a predefined list of search fields that you can add to your query. In addition to these predefined fields, you can also search based on any flexible headers that have been defined in the cartridge for the order.
Table 2-1 contains a list of the predefined search fields.
Table 2-1 Predefined Search Fields
| Column | Description |
|---|---|
|
Completed Date |
The date when the order was completed. In the from and to calendar fields, enter a date range on which you want to query (only available in Query). |
|
Execution Mode |
The execution mode of the task. Available values are Do (In Amending), Do, Redo, Undo, Do in Fallout (In Amending), Do in Fallout, Redo in Fallout, and Undo in Fallout. |
|
Expected Duration |
The amount of time the order is expected to take to complete processing. Use the following search string format for a query: PdaysDThoursHminutesMsecondsS When specifying hours, minutes, or seconds, you must use the T as part of the value. For example:
The following are not valid:
In the from and to fields, enter a duration range on which you want to query |
|
Expected Grace Period Completion |
The date when the grace period is expected to be completed. In the from and to calendar fields, enter a date range on which you want to query. |
|
Expected Order Completion Date |
The date when the order is expected to be completed. This is calculated as follows:
In the from and to calendar fields, enter a date range on which you want to query. |
|
Expected Start Date |
The date when the order is expected to start processing. In the from and to calendar fields, enter a date range on which you want to query. |
|
Has Failure |
Whether the order contains one or more tasks in a failed state. This may or may not be the current task. |
|
Namespace |
Namespace of the order. |
|
Order Creation Date |
The date when the order was created. In the from and to calendar fields, enter a date range on which you want to query. |
|
Order ID |
Unique system-generated order identifier. In the from and to fields, enter a range of order IDs on which you want to query. Only integers and wildcards are valid. |
|
Order State |
The state of the order. Available values are Aborted, Waiting for Revision, Waiting, Amending, Cancelled, Cancelling, Completed, Failed, In Progress, Not Started, and Suspended. |
|
Order Type |
The target order type, such as OsmCustomerOMExampleOrder, OsmServiceOMExampleOrder, and so on. |
|
Priority |
The priority of the order. In the from and to fields, enter a range of values from 0 (minimum) to 9 (maximum). |
|
Process |
The order process. |
|
Process Status |
All the built-in and user-defined statuses are listed here. The built-in statuses are Back, Cancel, Delete, False, Finish, N/A, Next, Submit, and True. |
|
Ref. # |
The reference number of the order. |
|
Requested Delivery Date |
The date by which the customer requests delivery of the order. |
|
Source |
Source of the order (typically the same as the order type). |
|
Target Order State |
The target state of the order. Available values are Aborted, Waiting for Revision, Amending, Cancelled, Cancelling, Completed, Failed, In Progress, Not Started, and Suspended. |
|
Type Order |
The action associated with the order, such as Add, Delete, and so on. |
|
Version |
Version of the order. |
Entering Search Criteria
You search for orders by entering a value or range of values for a field and then selecting a search operator. For example, Priority is a numeric field. You can select from the listed operators and then enter a value. (If you select the Between operator, an additional field is added for a second value.)
The operators available for a search field depend on the type of data the field stores. Table 2-2 lists the search operators for the various field types.
Table 2-2 Field Types and Available Search Operators
| Field Type | Available Search Operators |
|---|---|
|
Currency |
Equals (default), Between, Less Than Equals |
|
Date |
On or Before, On or After (default), Between |
|
Numeric |
Equals (default), Between, Less Than Equals |
|
Phone |
Starts With, Ends With, Equals (default), Contains |
|
Text |
Starts With, Ends With, Equals (default), Contains, Like |
|
List |
No operator displayed. Select a value in the list. |
|
Duration |
Greater Than Equals (default), Between, Less Than Equals. Format is: P[daysD][T[hoursH][minutesM][secondsS]] When specifying hours, minutes, or seconds, you must use the 'T' as part of the value. For example:
The following are not valid:
|
Working with Saved Searches
When you have configured search criteria and selected the fields that you want to see in the results (see "Searching for Orders" for more information), you can save the search to be used later.
Saving a Search
You can save a search so that you can reuse it. A saved search includes fields and search operators. Saved searches are available only to the users who created them.
To save a search:
-
In the Search area, click the Save button.
The Create Saved Search dialog box is displayed.
-
Enter a name for the search. This is the name that will appear in the Saved Searches list.
-
(Optional) Select one or more of the options displayed in the dialog box:
-
Set as Default: Configures the search to appear when you open the Order Management web client.
-
Run Automatically: Configures the search to run automatically when you select it. If you select both this option and Set as Default, the search runs automatically each time you open the application.
-
-
Click OK.
The search name is displayed in the Saved Searches list.
Modifying a Saved Search
After a search has been saved, you can modify it. You can change the name, set the search as the default, and configure it to run automatically. You can also delete saved searches. See "Deleting a Saved Search."
Note:
You cannot save changes to the predefined searches.To modify a saved search:
-
From the Saved Search list, select Personalize.
The Personalize Saved Searches dialog box is displayed.
-
In the Saved Searches field, select a saved search.
-
(Optional) Enter a new name for the search.
-
Select one or more of the options displayed in the dialog box.
-
Click Apply to apply your changes and leave the dialog box open. Click OK to apply your changes and close the dialog box. Click Cancel to close the dialog box without making any changes.
Deleting a Saved Search
You can delete saved searches that you no longer need.
To delete a saved search:
-
From the Saved Search list, select Personalize.
The Personalize Saved Searches dialog box is displayed.
-
In the Saved Searches field, select a saved search.
Note:
You cannot delete the search that is currently selected in the Saved Searches list in the Search area. -
Click Delete.
A Warning dialog box is displayed.
-
Click Yes.
The Warning dialog box closes and the search no longer appears in the Saved Searches field.
-
In the Personalize Saved Searches dialog box, click OK.
The Personalize Saved Searches dialog box closes.