4 Developing Custom Web Services
This chapter provides information about integrating Oracle Communications Unified Inventory Management (UIM) with external systems by developing custom web services. It describes the approach to developing web services and the guidelines you should follow.
About the UIM Reference Web Service
The chapter uses the UIM Reference Web Service as an example that you can extend.
Note:
Previous Reference Web Service operations were deprecated in earlier releases. The deprecated operations have now been removed from the reference_webservice.zip file.The UIM Reference Web Service is part of the UIM Software Developer's Kit (SDK). The UIM SDK provides the resources required to build an Inventory cartridge in Design Studio. For more information about the UIM SDK, see UIM Developer's Guide.
This chapter assumes you are using Design Studio to develop custom web services. If you use an integrated development environment (IDE) other than Design Studio, you can ignore the .classpath and .project files in the reference_webservice.zip file.
You can view the contents of reference_webservice.zip file in Oracle Communications Design Studio by importing the archive ZIP file into Design Studio. The ZIP file contains several types of files including the following:
-
WSDL File
The ReferenceUim.wsdl file defines the CreateLogicalDevice web service operation that creates a logical device. CreateLogicalDevice also defines an input, an output, and the possible faults that can be thrown.
See "About the WSDL File" for more information about the ReferenceUim.wsdl file.
-
Schema Files
The schema files define XML structures for the inputs, outputs, faults and operation definitions of the Reference Web Service.
See "About the Schema Files" for more information about the schema files.
-
Java Source Files
The Java source files provide the web service operation code. For example, these source files provide the following:
-
Input request and output response XML mapping
-
An API manager call to UIM core for the operation
-
Transaction management for the operation with the commit or rollback result
See "Developing the Web Service" for more information about the Java source files, including a listing and description of each type of class file, and information about which files need to be created or modified.
-
-
Ant Build File
The build.xml file defines Ant targets that you can run to build a custom web service. Ant targets are a set of executable tasks defined in the build.xml file. See "About the Ant Build File" for more information.
About the WSDL and Schema Files
The Reference Web Service operation is defined by the ReferenceUim.wsdl file, and is supported by several schema files. The WSDL file and supporting schema files are located in the UIM_SDK_Home/webservices/reference_webservice.zip file, where UIM_SDK_Home is the local directory for the UIM SDK.
About the WSDL File
The WSDL file is located in the wsdl directory of the reference_webservice.zip file. The WSDL file defines the web service operation CreateLogicalDevice. This operation defines a request, a response, and the possible faults that can be thrown on error. For example, the WSDL file defines the following for the CreateLogicalDevice operation:
-
createLogicalDeviceRequest
-
createLogicalDeviceResponse
The request, response, and faults each define an XML structure that is defined in the supporting schema files. Example 4-1 shows the port definition, the operation, and the input request message.
<wsdl:portType name="ReferenceUimPort">
        <wsdl:operation name="CreateLogicalDevice">
       <wsdl:input message="invws:CreateLogicalDeviceRequest" />
       <wsdl:output message="invws:CreateLogicalDeviceResponse" />
       <wsdl:fault name="InventoryFault" message="invws:InventoryFault" />
       <wsdl:fault name="ValidationFault" message="invws:ValidationFault" />
    </wsdl:operation>
</wsdl:portType>
.
.
.
<wsdl:message name="CreateLogicalDeviceRequest">
    <wsdl:part name="createLogicalDeviceRequest"
               element="invldmsgs:createLogicalDeviceRequest"/>
</wsdl:message>
This WSDL excerpt shows the message CreateLogicalDeviceRequest is defined by the element createLogicalDeviceRequest. createLogicalDeviceRequest references the invldmsgs namespace which indicates where the XML structure is defined. See "About Namespaces" for more information.
About the Schema Files
There are several schema files that support the Reference Web Service operation. These schemas are categorized as reference schemas and web service schemas.
The reference schemas define common elements used by all of the UIM web services, not just by the Reference Web Service. These elements are defined in the framework and then referenced in the various WSDL files.
The reference schemas are:
-
InventoryCommon.xsd
-
InventoryFaults.xsd
-
FaultRoot.xsd
The reference schemas are contained in the uim-webservices-framework.jar. You can copy them into your workspace using the get-framework-files Ant target defined in the build.xml file. The build.xml file is contained in the reference_webservice.zip file. See "About the Ant Build File" for more information.
Note:
The reference schemas use the Inventory.xsdconfig file to map XML namespaces to Java packages.Within the reference_webservice.zip file, the example schema file is located in the wsdl/schemas directory. The web service schema defines elements specific to the web service, such as the request structures, the response structures, and any fault structures.
The example web service schema file name is LogicalDeviceMessages.xsd.
Note:
The web service schemas use the type-mapping.xsdconfig file to map XML namespaces to Java packages.About Namespaces
The WSDL file defines a namespace to avoid naming conflicts. You use the namespace to determine the schema file location of the schema reference. Example 4-2 shows how a namespace defined in the WSDL file correlates to the supporting schema files.
In this example, the ReferenceUim.wsdl defines and references the invldmsgs namespace.
.
.
.
xmlns:invldmsgs="http://xmlns.oracle.com/communications/inventory/webservice/logicaldevice"
.
.
.
<xsd:import namespace=
    "http://xmlns.oracle.com/communications/inventory/webservice/logicaldevice"
     schemaLocation="./schemas/LogicalDeviceMessages.xsd"/>
     .
     .
     .
    <wsdl:message name="CreateLogicalDeviceRequest">
                        <wsdl:part name="createLogicalDeviceRequest"
            element="invldmsgs:createLogicalDeviceRequest"/>
        </wsdl:message>
    .
    .
    .
The CreateLogicalDeviceRequest message declaration tells you that createLogicalDeviceRequest is defined in the schema file that supports the invldmsgs namespace. A search for the namespace and for the following string:
xmlns.oracle.com/communications/inventory/webservice/logicaldevice
reveals that the LogicalDeviceMessages.xsd schema file defines the structures for the invldmsgs namespace.
After you determine that the LogicalDeviceMessages.xsd schema file defines the XML structure, you can navigate through the schema files to determine child XML structures if applicable.
Refer to the following website for more information on namespaces:
https://www.w3.org/TR/REC-xml-names/
About the Ant Build File
The build.xml file defines Ant targets that you can run to build a custom web service. These Ant targets are a set of executable tasks that aid building a web service.
Table 4-1 describes the Ant targets defined in the build.xml file. See "Developing and Running Custom Web Services" for information about when to run these Ant targets. For information more information about running Ant targets within Design Studio, see UIM Developer's Guide.
Table 4-1 build.xml Ant Targets
| Ant Target | Description |
|---|---|
|
clean |
Deletes the generated, temporary, and deliverable files and directories. |
|
all |
Initiates the complete build process for the web service supporting both HTTP and JMS. Identical to the build.full Ant target, it calls the following Ant targets in this order: clean,generate-from-wsdl, build-service. |
|
copyResources |
Copies the properties files that store localized error messages to the appropriate UIM deployment directory. These properties files are located in a ZIP file in the config/resources/logging directory, and are copied to the UIM_Home/config/resources/logging directory. |
|
wspolicy |
Updates the WAR file with the web service policy files, which describe the authentication and encryption mechanism for web service calls. |
|
build.full |
Initiates the complete build process for the web service supporting both HTTP and JMS. Calls the following Ant targets in this order: clean,generate-from-wsdl, build-service. |
|
build.full.http |
Initiates the complete build process for the web service WAR file supporting HTTP. Calls the following Ant targets in this order: clean,generate-from-wsdl, build-service-http. |
|
build.full.jms |
Initiates the complete build process for the web service WAR file supporting JMS. Calls the following Ant targets in this order: clean,generate-from-wsdl, build-service-jms. |
|
build-service |
Builds the web service WAR file for both HTTP and JMS, and stores it in the webarchive directory. The name of the WAR file is wsdl_name.war, where wsdl_name is the name specified by the WSDL_NAME parameter in the COMPUTERNAME.properties file. |
|
build-service-http |
Builds the web service WAR file for HTTP and stores it in the webarchive directory. The name of the WAR file is wsdl_nameHTTP.war, where wsdl_name is the name specified by the WSDL_NAME parameter in the COMPUTERNAME.properties file. |
|
build-service-jms |
Builds the web service WAR file for JMS and stores it in the webarchive directory. The name of the WAR file is wsdl_nameJMS.war, where wsdl_name is the name specified by the WSDL_NAME parameter in the COMPUTERNAME.properties file. |
|
build.deliverable |
Builds the web service cartridge JAR file and stores it in the deliverables directory. Calls the build.full Ant target first to get a complete build for the WAR file. |
|
generate-from-wsdl |
Performs WSDL-to-Java conversions and generates object representations of the schemas. This includes business schema files such as LogicalDevice.xsd. Calls the get-framework-files Ant target. |
|
get-framework-files |
Extracts the framework schema files InventoryCommon.xsd and InventoryFaults.xsd from the uim-webservices-framework.jar file stored in the directory specified by APP_LIB parameter defined in the COMPUTERNAME.properties file. The framework schema XSD files are also located in the schema_Inventory_webservice.zip file in the UIM SDK. |
|
extract.ear |
Extracts the application.xml file from the EAR file specified by the EAR_PATH parameter defined in the COMPUTERNAME.properties file into the reference_webservice_home/META-INF directory, where reference_webservice_home is the location of the extracted reference_webservice.zip file. The application.xml file needs to be edited manually so that the EAR file can be updated for proper deployment of the web services. |
|
update.ear |
Updates the EAR file specified by the EAR_PATH parameter in the COMPUTERNAME.properties file by adding the generated web service WAR file and the edited application.xml file in the webarchive directory into the EAR file. The updated EAR file can be deployed to test the web services. |
Note:
The UIM Reference Web Service is an example web service to follow for developing custom web services. The Reference Web Service cannot be used for production deployments.Guidelines for Developing Custom Web Services
This section describes the guidelines for developing a web service. It also contains class diagrams that represent the UIM Reference Web Service development classes.
Using the WSDL-First Approach to Developing Custom Web Services
The WSDL-first approach (also known as the top-down approach), is the recommended way to achieve interoperability, platform independence, and WSDL consistency across web services. Figure 4-1 shows the design and development sequence of the WSDL-first approach.
Figure 4-1 WSDL-First Design and Development Sequence

Description of ''Figure 4-1 WSDL-First Design and Development Sequence''
-
Define WSDL and schemas
Write the WSDL and the corresponding schemas (XSD files) to define the operations and data.
-
WSDL-to-Java generation
Use the build.xml Ant targets provided by the Reference Web Service to generate Java source files based on the WSDL and schema definitions.
-
Develop Java web service interface implementation
Use the web service development environment and tools provided by the Reference Web Service to implement the web service interface by creating new Java source files and changing existing ones.
For example, the UIM Reference Web Service module was designed using the WSDL-first approach. This means that:
-
The ReferenceUimPortImpl Java source file is generated based on the WSDL. This generation results in the WSDL operation being defined in the ReferenceUimPortImpl Java source file, but with no coding details.
-
Within the ReferenceUimPortImpl Java source, an operation is manually modified to call its respective operation in the AdapterRouter class.
-
The AdapterRouter class calls the respective operation in each individual Adapter class.
-
The build generates the ReferenceUimPort interface based on the WSDL.
Class Diagrams
In the following class diagrams, Action represents a UIM business action such as Create, and Entity represents a UIM entity such as LogicalDevice. In the Reference Web Service, an example of ActionEntity is the CreateLogicalDevice operation. You should use the CreateLogicalDevice example as a template when creating custom web services. Consider the following recommendations:
-
Follow the naming convention of ActionEntity for consistency on new operations.
-
Follow the template code example for the user environment and transaction management functionality. See "Transaction Guidelines" for more information on transaction management.
-
Make calls to UIM core functionality by invoking the API manager methods.
Some additional types of classes may be needed depending on the complexity of the web service operation that is developed. See "Creating Java Source Files" for more information about these additional types of classes.
Figure 4-2 through Figure 4-7 show the class designs provided by the Reference Web Service. These designs include request types, response types, fault types, adapters, and implementations.
You should follow the patterns illustrated in Figures 4-2 through 4-7 when you design interfaces and classes.
Note:
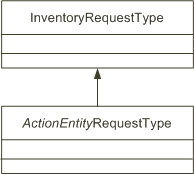
Several of the XSD files in this section are not in the Reference Web Service even though they are referenced in the ReferenceUim.wsdl file. You pull these files into the wsdl directory by initiating the get-framework-files Ant target in the build.xml file. See "About the Ant Build File" for more information.Figure 4-2 shows the recommended class design for custom request types. ReferenceUim.wsdl specifies the element createLogicalDeviceRequest as type CreateLogicalDeviceRequestType, which is defined in LogicalDeviceMessages.xsd. CreateLogicalDeviceRequestType extends InventoryRequestType, which is defined in InventoryCommon.xsd.
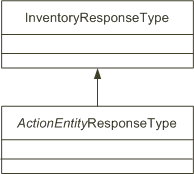
Figure 4-3 shows the recommended class design for custom response types. ReferenceUim.wsdl specifies the element createLogicalDeviceResponse as type CreateLogicalDeviceResponseType, which is defined in LogicalDeviceMessages.xsd. CreateLogicalDeviceResponseType extends InventoryResponseType, which is defined in InventoryCommon.xsd.
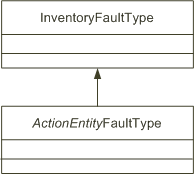
Figure 4-4 shows the recommended class design for custom fault types. ReferenceUim.wsdl uses the base fault types of InventoryFaultType and ValidationFaultType. These types are defined in InventoryFault.xsd. InventoryFaultType defines a sequence of faults, which are defined by ApplicationFaultType in FaultRoot.xsd.
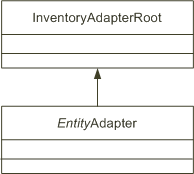
Figure 4-5 shows the recommended class design for custom adapters. The example adapter file is LogicalDeviceAdapter.java, which extends InventoryAdapterRoot.java. The UIM-owned InventoryAdapterRoot.java class extends the Platform-owned AdaptorRoot.java class.
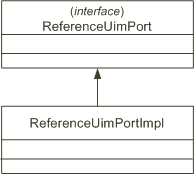
Figure 4-6 shows the recommended class design for the implementation class. The ReferenceUim.wsdl file is used to generate the ReferenceUimPort.java source file. The ReferenceUimPortImpl.java example file provides a skeleton class that implements the interface in the ReferenceUimPort.java source file.
Note:
The sequence of the method signatures in the implementation class is important and must match the generated source. The generated source is based on the WSDL file definitions.Figure 4-7 shows the class diagram with the ReferenceUimPortImpl, AdapterRouter and LogicalDeviceAdapter classes and their relationships. This design is recommended for building your own custom web services for other actions and entities similar to this example.
WSDL Interface Guidelines
ReferenceUim.wsdl defines a single port type (a web service interface) that defines all of the exposed custom operations. When developing new web service operations, you create them within this single port.
The current recommended practice in creating UIM web service operations is to use a single port. Multiple ports are not defined. The only time you use multiple ports is when you have a port for HTTP and another for JMS. Multiple ports should not be used for categorically grouping operations.
Operation Signatures
Oracle recommends you follow naming patterns for the following:
-
Operation names
-
Request type names
-
Response type names
-
Fault type names
The naming patterns discussed in this section give consistency for the operations signatures.
Signature Components
A web service operation signature contains the following:
-
Operation name
The pattern for defining an operation name is [action][EntityName] where action represents a verb action (such as create, update, delete) and the EntityName represents the entity acted upon (such as Equipment, LogicalDevice, TelephoneNumber). For example:
-
createEquipment
-
updateLogicalDevice
-
deleteTelephoneNumber
-
-
Request type
The pattern for defining a request type is operationNameRequestType. A single request type is defined per operation. For example:
-
CreateEquipmentRequestType
-
UpdateLogicalDeviceRequestType
-
DeleteTelephoneNumberRequestType
-
-
Response type
The pattern for defining a response type is operationNameResponseType. A single response type is defined per operation. For example:
-
CreateEquipmentResponseType
-
UpdateLogicalDeviceResponseType
-
DeleteTelephoneNumberResponseType
-
-
Fault types
The pattern for defining a fault type is businessFaultFaultType, where businessFault represents a specific business fault that might be thrown back to the user. Multiple business faults can be defined per operation. For example:
-
EquipmentNotUniqueFaultType
-
EquipmentNotFoundFaultType
-
NotAuthorizedFaultType
Fault types contain the error codes and stack trace set by the business logic. One-to-one mapping between thrown business logic exceptions and the defined business faults is required to capture the different exceptions.
-
Signature Pattern and Examples
The signature pattern of an operation in the Reference Web Service is defined as follows:
public OperationNameResponseType operationName(
        OperationNameRequestType operationNameRequest) throws
            businessFault1FaultType,
            businessFault2FaultType,
            businessFaultNFaultType
For example, the createLogicalDevice method is defined in the LogicalDeviceAdapter.java file as the following:
public CreateLogicalDeviceResponseType createLogicalDevice(
                        CreateLogicalDeviceRequestType createLogicalDeviceRequest)                      throws
            InventoryFaultType,
            ValidationFaultType
Table 4-2 shows the operation signature pattern on commonly used actions. In the table, Entity represents the name of the entity (such as Equipment, LogicalDevice, TelephoneNumber) acted upon by the operation.
Table 4-2 Operation Signature Examples
| Action | Operation Signature |
|---|---|
|
Create |
CreateEntityResponseType createEntity (CreateEntityRequestType request) throws businessFault1FaultType, businessFault2FaultType |
|
Find |
FindEntityResponseType findeEntity (FindEntityRequestType request) throws businessFault1FaultType, businessFault2FaultType |
|
Update |
UpdateEntityResponseType updateEntity (UpdateEntityRequestType request) throws businessFault1FaultType, businessFault2FaultType |
|
Delete |
DeleteEntityResponseType deleteEntity (DeleteEntityRequestType request) throws businessFault1FaultType, businessFault2FaultType |
|
Calculate |
CalculateEntityResponseType calculateEntity (CalculateEntityRequestType request) throws businessFault1FaultType, businessFault2FaultType |
Schema Guidelines
A custom web service schema is represented by multiple XSD files. The UIM API-level entity definitions closely follow the TM Forum (TMF) SID standard. Using XSD files that parallel the UIM APIs ensures SID standard compliance. For example, you build the XSD files parallel to business entities such as Service, Equipment, LogicalDevice, and so forth.
Keeping the XSD files separate from the WSDL makes the WSDL independent of web services and reusable across other software technologies. XSD files differ from WSDL files because they contain data structure definitions. The WSDL references these data structure definitions, but does not define them. Also, naming standards for the WSDL do not include Type in the name; naming standards for the schema do include Type in the name.
For example, the ReferenceUim.wsdl file defines createLogicalDeviceRequest as type CreateLogicalDeviceRequestType, which is defined in the LogicalDeviceMessages.xsd file. Similarly, the ReferenceUim.wsdl file defines createLogicalDeviceResponse as type CreateLogicalDeviceResponseType in the LogicalDeviceMessages.xsd file.
Transaction Guidelines
The Reference Web Service performs transaction actions in a specific order when managing operation transactions.
Note:
You must follow the steps in this order or transaction errors may occur, which can be hard to debug.To correctly manage the transaction, you write code that performs the following steps:
-
Start the user environment.
-
Start the transaction.
-
Set the user environment on the transaction.
-
Set up the request, call the API method on the entity manager class, and manage the response.
-
Commit or rollback the transaction.
-
Ensure a rollback is completed if an error occurred.
-
Ensure the user environment is ended with a call to the endUserEnvironment method on success or failure.
Example 4-3 provides a code section of how to manage the user environment, transaction and API manager call. The code section contains the recommended steps described previously with the relevant code lines in bold.
This code section is taken from the LogicalDeviceAdapter class with some logging logic removed. The Reference Web Service contains the full class code in the LogicalDeviceAdapter.java file. You can use this code as a template for similar entity adapter classes when building custom web services.
Example 4-3 LogicalDeviceAdapter.java Code Section with a Transaction
UserEnvironment userEnvironment = null;
InventoryTransactionValue transValue = null;
    try {
        userEnvironment = startUserEnvironment();
        transValue = startTransaction();
        transValue.setUserEnvironment(userEnvironment);
        LogicalDeviceManager logicalDeviceManager =
                    PersistenceHelper.makeLogicalDeviceManager();
        List<LogicalDevice> results = new ArrayList<LogicalDevice>(
            createLogicalDeviceRequest.getLogicalDevices().length);
        LogicalDeviceType[] ldTypes = createLogicalDeviceRequest
            .getLogicalDevices();
        List<oracle.communications.inventory.xmlbeans.LogicalDeviceType>
            ldTypesList = XMLBeansMappingUtils.fromEntityType(ldTypes);
        mapToLogicalDevice(logicalDeviceManager, ldTypesList, results);
        // call the API method
        results = logicalDeviceManager.createLogicalDevice(results);
        response.setLogicalDevices(mapToWebServiceResponseLDType(results));
        commitOrRollback(transValue);
    } catch (Throwable t) {
                        try {
            rollback(transValue);
                                } catch (Exception ignore) {
                                        log.error("", false, ignore, "Rollback failed");
                                }
                                log.error("", t, "LogicalDeviceAdapter.createLogicalDeviceFault");
                                InventoryFaultType ift = FaultFactory.getFaultType(t);
                                throw ift;
                } finally {
                                if (userEnvironment != null && userEnvironment.hasErrors()) {
                                        response.setMessages(new String[] { FAILED });
                                 } else {
                                             response.setMessages(new String[] { SUCCESS });
                                 }
                                 FeedbackUtils.copyFeedbacktoResponse(response);
                                 endUserEnvironment(userEnvironment, response);
                    }
Developing and Running Custom Web Services
You develop custom web services by working in Design Studio projects. In Design Studio you can generate the WAR files from the contents of the projects. You then import the WAR file into a deployable EAR file for deployment and testing. This section provides instructions to guide you through the WAR file creation and the deployment process.
Note:
This chapter assumes you are using Design Studio to develop custom web services. You can alternatively build custom web services by using provided scripted builds with UIM installed on Linux. For information about using scripted builds, see UIM Developer's Guide.This section assumes that you are working in Design Studio and therefore working in a Windows environment. Based on this assumption, the locations of all required UIM and Oracle WebLogic Server files are described using Windows paths.
Important:
Oracle recommends that you perform the instructions to import, configure, and run the CreateLogicalDevice web service operation before introducing any custom code for a new web service. A successful test of CreateLogicalDevice ensures that your project is configured properly before the start of your custom web service development.You perform the tasks described in the following development work sections to create a custom web service. The result of this work is the deployment of an EAR file that contains a new WAR file that defines the custom web service.
Pre-development work:
Development work:
Post-development work:
Configuring Your Work Environment
Before you begin developing a custom web service, configure your work environment.
WebLogic Server
You must install Oracle WebLogic Server locally. This installation provides the correct version of the JDK. Depending on the references in your code, you should determine the specific WebLogic files that are required from the installation to build the web services project.
You can also run WebLogic Server locally; however, UIM is not supported on Windows. Therefore, UIM can run on Windows for development purposes only. You can optionally run WebLogic Server remotely.
UIM
To build your project, you must have access to some of the UIM installation files. You can copy these files from a UIM installation on a UNIX machine to your machine, or you can install UIM locally. The following UIM files are needed:
-
UIM_SDK_Home/webservices/reference_webservice.zip
-
UIM_Home/app/custom.ear or inventory.ear
-
WebLogic Server patch files, if applicable, which are located in UIM_Home/lib/*.jar
Design Studio
Install and configure Design Studio to work with the Reference Web Service, and to develop new custom web services. See UIM Developer's Guide for information about using Design Studio to extend UIM, including information about installing and configuring Design Studio.
Important:
Configure Design Studio to use the correct version of JDK as specified by the WebLogic Server installation. See UIM System Administrator's Guide for version information. If not configured to use the correct version of JDK, problems can be encountered that are difficult to trace, debug, and resolve.You must also set the ANT_HOME system variable. See UIM Developer's Guide for more information.
Importing the Reference Web Service Project
Import the reference_webservice.zip file into Design Studio. For instructions on how to import projects into Design Studio using archive files, see the Design Studio Help.
To see the ZIP file directories and files in Design Studio after the import, open the Java perspective with a Navigator view. Table 4-3 shows the directories and top-level files for the reference_webservice.zip file.
Table 4-3 Contents of reference_webservice.zip
| Directory/File | Description |
|---|---|
|
codegen |
The codegen directory contains files that are generated from the WSDL and schema files. This directory is initially empty after the import of the reference_webservice.zip file. |
|
config |
The config directory contains a properties file that defines localized error messages used by the web services module. |
|
etc |
The etc directory contains the COMPUTERNAME.properties file. See "Configuring the COMPUTERNAME.properties File" for more information. |
|
src |
The src directory contains the Java source files that define the Reference Web Service. |
|
test |
The test directory contains input test XML files for testing the Reference Web Service. |
|
webarchive |
The webarchive directory contains the generated ReferenceUim.war file. |
|
WEB-INF |
The WEB-INF directory contains the web.xml file. The web.xml file is a web application deployment descriptor for the web service. |
|
wsdl |
The wsdl directory contains the ReferenceUim.wsdl file that defines the Reference Web Service example operation. This directory also contains schema files that support the WSDL definition inputs, outputs, and faults in the schemas directory. Reference schemas InventoryCommon.xsd, InventoryFault.xsd, and InventoryFaultRoot.xsd reside in the uim_webservices_framework.jar file and schema_Inventory_webservice.zip file and are automatically copied to the wsdl/referenceSchemas directory when you run the provided get-framework-files Ant target later in the process. The schema_Inventory_webservice.zip file is located in the UIM SDK. |
|
.classpath |
The .classpath file is an Eclipse-specific file provided with the imported project. This file contains the directories for the class path entries for building. |
|
.project |
The .project file is an Eclipse-specific file provided with the imported project. This file defines the project library list, which lists JAR files that are required to build the project. |
|
build.xml |
The build.xml file defines several Ant targets that you can run to build a custom web service, as described in Table 4-1, "build.xml Ant Targets". |
|
reference_webservice.inventoryCartridge |
The reference_webservice.inventoryCartridge file is an internal Design Studio file. It maintains project information, such as the project type, the UIM software version, and Design Studio project dependency information. |
|
.buildNumber |
The .buildNumber file is in the project directory. It is an internal Design Studio file. |
|
.studio |
The .studio file is in the project directory. It is an internal Design Studio file. |
Note:
After importing the archive ZIP file into your workspace, unresolved errors appear in Design Studio until you configure the project. See "Configuring the Imported Project" for more information.Configuring the Imported Project
You configure the project to build and deploy a web service. Configuring the imported project involves the following actions:
Configuring the COMPUTERNAME.properties File
You set the variables in the COMPUTERNAME.properties file as the first step in configuring your project. This file contains the values that vary between projects, such as path names and the WSDL name. To configure the reference_webservice/etc/COMPUTERNAME.properties file:
-
Copy and rename the COMPUTERNAME.properties file to reflect the name of the computer on which you have Design Studio installed. You can determine your computer name by running the following DOS command:
echo %COMPUTERNAME%
An example of the resulting file name is xlc123tx.properties.
-
Update the parameter values defined in the file to reflect the information appropriate to the computer on which you are developing custom web services.
Table 4-4 file defines the following parameters for the properties file:
Table 4-4 COMPUTERNAME.properties File Parameters
Parameter Description WSDL_NAME=ReferenceUim
The name of the WSDL file without the file extension. It is also used for deriving the context path and service URI for the generated web services WAR file. For example, in this case the web service context path and URI for the HTTP protocol is:
/ReferenceUim/ReferenceUimHTTP
and for JMS protocol is:
/ReferenceUim/ReferenceUimJMS
QUEUE_NAME=inventoryCustomWSQueue
The name of the JMS Web Service Queue. It matches the name of the queue used in the WSDL for the SOAP <address> element for the service port.
If you package your custom web service in an EAR file other than the provided custom.ear file, you must create your own message queue and configure your custom web service to use that queue by changing the QUEUE_NAME.
See "Packaging the WAR File in the EAR File" for more information.
MODULE_NAME=reference_webservice
The name of the web service module. The name is used for creating the distributable web service cartridge. It is also the name of the directory where the generated web service WAR file is stored.
FMW_HOME=C:/Oracle/Middleware/Oracle_Home
The Fusion Middleware WebLogic Server installation directory name.
WL_HOME=${FMW_HOME}/wlserver_Release
The WebLogic Server installation path that incorporates the FMW_HOME parameter, where Release is the directory version name portion of the WebLogic Server library files if needed given the installation.
DOMAIN_HOME=C:/Oracle/Middleware/Oracle_Home/projects/domains
The directory path of the WebLogic Server domains.
DOMAIN_NAME=uim_Release
The domain name where uim_Release is the domain name with the UIM release number.
UIM_HOME=${DOMAIN_HOME}/${DOMAIN_NAME}/UIM
The UIM home path. The DOMAIN_HOME, DOMAIN_NAME and UIM_HOME parameters collectively specify the UIM installation path.
APP_LIB=${UIM_HOME}/lib
The working directory to which dependent JAR files are extracted from the inventory.ear file. This working directory is automatically created for you based on the name provided here.
EAR_PATH=${UIM_HOME}/app/custom.ear
The directory where the custom.ear file is located.
If you package your custom web service in a custom EAR file other than the provided custom.ear file, you must configure your custom web service to use your custom EAR file by changing the EAR_PATH value.
See "Packaging the WAR File in the EAR File" for more information.
POMS_ROOT=C:/uim/OracleCommunications/POMSClient/lib
The location of the POMS JAR file.
PLATFORM=C:/uim/OracleCommunications/commsplatform/ws
The location of the Platform web service JAR file.
PATCH_CLASSPATH=pathFileDirectoryAndFile
The path to any WebLogic patch files, if applicable. You must replicate this parameter for each WebLogic patch file to specify the path and specific patch file name.
Configuring the web.xml File
The web.xml file must be modified to contain the listener class reference. To configure the reference_webservice/WEB-INF/web.xml file, add the following:
<listener>
    <listener-class>
        oracle.communications.inventory.api.framework.listener.
        InventoryWebApplicationListener
    </listener-class>
</listener>
Configuring the Project Library List
The project library list of JAR files does not indicate the location of the files, so you must configure the project library list to point to the location of the JAR files.
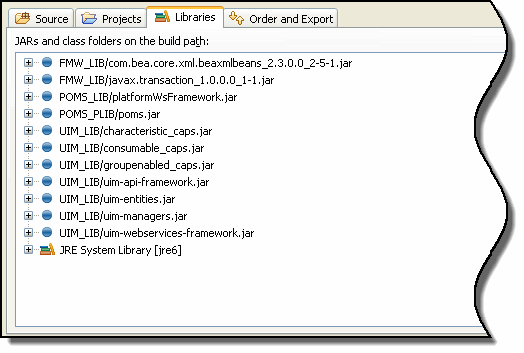
Figure 4-8 shows the imported project library list, which includes the JAR files needed to compile the project.
Figure 4-8 Project Library List Before Configuring
Description of ''Figure 4-8 Project Library List Before Configuring''
The required JAR files can be categorized into three groups:
-
WebLogic files (FMW_LIB)
-
Platform files (POMS_LIB and POMS_PLIB)
-
UIM files (UIM_LIB)
You perform the following to configure the Design Studio project:
-
Add new variables named FMW_LIB, POMS_LIB, POMS_PLIB, and UIM_LIB to your project.
-
Define these variables to point to the directories listed in Table 4-5.
Table 4-5 Location of JAR Files
| Variable Name | Directory Name |
|---|---|
|
FMW_LIB |
FMW_Home |
|
POMS_LIB |
Oracle_Home/commsplatform/ws |
|
POMS_PLIB |
Oracle_Home/POMSClient/lib |
|
UIM_LIB |
UIM_Home/lib |
For detailed instructions on how to configure the project library list, see the Design Studio Help.
Result of Configuring Project Library List
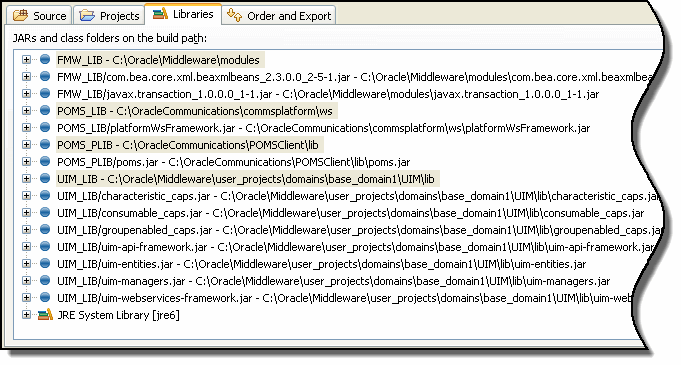
Figure 4-9 shows the project library list after the variables are added. Notice that the library list now includes the location of the JAR files, not just the JAR file names.
Figure 4-9 Project Library List After Configuring
Description of ''Figure 4-9 Project Library List After Configuring''
Adding the variables is one way to configure the library list; you can alternatively perform the following:
-
Write down the names of the required files.
-
Click Add External JARS.
-
Navigate to the directory location of JAR files.
-
Add it directly to the library list.
Either way, the result is the same. The library list has the location to the files needed to compile the project.
Locating the API Method Signature in the Javadoc
When creating a new web service, you wrap a call to an API manager method. For an overview of the primary API manager classes, see UIM API Overview.
To locate a particular API method:
-
Access the Javadoc.
For instructions on how to access the Javadoc, see UIM Developer's Guide.
-
Perform a wildcard search for *Manager class.
All manager class names end in Manager, such as TelephoneNumberManager.class, EquipmentManager.class, and so forth.
-
Open the appropriate manager class.
All exposed methods are defined in manager classes; so, look for a manager class with a name similar to the functional area that may contain the method you plan to wrap.
-
Locate the method you plan to wrap.
Information to Capture
You must capture a specific set of information to create a new web service. This information is available in the Javadoc after locating the method you plan to wrap. Capture the following information:
-
Class name that defines the method to wrap
-
Package in which the class resides
-
Method signature information:
-
Method name
-
Input parameters
-
Return values
-
Exceptions thrown
-
For example, the CreateLogicalDevice web service operation wraps the createLogicalDevice() API method. The following information was used to define this web service in the LogicalDeviceAdapter.java file:
-
LogicalDeviceManager is the UIM manager class that defines the createLogicalDevice() method.
-
LogicalDeviceManager resides in the package oracle.communications.inventory.api.logicaldevice.
-
The method signature information includes:
-
Method name: createLogicalDevice
-
Input parameters: Collection of LogicalDevice objects
-
Return values: List of LogicalDevice objects
-
Exceptions thrown: ValidationException
-
Developing the Web Service
Developing a new web service involves creating a new WSDL file, new schema files, and new Java source files. This section provides information about creating these files.
Creating the WSDL File
The imported project contains the ReferenceUim.wsdl file, which defines the example web service operation. Model your custom WSDL file after the ReferenceUim.wsdl file. For more information, see the W3C Web Services Description Language website at:
Note:
The ReferenceUim.wsdl file is written to be independent of the application server. However, the generate-from-wsdl Ant target in the build.xml file is specific to generating the required source files for deployment into a WebLogic Server environment. This target is also needed to pull in other XSD files referenced in the example ReferenceUim.wsdl file.The ReferenceUim.wsdl file uses WSDL_NAME variable in the COMPUTERNAME.properties file for naming its various SOAP elements. This naming convention allows the build.xml Ant targets to parse these elements consistently, and to generate the correct source files for the web service interfaces and implementation. Consider the following list of naming conventions for the WSDL file:
-
ReferenceUim
This is the name of the WSDL file without the file extension as set by the WSDL_NAME variable in the COMPUTERNAME.properties file. This name is also used to automatically set other important variables in the build.xml file, such as SERVICE_NAME and PORT_NAME. This name is assumed to be the name of the root definitions element in the WSDL file. This name identifies the name of the following files, which are generated later in the process: ReferenceUimPort.java, ReferenceUimPortImpl.java, ReferenceUim.war, ReferenceUimHTTP.war, and ReferenceUimJMS.war.
-
ReferenceUimPort
This is the name of the PortType that is generated for the implementation later in the process. It is used by the generated source ReferenceUimPort.java and ReferenceUimPortImpl.java.
-
ReferenceUimHTTPSoapBinding
This is the name of the SOAP binding for web service operations that are exposed through the HTTP transport protocol. The list of operations identified in this binding element can be a subset of the operations identified in the <PortType> element. The list of operations can be the same as or different from the JMS protocol operations.
-
ReferenceUimJMSSoapBinding
This is the name of the SOAP binding for web service operations that are exposed through the JMS transport protocol. The list of operations identified in this binding element can be a subset of the operations identified in the <PortType> element. The list of operations can be the same as or different from the HTTP protocol operations.
-
ReferenceUimHTTPPort
This is the name of the HTTP transport port used in the UIMReference service definition.
It references the ReferenceUimHTTPSoapBinding binding element identified earlier. Also, the SOAP address location uses the following for the context path (HTTP):
http://localhost:7001/ReferenceUim/ReferenceUimHTTP
-
ReferenceUimJMSPort
This is the name of the JMS transport port used in the UIMReference service definition.
It references the ReferenceUimJMSSoapBinding binding element identified earlier. Also, the SOAP address location uses the following for the context path (JMS):
jms://localhost:7001/ReferenceUim/ReferenceUimJMS?URI=inventoryCustomWSQueue
For example, if you create a new file named MyInventoryWs.wsdl, the naming conventions result in:
-
MyInventoryWsPort
-
MyInventoryWsHTTPSoapBinding
-
MyInventoryWsJMSSoapBinding
-
MyInventoryWsHTTPPort
-
MyInventoryWsJMSPort
Creating Schema Files
The imported project provides supporting schemas for the Reference Web Service operation. The schemas define the inputs, outputs, and faults of the wrapped methods. The schemas are used to generate the Java representation of the incoming/outgoing XML, which can then be mapped to an internal Java entity class (see "EntityMapper.java"). The Java representation is generated by the generate-from-wsdl Ant target.
For a new web service, new schemas must be written that reflect the inputs and outputs of the wrapped method.
Note:
The Reference Web Service schema files are written to be independent of the application server. However, the generate-from-wsdl Ant target in the build.xml file is specific to generating the required source files for deployment into a WebLogic Server environment.The imported project provides the type-mapping.xsdconfig mapping file. This file maps XML namespaces to Java packages. For a new web service, you modify the mapping file to update the namespace-to-Java package mappings.
Creating Java Source Files
The imported project provides the supporting Java code for the Reference Web Service operation. The following list of Java files is a recommended set of classes to implement.
-
ReferenceUimPortImpl.java
-
AdapterRouter.java
-
EntityAdapter.java
-
EntityValidator.java
-
EntityUtils.java
-
EntityWorker.java
-
EntityMapper.java
-
EntityException.java
-
FaultFactory.java
Note:
The example Reference Web Service does not contain all of the following source files.The following sections describe detailed information about the recommended Java source files.
The ReferenceUimPortImpl class is the entry point into the web service logic. This class calls the AdapterRouter class.
ReferenceUimPortImpl.java is a generated source file with the content based on the ReferenceUim.wsdl file. This file is generated by the generate-from-wsdl Ant target and is placed in the following directory:
codegen/WebServiceImpl/oracle/communications/inventory/webservice/ws
Copy this file to the following destination directory:
src/oracle/communications/inventory/webservice/ws
You use this destination directory as a starting point for the implementation of the web service calling the respective adapter classes.
This class must be modified to call the AdapterRouter for each new web service operation. Because this is a generated file, the modifications are based on the WSDL file.
Note:
When modifying this file with additional operations, do not change the order of the methods. The generated ReferenceUimPortImpl.java source file has a specific order of the web service methods, which is based on the order of how the corresponding operation names are defined in the WSDL. Even though changing the order of the methods is allowable by the Java language syntax, doing so may cause the web service to not be found at run time.The AdapterRouter class routes the call to a specific adapter. If the input from the external source requires mapping, the corresponding mapper class is the input/output parameter for this AdapterRouter class.
This class must be modified for each new web service operation.
Adapter classes extend the InventoryAdapterRoot class, which extends the Platform-owned AdapterRoot class. The UIM Reference Web Service provides the LogicalDeviceAdapter class as an example. Adapters wrap the calls to the UIM API methods. Typically, one adapter class exists per manager class, such as EquipmentAdapter.java and TelephoneNumberAdapter.java. However, one adapter class can wrap multiple methods from different manager classes.
Oracle recommends that adapters be as thin as possible. They should simply contain a call to the Manager API or to other worker classes.
An adapter calls EntityValidator and, if validations pass, calls the business layer API method.
An existing adapter class must be modified, or a new adapter class written, for each new web service operation.
Validator classes define an input validation method per a web service operation (where applicable). The adapter classes call the corresponding input validation method before calling the wrapped API method. The throw an error if the validation is not passed.
For cases where input data is passed in, a new validator class is needed per entity. The UIM Reference Web Service example does not contain this type of class file.
Utils classes define common utility methods used by the Reference Web Service operations.
The existing EntityUtils class can be extended or a new utils class written, as needed during the development of a new web service.
Worker classes define methods used by the web service operations.
EntityWorker classes can be written as needed during the development of a new web service. The UIM Reference Web Service example does not contain this type of class file.
Mapper classes map the generated object representation of the schemas (external) to the Java entity class (internal) for input parameters. Mapper classes map the Java entity class (internal) to the generated object representation of the schemas (external) for output parameters. One mapper class maps a single entity. A mapper class can be shared across methods in an adapter class if the methods use the same entity.
For cases where the source code references the entity data, a new mapper class is needed per entity.
Note:
In the UIM Reference Web Service example, the mapping code logic is contained in the adapter class.Exception classes define exceptions specific to a web service.
The existing EntityException classes can be extended or a new exception class written, as needed during the development of a new web service.
The FaultFactory class maps Exception objects thrown by the API method to InventoryFaultType objects returned by the web service.
You may need to modify this class for a new web service; it depends on whether the API method introduces any new Exception objects that are not already mapped.
Generating Java Source Based on the WSDL
The imported project contains the build.xml file, which defines the generate-from-wsdl Ant target. The generate-from-wsdl Ant target copies the latest framework schema files into the web services project and generates the Java source based on the input WSDL file and supporting schemas. You can run the generate-from-wsdl Ant target to automatically copy the framework files and generate the Java source.
The generated package structure and generated files include:
-
codegen/src/oracle/communications/inventory/webservice
This package contains the generated Java source files.
-
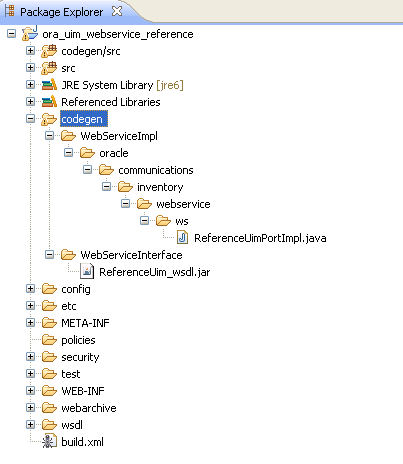
codegen/WebServiceImpl/oracle/communications/inventory/webservice/ws
This package contains the generated Java implementation source code file. Figure 4-10 shows the generated ReferenceUimPortImpl.java source file for the provided Reference Web Service.
-
codegen/WebServiceInterface
This package contains the generated JAR file. Figure 4-10 shows the generated ReferenceUim_wsdl.jar file for the provided Reference Web Service.
Figure 4-10 Package Explorer View Including the codegen Directory Generated Files
Description of ''Figure 4-10 Package Explorer View Including the codegen Directory Generated Files''
After the source is generated, the project workspace has access to all the dependent files needed to compile the project. The compiled classes are stored in the out directory. Class files compiled from Java source files that are part of the original imported project are also placed in the out directory, such as the class files in the out/oracle/communications/inventory/webservice/adapter directory.
Creating the WAR File
The WAR file contains the compiled classes from the developed custom web service, plus the JAR file containing the UIM API method that the web service wraps.
The imported project contains the build.xml file, which defines the Ant targets to build the WAR file. The following Ant targets build the WAR file:
-
build-service builds the WAR file for both HTTP and JMS
-
build-service-http builds the WAR file for HTTP
-
build-service-jms builds the WAR file for JMS
You can run any of these Ant targets to automatically build the WAR file.
Figure 4-11 shows the created ReferenceUim.war file which resides in the webarchive/reference_webservice directory. The created WAR file name is wsdl_name.war, where wsdl_name is the name specified by the WSDL_NAME parameter in the COMPUTERNAME.properties file. The WAR file resides in the webarchive/module_name directory, where module_name is the name specified by the MODULE_NAME parameter in the COMPUTERNAME.properties file.
The WAR file contains the following:
-
Compiled generated source files (WSDL and XML object representations)
-
Compiled developed source files (contents of the src directory)
-
JAR file that contains the classes that define the wrapped methods (UIM business logic)
Figure 4-11 shows the generated directory structure and the ReferenceUim.war file for the Reference Web Service.
Figure 4-11 Package Explorer View Including the webarchive Directory
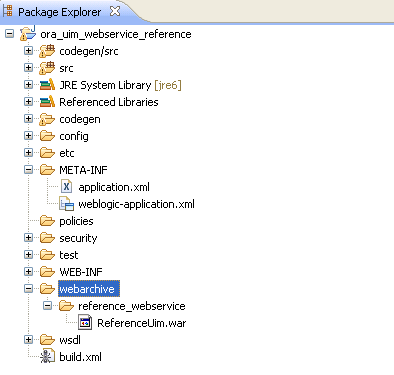
Description of ''Figure 4-11 Package Explorer View Including the webarchive Directory''
Packaging the WAR File in the EAR File
The Reference Web Service WAR file is not packaged in the inventory.ear file and is therefore not automatically deployed into UIM. Rather, you must manually import the provided ReferenceUim.war file into an EAR file to deploy. When developing custom web services, you have the option of packaging the custom web service WAR file into:
-
The custom.ear file
If you develop a single custom web service, Oracle recommends you use the provided custom.ear file. This approach saves you additional development work because you can use the provided inventoryCustomWSQueue and corresponding listener class.
-
Any custom EAR files
If you develop multiple custom web services, Oracle recommends you use a separate custom EAR for each web service. This approach involves additional development work because you must create and configure your own message queue and corresponding listener class. This is the safest approach for multiple custom web services, and provides the most efficient performance. See "Additional Custom Work" for more information.
Note:
You may consider including the WAR file in the inventory.ear so that your custom web service is automatically deployed when you deploy the UIM application. However, Oracle does not recommend this approach for performance reasons.Extracting and Updating the application.xml File
Every EAR file contains an application.xml file, which defines the WAR files that comprise the EAR file. Regardless of which packaging option you choose, the custom web service WAR file needs to be included in the EAR file, so the application.xml file must be updated to include the name of the custom web service WAR file.
The provided custom.ear file contains an application.xml file that you can manually extract, use as a starting point, and modify as needed.
If you are using the provided custom.ear file to package your custom web service, you can use the extract.ear Ant target to automatically extract the application.xml file. The EAR file is specified by the EAR_PATH parameter in the COMPUTERNAME.properties file. The XML file is extracted into the reference_webservice_home/META-INF directory, where reference_webservice_home is the location of the extracted reference_webservice.zip file. See "About the Ant Build File" for more information on the Ant targets.
Note:
This extract.ear Ant target only works if EAR_PATH is set to custom.ear; it does not work if EAR_PATH is set to a custom EAR file name or set to inventory.ear. The extract.ear Ant target is provided in the build.xml file.Updating the application.xml File
Example 4-4 shows the original application.xml file from the custom.ear file. For the custom web service, you add the following information to the <module> element to identify the following for the custom web service:
-
The WAR file name, such as ReferenceUim.war
-
The WSDL file prefix, such as ReferenceUim
You add the <web-uri> item for the WAR file name and the <context-root> item for the WSDL name, as shown in Example 4-5.
Example 4-4 Original application.xml
<?xml version = '1.0' encoding = 'windows-1252'?>
<application xmlns:xsi="http://www.w3.org/2001/XMLSchema-instance" xsi:schemaLocation="http://java.sun.com/xml/ns/javaee http://java.sun.com/xml/ns/javaee/application_5.xsd" version="5" xmlns="http://java.sun.com/xml/ns/javaee">
    <display-name>oracle.communications.inventory.customear</display-name>
    <module>
        <java></java>
    </module>
</application>
Example 4-5 Updated application.xml
<?xml version = '1.0' encoding = 'windows-1252'?>
<application xmlns:xsi="http://www.w3.org/2001/XMLSchema-instance" xsi:schemaLocation="http://java.sun.com/xml/ns/javaee http://java.sun.com/xml/ns/javaee/application_5.xsd" version="5" xmlns="http://java.sun.com/xml/ns/javaee">
    <display-name>oracle.communications.inventory.customear</display-name>
    <!-- Custom Web Service WAR -->
    <module>
        <web>
            <web-uri>ReferenceUim.war</web-uri>
            <context-root>ReferenceUim</context-root>
        </web>
    </module>
</application>
Additional Custom Work
This section describes additional work you must perform when packaging your custom web services in your own custom EAR files.
Note:
This section is not applicable if you are packaging your custom web service in the provided custom.ear file.Example 4-6 shows the custom.ear file content with a view of the notable directories and files. An EAR file format is similar to a ZIP file format.
Example 4-6 custom.ear File Content
01      META-INF
02          application.xml
03          weblogic-application.xml
04      InventoryCustomQueueMDB.jar
05          META-INF
06              ejb-jar.xml
07              weblogic-ejb-jar.xml
08          oracle
09              communications
10                  inventory
11                      ejb
12                          message
13                              custom
14                                  impl
15                                      InventoryCustomQueueListener.class
16      poms-ejbs.jar
Your custom EAR file content must use the custom.ear file content as a template to apply your modifications. Your modifications may include the following:
Referencing corelib and customlib
Each custom EAR file must contain a reference to the following libraries:
oracle.communications.inventory.corelib
oracle.communications.inventory.customlib
You reference these libraries within the META-INF/weblogic-application.xml file (line 03 in Example 4-6).
For an example to emulate, see the weblogic-application.xml file in the custom.ear file. Example 4-7 shows the contents of the weblogic-application.xml file.
Example 4-7 weblogic-application.xml
<?xml version = '1.0' encoding = 'UTF-8'?>
<weblogic-application xmlns:xsi="http://www.w3.org/2001/XMLSchema-instance" xsi:schemaLocation="http://www.bea.com/ns/weblogic/weblogic-application http://www.bea.com/ns/weblogic/weblogic-application/1.0/weblogic-application.xsd" xmlns="http://www.bea.com/ns/weblogic/weblogic-application">
<!-- Use the common Oracle Platform Security Services -->
<!-- oracle.communications.inventory application policies -->
  <application-param>
    <param-name>jps.policystore.applicationid</param-name>
    <param-value>oracle.communications.inventory</param-value>
  </application-param>
  <library-ref>
      <library-name>oracle.communications.inventory.corelib</library-name>
      <specification-version>7.3</specification-version>
      <implementation-version>7.3.1.0.0</implementation-version>
      <exact-match>false</exact-match>
  </library-ref>
  <library-ref>
      <library-name>oracle.communications.inventory.customlib</library-name>
      <specification-version>7.2</specification-version>
      <implementation-version>7.2.0.0.0</implementation-version>
      <exact-match>false</exact-match>
  </library-ref>
</weblogic-application>
If you create multiple custom web services, Oracle recommends they reside in different EAR files. Web services that reside in different EAR files cannot listen to the same queue, so you must create a message queue for each web service. In addition, Oracle recommends that you provide a message-driven bean (MDB) to dispatch requests for multi-threaded processing to ensure optimum performance of your custom web service.
See the WebLogic Server Administration Console documentation for information about creating message queues. See the Java Platform, Java EE Tutorial website at:
https://docs.oracle.com/javaee/7/tutorial/ejb-intro003.htm
for more information on message-driven beans.
You must create one listener class for every message queue you create. Example 4-8 shows a custom listener class named MyCustomQueueListener. The listener classes implement MessageListener.
Your custom listener class must reside within your custom EAR file. Specifically, it must reside within the oracle/communications/inventory/ejb/message/custom/impl directory (lines 08-14 in Example 4-6), within a custom MDB JAR file (line 04 in Example 4-6).
package oracle.communications.inventory.webservice.mdb;

import java.util.HashMap;
import java.util.Set;

import javax.ejb.MessageDrivenContext;
import javax.jms.Message;
import javax.jms.MessageListener;
import javax.persistence.PersistenceContext;

import oracle.communications.inventory.api.framework.logging.Log;
import oracle.communications.inventory.api.framework.logging.LogFactory;
import weblogic.wsee.server.jms.JmsWebservicesMessageDispatcher;

@PersistenceContext(name = "persistence/EntityManager", unitName = "default")
public class MyCustomQueueListener implements MessageListener
{
    private static Log log = LogFactory
        .getLog( MyCustomQueueListener.class );
    private static final String CONNECTION_FACTORY = "inventoryWSQueueCF";
    private HashMap<String, JmsWebservicesMessageDispatcher> listeners =
         new HashMap<String, JmsWebservicesMessageDispatcher>();
    private MessageDrivenContext context;

    public void setMessageDrivenContext(
        MessageDrivenContext messageDrivenContext )
    {
        this.context = messageDrivenContext;
    }

    public void onMessage( Message message )
    {
        try
        {
            String uri = message.getStringProperty( "URI" );
            JmsWebservicesMessageDispatcher listener = getListener( uri );
            if( log.isDebugEnabled() )
            {
                log.debug( "", "Thread " + Thread.currentThread().getId() + " "
                    + Thread.currentThread().hashCode()
                    + ": calling onMessage()..." );
            }
            if( listener != null )
            {
                listener.dispatchMessage( message );
            }
        }
        catch( Exception e )
        {
            log.error( "", "Failed to process JMS message: " + e.getMessage() );
            e.printStackTrace();
        }
    }

    public void ejbCreate()
    {
    }

    public void ejbRemove()
    {
        Set<String> keys = listeners.keySet();
        try
        {
            for( String key : keys )
            {
                JmsWebservicesMessageDispatcher listener = listeners.get( key );
                listener.shutdown();
            }
        }
        catch( Exception e )
        {
            log.error( "", "Error closing the listener: " + e.toString() );
        }
        listeners.clear();
        listeners = null;
    }

    private JmsWebservicesMessageDispatcher getListener( String uri )
    {
        JmsWebservicesMessageDispatcher listener = null;
        Object obj = listeners.get( uri );
        try
        {
            if( obj == null )
            {
                listener = new JmsWebservicesMessageDispatcher( uri,
                    CONNECTION_FACTORY );
                listeners.put( uri, listener );
            }
            else
            {
                listener = (JmsWebservicesMessageDispatcher) obj;
            }
        }
        catch( Exception e )
        {
            e.printStackTrace();
        }
        return listener;
    }
}
Configuring the Listener Class
After you create one or more listener classes, you must configure them to listen to their respective queues. This is accomplished by modifying the ejb-jar.xml and weblogic-ejb-jar.xml files, as shown in Example 4-9 and Example 4-10.
The ejb-jar.xml and weblogic-ejb-jar.xml files must reside within your custom EAR file. Specifically, they must reside within the META-INF directory (line 05 in Example 4-6), within a custom MDB JAR file (line 04 in Example 4-6).
<?xml version = '1.0' encoding = 'windows-1252'?>
<ejb-jar xmlns="http://java.sun.com/xml/ns/javaee"
xmlns:xsi="http://www.w3.org/2001/XMLSchema-instance"
xsi:schemaLocation="http://java.sun.com/xml/ns/javaee http://java.sun.com/xml/ns/j2ee/ejb-jar_3_0.xsd"
version="3.0">
  <enterprise-beans>
    <message-driven>
      <ejb-name>MyCustomQueueListener</ejb-name>
      <ejb-class>
        oracle.communications.inventory.webservice.mdb.MyCustomQueueListener
      </ejb-class>
      <transaction-type>Bean</transaction-type>
      <message-destination-type>javax.jms.Queue</message-destination-type>
    </message-driven>
  </enterprise-beans>
</ejb-jar>
Example 4-10 weblogic-ejb-jar.xml
<?xml version = '1.0' encoding = 'windows-1252'?>
<weblogic-ejb-jar xmlns:xsi="http://www.w3.org/2001/XMLSchema-instance"
xsi:schemaLocation="http://www.bea.com/ns/weblogic/weblogic-ejb-jar
http://www.bea.com/ns/weblogic/weblogic-ejb-jar/1.0/weblogic-ejb-jar.xsd"
xmlns="http://www.bea.com/ns/weblogic/weblogic-ejb-jar">
    <weblogic-enterprise-bean>
        <ejb-name>MyCustomQueueListener</ejb-name>
        <message-driven-descriptor>
            <destination-jndi-name>MyCustomQueue</destination-jndi-name>
        </message-driven-descriptor>
    </weblogic-enterprise-bean>
</weblogic-ejb-jar>
Importing the WAR File into the EAR File
After you determine which EAR file is to contain the custom web service WAR file, import the WAR file into the appropriate EAR file.
The imported project contains the build.xml file, which defines the update.ear Ant target. The update.ear Ant target updates the EAR file by adding the custom web service WAR file and the edited application.xml file. The update.ear Ant target determines the location of the EAR file to be updated by using the path you specified in the COMPUTERNAME.properties EAR_PATH parameter. Run the update.ear Ant target to automatically perform these updates to the EAR file.
See "About the Ant Build File" for more information on Ant targets.
Deploying the EAR File
The imported project contains the build.xml file, which defines the copyResources Ant target. The copyResources Ant target copies the referenceWS.properties file from the imported project to the UIM_Home/config/resources/logging directory. Before deploying the updated EAR file for the first time, run the copyResources Ant target. Unless you change the referenceWS.properties file, you only need to run this Ant target one time.
If your UIM environment resides on another machine, you must copy the updated EAR file to that machine before deploying.
For instructions on how to deploy an EAR file, see UIM System Administrator's Guide.
Note:
After you have gone through all the steps in this chapter once, you only need to run the clean, all, and update.ear Ant targets to rebuild the EAR file before deploying it.Verifying the Deployment
After you have deployed the updated EAR file, verify that the deployment includes the custom web service by viewing the web services in the WebLogic Server Administration Console. See "Verifying Deployments" for more information.
Specifying a Deployment Plan
If you placed your custom web service in the custom.ear file, or in any custom EAR file, you must specify a deployment plan for the updated EAR file.
Specifying a deployment plan enables the EAR file to retrieve property values from the UIM_Home/app/AppFileOverrides/platform/runtime-poms.properties file, which defines property values that are used by the persistence framework for cache coordination.
To specify a deployment plan:
-
Log in to the WebLogic Server Administration Console.
-
In the left panel, under Domain Structure, click the Deployments link.
The Summary of Deployments page appears.
-
In the left panel, under Change Center, click Lock & Edit.
-
Select the check box next to the updated EAR file that contains your custom web service.
-
Click Update.
The Update Application Assistant page appears.
-
Click Change Path.
-
Change the path to UIM_Home/app/plan.
-
Choose Plan.xml, and click Next.
-
Choose Redeploy this application using the following deployment files, and click Finish.
Deploying, Testing, and Securing the Web Service
Information about deploying, testing, and securing the web service is described in Chapter 5, "Deploying, Testing, and Securing UIM Web Services".
