A Preparing Session Monitor Installation Media
This appendix provides instructions for creating the Oracle Communications Session Monitor installation media.
Preparing the Installation Media
Session Monitor may be installed using a DVD or USB flash drive. If you are going to use a USB flash drive, make sure that its size is at least 1GB. Oracle recommends using brand drives, as issues have been reported when using low-quality thumb drives.
Download the Session Monitor Installer ISO image from the repository indicated to you by Oracle or your service provider. If you want to use the DVD installation method, create a new DVD from the image. Otherwise follow the instructions below to create a bootable USB flash drive.
Caution:
Following the instructions writes the image directly to the device, which can be very dangerous when done without care, if you give the wrong device name, for example, the one representing your internal hard drive instead of the one representing the USB flash drive, all data from the running system can be deleted.Preparing a USB Flash Drive Using UNetBootin
Note:
Using UNetBootin is the recommended way to prepare a USB flash drive for the installation. For Linux and Mac OS X, if this approach fails, an alternative preparation method is described in "Preparing a USB Flash Drive (alternative, Linux/Mac OS X)".-
Download the UNetBootin tool matching your operating system from:
http://unetbootin.sourceforge.net/This site also contains more information on using and troubleshooting the tool.
-
Plug the USB flash drive into the computer.
-
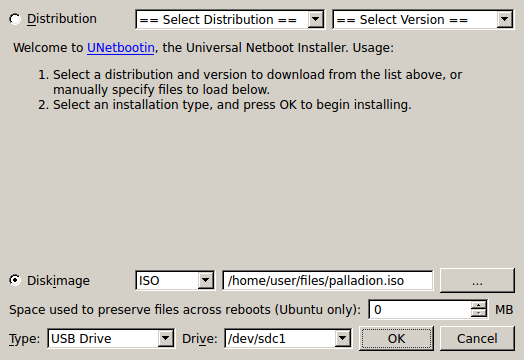
Start UNetBootin. Select Diskimage and ISO as the source. Click ... next to the empty text entry and select the Session Monitor ISO image.
-
Select the type USB Drive and the USB flash drive you just plugged in.
-
Double check the selections you have made. If they are all correct, click OK to start the writing process. UNetBootin informs you about the progress.
Figure A-1 shows the UNetbootin dialog box.
Preparing a USB Flash Drive (alternative, Linux/Mac OS X)
Important:
The method described below only applies to Linux and Mac OS X and should only be used if the preferred method using UNetBootin does not work.-
Plug the USB flash drive into the computer.
-
Find out which device name has been given to the USB flash drive:
Linux Execute lsblk on the command line. A tree of devices with their names, sizes and other information is shown. If lsblk is not available on your system, you can use dmesg.
Example output:
scsi 8:0:0:0: Direct-Access USB Flash Disk PMAP PQ: 0 ANSI: 0 CCS
sd 8:0:0:0: Attached scsi generic sg2 type 0
sd 8:0:0:0: [sdb] 7827456 512-byte hardware sectors (4008 MB)
sd 8:0:0:0: [sdb] Write Protect is off
sd 8:0:0:0: [sdb] Mode Sense: 23 00 00 00
sd 8:0:0:0: [sdb] Assuming drive cache: write through
sdb: sdb1
In this example, sdb is the device name to use. A tree of devices with their names, sizes and other information is shown.
Mac OS X Execute diskutil list on the command line. A list of devices with their names, sizes and other information is shown.
-
Unmount the partitions of the USB flash drive in case any have been mounted automatically.
On Linux, execute:
umount USB device name
For example:
umount /dev/sdb1
On Mac OS X, execute:
diskutil unmountdisk USB device name
For example:
diskutil unmountdisk /dev/disk1
-
Write the image to the USB flash drive:
dd if=/path/to/ocsm-3.3.90.0.0.iso of=USB device name bs=1m
where /path/to/ocsm-3.3.90.0.0.iso is the path to the image file.
Important:
All data from the USB flash drive will be deleted. -
Synchronize the disk caches and wait until disk activity stops to assure that all data has been completely written to the USB flash drive:
-
On Linux, execute sync on the command line.
-
On Mac OS X, execute:
diskutil eject USB device name
For example:
diskutil eject /dev/disk1
-
Creating a Bootable USB on Windows
-
If running Windows 7, use the Windows7 USB/DVD Download Tool.
-
Download the Windows 7 USB/DVD Download Tool from:
http://www.microsoft.com/en-us/download/windows-usb-dvd-download-tool -
In the Setup Wizard, click Next> Install.
-
After installing, click Finish and open the program.
-
Click Browse and locate the ISO file.
-
Click USB device.
-
Locate your USB device and click Begin copying.
-
If prompted, click Erase USB Device and then Yes.
-
-
If running Windows XP, use UNetbootin.
-
Download UNetbootin from:
-
Open the downloaded file and click Run.
-
When the program opens, click Diskimage and set to ISO.
-
Click . . . and locate the ISO file.
-
Set the Type to USB Drive, and set the Drive to the drive where the USB is mounted.
-
Click OK.
-