Oracle® Communications Unified Inventory Management
What's New
Release 7.4
E93986-06
July 2019
This document describes the enhancements that are delivered in Oracle Communications Unified Inventory Management (UIM) patches.
Enhancements in UIM 7.4.0.7 (Patch 30020979)
The following sections describe the enhancements delivered in this patch.
Platform Upgrade
The UIM application platform now supports the upgraded software version of Oracle Database 18c (18.3).
Web Services Now Support Telephone Number Bulk Operations
UIM web services now support the following bulk operations for telephone numbers:
-
Port In
-
Port Out
-
Snapback
-
Winback
For running bulk operations of the above listed operations, you can now upload the spreadsheets that contain telephone numbers as attachments in web services requests.
Evaluate Outage Impacts Caused By Simulation Failures
You can now generate an outage impacts report that has the list of all that outages occurred because of any impacted connectivity services or simulation failures and their associated contacts.
The following simulation failures cause the outages:
-
Field failure
-
Interrupted lines
-
Protection failure
-
Single point failure
See "Generating Outage Impacts Report" for more information on generating the outage impacts report.
Note:
You can generate outage impacts using REST API. See UIM NFV Orchestration Implementation Guide for more information about REST APIs.Table 1 lists the entities and the input types that you can specify to generate the corresponding outage reports.
Table 1 Inputs for Generating Outage Impacts Report
| Input Entity | Failure Type |
|---|---|
|
Equipment |
Card burn |
|
Logical Device |
Device/node failure |
|
Logical Device Account |
Information/registry of any existing failure |
|
Physical Device |
Device/node failure |
|
Connectivity |
Connectivity identifier |
|
Pipe |
Fiber, cable name, or ID |
|
Device Interface |
Physical ports with logical entities |
|
Physical Port |
Physical port |
Generating Outage Impacts Report
To generate the outage impacts report:
-
In the Operational Analysis group, click Outage Reports.
The Outage Impacts page appears.
-
From the Entity list, select the entity for which you want to generate an outage report.
Note:
See Table 1 for a list of entity and input types that you can select. -
(Optional) If you know the name of the entity, enter the name in the text field.
-
(Optional) Enter % in the text field to select an entity from the most recent 10 entities that you searched for.
-
(Optional) Add qualifications to the search:
-
Click the magnifying glass icon next to the text field to search.
The search page for the corresponding entity appears.
-
Enter search criteria in the desired fields. Some fields require that you enter text while other fields allow you to select from lists.
-
Click Search.
A table of search results appears in the Search Results section.
-
Select the entity and click OK.
The selected entity name appears in the text box.
-
-
Click Retrieve Outage Report.
The system generates the outage impacts report in a Microsoft Excel file.
-
Click Open to view the report.
See Table 2 for more information about the data and worksheets in the outage impacts report.
-
(Optional) Click Save to save the report on your local system.
Note:
You can customize the outage data to be refreshed periodically. Contact your system administrator to customize the intervals at which you want the data refreshed.If you cannot view the latest changes in the report, contact your system administrator to refresh the data by using the Reload option, which is available only to the administrator.
Table 2 Understanding Outage Impacts Report
| Sheet | Description |
|---|---|
|
Report Details |
Provides the name and other details of the generated Outage Impacts report |
|
ServiceImpacts |
Provides the list of outage impacts that occurred according to the given inputs |
|
Data Dictionary |
Helps in understanding the report by providing the descriptions for columns in ServiceImpacts sheets |
Perform Path Analysis from the Search Page
You can now perform path analysis from the Path Analysis Search page. The Path Analysis Search page provides you with an advanced search criteria using which you can fine-tune the path analysis search. You can view the path results in the Path Analysis Results table and also in the form of a schematic diagram from the Topological View tab.
See "Performing Path Analysis from the Path Analysis Search Page" for steps on how to do so.
You can access the Path Analysis Search page using either of the following options:
-
From the UIM landing page, hover your mouse over the Operational Analysis icon and select Path Analysis.
-
From the left navigation pane, under the Operational Analysis section, select Path Analysis.
The Path Analysis Search page has the following tabs:
-
General Information: This tab provides the following search criteria:
-
Source and Target: See Table 3, "Source and Target for Path Analysis" for information on the fields and descriptions in this criteria.
-
General Criteria: See Table 4, "General Criteria for Path Analysis" for information on the fields and descriptions in this criteria.
-
Advanced Criteria: See Table 5, "Advanced Criteria for Path Analysis" for information on the fields and descriptions in this criteria. The advanced search criteria has the following criteria panes along with other options:
-
Network
-
Pipe/Connectivity Specifications
-
-
-
Topological View: This tab provides you with the topological view of path analysis. See "Topological View of Path Analysis" for information about topological view of path analysis.
Table 3 Source and Target for Path Analysis
| Field | Description |
|---|---|
|
Source Type |
Select the source entity type. Valid values:
|
|
Source ID |
Enter the ID of the source entity if you know it or click Browse icon to search for the entity. If the source entity is part of a logical device, physical device, or equipment hierarchy, specify the highest-level entity in the hierarchy as the source. |
|
Target Type |
Select the target entity type. Valid values:
|
|
Target ID |
Enter the ID of the target entity if you know it or click Browse icon to search for the entity. If the target entity is part of a logical device, physical device, or equipment hierarchy, specify the highest-level entity in the hierarchy as the target. |
|
Intermediate Type |
Select the entity type of the intermediate node that you want to include in the path found by path analysis. If the pipe has a pipe configuration that includes specification relationships for the Intermediate Node configuration item, you can select only from the types of those specifications. Valid values:
|
|
Intermediate ID |
Enter the ID of the entity to use as an intermediate node if you know it or click Browse icon to search for the entity. The search is limited to entities of the type specified in the Intermediate Type field. If the pipe has a pipe configuration that defines specification relationships for the Intermediate Node configuration item, the search is further limited to entities based on those specifications. After you enter or select an ID, the Intermediate Name field is populated. |
Table 4 General Criteria for Path Analysis
| Field | Description |
|---|---|
|
Rate Code |
Enter the rate code associated with the connectivity. You can enter a wildcard value % to see all possible auto suggestions. When you enter a rate code, the system populates the corresponding Bit Rate. |
|
Bit Rate |
Enter a required bit rate to ensure that path analysis finds paths with sufficient capacity. For example, enter 64 for a 64 Kbps connection. This value is populated automatically after you enter the Rate Code. If a rate code is not provided, you can enter the value. If path analysis fails to find a path using the automatically entered bit rate, you can remove it and run path analysis again. If a path is returned, you can make design changes to accommodate it. |
|
UOM |
Enter the unit of measure that applies to the bit rate. For example, choose kbps if the bit rate was specified for that unit of measure. |
|
Quantity |
Enter the number of connections required. This field is used for fractional TDM services such as Fractional T1. For example, if you need 256 Kbps of capacity, this translates into four 64 Kbps channels. The default value is 1. |
Table 5 Advanced Criteria for Path Analysis
| Field | Description |
|---|---|
|
Custom Tuning |
Use custom tuning to control the number of paths returned. If you want path analysis to find the simplest paths in the shortest time, select Fastest. If you want path analysis to find the paths in more time, select Most Paths. See Table 6 for the list of custom tuning types and their corresponding tuning percentage ranges. The default value is Fastest. |
|
Algorithm |
Select the algorithm to control the topological view of the path analysis. See Table 7 for alogrithm types and descriptions. |
|
Filter By Hops |
Enter the number of hops to search for the paths that have less than or equal to the required number of hops. The default value is 10. You can also set the number of hops by setting the value for simpleLinearModeMaxCycles in the topologyProcess.properties file. If you enter 0 in the Filter By Hops field in the Path Analysis Search page, the value that you entered in the topologyProcess.properties file takes precedence. |
|
Network |
Search and select the required networks for searching the paths. You can select one or more networks. The path analysis result displays all the paths with any of the selected networks. See "Selecting Networks for Path Analysis" for more information on selecting the network criteria. |
|
Pipe/Connectivity Specifications |
Search and select the required pipe/connectivity specifications for searching the paths. You can select one or more specifications. The path analysis result displays all the paths with any of the selected specifications. See "Selecting Pipe/Connectivity Specifications for Path Analysis" for more information on selecting the pipe/connectivity specification criteria. |
Table 6 Custom Tuning for Path Analysis
| Custom Tuning Type | Tuning Percentage Range |
|---|---|
|
Fastest |
0-20 |
|
Fast |
20-40 |
|
Balanced |
40-60 |
|
More Paths |
60-80 |
|
Most Paths |
80-100 |
| Algorithm | Definition |
|---|---|
|
Full Mesh |
This mode considers all the inputs mentioned in General and Advanced Criteria. Note: This algorithm uses the most memory because it searches all data for analysis. |
|
Mesh Hybrid |
(Default) This algorithm uses less heap memory than a Full Mesh algorithm. It runs a series of queries from source to target for a maximum number of iterations depending on the number of hops. It uses the hops to continue searching even after the first path is found. |
|
Simple Linear |
This algorithm uses least memory and is the fastest. It considers how the nodes are connected while simultaneously analyzing the data. It runs a series of queries from source to target for a maximum number of iterations (Max Cycles) and stops once the paths overlap. The purpose of this algorithm is to find one path and it will not find as many paths as the other algorithms find. |
Performing Path Analysis from the Path Analysis Search Page
To perform path analysis from the Path Analysis Search page:
-
Open UIM.
-
In the navigation section, under Operational Analysis, click Path Analysis.
The Path Analysis Search page appears.
-
Expand the Source and Target criteria.
-
In the Source Type list, select the type of entity that represents the source.
-
In the Source ID field, enter the ID of the source entity.
To locate a source ID:
-
Click the Browse icon.
The Search page appears for the source entity.
-
Enter the search criteria.
-
Click Search.
The search results appear.
-
Select an entity.
-
Click OK.
The ID appears in the Source ID field.
-
(Optional) To reset the Source ID, click the Clear icon.
-
-
(Optional) Specify information about an intermediate node in the Intermediate Type and Intermediate ID fields.
See UIM Online Help for more information on intermediate nodes for path analysis.
-
In the Target Type list, select the type of entity that represents the target.
-
In the Target ID field, enter the ID of the target entity.
To locate a target ID:
-
Click the Browse icon.
The Search page appears for the source entity.
-
Enter the search criteria.
-
Click Search.
The search results appear.
-
Select an entity.
-
Click OK.
The ID appears in the Target ID field.
-
(Optional) To reset the Target ID, click the Clear icon.
-
-
(Optional) Enter General Criteria. See Table 4, "General Criteria for Path Analysis" for the list of fields and their descriptions in the General Criteria.
-
(Optional) Enter Advanced Criteria. See Table 5, "Advanced Criteria for Path Analysis" for the list of fields and their descriptions in the Advanced Criteria.
-
Click Search.
The paths appear in the Path Analysis Results pane.
-
To view path analysis in a topology view, click Topological View tab.
See "Topological View of Path Analysis" for more information about the topological view.
-
(Optional) To reset the path analysis search criteria and the toplogical view, click Reset.
-
To download the path analysis results to a spreadsheet, click Export from the Path Analysis Results pane.
The system generates the PathResults spreadsheet.
-
To download the list of network nodes that are included in the path analysis, click Export Analysis Data from the Path Analysis Results pane.
The system generates the ExportAnalysisData spreadsheet.
Selecting Networks for Path Analysis
To select the required networks for path analysis:
-
In the Path Analysis Search page, expand Advanced Criteria and then expand Network.
The Network criteria panel appears.
-
Click Filter By Network.
The Network Search page appears.
-
Enter the required details of search criteria.
-
Click Search.
The Search Results pane appears with a list of networks.
-
Select the required network(s).
Note:
You can select one or more networks from the search results. -
Click OK.
The list of selected network(s) appears in the Network criteria of the Path Analysis Search page.
-
(Optional) If you do not need any of the networks that are displayed, select them and click Delete.
The selected networks are removed from the list in Network criteria.
Selecting Pipe/Connectivity Specifications for Path Analysis
To select pipe or connectivity specifications for path analysis:
-
In the Path Analysis Search page, expand Advanced Criteria and then expand Pipe/Connectivity Specifications.
The Pipe/Connectivity Specification criteria panel appears.
-
Click Filter By Specification.
The Specification Search page appears.
-
Enter the required details of search criteria.
Note:
The Entity Type is non-editable and the default value is Pipe Specification. This is because, in UIM, every connectivity specification is modelled as a pipe specification. -
Click Search.
A list of specifications appears in Search Results.
-
Select the required specification(s).
-
Click OK.
The list of selected specification(s) appears in the Pipe/Connectivity Specifications criteria of the Path Analysis Search page.
-
(Optional) If you do not need any of the displayed specifications, select them and click Delete.
The selected specifications are removed from the list in Pipe/Connectivity Specifications criteria.
Topological View of Path Analysis
You can now view and analyze path analysis results in the form of a topology diagram. Searching for a path is a prerequisite for viewing path analysis in topological view. You need to provide a source entity and a target entity to perform path analysis. You can isolate any entity and further view all the nodes connected to it.
The topology diagram changes based on the algorithm that you select, even for the same set of source and target entities. If you select Simple Linear and Mesh algorithms, the topology diagram displays all the paths between the source and target. If you select Full Mesh algorithm, the topology diagram displays all the paths you have searched so far and highlights the source and target from your latest search. See Table 7, "Algorithm Types" for more information on the algorithms available for path analysis.
Figure 1 shows the Topological View page after performing path analysis.
The topology diagram shows the following:
-
All possible paths between source and target entities according to the search criteria
-
Nodes or entities that are used to determine the paths
-
Partial paths that are determined for feasibility analysis
-
Pipes and connectivities connecting the entities in each path
-
Locations of source and target entities
-
Overview of the topology diagram, which is useful if the diagram has a large number of entities. The overview helps to find the exact location of your current entity or path.
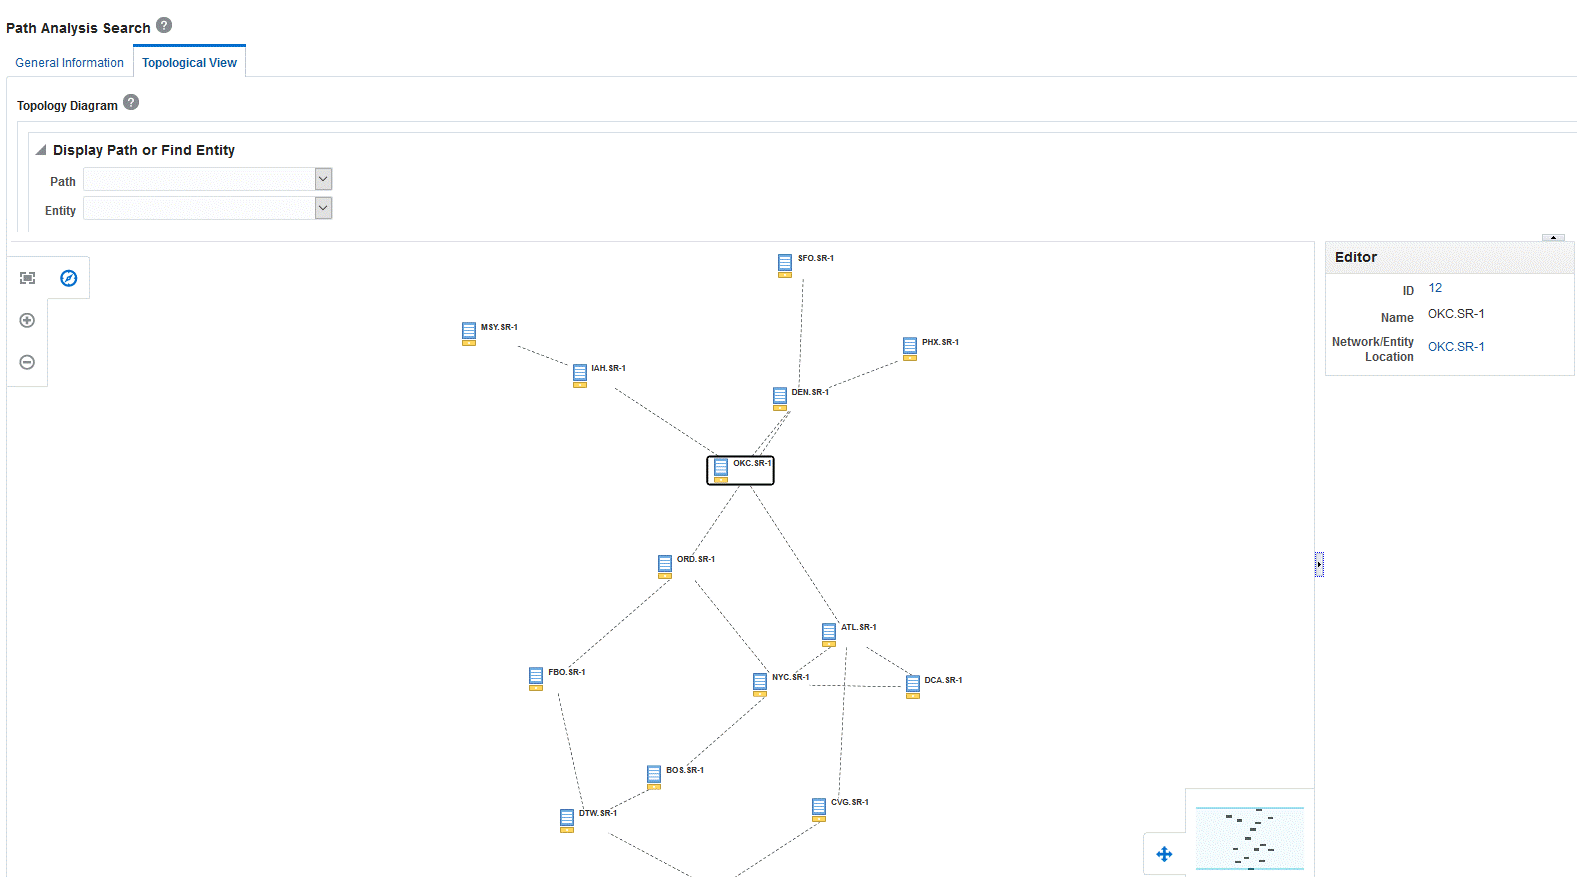
Viewing and Analyzing Path Analysis in a Topological View
To view and analyze path analysis in topological view:
-
Perform path analysis by searching for paths between source and target entities.
The Path Analysis Results pane appears.
-
Click the Topological View tab.
The topological diagram appears with all path results between the source and the target entities.
Note:
The source and target entities are highlighted in the diagram. -
Navigate to the Display Path or Find Entity pane by clicking the Restore Pane button on the top-right corner.
-
Select the required path in Available Paths.
The selected path is highlighted in the topology diagram.
-
Select an entity in the Entity Name field.
The selected entity is highlighted in the topology diagram.
Note:
You can view the information about the selected entity in the Editor pane on the right side. -
Select an entity or pipe in the topology diagram and navigate to the Editor pane by clicking the Restore Pane button on the right side, to view details.
The details of the selected entity or pipe appear in the Editor pane.
-
Click the ID value to open the corresponding entity page.
-
Click the Network/Entity Location value to open the corresponding network or entity location page.
-
-
To view the summary, right-click the entity and then click View Summary.
The summary page of the selected entity appears.
-
To adjust zoom options, use the following options in the top-left corner:
-
Zoom to Fit
-
Zoom In
-
Zoom Out
-
-
In the Overview panel (in the bottom-right corner), check the overview of the topology diagram.
-
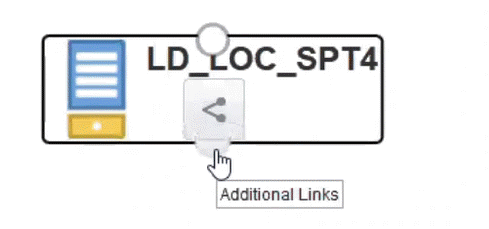
To isolate an entity, select the entity and then click the Isolate icon.
The selected entity gets isolated from the topology diagram.
-
To find all the nodes connected to the isolated entity:
-
Select the entity in the isolated pane.
-
Hover the mouse over the round buttons.
-
Click the Additional Links icon to find all the nodes connected to the entity.
-
Canvas Diagram Enhancements
In UIM, you can now use diagram templates to create canvas diagrams. In Design Studio, you can create a specification for diagram templates using the Diagram Specification resource.
For details about creating and using diagram templates, see the following sections:
Creating Diagram Specifications and Diagram Templates in Design Studio
You can access diagram templates from UIM by creating them in Design Studio and then deploying them to UIM.
You create diagram specifications by using the Diagram Specification resource in Design Studio. After creating a diagram specification and adding a diagram template to it in Design Studio, deploy the cartridge to UIM to use the diagram templates for creating canvas diagram.
To create a diagram template in Design Studio:
-
Open Design Studio.
-
Open any existing or create a new cartridge project.
Note:
See Design Studio documentation for more information about creating a new cartridge. -
Go to the Dependency tab.
-
Add the ora_uim_basetags base project.
-
Add Diagram Specification as a resource.
-
Create a Diagram Template.
-
Go to the Related Specifications tab and add any of the following specifications:
-
Connectivity
-
Pipe
-
Equipment
-
Logical Device
-
Physical Device
-
-
Go to the Tags tab and add the diagramnetwork tag.
Note:
You can use diagram templates in UIM only if you add the diagramnetwork tag in Design Studio. -
Save and close Design Studio.
-
Deploy the cartridge to UIM.
In UIM, you can see the diagram template in the Diagram Template list in the Business Interactions page.
Creating Canvas Diagrams Using Diagram Templates
To create a canvas diagram using a diagram template:
-
In UIM, go to the Business Interaction - New page.
-
From the Specification list, select Planning Diagram.
The Diagram Template option appears.
-
Select the diagram template that you want to use.
-
In the Name field, enter a name for the canvas diagram.
-
Click Save and Continue.
The Canvas Diagram page appears.
-
Click the Palette icon in the top-right corner of the diagram pane.
The list of specifications associated with the selected diagram template appears.
Note:
If you do not select any diagram template in the Business Interactions - New page, the palette pane of the Canvas Diagram page shows all the specifications in UIM.
Selecting Entities to Create a Canvas Diagram
When creating a new canvas diagram, you use the Search icon to locate entities that you want added to the canvas.
To use search criteria to select entities for a canvas diagram:
-
Go to the Canvas Diagram page.
-
In the Search by Entity pane, in the Entity Type list, select an entity type.
-
Click the Browse icon.
The corresponding entity search page appears.
-
Enter the search criteria and then click Search.
The search results appear.
-
Select the entity and then click OK.
The selected entity name appears in the Name field and its icon appears beside the Name field.
-
Click the selected entity icon, then drag it to the Diagram pane.
The diagram appears in the Diagram pane.
Channelization Support for CWDM and DWDM
You can now create optical fiber pipes and their corresponding channels for Coarse Wavelength Division Multiplexing (CWDM) and Dense Wavelength Division Multiplexing (DWDM). The UIM package now includes ora_uim_basewdm cartridge, which you can deploy to access the optical fiber specifications for CWDM and DWDM.
To create the optical fiber pipes and their corresponding channels, the following pipe specifications are introduced:
-
CWDM Optical Fiber: This specification has a parent pipe (CWDM_Optical_Fiber) and a child channel type (CWDM_Fiber_Channel). The CWDM_Optical_Fiber pipe has unlimited capacity so that it can adapt to any bit rate, according to the connectivity. See "Creating CWDM Pipe and Channels" for information on creating a CWDM pipe and its corresponding channels.
-
DWDM Optical Fiber: This specification has a parent pipe (DWDM_Optical_Fiber) and a child channel type (DWDM_Fiber_Channel). See "Creating DWDM Pipe and Channels" for information on creating a DWDM pipe and its corresponding channels.
Creating CWDM Pipe and Channels
To create a CWDM pipe and its corresponding channels:
-
In UIM, go to the Pipes page.
-
Click Create.
-
In the ID field, enter a unique ID.
-
From the Specifications menu, select CWDM_Optical_Fiber.
By default, the Medium field displays the value Fiber and the Transmission Signal Type field displays the value Optical.
Note:
You can change the values in the Medium and Transmission Signal Type fields. -
(Optional) Select ITU Channel Numbering.
-
Click Save and Continue.
The Pipe Summary page appears.
-
To create a channel(s) as a child for the pipe, click Related Pages and then click Provides.
The Pipe Provides page appears.
-
Click Create.
The Pipe-New page appears.
-
In the Number of Channels (1-18) field, enter the number of channels you want to create.
Note:
The minimum number of channels that you can create for a pipe is 1 and the maximum is 18. -
In the Starting Wavelength list, select a value.
Note:
The available wavelength values range from 1270 nm to 1610 nm.Note:
You can associate these wavelengths with colors. You can also customize these wavelength-color associations by updating the Fiber.properties file. See Table 8 for the default wavelength-to-color associations. -
Click Save and Close.
The Pipe Provides page appears and displays the list of channels that are created.
Table 8 Wavelength-to-Color Default Associations for CWDM Channels
| Wavelength (in nm) | Color Value |
|---|---|
|
1470 |
VIOLET |
|
1490 |
GREY |
|
1510 |
BLUE |
|
1530 |
GREEN |
|
1550 |
YELLOW |
|
1570 |
ORANGE |
|
1590 |
RED |
|
1610 |
BROWN |
Note:
The Name of a channel is generated automatically by the concatenation of the Fiber Channel ID, Wavelength, and Color.Creating DWDM Pipe and Channels
To create a DWDM pipe and its corresponding channels:
-
Go to the Pipes page.
-
Click Create.
The Pipe-New page appears.
-
In the ID field, enter a unique ID.
-
From the Specifications menu, select DWDM_Optical_Fiber.
By default, the Medium field displays the value Fiber and the Transmission Signal Type field displays the value Optical.
Note:
You can change the values in the Medium and Transmission Signal Type. -
(Optional) Select ITU Channel Numbering.
-
In the Offset list, select a value.
Note:
The available options for offset are 0 GHz and 50 GHz. -
In the Channel Spacing field, select the spacing required between the channels. The available channel spacing values are 100 GHz, 200 GHz (Even), 200 GHz (Odd), and 50 GHz.
-
Click Save and Continue.
The Pipe Summary page appears.
-
To create a channel(s) as a child for the pipe, click Related Pages and then click Provides.
The Pipe Provides page appears.
-
Click Create.
The Pipe-New page appears.
-
In the Number of Channels (1-144) field, enter the number of channels you want to create.
Note:
The minimum number of channels that you can create for a pipe is 1 and the maximum is 144. -
In the Starting Frequency list, select a value.
Note:
The available frequency values range from 190.1 THz to 197.20 THz.Note:
The Name of a channel is generated automatically by the concatenation of Fiber Channel ID and Wavelength.See Example 1 for an example of how to calculate the wavelength from a frequency.
-
Click Save and Close.
The Pipe Provides page appears and displays the list of channels that are created.
Example 1 shows how a wavelength is calculated from a frequency.
Enhancements in Bulk Operations
This release of UIM introduces new enhancements in using bulk operations, which the following sections describe in detail.
Support for Creating Places Using Bulk Operation
The place entity creation bulk operation enables you to create a number of place entities in UIM by uploading a spreadsheet. You can include all the place entities and their details in a spreadsheet and upload it into UIM.
Table 9 describes the columns you should define in the Places worksheet.
Table 9 Column Header in the Places Worksheet
| Column Header | Description |
|---|---|
|
Action |
This column must have the value of CREATE. |
|
PlaceType |
Valid values:
|
|
Specification |
The specification to be used for creating places. |
|
Name |
A generic name for the place. |
|
Latitude |
The corresponding latitude of the place, which is between -90.0000 and 90.0000 decimal degrees. |
|
Longitude |
The corresponding longitude of the place, which is between -180.0000 and 180.0000 decimal degrees. |
|
Vertical |
The North American V & H system vertical coordinate with a positive or negative numeric value. |
|
Horizontal |
The North American V & H system horizontal coordinate with a positive or negative numeric value. |
|
PlaceCharacteristic |
The characteristic name/value pair for the place. You can specify any number of characteristics. You can add any number of column headers for specifying multiple characteristics for a place with the column name PlaceCharacteristic. |
Support for Associating Places with Entities Using Bulk Operation
This release supports the bulk operation for associating places with entities by providing the ability to upload an Excel spreadsheet that specifies the place and entity associations.
Table 10 describes the columns you should define in the AssociatePlace worksheet.
Table 10 Column Headers in the AssociatePlace Worksheet
| Column Header | Description |
|---|---|
|
Action |
This column must have the value of CREATE. |
|
PlaceType |
Valid values:
|
|
PlaceName |
A generic name for the place. |
|
EntityType |
The type of entity that you want to associate with the place. Valid values:
|
|
EntityName |
A generic name of the entity that you want to associate with the place. |
Support for Creating Pipes Using Bulk Operation
The pipe creation bulk operation enables you to create a number of pipes in UIM by uploading a spreadsheet that contains the details of the pipes you want to upload.
Table 11 describes the columns you should define in the Pipes worksheet.
Table 11 Column Headers in the Pipes Worksheet
| Column Header | Description |
|---|---|
|
Action |
This column must have the value of CREATE. |
|
Specification |
The corresponding specification used to create the pipe. |
|
Name |
A generic name for the pipe. |
|
Medium |
The connection medium. Note: The default value is Fiber for CWDM and DWDM pipes. |
|
TransmissionSignalType |
The type of signal to use. For example, specify Optical to use optical transmission signal type. Note: The default value is Optical for CWDM and DWDM pipes. |
|
ParentPipe |
The name of the parent pipe. Note: This is required for creating child pipes only. |
|
StartingWavelength |
The starting wavelength for the CWDM pipe. |
|
StartingFrequency |
The starting frequency for the DWDM pipe. |
|
NumOfChannels |
Number of channels (child pipes) to be created. |
|
AutoTermination |
The option to terminate a pipe automatically, after it is created. Valid values:
Note: Auto-termination of a parent pipe does not terminate the associated child pipes. |
|
AEntityType |
The entity type for the A side of the pipe. Valid values:
Note: Ignore this if AutoTermination is FALSE |
|
ZEntityType |
The entity type for the Z side of the pipe. Valid values:
Note: Ignore this if AutoTermination is FALSE |
|
AEntityId |
The entity ID for the A side of the pipe. Note: Ignore this if AutoTermination is FALSE |
|
ZEntityId |
The entity ID for the Z side of the pipe. Note: Ignore this if AutoTermination is FALSE |
|
AEntityName |
The entity name for the A side of the pipe. Note: Ignore this if AutoTermination is FALSE |
|
ZEntityName |
The entity name for the Z side of the pipe. Note: Ignore this if AutoTermination is FALSE |
|
Pipecharacteristic |
The characteristic name/value pair for the pipe. You can specify any number of characteristics. You can add any number of columns for specifying multiple characteristics for a pipe with the column name Pipecharacteristic. See Table 12, "Pipecharacteristic Values for CWDM and DWDM Pipes" for more information on values in this column for CWDM and DWDM pipes. |
Table 12 describes the values in Pipecharacteristic column of Pipes worksheet for CWDM and DWDM pipes.
Table 12 Pipecharacteristic Values for CWDM and DWDM Pipes
| Pipecharacteristic Value | Description |
|---|---|
|
ITU_Channel_Numbering=true |
ITU channel numbering to be considered for CWDM and DWDM pipe names. |
|
Offset=<0 or 50> GHz |
Offset value for DWDM pipes. |
|
Channel_Spacing=<spacing in GHz> |
Channel spacing for DWDM pipes. |
Support for Enabling Pipes and Connectivities Using Bulk Operation
This bulk operation enables multiple connectivites or pipes with any number of connectivities or pipes in UIM by uploading a spreadsheet that contains the details about pipe channels and connectivities.
Table 13 describes the columns you should define in the ConnectivityPipeEnablement worksheet.
Table 13 Column Headers in the ConnectivityPipeEnablement Worksheet
| Column Header | Description |
|---|---|
|
Action |
This column must have the value of CREATE. |
|
TrailType |
The type of the trail you want to associate. Valid values:
|
|
TrailName |
The name or identifier of the pipe or connectivity that you want it to be enabled by the pipe or connectivity mentioned in the TDMFacility column. |
|
TDMFacility |
The name or identifier of the pipe or connectivity with which you want to enable the pipe or connectivity mentioned in the TrailName column. You should provide the values in this column as follows:
|
Support for Expressing Rate Code in Connectivities Using Bulk Operation
A new column header, ExpressToRateCode is introduced in the Connectivities worksheet tab for bulk operation. This column enables you to provide the rate code with which the connectivity can be expressed. The channelized connectivities are assigned with the rate codes. We can configure the signal structures of the channelized connectivities by mentioning the channel name till which the connectivity has to be channelized in this column header.
Support for Latitude and Longitude in Locations Using Bulk Operation
The following column headers have been introduced in the Locations worksheet tab for bulk operation.
-
Latitude: This column enables you to provide the corresponding latitude of the property location, which is between -90.0000 and 90.0000 decimal degrees.
-
Longitude: This column enables you to provide the corresponding longitude of the property location, which is between -180.0000 and 180.0000 decimal degrees.
Updates to the inventoryimport.properties File
This release includes several updates to the existing inventoryimport.properties file because of the enhancements in bulk operations. Example 4, "inventoryimport.properties File" shows the existing inventoryimport.properites file.
You can find the updates to the inventoryimport.properties file as follows:
-
Example 2 shows the new worksheet tabs that are added along with the corresponding column headers.
-
Example 3 shows the new column headers that are added in the existing worksheet tabs. The worksheet tab names are shown in the example only for your reference.
Example 2 New Worksheet Tabs in the inventoryimport.properties File
#PLACE HEADERS
inventoryimport.place.action=Action
inventoryimport.place.specification=Specification
inventoryimport.place.placeType=PlaceType
inventoryimport.place.name=Name
inventoryimport.place.latitude=Latitude
inventoryimport.place.longitude=Longitude
inventoryimport.place.vertical=Vertical
inventoryimport.place.horizontal=Horizontal
inventoryimport.place.Address=Address
inventoryimport.place.AddressRange=AddressRange
inventoryimport.place.Location=Location
inventoryimport.place.Site=Site
inventoryimport.place.placeCharacteristic=PlaceCharacteristic

#ASSOCIATE PLACE HEADERS
inventoryimport.assocPlace.action=Action
inventoryimport.assocPlace.placeName=PlaceName
inventoryimport.assocPlace.placeType=PlaceType
inventoryimport.assocPlace.entityType=EntityType
inventoryimport.assocPlace.entityName=EntityName
inventoryimport.assocPlace.Address=Address
inventoryimport.assocPlace.AddressRange=AddressRange
inventoryimport.assocPlace.Location=Location
inventoryimport.assocPlace.Site=Site
inventoryimport.assocPlace.EQUIPMENT=Equipment
inventoryimport.assocPlace.LOGICAL_DEVICE= LogicalDevice
inventoryimport.assocPlace.PHYSICAL_DEVICE= PhysicalDevice
inventoryimport.assocPlace.PROPERTY_LOCATION= PropertyLocation

#PIPE CREATE COLUMN HEADERS
inventoryimport.pipe.action=Action
inventoryimport.pipe.specification=Specification
inventoryimport.pipe.name=Name
inventoryimport.pipe.autotermination=AutoTermination
inventoryimport.pipe.medium=Medium
inventoryimport.pipe.transmissionSignalType=TransmissionSignalType
inventoryimport.pipe.parentPipe=ParentPipe
inventoryimport.pipe.startingWavelength=StartingWavelength
inventoryimport.pipe.startingFrequency=StartingFrequency
inventoryimport.pipe.numOfChannels=NumOfChannels
inventoryimport.pipe.aEntityType=AEntityType
inventoryimport.pipe.zEntityType=ZEntityType
inventoryimport.pipe.aEntityId=AEntityId
inventoryimport.pipe.zEntityId=ZEntityId
inventoryimport.pipe.aEntityName=AEntityName
inventoryimport.pipe.zEntityName=ZEntityName
inventoryimport.pipe.characteristic=Pipecharacteristic
inventoryimport.pipe.EQUIPMENT=Equipment
inventoryimport.pipe.LOGICAL_DEVICE= LogicalDevice
inventoryimport.pipe.PHYSICAL_DEVICE= PhysicalDevice
inventoryimport.pipe.DEVICE_INTERFACE= DeviceInterface
inventoryimport.pipe.PHYSICAL_PORT= PhysicalPort

#PIPE CONNECTIVITY ENABLE COLUMN HEADERS
inventoryimport.connPipeEn.action=Action
inventoryimport.connPipeEn.trailType=TrailType
inventoryimport.connPipeEn.trailName=TrailName
inventoryimport.connPipeEn.TDMFacility=TDMFacility
inventoryimport.connPipeEn.pipe=Pipe
inventoryimport.connPipeEn.connectivity=Connectivity
Example 3 New Column Headers in the Existing Worksheet Tabs of the inventoryimport.properties File
# SHEET NAMES
inventoryimport.place.sheetname=Places
inventoryimport.assocPlace.sheetname=AssociatePlace
inventoryimport.pipe.sheetname=Pipes
inventoryimport.connPipeEn.sheetname=ConnectivityPipeEnablement

#LOCATION CREATION SHEET COLUMN HEADERS
inventoryimport.loc.longitude=Longitude
inventoryimport.loc.latitude=Latitude

#CONNECTIVTY CREATE COLUMN HEADERS
inventoryimport.con.exprRateCode=ExpressToRateCode
Minor Enhancements in This Release
The following minor enhancements are delivered in this patch:
-
You can use a customized label for an equipment hierarchy in the Equipment View tab.
-
Based on the permissions you have, you can update one or more activities for various orders.
-
Activities can have custom characteristics, which you can view in the activities' summary pages under Activity Workspace > View.
-
The Tree View page of a place displays all the equipment entities associated with the place.
-
UIM Web Services can also support the creation, association, update, and disassociation of property locations.
-
For all specifications, you can customize a characteristic using the Search icon.
-
In any UIM page, a field type can change to Read Only, Writable, or Mandatory depending on the values that you enter in other fields within the page.
Enhancements in UIM 7.4.0.6 (Patch 29770794)
The following minor enhancements are delivered in this patch:
-
UIM supports Flow Identifier consumption on a Logical Device Configuration item. To enable this, execute the ora_uim_dbtools.jar file that is packaged with this patch. Along with the jar file, deploy the following cartridges that are packaged with this patch:
-
ora_uim_mds_cartproj.zip
-
ora_uim_model_cartproj.zip
-
-
Telephone Number Block search option is available in the Engineering Work Orders page.
-
A default email ID is available for all automatic emails. To enable this, set the uim.defaultSenderEmail=uim@mycompany.com property in the system-config.properties file.
-
A reference implementation is available for supporting groom activities of virtual connectivity in Oracle Communications MSS, using the UIM federation framework. To use this enhancement, you need to deploy the latest version of OracleComms_UIM_MSS_VLANExtensions_cartproj.zip that is packaged with this patch.
-
You can create Network Resource Management entities and associate them with other entities by using the drag-and-drop feature.
-
To retrieve URLs in the Web services, the following properties have been added.
When performing email trigger events through the Web services, the following credentials of the UIM server should be mentioned in the system-config.properties file:
-
uim.serverName=
-
uim.serverPort=
-
-
You can perform bulk creation of entities (by using spreadsheets) while upgrading UIM using the patch installer. To perform this:
-
Copy the inventoryimport1.properties file that is packaged with this patch into the <domain_location>/UIM/config/, where <domain_location> is the location of the domain.
-
Rename the file to inventoryimport.properties.
-
Copy the inventoryimport2.properties file that is packaged with this patch into the <domain_location>/UIM/config/resources/logging/, where <domain_location> is the location of the domain.
-
Rename the file to inventoryimport.properties.
-
Create a folder importEntityTemplates with read, write, and execute permissions for the user and the group (770 in Linux/Solaris) in the <domain_location>/UIM/config, where <domain_location> is the location of the domain.
-
Copy the BulkImportTemplate.xlsx file that is packaged with this patch into the <domain_location>/UIM/config/importEntityTemplates, where <domain_location> is the location of the domain.
-
Copy any customizations in the importEntity.properties file to the respective inventoryimport.properties file.
-
Restart the UIM server.
-
Enhancements in UIM 7.4.0.4 (Patch 29393632)
The following sections describe the enhancements delivered in this patch.
Support for Entity Bulk Operations
Entity bulk operations enable you to perform various bulk operations on entities at a time, based on the data you provide as input in a spreadsheet file. You can use different tabs in the spreadsheet for each entity bulk operation. You provide the required entity information in the spreadsheet, upload it into UIM, and subsequently UIM processes the spreadsheet file and completes the bulk operation.
To support this functionality, a new Automated Bulk Import section has been added in the Activity Summary page. This section contains the options that let you navigate to and import a spreadsheet file that contains the required information about the entities.
You can create the following entities in bulk by specifying the required information in the spreadsheet file:
-
Property locations
-
Network entity codes
-
Logical devices
-
Physical devices
-
Equipment
-
Connectivities
-
Networks
-
Complete device assemblies, which include logical device, physical device and equipment at the same time.
You can perform the following entity-specific actions in bulk by specifying the required information in the spreadsheet file:
-
Map physical devices to equipment and map physical devices to logical devices at the same time
-
Add shelves in racks
-
Add cards in shelves
-
Map physical devices to logical devices
-
Map device interfaces to ports
-
Add connectivities to networks
-
Add network nodes
-
Add network edges
For entity bulk operations, UIM provides a sample spreadsheet file that contains the following worksheet tabs:
-
Locations: Use this tab to create property locations. See Table 14, "Locations Worksheet Tab Column Headers" for more information.
-
NetworkEntityCodes: Use this tab to create network entity codes. See Table 15, "NetworkEntityCodes Worksheet Tab Column Headers" for more information.
-
LogicalDevices: Use this tab to create logical devices. See Table 16, "LogicalDevices Worksheet Tab Column Headers" for more information.
-
PhysicalDevices: Use this tab to create physical devices. See Table 17, "PhysicalDevices Worksheet Tab Column Headers" for more information.
-
Equipments: Use this tab to create equipment. See Table 18, "Equipments Worksheet Tab Column Headers" for more information.
-
DeviceMappings: Use this tab to map a physical device to equipment, and map a physical device to a logical device. See Table 19, "DeviceMappings Worksheet Tab Column Headers" for more information.
-
Devices: Use this tab to build the entire device assembly at one time, which includes physical devices, logical devices and equipment. The name, network location, and NEC are shared between the physical device, logical device and equipment. See Table 20, "Devices Worksheet Tab Column Headers" for more information.
-
InsertShelfs: Use this tab to add shelves in a rack. See Table 21, "InsertShelfs Worksheet Tab Column Headers" for more information.
-
InsertCards: Use this tab to add cards in a shelf. See Table 22, "InsertCards Worksheet Tab Column Headers" for more information.
-
PortMappings: Use this tab to create ports and interfaces, and to map the ports to the interfaces. See Table 23, "PortMappings Worksheet Tab Column Headers" for more information.
-
Connectivities: Use this tab to create connectivities. See Table 24, "Connectivities Worksheet Tab Column Headers" for more information.
-
Networks: Use this tab to create networks. See Table 25, "Networks Worksheet Tab Column Headers" for more information.
-
AddConnectivityEdges: Use this tab to create connectivity edges. See Table 26, "AddConnectivityEdges Worksheet Column Headers" for more information.
-
NetworkNodes: Use this tab to create network nodes. See Table 27, "NetworkNodes Worksheet Tab Column Headers" for more information.
-
NetworkEdges: Use this tab to create network edges. See Table 28, "NetworkEdges Worksheet Tab Column Headers" for more information.
Note:
You have the option of including only the mandatory columns within various tabs in the spreadsheet. If a column is not required and you do not want to enter a value, then you can remove that column from the spreadsheet. This allows you to build your own custom spreadsheet templates based on your business requirements.Table 14 describes the columns defined for the Locations worksheet tab.
Table 14 Locations Worksheet Tab Column Headers
| Column Header | Description |
|---|---|
|
Action |
This column must have the value of CREATE. |
|
PropertyName |
Name of the property location. |
|
Street |
The street address of the property location. |
|
City |
The city of the property location. |
|
State |
The state of the property location. |
|
PostalCode |
The postal code of the property location. |
|
Country |
The country of the property location. |
|
NetworkLocationCode |
An alphanumeric string that uniquely identifies a property location in a network. |
|
GeoCodeAddress |
Valid values: true or false. |
|
IsServiceLocation |
Valid values: true or false. |
|
IsNetworkLocation |
Valid values: true or false. |
Table 15 describes the columns defined for the NetworkEntityCodes worksheet tab.
Table 15 NetworkEntityCodes Worksheet Tab Column Headers
| Column Header | Description |
|---|---|
|
Action |
This column must have the value of CREATE. |
|
NetworkLocationCode |
An alphanumeric string that uniquely identifies a property location in a network. |
|
NetworkEntityCode |
A string that uniquely identifies a network entity (such as a logical device) within a network location. |
Table 16 describes the columns defined for the LogicalDevices worksheet tab.
Table 16 LogicalDevices Worksheet Tab Column Headers
| Column Header | Description |
|---|---|
|
Action |
This column must have the value of CREATE. |
|
Name |
The name of the logical device. |
|
Specification |
The specification used to create the logical device. |
|
NetworkLocation |
The network location associated to the Logical Device entity. |
|
NetworkEntityCode |
A string that uniquely identifies a logical device within a network location. |
|
DeviceIdentifier |
Displays the device identifier of the logical device associated with the network entity code. |
|
LDcharacteristic |
The characteristic name/value pair per cell for the Logical Device entities you are creating. You can specify any number of characteristics. You can add any number of column headers for specifying multiple characteristics for an entity. For example, LDcharacteristic1, LDcharacteristic2,.....LDcharacteristicN. Valid format: LD_Char1=value, LD_Char2=value,....LD_CharN=value. |
Table 17 describes the columns defined for the PhysicalDevices worksheet tab.
Table 17 PhysicalDevices Worksheet Tab Column Headers
| Column Header | Description |
|---|---|
|
Action |
This column must have the value of CREATE. |
|
Name |
The name of the physical device. |
|
Specification |
The specification used to create the physical device. |
|
NetworkLocation |
The network location associated to the Physical Device entity. |
|
SerialNumber |
The serial number of the physical device. |
|
PDcharacteristic |
The characteristic name/value pair per cell for the Physical Device entities you are creating. You can specify any number of characteristics. You can add any number of column headers for specifying multiple characteristics for an entity. For example, PDcharacteristic1, PDcharacteristic2,.....PDcharacteristicN. Valid format: PD_Char1=value, PD_Char2=value,....PD_CharN=value. |
Table 18 describes the columns defined for the Equipments worksheet tab.
Table 18 Equipments Worksheet Tab Column Headers
| Column Header | Description |
|---|---|
|
Action |
This column must have the value of CREATE. |
|
Name |
The name of the equipment. |
|
Specification |
The specification used to create equipment. |
|
NetworkLocation |
The network location associated to the Equipment entity. |
|
SerialNumber |
The serial number of the equipment. |
|
EQcharacteristic |
The characteristic name/value pair per cell for the Equipment entities you are creating. You can specify any number of characteristics. You can add any number of column headers for specifying multiple characteristics for an entity. For example, EQcharacteristic1, EQcharacteristic2,......EQcharacteristicN. Valid format: EQ_Char1=value, EQ_Char2=value,....EQ_CharN=value. |
Table 19 describes the columns defined for the DeviceMappings worksheet tab.
Table 19 DeviceMappings Worksheet Tab Column Headers
| Column Header | Description |
|---|---|
|
PhysicalDevice |
The name of the physical device. |
|
LogicalDevice |
The name of the logical device. |
|
Equipment |
The name of the equipment. |
Table 20 describes the columns defined for the Devices worksheet tab.
Table 20 Devices Worksheet Tab Column Headers
| Column Header | Description |
|---|---|
|
Action |
This column must have the value of CREATE. |
|
Name |
The generic name for logical device, physical device, and equipment. |
|
DeviceIdentifier |
Specify the device identifier in the format: NetworkLocation.NetworkEntityCode. |
|
LogicalDeviceSpecification |
The specification used to create the logical devices. |
|
PhysicalDeviceSpecification |
The specification used to create the physical devices. |
|
EquipmentSpecification |
The specification use to create the equipment. |
|
NetworkLocation |
A property location that has been assigned a network location code. |
|
NetworkEntityCode |
A string that uniquely identifies a network entity (such as a logical device) within a network location. |
|
SerialNumber |
The serial number for the physical device, logical device, and equipment. |
|
MACAddress |
The MAC address that uniquely identifies a device. |
|
PDcharacteristic |
The characteristic name/value pair per cell for the Physical Device entities you are creating. You can specify any number of characteristics. You can add any number of column headers for specifying multiple characteristics for an entity. For example, PDcharacteristic1, PDcharacteristic2,......PDcharacteristicN. |
|
LDcharacteristic |
The characteristic name/value pair per cell for the Logical Device entities you are creating. You can specify any number of characteristics. You can add any number of column headers for specifying multiple characteristics for an entity. For example, LDcharacteristic1, LDcharacteristic2,......LDcharacteristicN. |
|
EQcharacteristic |
The characteristic name/value pair per cell for the Equipment entities you are creating. You can specify any number of characteristics. You can add any number of column headers for specifying multiple characteristics for an entity. For example, EQcharacteristic1, EQcharacteristic2,......EQcharacteristicN. |
Table 21 describes the columns defined for the InsertShelfs worksheet tab.
Table 21 InsertShelfs Worksheet Tab Column Headers
| Column Header | Description |
|---|---|
|
Action |
This column must have the value of CREATE. |
|
RackName |
The name of the rack in which you want to create a shelf. |
|
ShelfSpecification |
The specification used to create the shelf. |
|
ShelfName |
The name of the shelf. |
|
SerialNumber |
The serial number of the Equipment entity (that represents the shelf). |
|
ShelfCharacteristic |
The characteristic name/value pair per cell for the Equipment entities (that represent shelves) you are creating. You can specify any number of characteristics. You can add any number of column headers for specifying multiple characteristics for an entity. For example, ShelfCharacteristic1, ShelfCharacteristic2,......ShelfCharacteristicN. Valid format: Shelf_Char1=value, Shelf_Char2=value,....Shelf_CharN=value. |
Table 22 describes the columns defined for the InsertCards worksheet tab.
Table 22 InsertCards Worksheet Tab Column Headers
| Column Header | Description |
|---|---|
|
Action |
This column must have the value of CREATE. |
|
ShelfName |
The name of the shelf in which you want to create a card. |
|
CardSpecification |
The specification used to create the card. |
|
Slot |
The slot number on the shelf to install the card, based on the equipment holder position number. |
|
Name |
The name of the card. |
|
Abbreviation |
The abbreviation for the card (for example, PWR) used to derive the names of the ports. |
|
CardCharacteristic |
The characteristic name/value pair per cell for the Equipment entities (that represent cards) you are creating. You can specify any number of characteristics. You can add any number of column headers for specifying multiple characteristics for an entity. For example, CardCharacteristic1, CardCharacteristic2,......CardCharacteristicN. Valid format: Card_Char1=value, Card_Char2=value,....Card_CharN=value. |
Table 23 describes the columns defined for the PortMappings worksheet tab.
Table 23 PortMappings Worksheet Tab Column Headers
| Column Header | Description |
|---|---|
|
Action |
This column must have the value of CREATE. |
|
Type |
Valid values:
|
|
Name |
Name of the physical device or equipment. |
|
PortSpecification |
The specification used to create the port. |
|
PortName |
The name of the port. |
|
InterfaceSpecification |
The specification used to create the device interface. |
|
InterfaceName |
The name of the device interface. |
|
LogicalDeviceName |
The logical device to which the device interface is associated. |
Table 24 describes the columns defined for the Connectivities worksheet tab.
Note:
The valid values for Rate Code, Technology, Function, and so on, are determined based on the Connectivity Summary or Connectivity Search pages in the UIM application.Table 24 Connectivities Worksheet Tab Column Headers
| Column Header | Description |
|---|---|
|
Action |
This column must have the value of CREATE. |
|
Technology |
The technology that applies to this connectivity. |
|
Specification |
The specification used to create the connectivity. |
|
Format |
The identification format for this connectivity. Specify only the identification formats that are valid for the connectivity specification. Valid values:
|
|
ALocation |
The network location code or network entity code for the A side of the connectivity. |
|
ZLocation |
The network location code or network entity code for the Z side of the connectivity. |
|
RateCode |
The rate code that applies to the connectivity. |
|
OverSubscription |
The oversubscription value for the connectivity. |
|
Function |
The function that applies to the connectivity. |
|
Identifier |
You can leave this column blank. |
|
Concharacteristic |
The characteristic name/value pair per cell for the Connectivity entities you are creating. You can specify any number of characteristics. You can add any number of column headers for specifying multiple characteristics for an entity. For example, Concharacteristic1, Concharacteristic2,.....ConcharacteristicN. Valid format: Con_Char1=value, Con_Char2=value,....Con_CharN=value. |
|
AutoTermination |
Specify a value of true or false. If you specify true, UIM searches for the logical device with network entity code specified in the ALocation and ZLocation columns and terminates with the device interface if an interface with the same rate code exists. |
|
Adevice |
Name of the logical device for the A side of the connectivity. |
|
Zdevice |
Name of the logical device for the Z side of the connectivity. |
|
GapMessage |
Specify a message for accepted connectivity gaps. |
Table 25 describes the columns defined for the Networks worksheet tab.
Table 25 Networks Worksheet Tab Column Headers
| Column Header | Description |
|---|---|
|
Action |
This column must have the value of CREATE. |
|
NetworkName |
The name of the network you want to create. |
|
NetworkSpecification |
The specification used to create the network. |
|
Topology |
The network topology. |
|
NWCharacteristic |
The characteristic name/value pair per cell for the Network entities you are creating. You can specify any number of characteristics. You can add any number of column headers for specifying multiple characteristics for an entity. For example, NWCharacteristic1, NWCharacteristic2,......NWCharacteristicN. Valid format: NW_Char1=value, NW_Char2=value,....NW_CharN=value. |
Table 26 describes the columns defined for the AddConnectivityEdges worksheet tab.
Table 26 AddConnectivityEdges Worksheet Column Headers
| Column Header | Description |
|---|---|
|
Action |
This column must have the value of CREATE. |
|
NetworkName |
The name of the network in which you want to create the connectivity. |
|
EntityType |
Valid value: CONNECTIVITY |
|
EntityName |
The name of the connectivity. |
Table 27 describes the columns defined for the NetworkNodes worksheet tab.
Table 27 NetworkNodes Worksheet Tab Column Headers
| Column Header | Description |
|---|---|
|
Action |
This column must have the value of CREATE. |
|
NetworkName |
The name of the network in which you want to create the network node. |
|
EntityType |
Valid value: LOGICAL_DEVICE |
|
EntityName |
The name of the logical device. |
Table 28 describes the columns defined for the NetworkEdges worksheet tab.
Table 28 NetworkEdges Worksheet Tab Column Headers
| Column Header | Description |
|---|---|
|
Action |
This column must have the value of CREATE. |
|
NetworkName |
The name of the network in which you want to create the network edge. |
|
EntityType |
Valid value: CONNECTIVITY |
|
EntityName |
The name of the connectivity. |
|
FromNode |
The originating logical device name for the connectivity that the network edge represents. |
|
ToNode |
The terminating logical device name for the connectivity that the network edge represents. |
Customizing Column Headers in Worksheet Tabs for Importing Entities
You can use the UIM_Home/config/inventoryimport.properties file to customize column headers in spreadsheets for importing entities. See the tables listed in "Support for Entity Bulk Operations" for more information about the column headers that you can customize based on your business requirements.
Note:
You have the option of including only the mandatory columns within various tabs in the spreadsheet. If a column is not required and you do not want to enter a value, then you can remove that column from the spreadsheet. This allows you to build your own custom spreadsheet templates based on your business requirements.The inventoryimport.properties file was previously known as importEntity.properties file, which contained properties for defining column headers for importing only Telephone Number entities. The importEntity.properties file has now been renamed to inventoryimport.properties.
Example 4 shows the inventoryimport.properties file, which defines column headers for the different worksheet tabs that you use to import entities into UIM to process entity bulk operations.
Example 4 inventoryimport.properties File
# SHEET NAMES
inventoryimport.loc.sheetname=Locations
inventoryimport.nec.sheetname=NetworkEntityCodes
inventoryimport.ld.sheetname=LogicalDevices
inventoryimport.pd.sheetname=PhysicalDevices
inventoryimport.eq.sheetname=Equipments
inventoryimport.devicemapping.sheetname=DeviceMappings
inventoryimport.device.sheetname=Devices
inventoryimport.shelf.sheetname=InsertShelfs
inventoryimport.card.sheetname=InsertCards
inventoryimport.portmap.sheetname=PortMappings
inventoryimport.con.sheetname=Connectivities
inventoryimport.nw.sheetname=Networks
inventoryimport.addcon.sheetname=AddConnectivityEdges
inventoryimport.node.sheetname=NetworkNodes
inventoryimport.edge.sheetname=NetworkEdges
inventoryimport.tn.sheetname=TelephoneNumber
inventoryimport.tnsa.sheetname=TNServiceAssignment
inventoryimport.sim.sheetname=SIM
inventoryimport.imsi.sheetname=IMSI
inventoryimport.simmapping.sheetname=SimMapping

#TelephoneNumber SHEET COLUMN HEADERS
inventoryimport.tn.action=action
inventoryimport.tn.id=telephoneNumber
inventoryimport.tn.specification=specification
inventoryimport.tn.description=description
inventoryimport.tn.characteristic=characteristic

#TNServiceAssignment SHEET COLUMN HEADERS
inventoryimport.tnsa.action=action
inventoryimport.tnsa.tnId=telephoneNumber
inventoryimport.tnsa.serviceSpecification=serviceSpecification
inventoryimport.tnsa.serviceName=serviceName
inventoryimport.tnsa.serviceConfigurationSpecification=serviceConfigurationSpecification
inventoryimport.tnsa.serviceDescription=serviceDescription
inventoryimport.tnsa.serviceCharacteristic=serviceCharacteristic

#SIM SHEET COLUMN HEADERS
inventoryimport.sim.action=action
inventoryimport.sim.name=name
inventoryimport.sim.specification=specification
inventoryimport.sim.description=description
inventoryimport.sim.characteristic=characteristic
inventoryimport.sim.deviceIdentifier=deviceIdentifier
inventoryimport.sim.networkLocation=networkLocation

#IMSI SHEET COLUMN HEADERS
inventoryimport.imsi.action=action
inventoryimport.imsi.name=name
inventoryimport.imsi.specification=specification
inventoryimport.imsi.description=description
inventoryimport.imsi.characteristic=characteristic
inventoryimport.imsi.simName=SIMName
inventoryimport.imsi.simId=SIMId

#SimMapping SHEET COLUMN HEADERS
inventoryimport.simMapping.action=action
inventoryimport.simMapping.msisdn=MSISDN
inventoryimport.simMapping.simName=SIMName
inventoryimport.simMapping.imsiName=IMSIName

#LOCATION CREATION SHEET COLUMN HEADERS
inventoryimport.loc.action=Action
inventoryimport.loc.propertyname=PropertyName
inventoryimport.loc.street=Street
inventoryimport.loc.city=City
inventoryimport.loc.state=State
inventoryimport.loc.postalcode=PostalCode
inventoryimport.loc.country=Country
inventoryimport.loc.networklocationcode=NetworkLocationCode
inventoryimport.loc.geocodeaddress=GeoCodeAddress
inventoryimport.loc.isnetworklocation=IsNetworkLocation
inventoryimport.loc.isservicelocation=IsServiceLocation

#NETWORKENTITYCODE CREATION SHEET COLUMN HEADERS
inventoryimport.nec.action=Action
inventoryimport.nec.networklocationcode=NetworkLocationCode
inventoryimport.nec.networkentitycode=NetworkEntityCode

#LOGICAL DEVICE COLUMN HEADERS
inventoryimport.ld.action=Action
inventoryimport.ld.name=Name
inventoryimport.ld.specification=Specification
inventoryimport.ld.networklocation=NetworkLocation
inventoryimport.ld.networkentitycode=NetworkEntityCode
inventoryimport.ld.deviceidentifier=DeviceIdentifier
inventoryimport.ld.characteristic=LDcharacteristic

#PHYSICAL DEVICE COLUMN HEADERS
inventoryimport.pd.action=Action
inventoryimport.pd.name=Name
inventoryimport.pd.specification=Specification
inventoryimport.pd.networklocation=NetworkLocation
inventoryimport.pd.serialnumber=SerialNumber
inventoryimport.pd.characteristic=PDcharacteristic

#EQUIPMENT COLUMN HEADERS
inventoryimport.eq.action=Action
inventoryimport.eq.name=Name
inventoryimport.eq.specification=Specification
inventoryimport.eq.networklocation=NetworkLocation
inventoryimport.eq.serialnumber=SerialNumber
inventoryimport.eq.characteristic=EQcharacteristic

#DEVICE MAPPING COLUMN HEADERS
inventoryimport.devicemapping.physicaldevice=PhysicalDevice
inventoryimport.devicemapping.logicaldevice=LogicalDevice
inventoryimport.devicemapping.equipment=Equipment


#DEVICE CREATION COLUMN HEADERS
inventoryimport.device.action=Action
inventoryimport.device.name=Name
inventoryimport.device.deviceidentifier=DeviceIdentifier
inventoryimport.device.logicaldevicespecification=LogicalDeviceSpecification
inventoryimport.device.physicaldevicespecification=PhysicalDeviceSpecification
inventoryimport.device.equipmentspecification=EquipmentSpecification
inventoryimport.device.networklocation=NetworkLocation
inventoryimport.device.networkentitycode=NetworkEntityCode
inventoryimport.device.serialnumber=SerialNumber
inventoryimport.device.macaddress=MACAddress
inventoryimport.device.pdcharacteristic=PDcharacteristic
inventoryimport.device.ldcharacteristic=LDcharacteristic
inventoryimport.device.eqcharacteristic=EQcharacteristic

#INSERT SHELF CREATION COLUMN HEADERS
inventoryimport.shelf.action=Action
inventoryimport.shelf.rackname=RackName
inventoryimport.shelf.specification=ShelfSpecification
inventoryimport.shelf.name=ShelfName
inventoryimport.shelf.serialnumber=SerialNumber
inventoryimport.shelf.characteristic=ShelfCharacteristic

#INSERT CARD CREATION COLUMN HEADERS
inventoryimport.card.action=Action
inventoryimport.card.shelfname=ShelfName
inventoryimport.card.specification=CardSpecification
inventoryimport.card.slot=Slot
inventoryimport.card.name=Name
inventoryimport.card.abbreviation=Abbreviation
inventoryimport.card.characteristic=CardCharacteristic

#PORT MAPPINGS COLUMN HEADERS
inventoryimport.portmap.action=Action
inventoryimport.portmap.type=Type
inventoryimport.portmap.name=Name
inventoryimport.portmap.portspecification=PortSpecification
inventoryimport.portmap.portname=PortName
inventoryimport.portmap.interfacespecification=InterfaceSpecification
inventoryimport.portmap.interfacename=InterfaceName
inventoryimport.portmap.ldname=LogicalDeviceName

#CONNECTIVTY CREATE COLUMN HEADERS
inventoryimport.con.action=Action
inventoryimport.con.technology=Technology
inventoryimport.con.specification=Specification
inventoryimport.con.format=Format
inventoryimport.con.alocation=ALocation
inventoryimport.con.zlocation=ZLocation
inventoryimport.con.ratecode=RateCode
inventoryimport.con.oversubscription=Oversubscription
inventoryimport.con.function=Function
inventoryimport.con.identifier=Identifier
inventoryimport.con.characteristic=Concharacteristic
inventoryimport.con.autotermination=AutoTermination
inventoryimport.con.adevice=ADevice
inventoryimport.con.zdevice=ZDevice
inventoryimport.con.gapmessage=GapMessage
#Additional UNI Connectivity Attributes
inventoryimport.con.servicemultiplexing=ServiceMultiplexing
inventoryimport.con.bundling=Bundling
inventoryimport.con.alltoonebundling=AllToOneBundling
inventoryimport.con.valanbased=VLANBased
inventoryimport.con.maxpvncount=MaxPacketVirtualNetworkCount
#Additional INNI Connectivity Attributes
inventoryimport.con.internetwork=Internetwork
#Additional ENNI Connectivity Attributes
inventoryimport.con.otherserviceprovidername=OtherServiceProvider
inventoryimport.con.otherproviderdemarcationpoint=OtherProviderDemarcationPoint

# Network COLUMN HEADERS
inventoryimport.nw.action=Action
inventoryimport.nw.name=NetworkName
inventoryimport.nw.specification=NetworkSpecification
inventoryimport.nw.topology=Topology
inventoryimport.nw.characteristic=NWCharacteristic

# ADD Network NODES COLUMN HEADERS
inventoryimport.node.action=Action
inventoryimport.node.nwname=NetworkName
inventoryimport.node.entitytype=EntityType
inventoryimport.node.entityname=EntityName


# Add Connectivity Edges to Network
inventoryimport.addcon.action=Action
inventoryimport.addcon.nwname=NetworkName
inventoryimport.addcon.entitytype=EntityType
inventoryimport.addcon.entityname=EntityName

# ADD Network EDGES CUCOLUMN HEADERS
inventoryimport.edge.action=Action
inventoryimport.edge.nwname=NetworkName
inventoryimport.edge.entitytype=EntityType
inventoryimport.edge.entityname=EntityName
inventoryimport.edge.fromnode=FromNode
inventoryimport.edge.tonode=ToNode

#Specification for creating custom involvements between SIM and MSISDN
inventoryimport.simMapping.custInvSpecName=PreconfigureSpec

#FileUpload content types
inventoryimport.fileUploadWhiteListMimeTypes=application/vnd.openxmlformats-officedocument.spreadsheetml.sheet
New Canvas Diagram Page
UIM now includes a new Canvas Diagram page, which is available for business interaction entities created using the new Planning Diagram specification.
The Canvas Diagram page enables you to do the following:
-
Create, name, and search for planning diagrams for network buildouts
-
Create new entities by dragging the following entity specifications onto the canvas:
-
Connectivity Specifications
-
Equipment Specifications
-
Logical Device Specifications
-
Physical Device Specifications
-
-
Add multiple entities at a time using the Quantity slider control
-
Associate entities to the Planning Diagram specification in a business interaction, thus tying the entities to the business interaction and providing full life-cycle management of those entities, including the ability to complete and cancel them
-
Search for and add the following existing entities onto the canvas and perform actions on them:
-
Equipment
-
Logical Device
-
Network/Entity Location
-
Physical Device
-
Place
-
Pipe
After adding the existing entities onto the canvas, you can perform actions on the entities, such as adding a connectivity between property locations, associating a pipe between logical devices, and so on.
-
-
Auto-terminate connectivities
-
Open Summary pages of entities and edit entities directly using links on the canvas
See the "Working with the Canvas Diagram Page of a Business Interaction" and "Canvas Diagram Page" topics in the UIM Help for more information.
Web Service Operations Now Support the Equipment Entity Type
In addition to the currently supported entity types, the following web service operations have now been enhanced to support the Equipment entity type:
-
CreateEntity: Enables you to create equipment, such as rack, shelf, or card
-
FindEntity: Enables you to find equipment
-
DeleteEntity: Enables you to delete equipment
-
AssociateEntity: Enables you to associate a shelf to a rack, or associate a card to a shelf
-
DisassociateEntity: Enables you to disassociate a shelf from a rack, or disassociate a card from a shelf
To support this functionality, an entity type of EquipmentType is defined in the PhysicalDevice.xsd schema file.
See the "CreateEntity," "DeleteEntity," "FindEntity,""AssociateEntity,"and "DisassociateEntity" sections in UIM Web Services Developer's Guide for more information.
Bulk Editing Characteristics of Physical Device and Equipment Entities
You can now bulk edit the characteristics of Physical Device and Equipment entities from the following newly added pages:
-
Physical Device - Bulk Edit
-
Equipment - Bulk Edit
See the UIM Help for more information.
Ability to Search for Telephone Number Blocks from within Activities
You can now search for telephone number blocks from within activities in the Activity Workspace area of an Activity Summary page. A new TN Bulk Actions option is now available on the Actions menu in the Activity Workspace section.
Selecting the TN Bulk Actions option and then selecting the Telephone Number Blocks sub-option opens the Telephone Number Blocks page, which enables you to search for telephone number blocks.
See the UIM Help for more information.
Assigning Flow Identifiers as Configuration Items to Logical Device Configurations
You can now assign a flow identifier as a configuration item to a logical device configuration version in both the current and business interaction context.
Existing MSS/UIM Reference Integration for VLAN Management Expanded to Support MSS Network Grooming
The reference integration for VLAN Management between Oracle Communications Unified Inventory Management (UIM) and Oracle Communications MetaSolv Solution (MSS) now supports the assignment and management of VLANs within the context of an MSS Network Grooming project.
To support this capability, a new Generate Virtual Channels menu option is now available within the MSS Network Grooming project, which does the following:
-
Packages up the current and pending design changes for every highlighted connection to send to UIM, which will determine, track, and send back the appropriate VLANs, to be stored within MSS
-
Creates or updates an existing Business Interaction within UIM to manage the VLANS, which is tied directly to the MSS Network Grooming project
-
Tracks all of the connections on the Network Grooming project within this single UIM Business Interaction, thus simplifying the use and maintainability of the VLANs
-
Automatically creates and stores a direct link to the UIM Business Interaction within the Network Grooming project for easy navigation and maintenance
Additionally, the reference integration now supports the following activities, which enable it to keep the VLAN data synchronized between MSS and UIM:
-
Validate Groom: Responsible for validating all VLAN data is synchronized between MSS and UIM prior to generating the Network Grooming order within MSS
-
Remove Connection from Groom: Responsible for updating the statuses of any VLANs associated to a connection that is removed from a Network Grooming project
-
Delete Groom: Responsible for deleting the UIM Business Interaction associated to the Network Grooming project, and updating the associated VLANs
For detailed instructions about installing the required software, setting up UIM and MSS, and integrating UIM with MSS for the reference implementation, see Knowledge Article 2472722.1 - Integrating MetaSolv Solution with Unified Inventory Management for VLAN Management on the My Oracle Support website:
Enhancements in UIM 7.4.0.3 (Patch 28871164)
The following sections describe the enhancements delivered in this patch.
Telephone Number Enhancements
This release of UIM introduces a number of new and improved features related to telephone numbers, which the following sections describe in detail.
New Landing Page
UIM now includes a new landing page for Telephone Number entities. To open the new telephone number landing page, in the Inventory - Resources group of the navigation section, click Telephone Numbers.
The new telephone number landing page contains the following icons:
-
Search and Edit: Enables you to search for, edit, and delete existing telephone numbers.
-
Create: Enables you to create new telephone numbers.
-
Search TN Blocks: Enables you to search for telephone numbers in blocks of sequential numbers. See "Ability to Search for Telephone Number Blocks" for more information.
-
Load And Associate: Enables you to load and associate subscriber identity modules (SIMs), international mobile subscriber identities (IMSIs), and Mobile Station International Subscriber Directory Numbers (MSISDNs) in bulk.
-
Port In: Create ported-in telephone numbers in bulk and assign the ported-in telephone numbers to services
-
Port Out: Transition port-out numbers in bulk.
-
Snapback: Transition snapback telephone numbers in bulk.
-
Winback: Enables you to transition winback telephone numbers in bulk and assign the winback telephone numbers to services.
See "Support for Telephone Number Bulk Operations" for more information about the Load and Associate, Port In, Port Out, Snapback, and Winback bulk operations.
Ability to Search for Telephone Number Blocks
UIM now enables you to search for telephone number entities in blocks of sequential numbers. You can search for telephone numbers blocks using the Telephone Numbers Block Search page, which you open by clicking Search TN Block in the telephone number landing page.
Note:
The telephone number block search does not retrieve the reserved telephone numbers.You can also reserve a telephone number block (multiple telephone numbers) the same way as you reserve a single telephone number. When reserving telephone number block, you can specify the range of numbers that you want to reserve in the block, because you may not want to reserve all the numbers retrieved in the telephone number block search.
See the UIM Help for more information.
Support for Telephone Number Bulk Operations
Telephone number bulk operations enable you to perform various bulk operations on multiple telephone numbers at a time, based on the data you provide as input in a spreadsheet file. UIM provides a separate sample spreadsheet for each bulk operation. You provide the required telephone number information in the spreadsheet file, upload it into UIM, and subsequently UIM processes the spreadsheet file and completes the bulk operation.
You can perform the following bulk operations on telephone numbers:
-
Load and associate telephone numbers in bulk: You can load and associate subscriber identity modules (SIMs), international mobile subscriber identities (IMSIs), and Mobile Station International Subscriber Directory Numbers (MSISDNs) in bulk using the Telephone Number Operation - Load And Associate page, which you open by clicking Load and Associate in the telephone number landing page.
Logical devices represent the SIMs, logical device accounts represent the IMSIs, and telephone numbers represent the MSISDNs.
Loading and associating telephone numbers implies that in a single operation you can do the following:
-
(Optional) Create logical devices.
-
(Optional) Create logical device accounts.
-
(Optional) Associate logical devices with telephone numbers. The telephone numbers must already exist in the inventory.
-
Associate logical devices with logical device accounts.
-
-
Create ported-in telephone numbers in bulk and assign ported-in numbers to services: You work with the ported-in telephone numbers in the following pages:
-
Telephone Number Operation - Port In: Enables you to create ported-in telephone numbers in bulk by providing the required information in a spreadsheet file. You open this page by clicking Port In in the telephone number landing page.
-
Telephone Number Operation - Port In Service Assignment: Enables you to bulk assign the ported-in telephone numbers to services by providing the required information in a spreadsheet file. You open this page by clicking Port In Service Assignment in the telephone number landing page.
-
-
Transition port-out telephone numbers in bulk: You can transition port-out telephone numbers in bulk using the Telephone Number Operation - Port Out page, which you open by clicking Port Out in the telephone number landing page.
-
Transition snapback telephone numbers in bulk: You can transition snapback telephone numbers in bulk using the Telephone Number Operation - Snapback page, which you open by clicking Snapback in the telephone number landing page.
-
Transition winback telephone numbers in bulk and assign winback telephone numbers to services: You work with the winback telephone numbers in the following pages:
-
Telephone Number Operation - Winback: Enables you to transition winback telephone numbers in bulk by providing the required information in a spreadsheet file. You open this page by clicking Winback in the telephone number landing page.
-
Telephone Number Operation - Winback Service Assignment: Enables you to bulk assign winback telephone numbers to services by providing the required information in a spreadsheet file. You open this page by clicking Winback Service Assignment in the telephone number landing page.
-
See the UIM Help for more information.
The following properties files have been added to support the telephone number bulk operations:
-
importEntity.properties: You use this file to define column headers in spreadsheets for importing entities.
-
inventoryBulkProcess.properties: You use this file to control the telephone number bulk operations.
-
telephoneNumberBulk.properties: You use this file to control the consumption of the ported-in telephone numbers
See UIM System Administrator's Guide for more information about the properties files.
UIM Cartridge Deployer Tool Enhancements
This release of UIM includes the following enhancements to the Cartridge Deployer Tool, particularly around error handling and logging during cartridge deployment:
-
Cartridge Management Client Code Error Logging with Apache Log4j
-
Missing Dependent Cartridges Are Now Listed in the Error Message
-
Appropriate Error Displayed When the custom.ear File is Missing
-
Updated Error Message for Timeout During Cartridge Deployment
Cartridge Management Client Code Error Logging with Apache Log4j
UIM now uses Log4j to log the cartridge management client code-related errors in a separate log file: serverName_uim_cartridgeDeployment.log, which is located in the Domain_Home/uim/logs directory.
where
-
serverName is the host name for UIM
-
Domain_Home is the is the domain root directory
Missing Dependent Cartridges Are Now Listed in the Error Message
When you try to deploy a cartridge before all of its dependent cartridges have been deployed using either the Cartridge Deployer Tool or Oracle Communications Design Studio, all the missing dependent cartridges are now listed in the error message.
For example, consider three cartridges: CartA, CartB, and CartC. CartC is dependent on CartA and CartB. If you try deploying CartC, the following error message is displayed:
"The cartridge cannot be installed due to Dependency errors:
A Dependent Cartridge CartA with Version 1.0.0.0.0 doesn't exist
A Dependent Cartridge CartB with Version 1.0.0.0.0 doesn't exist."
Appropriate Error Displayed When the custom.ear File is Missing
When you deploy a cartridge containing java classes in an environment where the custom.ear file is missing, the following error message is displayed:
"Unable to find the deployment with name custom. Please deploy custom.ear as application."
Note:
This error is applicable only to development environments.Rule Compilation Errors Are Now Handled Properly
When you deploy a ruleset cartridge using either the Cartridge Deployer Tool or Oracle Communications Design Studio, the following exception is displayed if the ruleset cartridge has syntax errors or compilation issues:
"RuleExecutionException"
Updated Error Message for Timeout During Cartridge Deployment
The timeout error message that you receive when deploying the super JAR file has been updated as follows:
"Deployment Failed Cancelled the operation after a timeout of 600 sec
Please verify logs and retry cartridge deployment after increasing timeout value with below steps.
1. Login to WebLogic Console
2. Click on 'Lock & Edit' to modify
3. Expand Services under Domain Structure and click on JTA
4. Increase the timeout seconds value and save
5. Click on Activate Changes"
Device Interface Search Results Display Device Interface Assignments
In this enhancement, the Device Interface Search Results section includes a new Assignment column, which displays the entities to which the device interface is assigned. The Assignment column displays these entities as links which, when clicked, opens the General Information tab of the entity Summary page.
The Assignment column displays the entities in the following format:
entitySpecification - entityID - entityName
where:
-
entitySpecification is the specification used to define the entity.
-
entityID is the unique ID generated for the entity.
-
entityName is the name for the entity.
For example, a Pipe entity is displayed as follows:
DSL_Base_Pipe_Spec - 75002 - DSL_Base_Pipe#1
Bulk Editing Characteristics of Logical Device and Device Interface Entities
You can now bulk edit the characteristics of Logical Device and Device Interface entities from the following newly added pages:
-
Logical Device - Bulk Edit
-
Device interface - Bulk Edit
See UIM System Administrator's Guide and the UIM Help for more information.
New Query Behavior Introduced
In UIM, the ui.search.queryBehavior property determines the query behavior.
In this enhancement, a new query behavior, FULL_COUNT_LIMIT_QUERY (6), has been added, which is now the default value.
You configure query behaviors by setting the ui.search.queryBehavior property in the UIM_Home/config/system-config.properties file.
For example:
ui.search.queryBehavior=6
The ui.search.queryBehavior property setting determines how much data is queried from the database and whether the count is retrieved for the UI.
In addition, the default value of the ui.search.queryLimit property has been changed from -1 to 10000. This property sets a limit to UIM query results. The default value of 10000 indicates that a maximum of 10000 rows will be retrieved and displayed in the UIM query results. You can also set this property to -1, which indicates that no limit is applied to the query results.
See UIM System Administrator's Guide for more information.
Assigning a User to Multiple Activities at a Time
Prior to this enhancement, you could assign a user only to a single activity. With this enhancement, you can now assign a user to multiple activities at a time from the Activity Details tab of the Engineering Work Order Summary page.
Note:
Only the user who has a role of ProjectManager can assign a user to multiple activities. See UIM System Administrator's Guide for information about granting application roles.See the UIM Help for more information.
Improved Process for Creating Engineering Work Orders and Business Interactions
Prior to this enhancement, when creating a business interaction or an engineering work order, you were required to manually enter values in the Name and Effective Date fields on the Business Interaction - New page or on the Engineering Work Order - New Page, even after selecting a workflow from the Workflow Template list. Also, after you saved the business interaction or the engineering work order, the application opened the General Information tab and you were required to click the Activity Details tab to view the activities, which was time-consuming.
In this enhancement, when creating a business interaction or an engineering work order, when you select a workflow from the Workflow Template list, the following occurs:
-
The Name field is autopopulated with a name in the format:
templateName_user_sequenceNumber
where:
templateName is the name of the workflow template.
user is the name of the UIM user.
sequenceNumber indicates the nth workflow that the user is associating with the business interaction/engineering work order. For example, a sequence number of 3 indicates that this is the third workflow that the user is associating.
For example, BIWORKFLOWTEMP_inv_3
The Name field is editable.
-
The Effective Date field is autopopulated with the effective date of the last activity in the workflow. This field is read-only.
-
The Desired Due Date field is autopopulated with the same date that is autopopulated in the Effective Date field. This field is editable.
After you click Save and Continue on the Business Interaction - New page or on the Engineering Work Order - New Page, the Activity Details tab appears, displaying a list of all the activities in the workflow in chronological order.
New Web Service Operations for Searching and Reserving Telephone Number Blocks
In this enhancement, the following new web service operations have been added, which enable you to find and reserve telephone number blocks:
-
FindTNBlock: This operation enables external systems to send a request to UIM to find and return telephone number blocks in UIM, based on specified search criteria. In the search criteria, you must specify the entity type of TelephoneNumberType, which is defined in the Number.xsd schema file.
-
ReserveTNBlock: This operation enables external systems to send a request to UIM to find an existing reservation or create a new reservation, and to add telephone number blocks to the existing or newly created reservation. You must specify search criteria to find an existing telephone number block to add to an existing reservation or to a new reservation. The reserveTNBlockRequest XML structure is defined in the newly added TNBlockModelType.xsd schema file.
See the "FindTNBlock" and "ReserveTNBlock" sections in UIM Web Services Developer's Guide for more information.
Integration with Oracle Communications MetaSolv Solution to Support VLAN Life-Cycle Management
This enhancement includes a reference implementation that enables you to integrate Oracle Communications Unified Inventory Management (UIM) with Oracle Communications MetaSolv Solution (MSS) to enhance the existing capabilities of MSS to support VLAN life-cycle management.
This integration of UIM's robust service orchestration and resource management capabilities with MSS's functionality for VLAN assignment offers a highly adaptable and scalable enterprise solution for ordering and designing services requiring VLANs, in a fully-orchestrated, flow-through environment.
This reference implementation offers the following advantages:
-
Reduces delivery time by automating the VLAN selection
-
Improves service quality and reduces problem resolution time by tracking the VLAN life cycle
-
Increases the accuracy of the connection design
-
Provides a short delivery cycle without requiring any conversions
-
Maps the VLANs to the network component, port, or domain setup on the network
-
Integrates directly into MSS workflows, thus requiring limited additional training
-
Provides an automation framework for MSS
-
Provides a Federation Framework for integration to other systems
In this reference implementation, the physical connectivity, virtual connectivity, equipment, port assignments, and networks continue to reside within the MSS inventory. Additional entities for service, VLAN IDs, and VLAN domains are managed within UIM, thus allowing you to extend MSS connection design to include additional capabilities.
For detailed instructions about installing the required software, setting up UIM and MSS, and integrating UIM with MSS for the reference implementation, see Knowledge Article 2472722.1 - Integrating MetaSolv Solution with Unified Inventory Management for VLAN Management on the My Oracle Support website:
Enhancements in UIM 7.4.0.2 (Patch 28168421)
The following sections describe the enhancements delivered in this patch. The UIM Help and product documentation were not updated for the enhancements delivered in this patch.
UIM Compliance Tool
UIM now includes the UIM compliance tool. The UIM compliance tool captures a snapshot of your UIM configuration and evaluates it against established rules. These rules are based on best practices and guidelines using which the compliance tool analyzes the UIM configuration and generates an evaluation result that enables you to optimally configure your UIM environment.
The UIM compliance tool captures snapshots of the following:
-
WebLogic domain
-
UIM configuration parameters
-
Database configuration parameters
The UIM compliance tool is packaged with the UIM software, which you can download from the My Oracle Support website at:
Setting Up the UIM Compliance Tool
To set up the UIM compliance tool:
-
Download the compliance-1.2.1.zip file.
-
Create a local directory; for example, Compliance_Home.
-
Extract the contents of the compliance-1.2.1.zip file into the Compliance_Home directory.
-
Download the required third-party software for the compliance tool by doing the following:
-
Navigate to the Compliance_Home/config directory and update the proxy.settings file to include any proxy settings that are required to access the Internet.
-
Add the Ant binary directory to the PATH environment variable by doing one of the following:
-
On Windows, run the following command:
set %PATH%=%ANT_HOME%/bin;$PATH
-
On Linux, run the following command:
export PATH=$ANT_HOME/bin:$PATH
-
-
Navigate to the Compliance_Home/bin directory and run the ant command, which downloads the required third-party software for the compliance tool.
-
-
Generate a wlfullclient.jar file by doing the following:
-
Navigate to the WL_HOME/server/lib directory.
-
Run the following command to generate the wlfullclient.jar file in the WL_Home/server/lib directory (where WL_Home is the directory in which the WebLogic Server is installed):
java -jar wljarbuilder.jar
-
Copy the wlfullclient.jar file into the Compliance_Home/lib directory.
-
For more information, see the compliance tool documentation at the following location:
Compliance_Home/docs/installation.html
Running the UIM Compliance Tool
To run the UIM compliance tool:
-
Navigate to the Compliance_Home/config directory
-
Create a new compliance.properties file.
-
Copy the contents of the compliance-sample.properties.file into the compliance.properties file.
-
In compliance.properties file, update the following properties with the UIM Administration Server details:
weblogic.hostname=WL_HostName
weblogic.port=WL_Port
weblogic.username=WL_UserName
where:
-
WL_HostName is the host name of the WebLogic Administration Server.
-
WL_Port is the port number of the WebLogic Administration Server.
-
WL_UserName is the user name used to log in to the WebLogic Administration Server.
-
-
Navigate to the Compliance_Home/bin directory and do the following:
On Windows, run the following script:
compliance.bat
On Linux, run the following script:
compliance.sh
The compliance tool generates the evaluation results in the Compliance_Home/result directory.
Back and Forward Buttons for Easier Navigation
UIM now includes Back and Forward buttons, which enable you to go back or forward one page at a time, respectively.
Figure 3shows the newly added Back and Forward buttons.

New Icons for Managing Activities in the Activity Summary Page
In the Activity Summary page of business interactions and engineering work orders, new icons have been added to represent the Start, Complete, Reopen, and Complete and Next options. These options were previously available in the Actions menu. Figure 4 shows the newly added icons in the Activity Summary page.
You open the Activity Summary pages from the Activity Details tab in Summary pages of business interactions or engineering work orders with associated workflow templates.
Assigning Resources to Termination Points Made Easier
You can now assign resource to termination points using the newly added Terminate at Resource list icons shown in Figure 5. The list icons have been added in the Termination Points section on the General Information tab of the Pipe Summary page.
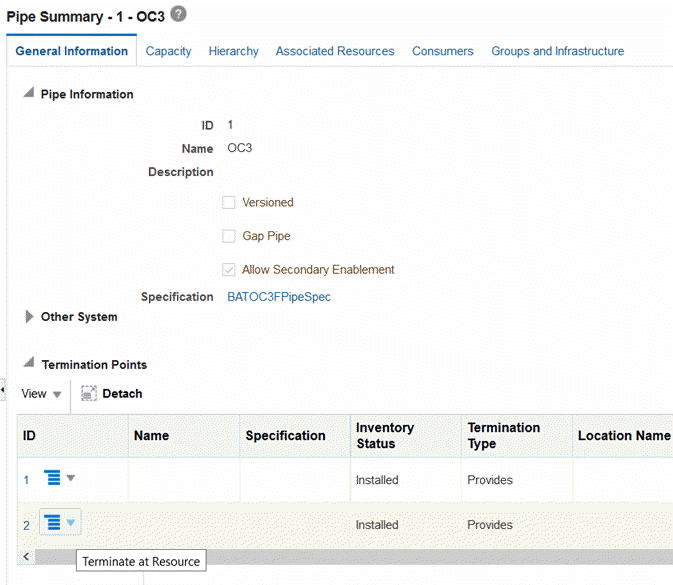
The Terminate at Resource list icons display a list of resource types that you can search for and assign to the termination points as shown in Figure 6.
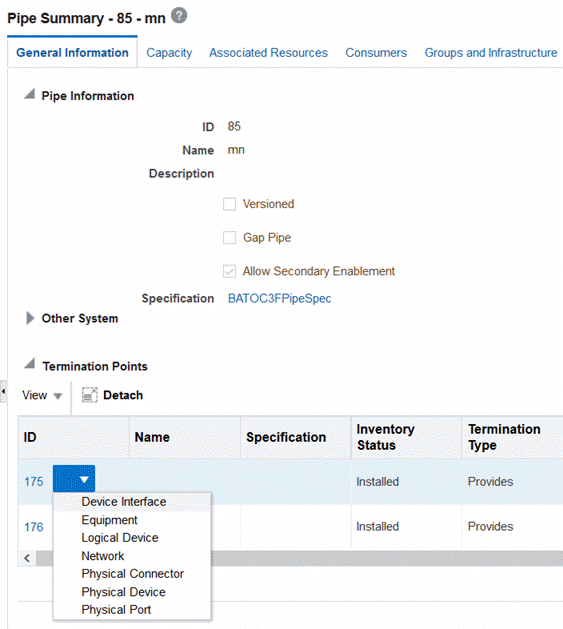
Enhanced Recent Items Menu
The Recent Items menu now displays a list of all the pages (including the individual sections and subtabs within those pages) that you opened within the application. This enhancement enables you to quickly open the page that you want to view.
For example, if you are currently on the Groups and Infrastructure tab of the Summary page of a logical device with an ID of 14 and name LD_TWO, and then if you navigate away to various different pages, you can return to the Groups and Infrastructure tab of the logical device (with an ID of 14) by selecting Logical Device Summary - 14 - LD_TWO - Groups and Infrastructure from the Recent Items menu as shown in Figure 7.
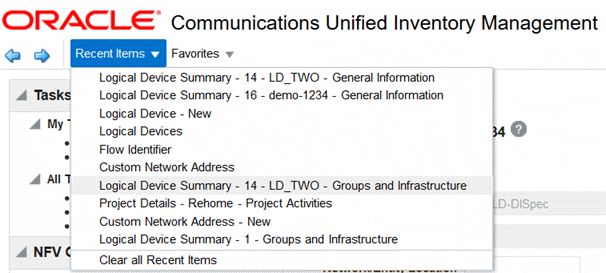
Last Search Run is Now Automatically Saved
UIM now automatically saves the results of your last search and stores the results. If you navigate away from the Search page, and then return to it later, the Search Results section displays the results of your last search as Saved Last Search in the Saved Search menu as shown in Figure 8. However, after you run a new search in a different Search page, the earlier search results in the previous Search page are no longer available and you can view the search results only in the latest Search page.
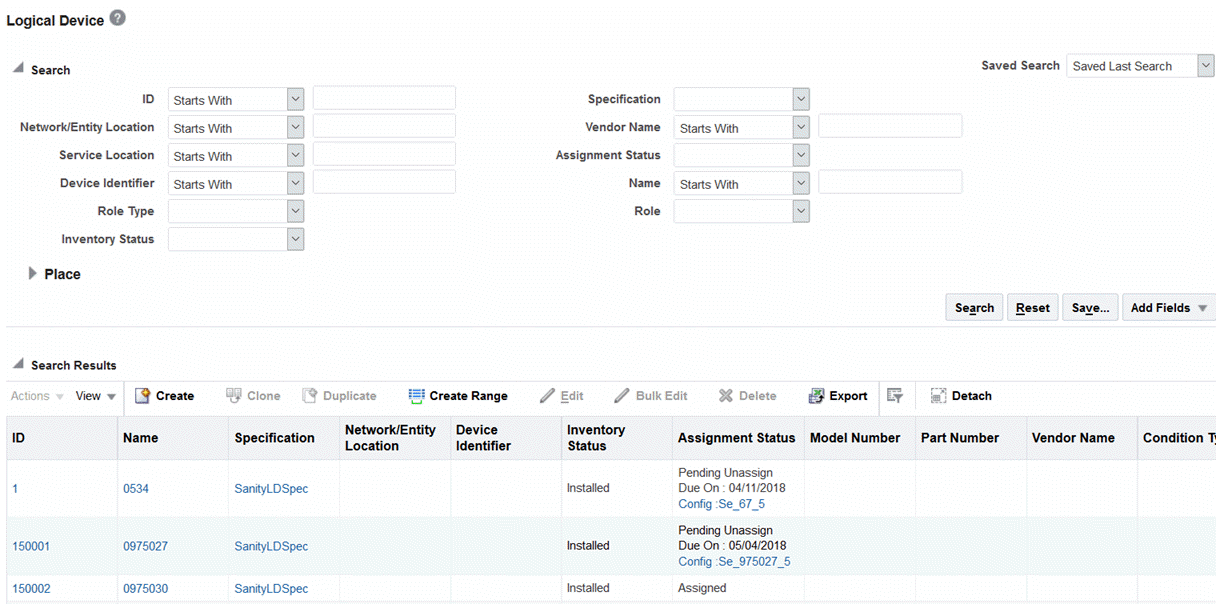
For example, consider a scenario where you run a search in the Logical Device Search page, and then navigate away to the Place Search page. Then, immediately you realize that you want to look at the Logical Device search results one more time, so you open the Logical Device Search page. In this case, the results of the last search that you ran are displayed in the Logical Device Search page.
Similarly, consider a scenario where you run a search in the Logical Device Search page, and then navigate away to the Place Search page and run a Place entity search. In this case, if you subsequently open the Logical Device Search page, the results of the last search run are no longer available in this page. The results of the last search are now displayed only in the Place Search page.
Improved Usability of Entity Summary Pages
Prior to this enhancement, the entity Summary page was long and displayed a lot of information in a single page, which required considerable scrolling to see all the information about an entity.
In this enhancement, the entity Summary page has been redesigned to display information within newly added tabs to provide an uncluttered view of entity information. Each tab displays only specific data about the entity, which enables you to quickly see the desired information without scrolling through the entire page.
The Summary pages for the following entities have been redesigned:
-
Logical Device
-
Device Interface
-
Logical Device Account
-
Physical Device
-
Physical Port
-
Pipe
-
Custom Network Address
-
Equipment
-
Telephone Number
-
Party
-
Place
-
Network
-
Inventory Group
-
Custom Object
Figure 9 shows the redesigned Logical Device Summary page.
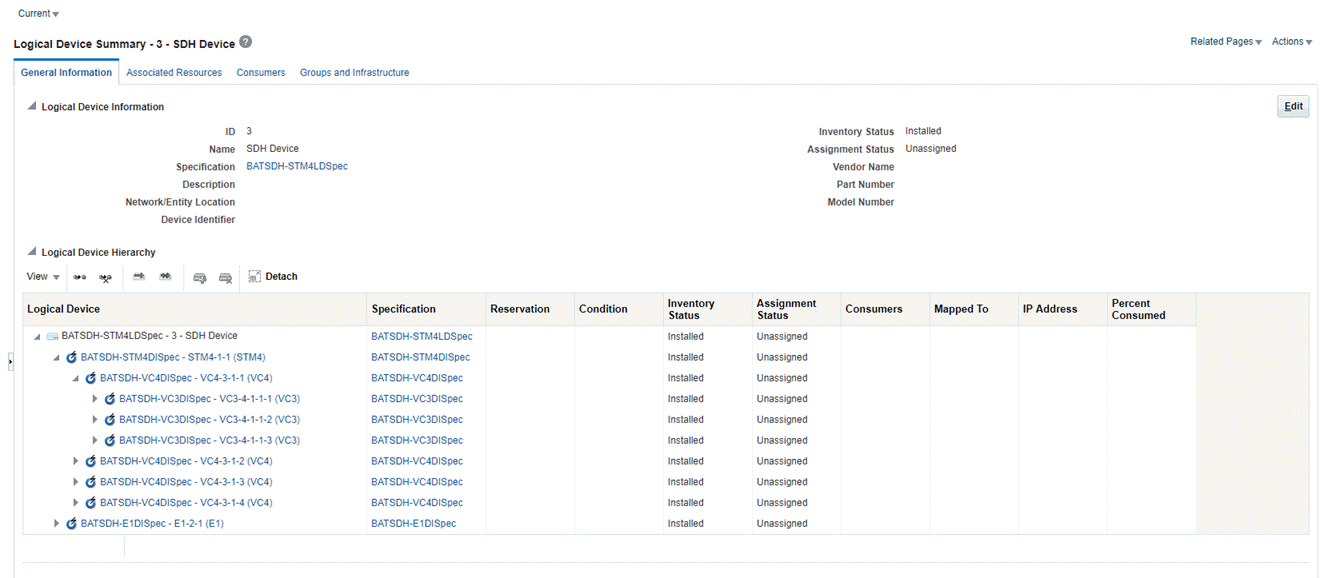
The entity Summary page contains the following tabs, which are common to most entity types:
-
General Information: Displays basic information about the entity and the entity hierarchy. This tab is displayed by default when you open an entity Summary page.
-
Configurations: Displays any entity configurations created for the entity. This tab is available only when the specification on which the entity is based includes a reference to a entity configuration specification.
-
Associated Resources: Displays information about the parent entity, network nodes, and custom involvements.
Depending on the entity type, an entity Summary page displays additional or fewer subtabs in the Associated Resources tab. In case of a few specific entities, the Associated Resources tab displays information in subtabs, rather than in sections.
This tab contains the following subtabs/sections:
-
Parent Entity (where Entity is the entity type; for example, Parent Logical Device, Parent Physical Device, and so on): Displays any associations with the parent entity.
-
IP Resources: Displays IP resources assigned to the entity.
-
Network Nodes: Displays any network nodes with which an entity is associated.
-
Grants Media Streams: Displays any media streams with which the entity is associated.
-
Custom involvements: Displays any custom associations defined for the entity with other entities that are not otherwise associated.
-
-
Consumers: This tab contains the following sections:
-
Assignments: Displays information about the entities that are assigned to an entity.
-
References: Displays information about the entity references.
-
Business Interactions: Displays any business interactions with which the entity is associated.
-
-
Groups and Infrastructure: This tab contains the following sections:
-
Inventory Groups: Displays any inventory groups to which the entity is associated.
-
Roles: Displays any roles that are associated with the entity.
-
Places: Displays any places that are associated with the entity.
-
You can personalize entity Summary pages by choosing to show or hide different sections or subtabs within the General Information, Associated Resources, Consumers, and Groups and Infrastructure tabs using the Personalization - Set Preferences window. See "Personalizing Entity Summary Pages" for more information.
Ability to Set Default Landing Page
UIM now enables you to set any page that you frequently access as the default landing page. This page will be displayed first every time you log in to UIM.
Note:
The default landing page setting is user-specific, which means that any change that you make is applied only to the current logged-in user.You set the landing page in the Set Preferences window, which you open by selecting Set Preferences from the newly added Personalization menu, shown in Figure 10.
To set the landing page:
-
From the Personalization menu, select Set Preferences.
The Set Preferences window is displayed.
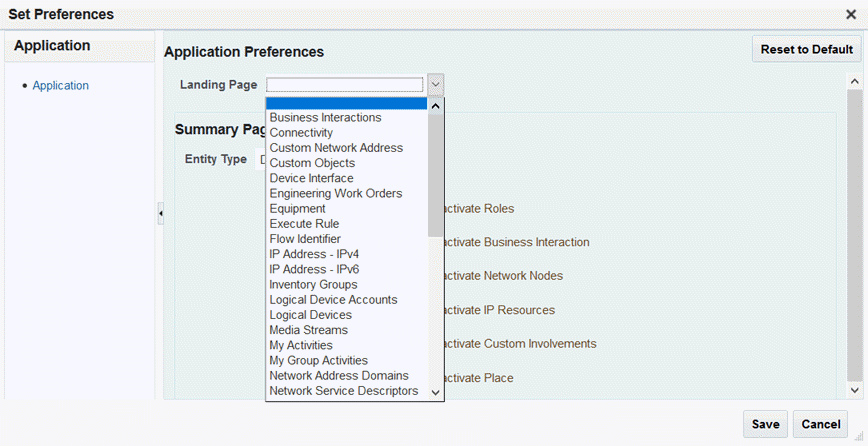
-
From the Landing Page list, select the entity page that you want set as the landing page.
-
Click Save.
Note:
To set the UIM Home Page as the default landing page, in the Set Preferences window, click Reset to Default.
Personalizing Entity Summary Pages
You can now personalize the entity Summary pages to show or hide various subtabs and sections within different tabs. You personalize entity Summary pages in the Set Preferences window. Figure 11 shows the summary page preferences in the Set Preferences window.
Note:
The Summary page preferences are user-specific, which means that any changes that you make are applied only to the current logged-in user.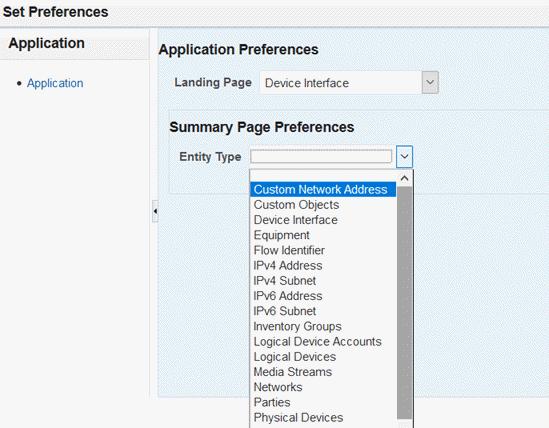
Figure 12 shows different subtabs in the Associated Resources tab of a Logical Device Summary page.
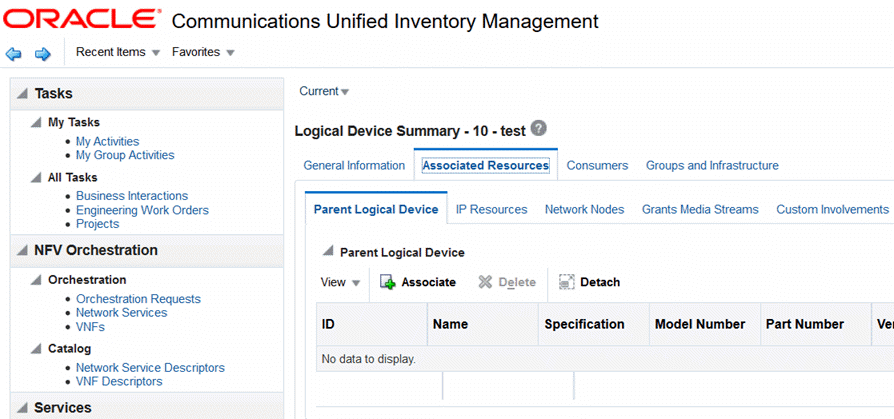
For example, you can personalize the Logical Device Summary page by hiding the IP Resources, Network Nodes, and Grants Media Streams subtabs in the Associated Resources tab.
To personalize the Logical Device Summary page by hiding the subtabs mentioned above:
-
From the Personalization menu, select Set Preferences.
The Set Preferences window is displayed.
-
From the Entity Type list, select Logical Devices. The page displays the subtabs and sections that appear within different tabs in the Logical Device Summary page.
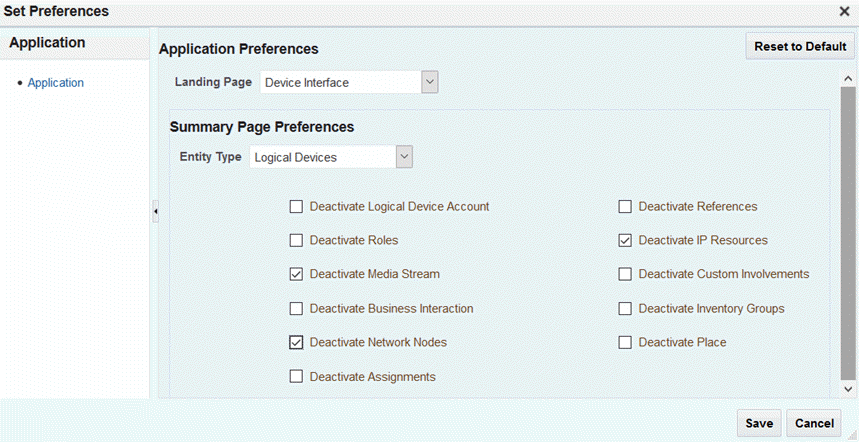
-
Select the Deactivate IP Resources, Deactivate Network Nodes, and Deactivate Media Stream check boxes, and then click Save.
-
From the Recent Items menu, reopen the Logical Device Summary page and click the Associated Resources tab, you will notice that the IP Resources, Network Nodes, and Grants Media Streams subtabs are now hidden.
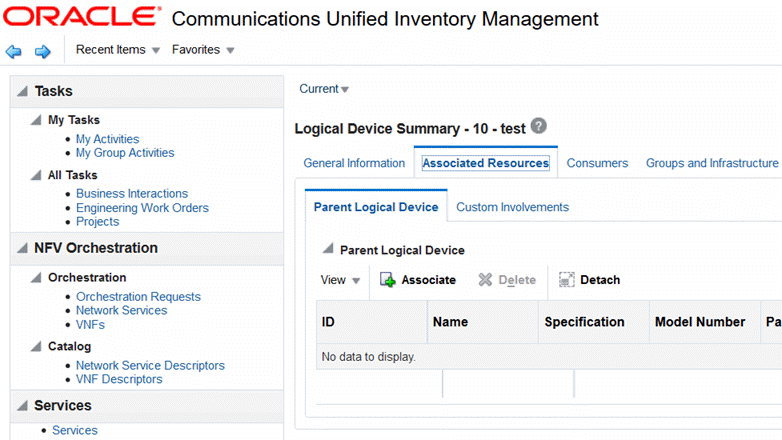
Note:
To clear all the preferences for the entity Summary pages, in the Set Preferences window, click Reset to Default.Personalizing the Entity Summary Pages By Setting System Properties
In addition to personalizing entity Summary pages from the UIM user interface, you can now personalize the entity Summary pages using the system-config.properties file.
The various sections and subtabs within tabs are referred to as portlets in the system-config.properties file. You can show or hide a portlet by specifying the portlet name and the name of the entity Summary page within which you want to show or hide the portlet.
In the system-config.properties file, use the following format to show or hide the portlets:
ui.entitysummary.portletName.deactivate=true
where:
-
entity is the name of the entity within whose Summary page you want to show or hide the portlet
-
portletName is the name of the portlet that you want to show or hide
Note:
The portlet settings that you make in the system-config.properties file are applied system-wide and affect all users.For example, to hide the Roles portlet in the Party Summary page, do the following:
-
Navigate to the UIM_Home/config directory.
-
Open the system-config.properties file.
-
Add the following entry:
ui.partysummary.rolesportlet.deactivate=true
-
Save and close the system-config.properties file.
The Roles portlet is now hidden in the Party Summary page.
You can show or hide the following portlets (sections/subtabs) in the entity Summary pages:
-
logicaldeviceaccountportlet
-
ipresourcesportlet
-
networknodesportlet
-
mediaportlet
-
custominvolvementsportlet
-
serviceportlet
-
assignmentsportlet
-
referencesportlet
-
biportlet
-
inventorygroupsportlet
-
rolesportlet
-
placesportlet
-
equipmentportlet
-
partyportlet
-
physicaldeviceportlet
-
logicaldeviceportlet
-
pipeportlet
-
reservationsportlet
-
conditionsportlet
-
subnethierarchyportlet
-
networkedgeportlet
Setting Column Preferences in Tables of Entity Search and Summary Pages
With this enhancement, each UIM user can now set column preferences to reorder, show and hide columns in tables of entity Search and entity Summary pages.
See the UIM Help for more information about working with tables.
Ability to Create a Connectivity and Associate it to a Network Edge
Prior to this enhancement, when associating a connectivity to a network edge in a network, you could only search for connectivities and not create them.
With this enhancement, you can now create connectivities, and then associate them to network edges in a network.
A new Create button has been added in the Network Edge Connectivity Associate page. This page is opened when you right-click an edge and select Associate Connectivity in the Network Topological View subtab of the Visualization tab in the Network Summary page. Figure 13 shows the newly added Create button.
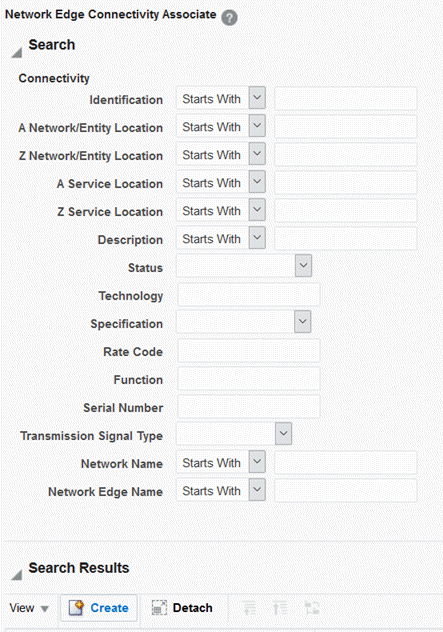
Clicking the Create button opens the Create Connectivity page, which enables you to create a connectivity. Figure 14 shows the Create Connectivity page.
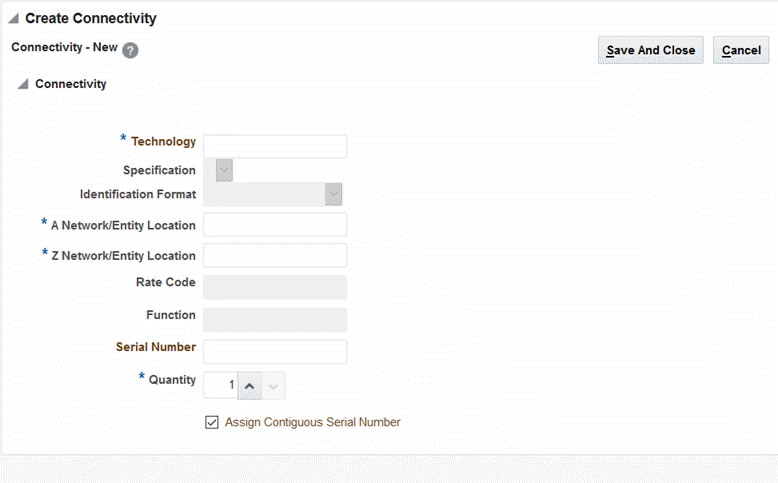
Prepopulated Termination Points When Running Path Analysis
Prior to this enhancement, when running path analysis, you were required to either manually enter the values in the Source Type list, Source ID field, Target Type list, and Target ID field, or you had to search for the source and target entities using the entity Search page.
In this enhancement, when you run path analysis, the Source Type list, Source ID field, Target Type list, and Target ID field are prepopulated in the Path Analysis page. You can modify the prepopulated values for the source and target to perform partial path analysis between intermediate nodes.
This feature is especially useful for scenarios where the pipe terminates on multiple shared resources and manually entering values or searching for the source and target entities is time-consuming.
For example, if a pipe terminates on the source logical device demoLD1 with ID 525009 and on the target physical device demoPD1 with ID 300002, then when you run path analysis, the Path Analysis Search page displays prepopulated values for both the source and target as shown in Figure 15.
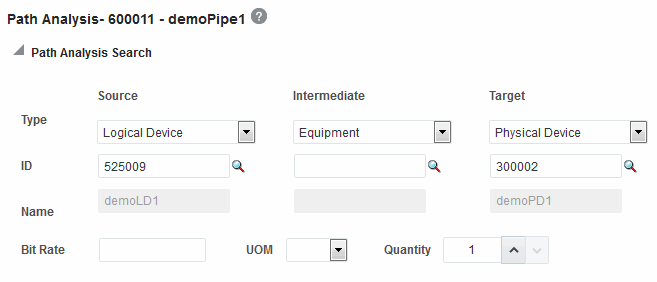
Support for Canceling a Pending Configuration Version in Between Two In-Progress Configuration Versions
In this patch, the multiple pending configuration functionality has been enhanced, which now enables you to cancel a pending configuration version that is in between two in-progress configuration versions.
You can also disconnect a service using the UIM Service Fulfillment Web Service. When you disconnect a service using the UIM Service Fulfillment Web Service, all the configuration versions on the service transition to Canceled status, and an additional configuration version is created with the current date after the service configuration version that is in Completed status.
Note:
If a service has multiple pending configurations, you cannot cancel the first service configuration version, regardless of the status of the resource assignments. However, if a service has only one service configuration, then you can cancel that service configuration version.For example, in Figure 16, you can cancel the pending configuration version 9 (shown in dashed box) because there are no resource assignment changes made in the configuration version 10.
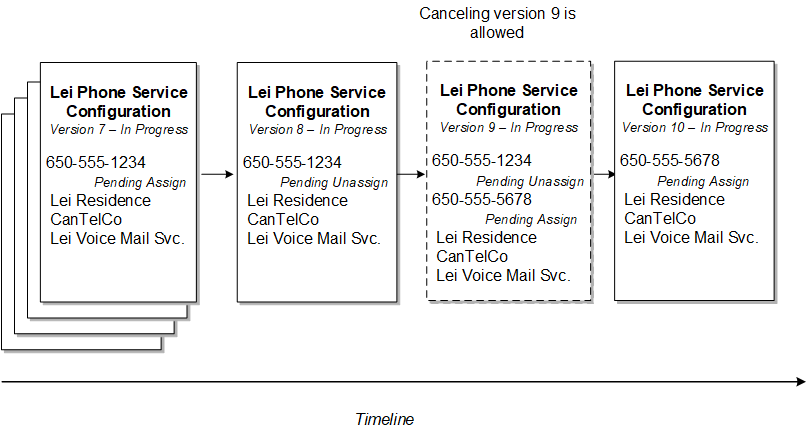
After the configuration version 9 is canceled, all the assignment changes that were made in version 9 are rolled back, and the configuration version 10 inherits the resource assignments of the configuration version 8, as shown in Figure 17.
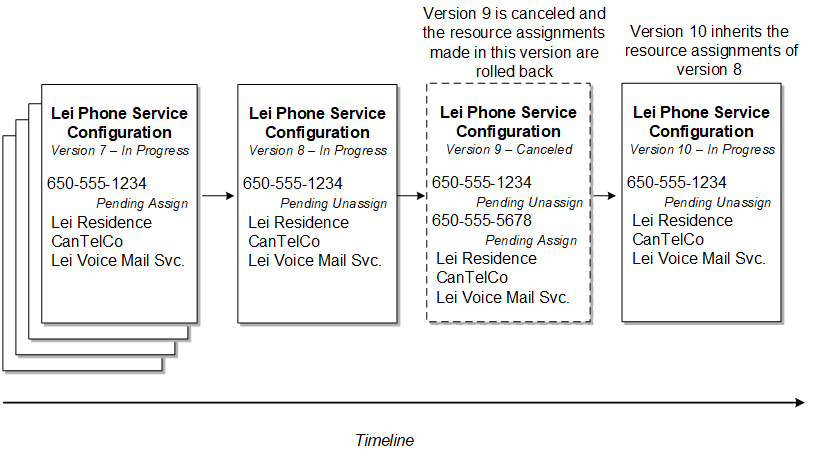
UIM does not allow you to cancel a service configuration version on a service that is not in Pending Disconnect status if there are resource assignment changes in the future-dated service configuration version. For example, in Figure 18, you cannot cancel service configuration version 2.
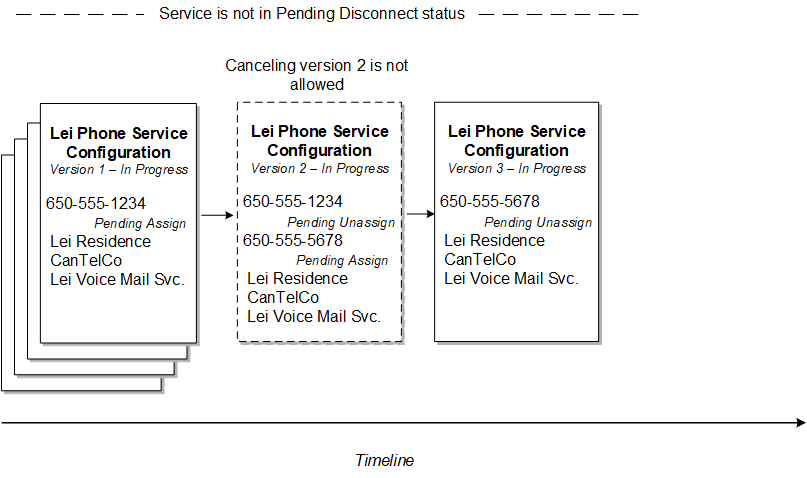
UIM allows you to cancel service configuration version 2 on a service that is in Pending Disconnect status, even if resource assignments are updated and are in Pending Unassign status in the future-dated disconnect service configuration version 3. For example, you can cancel service configuration version 2 in Figure 19, which shows the resource assignment status before version 2 is canceled on a service that is in Pending Disconnect status.
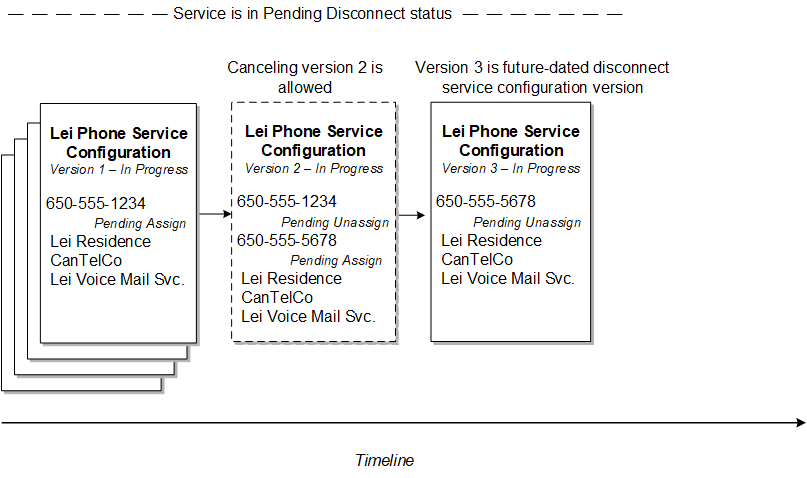
Figure 20 shows the resource assignment status after the service configuration version 2 is canceled on a service that is in Pending Disconnect status.
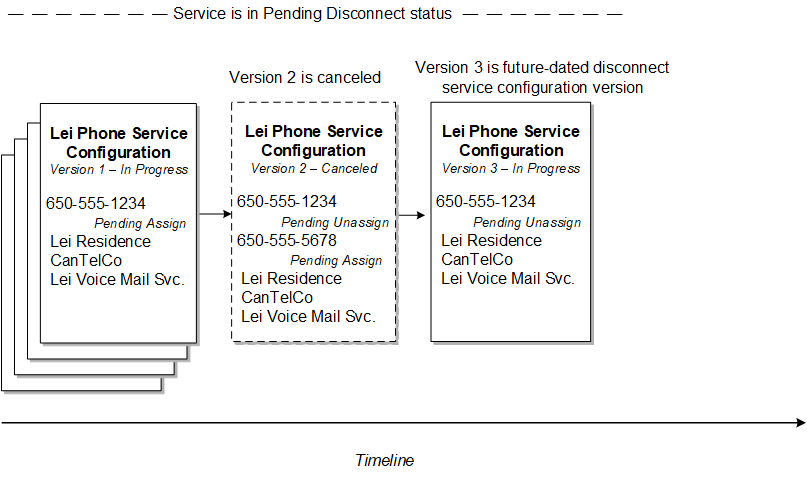
Enhancements in UIM 7.4.0.1 (Patch 27728240)
The following section describes the enhancement delivered in this patch.
Enhanced UIM Purge Functionality
In previous releases, UIM supported the purging of only service entities. In other words, UIM supported the purging of entities of only one purge type: Service.
In this release, the UIM purge functionality has been enhanced and now in addition to service entities, you can also purge entities of the following purge types:
-
Service Configuration Version
-
Logical Device
-
Logical Device Account
-
Party
-
Place
-
BI/EWO (business interaction/engineering work order)
The enhanced purge functionality enables you to purge UIM entities using purge scripts that are specific to each entity. The enhanced purge functionality includes new mandatory and optional arguments that you use with purge operations for the entity purge types mentioned previously.
The entity purge process also purges entities that are referred as entity link characteristics. UIM provides the elcharScripts.sql script, which you can use to prevent the deletion of entities that are referred as entity link characteristics.
See the section on "Purging UIM Entities" in the chapter, "Monitoring and Managing Unified Inventory Management" in UIM System Administrator's Guide for more information about the enhanced purge functionality.
Documentation Accessibility
For information about Oracle's commitment to accessibility, visit the Oracle Accessibility Program website at http://www.oracle.com/pls/topic/lookup?ctx=acc&id=docacc.
Oracle customers that have purchased support have access to electronic support through My Oracle Support. For information, visit http://www.oracle.com/pls/topic/lookup?ctx=acc&id=info or visit http://www.oracle.com/pls/topic/lookup?ctx=acc&id=trs if you are hearing impaired.
Oracle Communications Unified Inventory Management What's New, Release 7.4
E93986-06
Copyright © 2019, Oracle and/or its affiliates. All rights reserved.
This software and related documentation are provided under a license agreement containing restrictions on use and disclosure and are protected by intellectual property laws. Except as expressly permitted in your license agreement or allowed by law, you may not use, copy, reproduce, translate, broadcast, modify, license, transmit, distribute, exhibit, perform, publish, or display any part, in any form, or by any means. Reverse engineering, disassembly, or decompilation of this software, unless required by law for interoperability, is prohibited.
The information contained herein is subject to change without notice and is not warranted to be error-free. If you find any errors, please report them to us in writing.
If this is software or related documentation that is delivered to the U.S. Government or anyone licensing it on behalf of the U.S. Government, then the following notice is applicable:
U.S. GOVERNMENT END USERS: Oracle programs, including any operating system, integrated software, any programs installed on the hardware, and/or documentation, delivered to U.S. Government end users are "commercial computer software" pursuant to the applicable Federal Acquisition Regulation and agency-specific supplemental regulations. As such, use, duplication, disclosure, modification, and adaptation of the programs, including any operating system, integrated software, any programs installed on the hardware, and/or documentation, shall be subject to license terms and license restrictions applicable to the programs. No other rights are granted to the U.S. Government.
This software or hardware is developed for general use in a variety of information management applications. It is not developed or intended for use in any inherently dangerous applications, including applications that may create a risk of personal injury. If you use this software or hardware in dangerous applications, then you shall be responsible to take all appropriate fail-safe, backup, redundancy, and other measures to ensure its safe use. Oracle Corporation and its affiliates disclaim any liability for any damages caused by use of this software or hardware in dangerous applications.
Oracle and Java are registered trademarks of Oracle and/or its affiliates. Other names may be trademarks of their respective owners.
Intel and Intel Xeon are trademarks or registered trademarks of Intel Corporation. All SPARC trademarks are used under license and are trademarks or registered trademarks of SPARC International, Inc. AMD, Opteron, the AMD logo, and the AMD Opteron logo are trademarks or registered trademarks of Advanced Micro Devices. UNIX is a registered trademark of The Open Group.
This software or hardware and documentation may provide access to or information about content, products, and services from third parties. Oracle Corporation and its affiliates are not responsible for and expressly disclaim all warranties of any kind with respect to third-party content, products, and services unless otherwise set forth in an applicable agreement between you and Oracle. Oracle Corporation and its affiliates will not be responsible for any loss, costs, or damages incurred due to your access to or use of third-party content, products, or services, except as set forth in an applicable agreement between you and Oracle.