8 Localizing OSM
This chapter provides information about localizing the Oracle Communications Order and Service Management (OSM) web clients. Localization is the process of changing a user interface (UI) from the original language in which it was written to another language. This chapter also provides information for customizing regional settings across all OSM applications. This chapter is intended for service professionals developing a custom installation for their clients.
About Localization
Localization is the process of customizing the OSM system for use in a specific market and language. This process includes translating the user interface and documentation, as well as adapting time, date, number formats, and punctuation conventions. It may also include editing or creating new icon graphics.
Note:
Oracle recommends that you have an experienced localization professional perform the documentation translation and coding localization.This chapter describes how to:
-
Modify the OSM Order Management web client and Task web client
-
Configure regional settings for the Administration area of the OSM Order Management web client
-
Identify information in the OSM database that requires localization
-
Convert the OSM web clients into a single foreign language.
Note:
After you run any migration script such as upgrading an installation, you must reapply any customization done to the database.Localizing OSM
Localizing OSM involves the following high-level steps.
Note:
These steps assume you have followed the directions specified in the OSM Installation Guide, which include:-
Installing Oracle WebLogic Server
-
Making a backup of your WebLogic Server installation
-
Installing OSM to create the database schema by selecting Custom Installation and Database Schema. This generates the omsmodel_l10n.jar file needed for localization.
-
Making a backup of your OSM installation after performing these localization steps
-
Uncompress the OSM_home/Database/osm-db-installer-core/install/omsmodel_l10n.jar file.
Set the environment variable PATH to JDK_home/bin, then from a command prompt run the command:
jar xvf omsmodel_l10n.jar
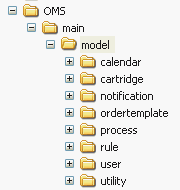
The uncompressed files are organized into the directories shown in Figure 8-1.
-
Navigate to the directories listed below, and localize the text strings in the XML files indicated. You must localize this information first so that the database parameters are defined in the target language. For information on how to localize the content of the XML files, see the following sections in this chapter:
OMS/main/model/calendar/_table/_data:
-
om_region.xml
-
om_schedule.xml
OMS/main/model/cartridge/_table/_data:
-
om_cartridge.xml
OMS/main/model/notification/_table/_data:
-
om_notification_def.xml
OMS/main/model/ordertemplate/_table/_data:
-
om_attribute_type.xml
-
om_order_data_dictionary.xml
-
om_order_hier.xml
-
om_order_remarks_type.xml
-
om_order_type_category.xml
-
om_view_order_node_label.xml
OMS/main/model/process/_table/_data:
-
om_behavior.xml
-
om_process.xml
-
om_process_point.xml
-
om_process_position.xml
-
om_process_status.xml
-
om_state.xml
-
om_state_category.xml
-
om_status_category.xml
-
om_task.xml
-
om_task_state.xml
-
om_task_status.xml
OMS/main/model/rule/_table/_data:
-
om_rule_def.xml
-
om_rule_source.xml
-
om_rule_task.xml
OMS/main/model/user/preference/_table/_data:
-
om_generic_mnemonic.xml
OMS/main/model/user/privilege/_table/_data:
-
om_application_function.xml
-
om_responsibility.xml
OMS/main/model/utility/_table/_data:
-
om_errors.xml
-
om_server_strings.xml
-
Compress omsmodel_l10n.jar.
After you have localized the XML files, open a command prompt console, navigate to the directory that contains the JAR file, and run the command:
jar cvf omsmodel_l10n.jar .
-
Choose option a or option b:
-
Drop the existing schemas from the database so you can reuse the schema names when you reinstall (Step 5). This is done by running the commands below. Stop the WebLogic server prior to running these commands, and start it again upon completion.
-
OMS user schema:
drop user oms_schema_name cascade; commit; -
Rule engine schema:
drop user rule_engine_schema cascade; commit; -
The context:
drop context oms_schema_name; commit;
-
-
When reinstalling (Step 5), create a new schema with a different name.
-
-
Reinstall OSM, this time selecting all of the components you want to install permanently. When the Database Schema Localization Information window appears, select the Use localized Order and Service Management initial data check box and specify the path to your localized JAR file.
The installer localizes the schema using your JAR file.
-
Localize the OSM web clients as required.
After the database information has been localized and the product has been installed, you can customize the OSM web clients to suit the needs of the target locale. For more information, see "Localizing the Task Web Client," "Localizing the Order Management Web Client," and "Localizing the Order Lifecycle Management User Interface."
Localizing the XML Import/Export Application
If you localized OSM, you must also localize the XML Import/Export application. Localizing the XML Import/Export application involves the following high-level steps:
-
Uncompress the OSM_home/SDK/XMLImportExport/classes/modelHandler.jar file.
Set the environment variable PATH to JDK_home/bin, then from a command prompt run the command:
jar xvf modelHandler.jar
-
Localize the sql/default_data.sql file.
To localize the default_data.sql file, you must understand the relationship between the data that was localized in the XML files from the omsmodel_l10n.jar file, and the insert scripts defined in the default_data.sql file. The following example provides that understanding:
Suppose om_state.xml of omsmodel_l10n.jar is localized. The localization corresponds to the INSERT statements of the table OM_STATE defined in default_data.sql in the om_state.xml file. For example, if the
<state_description>of<state_mnemonic>received</state_mnemonic>is localized as<state_description>TEMP_received</state_description>, in default_data.sql the INSERT statement that is inserting received state in the OM_STATE table must be localized to:[INSERT INTO OM_STATE (STATE_ID, STATE_MNEMONIC, STATE_CATEGORY_ID, STATE_DESCRIPTION,STATE_ICON_ID, CARTRIDGE_ID) VALUES (1, 'received', 1, 'TEMP_received', 0, 0); ]
Following this example, all fields that are localized in the XML files of omsmodel_l10n.jar must also be localized in default_data.sql.
-
Compress modelHandler.jar.
After you have localized the sql/default_data.sql file, open a command prompt, navigate to the directory that contains the JAR file, and run the command:
jar cvf modelHandler.jar .
Localizing the Encoding Element
To support localization, the <encoding> element in the config.xml file determines the appropriate language. For information on the config.xml file, see OSM System Administrator's Guide.
-
Configure the following line in the config.xml file with the appropriate ISO character code, shown in bold, below:
<encoding>ISO-8859-2</encoding -
Be sure that your Microsoft Windows operating system is localized for your language. See Microsoft documentation for instructions.
-
Some pattern restrictions for entity names in the XML model schema are provided with the XML Import/Export application. For non-English environments, you must customize the schema for entity name patterns.
Additional Considerations for Localizing OSM
The process of localization also involves the support for different locales, character set encoding, and localization of settings.
Support for Different Locales
Locales are linguistic regions that share spelling conventions. A locale consists of a language code, followed by an optional country code, followed by an optional variant code. For example, "en_US" specifies English in the United States, while "en_GB" specifies English in Great Britain.
Operating systems such as Windows, Linux, Oracle Solaris, and HP-UX support the locale model and provide facilities to properly read and format locale-specific information. Additionally, newer programming languages such as Java provide similar facilities to support localization.
However, HTML does not support localization or have solutions for date or time issues. The localization of HTML requires support from the OSM server and Javascript code sent to the browser.
Character Set Encoding and Fonts
Characters in an HTML file are stored as numeric values with a range from 0 to 255. When a web browser displays a character symbol, it uses the numeric value to find the correct symbol to display. The set of symbols displayed for each number is known as a character set. As 256 numbers is insufficient to describe all possible characters that may need to be displayed in all languages, you must specify what character set the browser is to use when it displays an HTML page.
By default, HTML uses the ISO-8859-1 character set, which can display all characters needed for Western European Languages. When you create HTML pages using other character sets (such as ISO-8859-2 for Eastern European Languages), you must use the corresponding encoding.
You must ensure that a font appropriate for the text you intend to use has been installed on the system.
Localization of Settings
OSM supports localized Windows regional settings: All number, currency, date, and time formats displayed in the Administration area of the OSM Order Management web client come from the Windows regional settings.
You can also localize regional settings through the OSM properties file. See "Task Web Client Localization Resource Bundles" for more information on how to do this.
For more information on Windows regional settings, see the Microsoft Windows documentation.
About NLS Database Configuration
Oracle's National Language Support (NLS) architecture allows you to store, process, and retrieve data in native languages. It ensures that database utilities and error messages, sort order, date, time, monetary, numeric, and calendar conventions automatically adapt to the native language and locale.
Oracle Database Character Set
OSM stores its text data in CHAR and VARCHAR2 columns in an Oracle database. The database character set determines what languages can be represented in the database. So, you must install OSM in an Oracle database with a character set that meets your language requirements.
You can specify a character set when creating a database using the CHARACTER SET clause of the CREATE DATABASE statement. A complete list of character sets supported by Oracle is included in the Oracle documentation.
You can use the v$nls_parameters view to determine the existing database character set.
OSM does not use the NCHAR, NVARCHAR2, or NCLOB data types and so has no specific requirements for the alternate character set for the database.
To determine the existing character set:
-
Connect to the Oracle server using SQL*Plus as a user who has access to the v$nls_parameters view.
-
At the SQL*Plus prompt, enter the following:
SQL> select value from v$nls_parameters where parameter = 'NLS_CHARACTERSET';
Information similar to the following is returned:
VALUE
----------------------------------------
WE8ISO8859P1
You can use the CHARACTER SET clause of the ALTER DATABASE statement to change the character set for an existing database.
Note:
You must have SYSDBA system privileges.
To change the character set:
-
Initiate the database in restricted mode. For example, use the
SQL*Plus STARTUP RESTRICTcommand. -
Connect to server Manager (svrmgrl in UNIX or svrmgr30 on Windows XP).
-
At the prompt, enter:
ALTER DATABASE db1 CHARACTER SET WE8ISO8859P1;
Note:
The source character set must be a strict subset of the target character set.
NLS Environment
For the OSM Order Management web client Administration area to support localization, the Oracle NLS parameters must be configured properly in Windows XP.
On UNIX, the Oracle NLS parameters are configured as environment variables. On Windows XP, the Oracle NLS parameters are configured as registry entries under HKEY_LOCAL_MACHINE/SOFTWARE/ORACLE.
NLS_LANG Parameter
Use the NLS_LANG parameter to set the language, territory, and character set used for the database.
The NLS_LANG parameter has three components: language, territory, and charset, in the form:
NLS_LANG = language_territory.charset
Each component controls the operation of a subset of the NLS features.
-
Language: Specifies conventions such as the language used for Oracle messages, as well as day and month names. Each supported language has a unique name, such as French, or German.
-
Territory: Specifies conventions such as the default calendar, collation, date, monetary, and numeric formats. Each supported territory has a unique name, such as America, France, or Canada.
-
Charset: Specifies the character set used by the client application. Each supported character set has a unique acronym, such as US7ASCII, WE8ISO8859P1, WE8DEC, WE8EBCDIC500, or JA16EUC.
About OSM Database Error Messages
You can localize OSM database error messages by editing the error message text in the om_errors.xml file.
This file is located in your OSM_home/ Database/osm-db-installer-core/install/OMS/main/model/utility/_table/_data directory.
To edit these error messages, open the file using an XML or text editor and replace the "error_message" text with the target language text. Table 8-1 lists all of the error messages in the om_errors.xml file.
Note:
After you have localized this file, make sure you provide an updated copy to Oracle Global Support to assist you in any issues that may arise.| Error Codes | Error Message |
|---|---|
|
-20001 |
Order satisfied no rule. Cannot start process. |
|
-20002 |
Order status and order state have not been changed. |
|
-20004 |
Starting position for the process is not defined. Call support. |
|
-20005 |
There is no creation task. Call support. |
|
-20006 |
Workflow thread does not exist. The order may have been moved by another user. Refresh your worklist and try again. |
|
-20007 |
Order is locked. Try again later. |
|
-20008 |
Current history detail record not found for the order. Call support. |
|
-20009 |
Cannot remove node, which has children. |
|
-20011 |
Order to be updated is currently locked by another user. |
|
-20012 |
Order not found. |
|
-20014 |
Rule to be evaluated is not found. Call support. |
|
-20015 |
System data is protected. |
|
-20016 |
Value cannot be null. |
|
-20017 |
Rule cannot be evaluated. |
|
-20020 |
Operation affected too many rows. |
|
-20022 |
Access denied: not enough privileges. |
|
-20023 |
You cannot accept this order thread. |
|
-20025 |
There are too many instances for the order node. |
|
-20026 |
There are too few instances for the order node. |
|
-20027 |
Parent order node does not exist. |
|
-20028 |
Rule engine has already been started. |
|
-20029 |
Rule engine has not been started. |
|
-20030 |
Invalid process definition. |
|
-20031 |
Order node cannot be found. Call support. |
|
-20038 |
Mandatory check failed. |
|
-20040 |
Order view for task cannot be found. |
|
-20041 |
Process position cannot be found. Call support. |
|
-20044 |
Reporting status cannot be found. Call support. |
|
-20049 |
Status is not valid for task. |
|
-20050 |
View node cannot be found. |
|
-20051 |
Notification cannot be found. |
|
-20054 |
Notification history cannot be found. |
|
-20055 |
Notification is not active. |
|
-20056 |
Time interval is not valid. |
|
-20043 |
Jump record does not exist. |
|
-20059 |
Error processing notification. |
|
-20060 |
Node information does not match any node in the database. |
|
-20061 |
New parent node information is not valid. |
|
-20062 |
Remark cannot be found. |
|
-20063 |
The remark cannot be changed. |
|
-20064 |
Attachment cannot be found. |
|
-20065 |
No orders are stored in the system. |
|
-20067 |
No orders satisfy the purge criteria. |
|
-20068 |
The wrong task has been supplied for the order. |
|
-20069 |
Invalid state transition. |
|
-20070 |
Invalid order type. |
|
-20071 |
Invalid order source. |
|
-20072 |
Invalid process status. |
|
-20073 |
Invalid state. |
|
-20074 |
State is not valid for task. |
|
-20075 |
Task not found. |
|
-20076 |
Stop date/time must be greater than start date/time. |
|
-20077 |
Shift violates schedule boundary. |
|
-20078 |
Please change the shift boundaries not to overlap any existing shift. |
|
-20079 |
Exception shift not found. |
|
-20080 |
Parent region is not found. |
|
-20081 |
Cannot remove region, which has child regions. |
|
-20082 |
Cannot remove region, which is attached to workgroup. |
|
-20083 |
Cannot move to the next task. Cannot calculate expected completion time. Schedule is too short. Ask OSM administrator to extend the calendar. |
|
-20084 |
Cannot move to the next task. Cannot calculate expected completion time. Cannot find the schedule. |
|
-20085 |
Invalid parameter when you call internal function. |
|
-20086 |
DST start/stop date is not correctly specified in om_workgroup table. |
|
-20087 |
Can not find workgroup during the building of DST date. |
|
-20088 |
Invalid calendar DST start/stop day of the month in the workgroup settings |
|
-20089 |
Incorrect value in DST week settings in the workgroup definition |
|
-20090 |
Missing parameter "oms_timezone" in OM_PARAMETER table |
|
-20091 |
The node is used as a coordinator node for this thread. |
|
-20092 |
Parameter Stop Date must be greater than Current System Date |
|
-20093 |
Parameter Completion Date Before should be less than Current System Date |
|
-20094 |
Calendar can be generated only workgroup by workgroup not for all workgroups at once |
|
-20095 |
Parent thread is not found. |
|
-20096 |
Partition boundary is too low. Increase the value of NEXT RANGE PARTITION BOUNDARY parameter. |
|
-20097 |
Specific view is not assigned to a workgroup |
|
-20098 |
Specific task is not assigned to workgroup. |
|
-20099 |
JMS message does not exists. |
|
-20103 |
Event type is not recognized. Call support. |
|
-20104 |
Increase value of job_queue_processes parameter in the init*.ora file. |
|
-20105 |
Job type is not valid. Call support. |
|
-20106 |
Minimum running jobs should be greater than 0 |
|
-20107 |
It can be only one notification job running at the same. |
|
-20108 |
Task list is empty. |
|
-20109 |
Specified pooler id is invalid. |
|
-20110 |
Invalid type/source combination. Call support. |
|
-20112 |
Cartridge already exists. |
|
-20113 |
Cartridge can not be dropped. There are pending orders found. |
|
-20114 |
Oracle runtime error. |
|
-20121 |
Cannot modify cartridge - automation component is referring it. |
|
-20122 |
Order type does not exist. |
|
-20123 |
Order source does not exist. |
|
-20124 |
Parent order not found for target node. |
|
-20125 |
Cannot migrate the order header because it has activities in the source cartridge. |
|
-20126 |
Character to number conversion error. |
|
-20127 |
Unable to drop cartridge. There are pending orders referencing current cartridge. |
|
-20128 |
Unable to drop cartridge. Drop oldest cartridge first. |
|
-20129 |
Migration of schedule based tasks is not supported. |
|
-20142 |
Operation is not allowed. |
|
-20143 |
Summary extend date is invalid for existing summary interval. |
About Application Server Strings
Application server strings are used in Java business application code in the OSM UI. These strings can be found in the om_server_strings.xml file in your OSM_home/Database/osm-db-installer-core/install/OMS/main/model/utility/_table/_data directory.
To edit these strings, open an XML or text editor and replace the "description" text with the target language text.
Note:
After you localize this file, make sure you provide an updated copy to Oracle Global Support, so that they can assist you with any future issues that may arise.The strings shown in Table 8-2 are representative of the types of information displayed in the Worklist, Query, and Notifications views. For a full listing, see the om_server_strings.xml file.
| Class | Key | Description |
|---|---|---|
|
order_history |
NODEINST |
Order Instance |
|
order_history |
FITEREDNODE |
Filtered Node |
|
fixed_header |
]date_pos_started |
"Started" |
|
fixed_header |
]expected_duration |
"Expected Duration" |
|
fixed_header |
]expected_start_date |
"Expected Start Date" |
|
fixed_header |
]order_creation_date |
"Order Creation Date" |
|
fixed_header |
]ord_compl_date_expected |
"Expected Order Completion Date" |
|
fixed_header |
]order_seq_id |
"Order ID" |
|
fixed_header |
]order_source |
"Source" |
|
fixed_header |
]order_state |
"State" |
|
fixed_header |
]order_type |
"Type" |
|
fixed_header |
]process_description |
"Process" |
|
fixed_header |
]reference_number |
"Ref. #" |
|
fixed_header |
]reporting_status |
"Process Status" |
|
fixed_header |
]requested_delivery_date |
"Requested Delivery Date" |
|
fixed_header |
]task_description |
"Task" |
|
fixed_header |
]user |
"User" |
|
notification_ fixed_header |
_NOTIFICATION_ DESC |
"Notification Description" |
|
notification_ fixed_header |
_NOTIFICATION_ TYPE |
"Notification Type" |
|
notification_ fixed_header |
_PRIORITY |
"Priority" |
|
notification_ fixed_header |
_TIMESTAMP |
"Notification Timestamp" |
|
GUIMessage |
ALT |
"View Remark(s)" |
|
fixed_header |
]completion_date_expected_at_task |
"Expected Task Completion Date" |
|
fixed_header |
]ord_completion_date |
"Completed Date" |
|
fixed_header |
]num_remarks |
"Number of Remarks" |
|
fixed_header |
]order_hist_seq_id |
"Order History ID" |
About OSM Process Definition Data
This section lists the process definition data used in OSM database tables. The data is contained in various files located in your OSM_home/Database/osm-db-installer-core/install/OMS/main/model directory.
-
om_application_function
-
om_attribute_type
-
om_order_data_dictionary
-
om_order_remarks_type
-
om_order_type_category
-
om_process
-
om_process_status
-
om_responsibility
-
om_rule_def
-
om_state
-
om_state_category
-
om_status_category
-
om_task
-
om_view_order_node_label
To edit these tables, open the file using an XML or text editor and replace the "description" text with the target language text.
Note:
Do not localize the column names. Column names are not externally visible, and are necessary for the internal operation of OSM.After you localize any of these files, make sure you provide an updated copy to Oracle Global Support, so they can assist you with any future issues that may arise.
om_application_function
Table 8-3 lists the application functions defined for OSM. The file is located in your OSM_home/Database/osm-db-installer-core/install/OMS/main/model/user/privelege/_table/_data directory. Localize the values in the right column.
Table 8-3 om_application_function
| app_function_mnemonic | app_function_description |
|---|---|
|
reference_number_modification |
Reference Number Modification |
|
priority_modification |
Order Priority Modification |
|
online_reports |
Online Reports |
|
worklist_viewer |
Worklist Viewer |
|
task_assignment |
Task Assignment |
|
exception_processing |
Exception Processing |
|
search_viewer |
Search Viewer |
|
create_versioned_orders |
Create Versioned Orders |
om_attribute_type
Table 8-4 lists the attribute types used by OSM. The file is located in your OSM_home/Database/osm-db-installer-core/install/OMS/main/model/ordertemplate/_table/_data directory. Localize the values in the description column.
om_order_data_dictionary
Table 8-5 describes the data dictionary. The data dictionary contains one element, which is a dictionary element for the root node in the OSM master order template. This file is located in your OSM_home/Database/osm-db-installer-core/install/OMS/main/model/ordertemplate/_table/_data directory. Localize the text that appears in the business_name column.
om_order_remarks_type
Table 8-6 describes the order remarks localization. This file is located in your OSM_home/Database/osm-db-installer-core/install/OMS/main/model/ordertemplate/_table/_data directory. Localize the text that appears in the remarks_type_description column.
om_order_type_category
Table 8-7 describes the order type localization. This file is located in your OSM_home/Database/osm-db-installer-core/install/OMS/main/model/ordertemplate/_table/_data directory. Localize the text that appears in the order_type_category_descr column.
om_process
Table 8-8 describes the order process localization. This file is located in your OSM_home/Database/osm-db-installer-core/install/OMS/main/model/process/_table/_data directory. Localize the text that appears in the process_id_description column.
om_process_status
Table 8-9 describes the process status localization. This file is located in your OSM_home/Database/osm-db-installer-core/install/OMS/main/model/process/_table/_data directory. Localize the text that appears in the process_status_description column.
om_responsibility
Table 8-10 describes the responsibility localization. This file is located in your OSM_home/Database/osm-db-installer-core/install/OMS/main/model/user/privelege/_table/_data directory. Localize the text that appears in the responsibility_description column.
om_rule_def
Table 8-11 describes the rule definition localization. This file is located in your OSM_home/Database/osm-db-installer-core/install/OMS/main/model/rule/_table/_data directory. Localize the text that appears in the rule_description and rule_comment columns.
Null Rule is the rule that always evaluates to true.
om_state
Table 8-12 describes the state description localization. This file is located in your OSM_home/Database/osm-db-installer-core/install/OMS/main/model/process/_table/_data directory. Localize the text that appears in the state_description column.
om_state_category
Table 8-13 describes the state category description localization. This file is located in your OSM_home/Database/osm-db-installer-core/install/OMS/main/model/process/_table/_data directory. Localize the text that appears in the state_category_description column.
om_status_category
Table 8-14 describes the status category description localization. This file is located in your OSM_home/Database/osm-db-installer-core/install/OMS/main/model/process/_table/_data directory. Localize the text that appears in the status_category_description column.
om_task
Table 8-15 describes the task description localization. This file is located in your OSM_home/Database/osm-db-installer-core/install/OMS/main/model/process/_table/_data directory. Localize the text that appears in the task_description column.
om_view_order_node_label
Table 8-16 describes the view order node label localization. This file is located in your OSM_home/Database/osm-db-installer-core/install/OMS/main/model/ordertemplate/_table/_data directory. Localize the text that appears in the label column.
About Generic Preferences
This section lists the generic user preferences in the OSM database tables. The file is located in your OSM_home/Database/osm-db-installer-core/install/OMS/main/model/user/preference/_table/_data directory.
To edit these tables, open the file using an XML or text editor and replace the description text with the target language text.
Note:
You must only localize the description values and not the column names. Column names are not externally visible, and are necessary for the internal operation of OSM.After you localize this file, make sure you provide an updated copy to Oracle Global Support, so they can assist you with any future issues that may arise.
om_generic_mnemonic
Table 8-17 describes the generic mnemonic localization. Localize the text that appears in the description column.
Table 8-17 om_generic_mnemonic
| CLASS Column | Description |
|---|---|
|
worklist_filter |
Possible values are:
|
|
colour |
Possible values are:
|
|
order_list |
Possible values are:
|
|
user_attr |
Possible values are:
|
|
dynamic_filter |
Possible values are:
|
|
login_screen |
Possible values are:
|
Localizing the Task Web Client
The Task web client is a web-based application that provides information dynamically and a set of interactions that the end-user can perform on this information. The information appears as HTML pages, but server-side technologies produce the HTML output and provide user interaction.
For information about the Task web client architecture, see OSM Task Web Client User's Guide.
You can localize the following Task web client elements:
-
Text Strings: Every non-database driven text message, including labels for fields and buttons.
-
Page titles
-
Hyperlink text
-
Images: You can replace standard images with localized versions; you can also localize the alternate text for each image.
-
Dates and Date/Times: You can display all date and date/time values in the locally preferred format.
-
Numerics: You can display all numeric values in the locally preferred format.
-
Currency format
-
Error messages
-
Log messages
The Task web client uses the Java language, which has built-in support for localization of dates and times, as well as string sorting capabilities. The Task web client uses the locale of the operating system upon which it runs in order to determine regional date and time settings.
When a user connects to OSM using their web browser, the OSM server attempts to determine their preferred locale. If no customization can be found for their preferred locale, the default locale (English) appears.
All modern web-browsers support an Accept-Language header which indicates locale preferences. Multiple language preferences can be specified, however OSM uses the top one listed to locate localization resources.
To localize the Task web client:
-
Unpack the oms.ear file. See "Unpacking the oms.ear File."
-
Localize and customize the files in the oms.ear/resources directory as described in the following sections:
-
Pack the oms.ear file and redeploy it to the WebLogic server. See "Working with the oms.ear File."
Task Web Client Localization Resource Bundles
After you unpack the oms.ear file (see "Unpacking the oms.ear File"), the localizable resources for the Task web client are contained in the OSM_home/SDK/Customization/resources/resources directory.
This directory contains the resources.properties file. This file contains all localizable strings and image references for the Task web client. Several other properties files are included in the resources directory as samples, including:
-
resources_cs.properties (localized for the Czech Republic)
-
resources_zh.properties (localized for China)
-
resources_en.properties
To create a new localization property file:
-
Copy the resources.properties file and create a new file using the following naming convention:
resources_locale.properties
where locale is a locale code. For example, resources_ja.properties for Japan.
-
For each parameter in the resources_locale.properties file, provide a replacement value in the new locale. If you do not provide a replacement value, the Task web client uses the default value.
Localizing the Process History Pages
The Process History pages in the Task web client user interface use the Oracle JavaScript Extension Toolkit (JET), which has built-in support for internationalization and localization.
When a user connects to this client using a web browser, the OSM server attempts to determine their preferred locale. If no customization can be found for the preferred locale, the default locale (English) is used. All modern web-browsers support an Accept-Language header which indicates locale preferences. If you specify multiple language preferences, OSM uses the top one listed to locate localization resources.
After you unpack the oms.ear file (see "Unpacking the oms.ear File"), the localizable resources for the Process History pages in the Task web client are contained in the OSM_homeSDK/Customization/osm-ui-web/js/resources/nls/ directory.
This directory contains the bundle.js property file. This file contains all localizable strings for the Process History page. The bundle.js file is loaded by the server by default, if no customization is found. Several other properties files are included in the nls directory as samples, including:
-
zh/bundle.js (localized for China)
-
cs/bundle.js (localized for the Czech Republic)
To create a new localization property file:
-
Create a new directory with the name of the language code and copy the bundle.js file to the directory you created. For example, create a directory with the name fr (localized for France) and copy the bundle.js file to the fr directory.
-
For each parameter in the fr/bundle.js properties file, provide a replacement value in the new locale. If you do not provide a replacement value, the Task web client uses the default value.
-
Add the new locale to the list of locales provided in the default bundle.js file.
For example, if you want to localize the Process History pages for France, add the string "fr":1 to OSM_HOME/SDK/Customization/osm-ui-web/js/resources/nls/bundle.js as shown below:
define({ root: { appName: "Order and Service Management", ... .... } "cs": 1, "zh": 1, "fr" : 1 }); -
Pack the oms.ear file and redeploy it to the WebLogic server.
-
Change the language settings in the browser to the language you want to use.
Localizing Date, Time and Currency Formats
To differentiate between 2:00:00 pm EST and 2:00:00 pm CST, modify the resource.properties file by changing the format.datetime.input setting to include time zone.
To specify this, you must:
-
Open the resources.properties file.
-
Specify date time input and display format. For example:
format.datetime.input=MM/dd/yy hh:mm:ss a
format.datetime.display=MM/dd/yy hh:mm:ss a
Table 8-18 lists the localization data properties.
Table 8-18 Localizing Data Formats
| Data Formats | Description |
|---|---|
|
format.encoding |
Character set encoding used in browser communication |
|
format.currency |
Mask used for currency display and validation |
|
format.date.input |
Mask used for date display and validation in input fields |
|
format.date.display |
Mask used for date display in tables |
|
format.datetime.input |
Mask used for datetime display and validation in input fields |
|
format.datetime.display |
Mask used for datetime display in tables |
|
format.am |
String for AM field in web calendar |
|
format.pm |
String for PM field in web calendar |
You must edit the mask.date and mask.time properties together. You cannot edit one property and leave the other one empty.
Table 8-19 lists the available values for the mask.date and mask.time properties.
| Symbol | Description | Presentation | Examples |
|---|---|---|---|
|
y |
year: Use two or four characters. If a different number of y characters is used, a four-digit year will be displayed. |
Number |
05 2005 |
|
M |
month in year: Use one or two M characters to display a numeric month value. Use three M characters to display a three-character text representation of the month. Use four M characters to display the full text representation of the month. |
Text & Number |
7 07 Jul July |
|
d |
day in month |
Number |
10 |
|
h |
hour in am/pm (1~12) |
Number |
12 |
|
H |
hour in day (0~23) |
Number |
0 |
|
m |
minute in hour |
Number |
30 |
|
s |
second in minute |
Number |
55 |
|
E |
day in week |
Text |
Tue |
|
D |
day in year |
Number |
189 |
|
w |
week in year |
Number |
27 |
|
a |
am/pm marker |
Text |
PM |
|
' |
escape for text |
Delimiter |
N/A |
|
'' |
single quote |
Literal |
' |
Table 8-20 lists the available values for the mask.currency property.
Table 8-20 Mask Currency Values
| Symbol | Meaning | Presentation |
|---|---|---|
|
# |
zeros show as absent |
Number |
|
0 |
zeros show as 0 |
Number |
|
, |
the locale-specific grouping separator |
Text |
|
- |
the locale-specific negative prefix |
Text |
|
; |
separates positive number format from optional negative number |
Text |
|
' |
escape for text |
Delimiter |
|
other |
all other symbols appear as entered |
Text |
You must change the on-window text of the HTML pages produced by the OSM UI, and, if necessary, indicate the character set encoding.
Localizing Text and Error Messages
If text and error messages (that is, messages in the resource file that begin with text or error), contain parameterized values, for example: {0}, {1}, {2}, and so on, ensure the localized message uses the same parameterized values.
Localizing Page Titles
Page titles in the resource file begin with page.
Localizing Image References
Image references consist of two parameters:
-
image.name.alt: The HTML alternate text to display for the image
-
image.name.src: The location of the image file in oms.war (see "Inserting New Images").
Inserting New Images
All images that display in the Task web client are contained in the oms.war file packed in the oms.ear file. You can insert new images anywhere inside oms.war as long as your reference the correct location in the locale's resource.properties file. Oracle recommends that you create a directory for each localization and name the directory images_locale, where locale is a code for the location.
Editing the First Day of the Week
By default, the Task web client date and time calendar assumes Sunday is the first day of the week. However, this value is set automatically based on the user's locale.
Note:
When displaying lists, the Administration area of the Order Management web client always displays Sunday as the first day of the week.Editing the Boolean Data Element Values
The Task web client displays boolean data element values in drop-down lists in several views. You can change the Boolean data element values the Task web client displays by editing the Boolean display value fields in the resources.properties file.
For example:
# Boolean display values
text.boolean.yes=Yes
text.boolean.no=No
Editing the Number of Records Displayed in the Worklist
You can change the number of records displayed in the Worklist view from the default by editing the oms-config.xml file.
See the chapter on configuring OSM with oms-config.xml in OSM System Administrator's Guide for detailed instructions on accessing and modifying the oms-config.xml file.
To change the number of records displayed in the Worklist view:
-
Open the oms-config.xml file for editing.
-
Search for max_worklist_rows, and update the <oms-parameter-value> tag with the new value.
-
Save and close the oms-config.xml file.
Editing and Replacing Task Web Client Icons
You can edit or replace the icon graphics that appear in the Task web client. To do this, replace the graphical content of the existing icon files with your own, customized graphics.
When creating or editing an icon graphic, ensure you maintain the file name. For example, if you replace the graphical content of the about.gif file, ensure you name the resulting file about.gif.
Oracle recommends that you only customize or replace existing icon graphics if the original graphic introduces ambiguities or errors when you localize the Task web client.
All of the OSM icon files are located in the OSM_home/SDK/Customization/osm-war/images directory.
Localizing the Order Management Web Client
As with the Task web client, all language-specific text exposed by the Order Management web client is localizable.
To localize the Oder Management web client:
-
Unpack the oms.ear file. See "Unpacking the oms.ear File."
-
Localize the files located in the OSM_home/SDK/Customization/resources/xliff directory.
The Order Management web client defines one XLIFF file per localizable application page.
-
Register the default and supported locales:
-
Open the following file for editing:
OSM_home/SDK/Customization/osmwebui/WEB-INF/faces-config.xml
-
Search for the <local-config> tag.
-
Specify the default and supported locales as follows:
<locale-config>
  <default-locale>locale1</default-locale>
  <supported-locale>locale2</supported-locale>
</locale-config>
where locale1 is the default locale you want to register and locale2 is a different locale you want to register. See Example 8-4.
-
Save and close the file.
-
-
(Optional) Change the Order Management web client logo. See "Changing the Order Management Web Client Logo Image and Text."
-
Pack and redeploy the oms.ear file. See "Working with the oms.ear File."
Visit the following website to learn about the XLIFF standard:
http://docs.oasis-open.org/xliff/xliff-core/xliff-core.html
Example 8-1 shows a simple XLIFF example.
<?xml version="1.0" encoding="UTF-8" ?>
<xliff version="1.1" xmlns="urn:oasis:names:tc:xliff:document:1.1">
  <file source-language="en" original="i18n.view.i18nTestBundle"
  datatype="xml">
    <body>
      <trans-unit id="MESSAGE">
        <source>Hello world!</source>
        <target/>
        <note>The message to display</note>
      </trans-unit>
    </body>
  </file>
</xliff>
This file specifies a single localizable token (MESSAGE) as well as the text with which to replace the token (Hello world!) for the specified language (en, which is English). The note element provides a description of the context in which the token is used. As with the resources_locale.properties file, an XLIFF file may contain parameters. However, unlike the numeric parameters in resources_locale.properties, the parameters in the Order Management web client XLIFF files are named. For example:
<source>Change Reference for Order {ORDER_ID}</source>
Building on Example 8-1, the XLIFF file might look like Example 8-2.
Example 8-2 XLIFF with <source>
<?xml version="1.0" encoding="UTF-8" ?>
<xliff version="1.1" xmlns="urn:oasis:names:tc:xliff:document:1.1">
  <file source-language="en" original="i18n.view.i18nTestBundle"  datatype="xml">
    <body>
      <trans-unit id="MESSAGE">
        <source>{SALUTATION} {RECIPIENT}!</source>
        <target/>
        <note>The message to display</note>
      </trans-unit>
    </body>
  </file>
</xliff>
As with the resources_locale.properties file, each XLIFF file is localized by creating a new file with the language code and (optionally) country code appended. Building on Example 8-2, if the contents are found in a default bundle file named applicationBundle.xlf, a version localized to the French language would be named applicationBundle_fr.xlf, as shown in Example 8-3.
Example 8-3 XLIFF Language set to French
<?xml version="1.0" encoding="UTF-8" ?>
<xliff version="1.1" xmlns="urn:oasis:names:tc:xliff:document:1.1">
  <file source-language="fr" original="i18n.view.i18nTestBundle_fr" datatype="xml">
    <body>
      <trans-unit id="MESSAGE">
        <source>Bonjour le monde!</source>
        <target/>
        <note>The message to display</note>
      </trans-unit>
    </body>
  </file>
</xliff>
For more information about the faces.config.xml file, see Oracle Fusion Middleware Web User Interface Developer's Guide for Oracle Application Development Framework.
Example 8-4 shows an example faces.config.xml with the language set to French and English.
Example 8-4 faces.config.xml Language set to French and English
<?xml version="1.0" encoding="windows-1252"?>
<faces-config version="1.2" xmlns="http://java.sun.com/xml/ns/javaee">
  <application>
    <default-render-kit-id>oracle.adf.rich</default-render-kit-id>
    <locale-config>
      <default-locale>en</default-locale>
      <supported-locale>en</supported-locale>
      <supported-locale>fr</supported-locale>
    </locale-config>
  </application>
</faces-config>
Changing the Order Management Web Client Logo Image and Text
To change the Order Management web client logo image and text:
-
Go to the OSM_home/SDK/Customization/osmwebui/images folder.
-
Change any images with the Oracle logo. Do not change the image names or file types.
For example:
-
splash.jpg: This image is used in the Order Management web client login and about screens and contains the Oracle logo at the top left corner.
-
splash.bmp: This is the Order Management web client background and contains the Oracle logo at the top left corner.
-
-
Open OSM_home/SDK/Customization//resources/xliff/oracle/communications/
ordermanagement/ui/order3columnBundle.xlf using a text editor. -
Change the text associated with the customized Oracle logo images.
For example:
<?xml version="1.0" encoding="windows-1252" ?>
<xliff version="1.1" xmlns="urn:oasis:names:tc:xliff:document:1.1">
  <file source-language="en" original="oracle.communications.ordermanagement.ui.order3columnBundle"
        datatype="xml">
    <body>
      <trans-unit id="OSM_APP_NAME">
        <source>custom_name</source>
        <target/>
      </trans-unit>
      <trans-unit id="HOME_PAGE_TITLE">
        <source>custom_name2</source>
        <target/>
      </trans-unit>
      <trans-unit id="DENIED_SEARCH_MSG">
        <source>You are not authorized to perform search</source>
        <target/>
      </trans-unit>
      <trans-unit id="ERROR_MSG_SUBJECT">
        <source>Error</source>
        <target/>
      </trans-unit>
    </body>
  </file>
</xliff>
where custom_name is the text associated splash.jpg and custom_name2 is the text associated with splash.bmp.
-
Save and close the file.
Localizing the Order Lifecycle Management User Interface
You can localize the following elements in the Order Lifecycle Management user interface:
-
Text Strings: Every non-database driven text message, including labels for fields and buttons
-
Page titles
-
Hyperlink text
-
Error and informational messages
The Order Lifecycle Management user interface uses the Oracle JavaScript Extension Toolkit (JET), which has built-in support for internationalization and localization.
When a user connects to this client using a web browser, the OSM server attempts to determine their preferred locale. If no customization can be found for the preferred locale, the default locale (English) is used. All modern web-browsers support an Accept-Language header which indicates locale preferences. If you specify multiple language preferences, OSM uses the top one listed to locate localization resources.
To localize the Order Lifecycle Management user interface:
-
Unpack the oms.ear file.
See "Unpacking the oms.ear File."
-
Create a directory in oms.ear/osm-responsive-web/resources/nls with the name of the language code. For example, oms.ear/osm-responsive-web/resources/nls/es for Spanish.
-
In the directory you created in the previous step, create a file named bundle.js and include any strings that need localization in the following format:
define({
'label1': 'Localized message 1',
'label2': 'Localized message 2',
...
'label_n': 'Localized message n'
});
The labels and label hierarchies should match those in the oms.ear/osm-responsive-web/resources/nls/bundle.js file.
For more information about localizing Oracle JET interfaces, see the discussion of adding translation bundles to Oracle JET in Oracle JET Developing Applications with Oracle JET.
-
Edit the oms.ear/osm-responsive-web/resources/nls/bundle.js file and add the translation you have created after the root element, as described in the discussion of adding translation bundles to Oracle JET in Oracle JET Developing Applications with Oracle JET, for example:
define({ "root": { ... }, "es": true }); -
Pack the oms.ear file and redeploy it to the WebLogic server. See "Working with the oms.ear File."
Working with the oms.ear File
The oms.ear file is an OSM WebLogic application component deployed to the WebLogic server. It contains OSM configuration directories and files, including localization files.
Unpacking the oms.ear file lets you access and change the OSM configuration files, and packing and redeploying the oms.ear file implements your changes. The scripts for unpacking and packing the oms.ear file are located in the OSM_home/SDK/Customization directory. This directory exists only if you installed the SDK during a Custom installation.
Note:
You can install only the SDK on a Windows, UNIX, or Oracle Linux machine by running the OSM installer again and selecting Custom.Undeploying and redeploying oms.ear allows the WebLogic server to pick up any changes you have made to oms.ear.
Unpacking the oms.ear File
Before you can work with a configuration file that is packed in the oms.ear file, you must unpack the oms.ear file.
To unpack the oms.ear file:
-
Copy the oms.ear file from the domain_home/servers/admin_server_name/upload/oms/app/ directory to your OSM_home/SDK/Customization directory:
where admin_server_name is the name of the WebLogic administration server.
Note:
Oracle recommends that you make a backup copy of your original oms.ear file, in case you need to restore the default settings. -
From the OSM_home/SDK/Customization directory, use a text editor to do one of the following:
-
On UNIX or Linux, open unpackOMS.sh and set the JAVA_HOME variable to the path to the JDK on your system.
-
On Windows, open unpackOMS.bat and set the JAVA_HOME variable to the path to the JDK on your system.
Note:
If the path in JAVA_HOME contains a space, enclose the path in quotation marks. For example:set JAVA_HOME="C:\oracle\middleware test\jdk170_67"
-
-
Save and close the file.
-
Do one of the following:
-
On UNIX or Linux, run unpackOMS.sh.
-
On Windows, run unpackOMS.bat.
The script unpacks the oms.ear file and creates the following new sub-directories in the Customization directory:
-
osm-ear
-
osm-ejb
-
osm-war
-
osmwebui
-
resources
-
Packing the oms.ear File
When you finish editing a configuration file, you must pack the oms.ear file and redeploy it to the OSM WebLogic server so that your edits take effect.
To pack the oms.ear file:
-
From the OSM_home/SDK/Customization directory, use a text editor to do one of the following:
-
On UNIX or Linux, open packOMS.sh and set the JAVA_HOME variable to the path to the JDK on your system.
-
On Windows, open packOMS.bat and set the JAVA_HOME variable to the path to the JDK on your system.
Note:
If the path in JAVA_HOME contains a space, enclose the path in quotation marks. For example:set JAVA_HOME="C:\oracle\middleware test\jdk170_51"
-
-
Save and close the file.
-
Do one of the following:
-
On UNIX or Linux, run packOMS.sh.
-
On Windows, run packOMS.bat.
The script creates a new oms.ear file.
-
-
Copy the new oms.ear file to the domain_home/servers/admin_server_name/upload/oms/app/ directory:
where admin_server_name is the name of the WebLogic administration server.
-
Do one of the following:
-
Stop and restart the WebLogic server. For information about starting and stopping the WebLogic server, see OSM Administrator's Guide.
-
Redeploy the oms.ear file:
-
Log in to the WebLogic Administration Console.
-
In the Domain Structure pane, click Deployments.
-
In the Deployments window, select the box next to oms, click Stop, and select the option appropriate for your situation.
-
With the box next to oms selected, click Delete.
-
Click Activate Changes.
-
Click Install.
-
In the Install Application Assistant window, browse to the location of the updated oms.ear file and click Finish.
-
Select the box next to oms and click Start and Servicing all Requests.
-
-
Undeploying and Redeploying the oms.ear File
Undeploying and redeploying the oms.ear file makes any changes you have made active on the OSM server.
To undeploy and redeploy the oms.ear file:
-
Log in to the WebLogic Server Administration console as a user with administrative privileges.
-
In the Domain Structure pane, click Deployments.
-
In the Deployments table, select the oms enterprise application deployment by clicking the check box for that row.
-
From the Stop menu in the Deployments table, select either When work completes or Force stop now.
-
When the server has stopped, select the oms deployment again and click Delete.
-
Click Install.
The Install Application Assistant window is displayed.
-
Browse to the location of the new version of the oms.ear file and select oms.ear.
-
Click Next.
-
Select Install this deployment as an application and click Next.
-
Click Finish.
You are returned to the Deployments window with the oms deployment added and active.