3 Configuring Session Monitor
This chapter describes how to configure Oracle Communications Session Monitor.
About the Platform Setup Application
The Platform Setup Application (PSA) guides you through the configuration steps to get the Session Monitor system running, including configuring the machine type, capture settings, DNS settings, and SMTP settings.
The menu on the right shows your progress in the overall configuration.
Platform Setup Application Initial Log In
This section provides how to log into Platform Setup Application initially.
-
Open the web browser and enter the URL provided by the System Administrator.
-
Confirm the security exception to proceed.
The Log in page appears.
-
Enter the default Username and Password. Contact your Oracle representative for the user credentials.
-
Click Sign in.
-
Review and Accept the license of the software to continue.
The Platform Application Setup page appears.
Changing Your Password
To change your password, click your user name in the top right-hand corner of the screen and select Change Password from the drop-down menu.
In the Change Password dialog box, enter the old and the new passwords in the indicated fields and click Change.
Note:
The password contains only digits, letters and white spaces.Restarting or Powering Off Session Monitor
The restart and power off buttons are accessible through the power button on the top right-hand corner of the screen.
Figure 3-1 shows the drop-down menu when you click the power button.
Figure 3-1 Restarting or Powering Off Session Monitor

Description of ''Figure 3-1 Restarting or Powering Off Session Monitor''
After selecting an option, you are prompted a final time to confirm that you wish to proceed.
Selecting the Machine Type
Figure 3-2 shows the Machine Type Settings page.
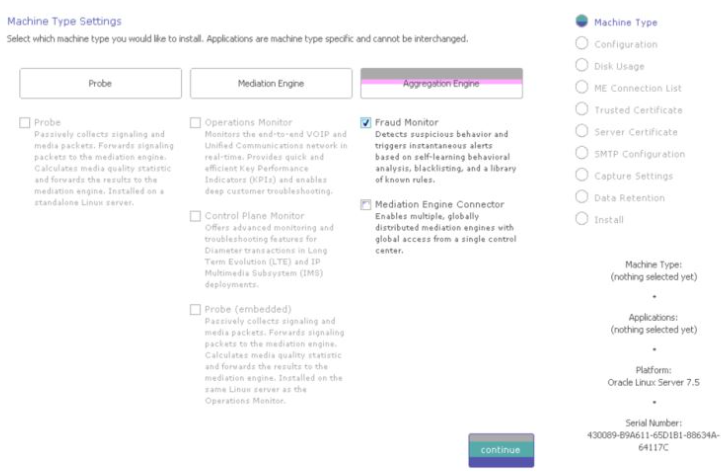
The Machine Type Settings page allows you to select which products you want to install. This page only appears the first time you configure Session Monitor prior to the products installation.
Select your machine type by clicking Probe or Mediation Engine or Aggregation Engine button. This will enable the corresponding product selection.
Note:
-
You can select only one machine type per installation.
-
Packet Inspector is not supported on the machine collocated with Operations Monitor or Probe with SIP/RTP sniffing for the calls and VQ analysis.
Next, select the check boxes next to the products that you want to install. Only checked items are included in the installation.
Note:
The products are machine type specific and cannot be interchanged between machine types.For example, the Probe machine type requires a probe product, and the Mediation Engine machine type requires the Operations Monitor product.
After selecting the products, click continue to proceed with the installation. Your machine type and product selections should appear in the status panel located on the right under the navigation menu.
Configuring Session Monitor
This step in the configuration process allows you to configure Session Monitor settings for this machine in accordance with the terms of your license.
Note:
If you do not have a valid Session Monitor license, contact Oracle.Figure 3-3 shows the Configuration page.
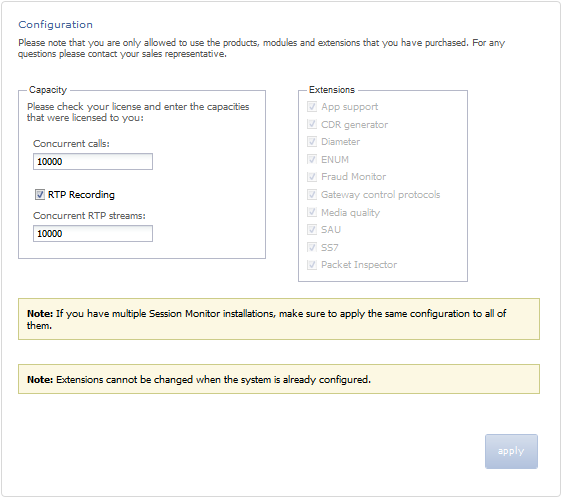
On the left side of the page you must enter the number of concurrent calls printed on your license. On the right side you must check the product extensions you have a license to use. All enterprise customers should automatically check Media quality.
Note:
The number of Concurrent RTP streams can cause performance and stability issues if it is set higher than the hardware and the network permits. Values above 20 are not recommended. Changes to the RTP recording setting take effect only after a restart of the system.If you have multiple servers involved in your set up (additional standalone Probes servers connected to the Mediation Engine), this setting must be set on each Probe (unless certain Probe is not sniffing Media so that RTP recording is not really applicable for the Probe). In such scenarios, the value that is set should be same on each node, on the Mediation Engine (or the Mediation Engine with local Probe), and the Probes.
Click the continue button to navigate to the ME Connection List page.
Mediation Engine Connection List
For a Probe machine type, the Mediation Engine Connection List page allows you to configure which Mediation Engines the Operations Monitor Probe connects to.
Figure 3-4 shows the ME Connection List page.
The Operations Monitor Probe can connect to one or more Mediation Engines, using TLS encryption, or with some configurations, also cleartext. Likewise, a Mediation Engine can connect to more than one Operations Monitor Probe (as well as Session Border Controller Probes).
On the Mediation Engine, cleartext connections are usually on port 4741 and encrypted connections on port 4742. For encrypted connections, the Operations Monitor Probe and the Mediation Engine need to be able to verify the certificate of the other party. See "Secure Configuration" for more information.
Figure 3-4 Mediation Engine Connection List Page
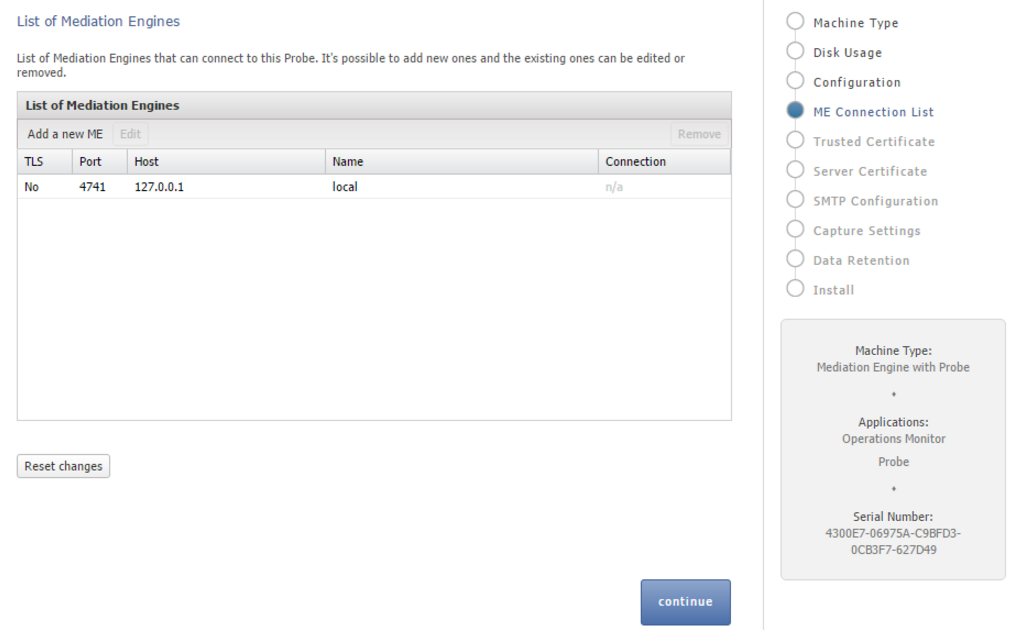
Description of ''Figure 3-4 Mediation Engine Connection List Page''
The Mediation Engine machines by default only accept encrypted connections (unless the Mediation Engine and Probe are on the same machine); for unencrypted connections the check box Accept insecure connections from remote probes on the Trusted Certificate page must be checked.
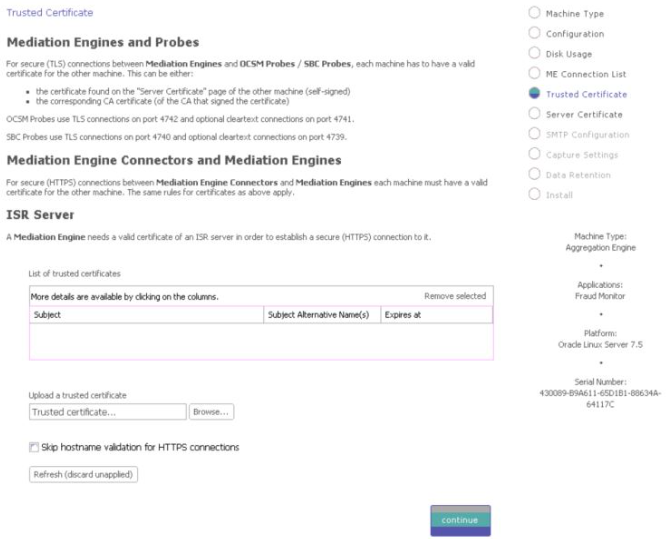
Figure 3-5 shows the Trusted Certificate page.
Typical Connection Scenarios
Mediation Engine and Operations Monitor Probe Are on the Same Machine
For setups with a Mediation Engine machine with an embedded Probe, a cleartext connection is automatically added to the ME connection list. For cleartext connections, no certificates are exchanged.
One Mediation Engine and Two Operations Monitor Probes
For setups with one Mediation Engine and two Operations Monitor Probes, the self-signed server certificates of both Operations Monitor Probes are uploaded as trusted certificates on the Mediation Engine, and the self-signed server certificate of the Mediation Engine is uploaded on both Operations Monitor Probes as a trusted certificate. On each Operations Monitor Probe, the IP of the Mediation Engine is added to the ME connection list with TLS check box selected.
Table 3-1 describes the actions to configure the connections between one Mediation Engine and two Operations Monitor Probes.
Table 3-1 One Mediation Engine and Two Operations Monitor Probes
| Machine | Action |
|---|---|
|
Mediation Engine |
|
|
Operations Monitor Probe 1 |
|
|
Operations Monitor Probe 2 |
|
Two Mediation Engines and One Operations Monitor Probe
For setups with two Mediation Engines and one Operations Monitor Probe, the self-signed server certificate of the Operations Monitor Probe is uploaded as trusted certificate on both Mediation Engines, and the self-signed server certificates of the Mediation Engine are uploaded on the Operations Monitor Probe as a trusted certificate. On the Operations Monitor Probe, the IPs of the Mediation Engines are both added to the ME connection list with TLS check box selected.
Table 3-2 describes the actions to configure the connections between two Mediation Engines and one Operations Monitor Probe.
Table 3-2 Two Mediation Engine and One Operations Monitor Probe
| Machine | Action |
|---|---|
|
Mediation Engine 1 |
|
|
Mediation Engine 2 |
|
|
Operations Monitor Probe |
|
For setups with more than two Operations Monitor Probes or Mediation Engines, Oracle recommends that you use PKI (Public Key Infrastructure) with root certificates as described in Oracle Communications Session Monitor Security Guide.
Trusted Certificates
The Trusted Certificates page is used to configure the authentication of session border controllers (SBCs). This step is necessary before attempting to connect SBCs to Session Monitor.
For secure (HTTPS) connections between Mediation Engine Connectors and Mediation Engines each machine must have a valid certificate for the other machine. The same rules for certificates as for ME and Probe.
A Mediation Engine requires a valid certificate of an ISR server in order to establish a secure (HTTPS) connection to it.
For secure (HTTPS) connections between Fraud Monitor and Mediation Engine, each machine must have a valid certificate for the other machine. The same rules for certificates as for ME and Probe.
For more information, see the discussion about connection with Oracle Session Border Controller in Session Monitor Security Guide.
Configuring the SMTP Settings
Figure 3-6 shows the SMTP Configuration page.
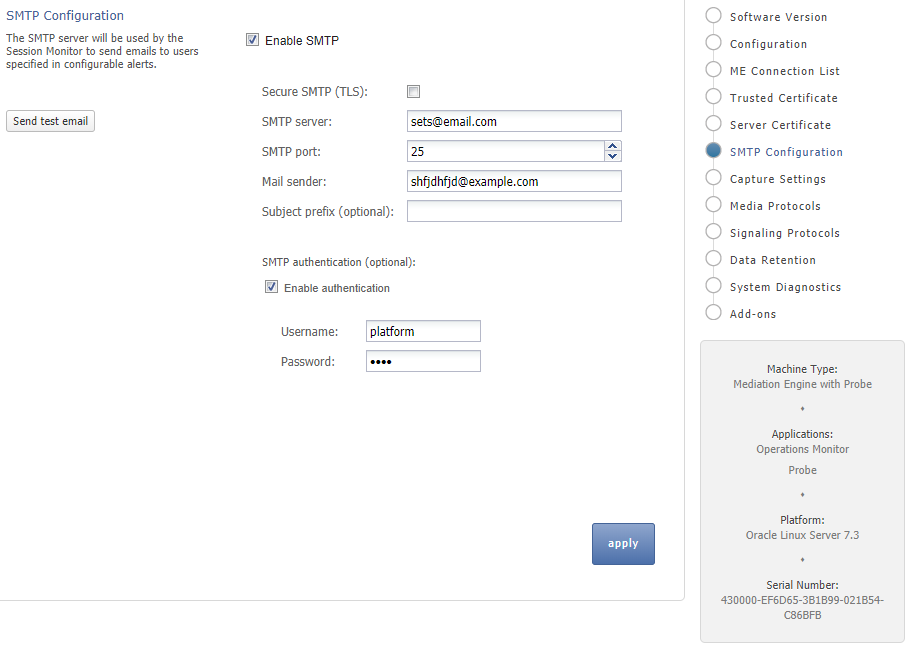
Session Monitor can send notifications and alerts directly to users' email addresses. Which notification to send to which address is configured in the relevant products. However, you first need to configure the SMTP settings properly for this feature to be available.
Setting Up the Mail Server
To use the email notification feature, select Enable SMTP check box. The system needs an SMTP server to send emails. Contact your network administrator to find out the address of the server your organization uses. The default port is the standard port 25.
If the server requires a valid email account, you will need to create one for Session Monitor. Then, select Enable authentication check box and enter the credentials.
Setting Up the Email Notifications
You can choose how the emails from Session Monitor will look like in the users' mailboxes.The field Mail sender is the email address Session Monitor will use; users will see this address in the Sender: or From: field of the emails. You can optionally specify a Subject prefix; which appears at the beginning of the subject of the emails and make it easy to identify Session Monitor's emails in users' inbox.
Configuring the Capture Settings
The Capture Settings page contains a list of configured network interfaces, with a toolbar for deleting interfaces, as well as a restore button to reset the last applied settings (usually, you want to add interfaces you didn't add during the installation procedure).
There's also a check box below the network list that can be checked if you wish to apply capture settings that won't allow you to reconnect to the Platform Setup Application again.
Figure 3-7 shows the Capture Settings page.
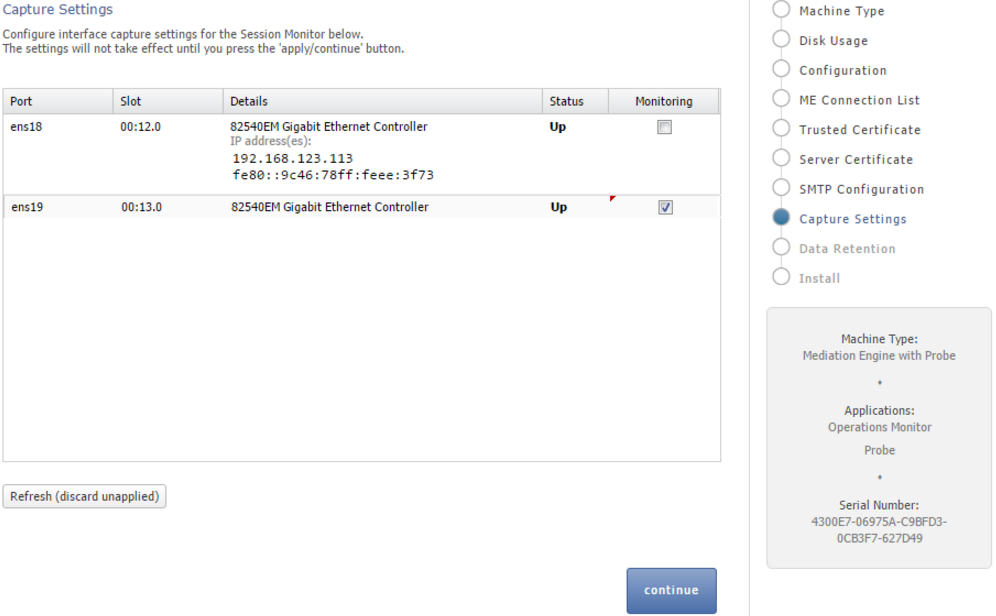
Note:
Monitoring is only enabled for machines that are configured as probes. On other machines, the monitoring check box is grayed out.Important:
Do not configure dummy interfaces with DHCP if there is no DHCP server to give an IP.When applying settings with a dummy interface using the DHCP method wait for the DHCP client to time out (usually one minute).
Configuring Data Retention
The Data Retention page is used for configuring data retention in database for different data sources. Some settings depend on the license settings and will be available only if the associated configuration is set.
Figure 3-8 shows the Data Retention page.
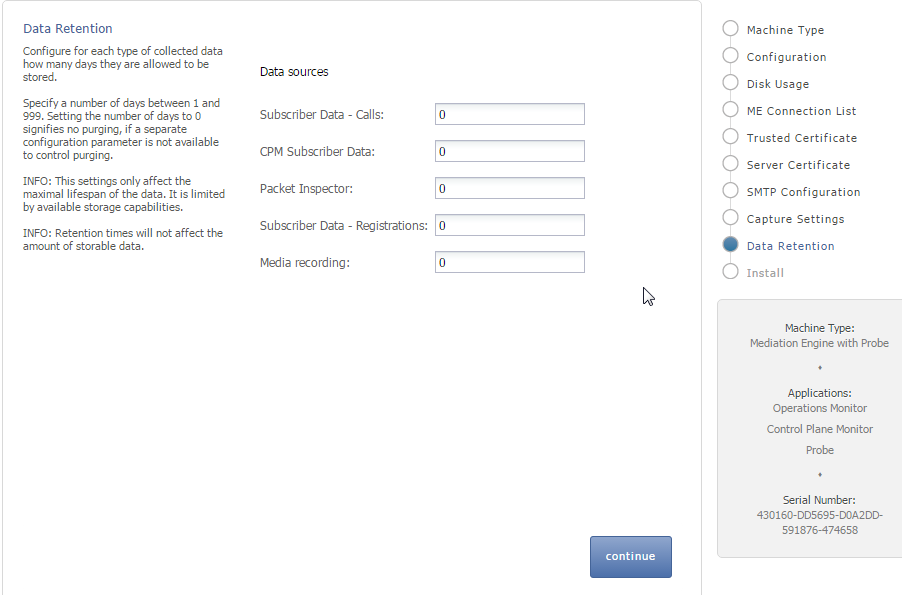
Data retention is configured in days per data source. A value of 0 disables time based data retention.
Note:
The settings only affect the maximal lifespan of the data. Data availability is limited by available storage capabilities.Note:
Retention times does not affect the amount of storable data.You can configure data retention times for the following data sources:
-
CPM Subscriber Data: Specifies the number of days to consider for storing the Diameter S6 transaction data. Enabled by the CPM module.
-
Media Recording: Specifies the number of days to consider for storing the RTP recordings. Enabled by RTP recording configuration.
-
Packet Inspector: Specifies the number of days to consider for storing the network-traffic history. Enabled by Packet Inspector configuration.
-
Subscriber Data - Calls: Specifies the number of days to consider for storing the call meta data and signaling.
Note:
Saved calls are not deleted by this option. Saved calls must be deleted by operators. (Optional) Disable user permissions for saved call functionality. -
Subscriber Data - Registration: Specifies the number of days to consider for storing the registration events.
Note:
CDR/MDRs are not supported. Data retention affects data in the database only. For deleting CDR/MDRs, use FTP to delete files after downloading.Secure Configuration
To help protect users of Session Monitor and consumers' data, see the Session Monitor Security Guide for information on the security features of Session Monitor.
During the installation of a Session Monitor server, you will encounter the server certificate and trusted certificate pages.
Installing the Products
The Install page summarizes the components to install. Check that you selected the correct components; after the installation is complete, the selection of the components cannot be changed.
Figure 3-9 shows the Install page.
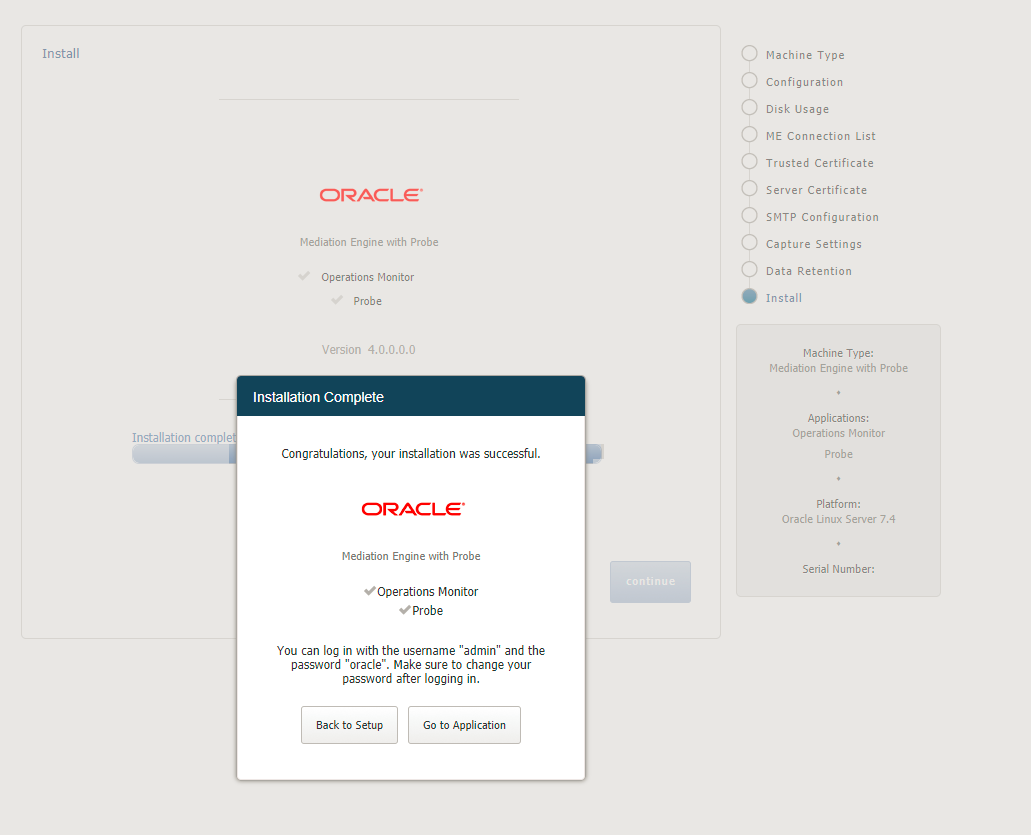
Click Install to start with the installation. The Platform Setup Application initiates the installation process and reports back the progress. The installation process might take a few minutes to complete.
You can click on the Session Monitor button when the installation is complete. This will bring you to the installed products' interface.