4 Configuring Fraud Monitor
This chapter provides information for configuring Oracle Communications Fraud Monitor.
About Configuring Fraud Detection Rules
The Settings page of the Fraud Monitor user interface lets you configure the rules, manage the users, adapt the notifications, specify blacklists, whitelists, ratelimit, redirect, import/export lists, and generate automatic lists required for a successful operation of Fraud Monitor.
The Rules section enables you to configure the patterns that are used to detect fraud and trigger incidents. If the current settings do not trigger any incidents, you may need to change the patterns or raise the points.
Note:
Go to the Platform Setup Application and refer to Session Monitor Installation Guide for settings (for example, network interfaces, DNS, or SMTP) that affect the server running Fraud Monitor.Configuring Rules
Fraud Monitor raises an incident if a given destination user receives unusually high traffic, as in an IRSF scenario. For each call, Fraud Monitor monitors the total number of minutes that the destination user has received the traffic and compares it to its historical average. If a configurable threshold is exceeded, both the source and destination users accumulate points. This rule can be used to identify possible candidates for blacklisting destination numbers.
Call Volume:
Fraud Monitor can raise an incident if a given destination user receives unusually high traffic rate as measured by Success Calls Per second or Max Active Calls.
For each call, Fraud Monitor, monitors the Success Calls Per Second that the destination user has received and compares it to its historical average (Success Calls are when 200OK for INVITE is received).
Simultaneously, it also monitors the Active Calls for that user. If a configurable threshold is exceeded for either Calls per second OR Max Active Calls, both the source and destination users accumulate points. This rule can be used to identify possible candidates for blacklisting or redirecting destination numbers.
Fraud Monitor uses configurable rules to find call patterns which are considered fraudulent and classify the severity of the incident with a points system. On the Rules section, you can decide which rules are used, configure them, and restrict their use.
The navigation bar on the right-hand side of the page lists the pre configured fixed set of rules you can use.
Figure 4-1 shows the navigation bar on the Settings page.
Figure 4-1 Navigation Bar on the Settings Page
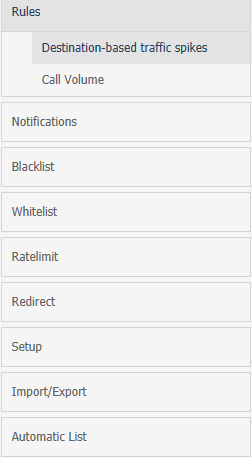
Description of ''Figure 4-1 Navigation Bar on the Settings Page''
Clicking on a rule opens up its configuration panel in the left column. Use the check boxes next to the rule name in the left column to enable and disable the rule.
Figure 4-2 shows an example of rules configuration.
Every configuration panel has Add, Edit and Delete buttons, which you can use to configure that specific rule. A brief help text is shown above the panel to aid you in the configuration process.
Every rule is assigned a weight. The default is 1.00. The rule weight can be used to make some rules more important than others.
To restrict the applicability of the rule, select the Rule Filters checkbox and enter the caller or callee information in the dialog box.
Figure 4-2 Example of Rules Configuration
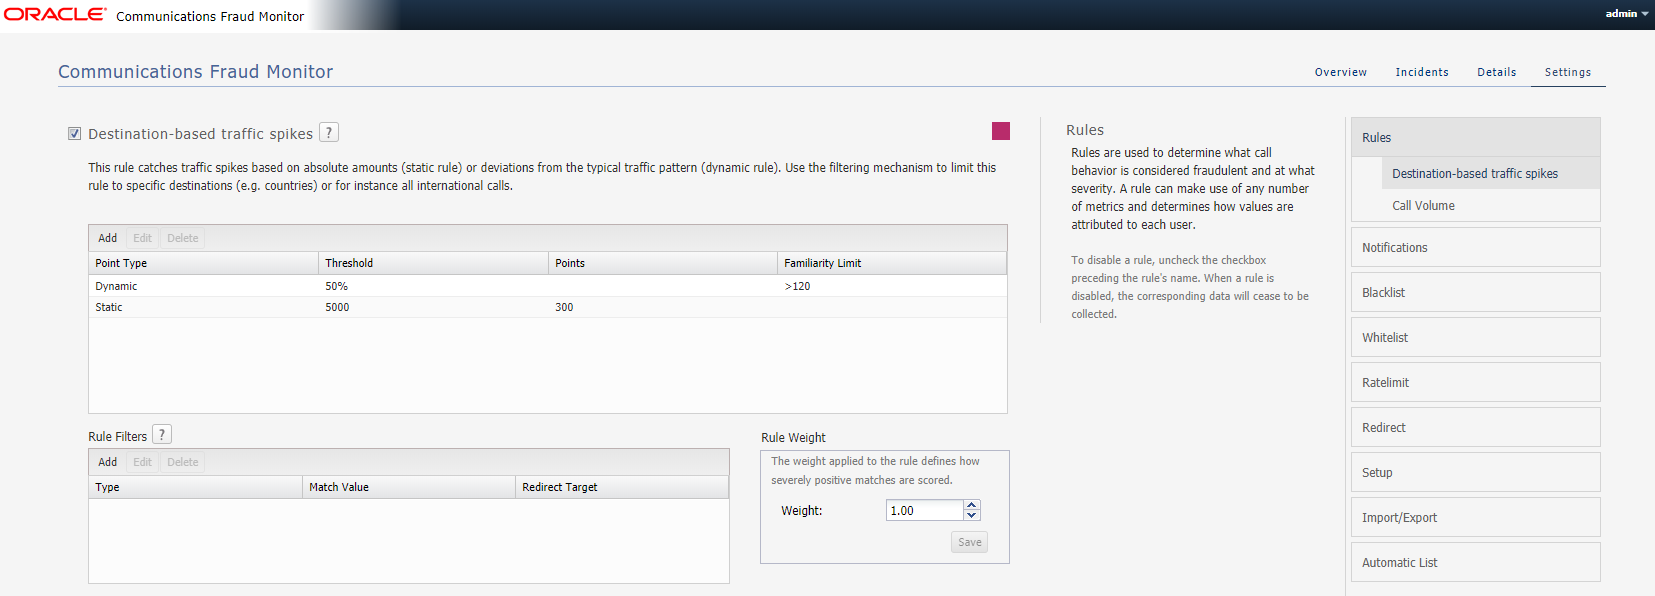
Description of ''Figure 4-2 Example of Rules Configuration''
Setting Up Email Notifications
When Fraud Monitor detects an incident, it notifies the users by email.
Figure 4-3 shows an example of the notification settings.
To send e-mail notifications, click on Add recipient... In the window that appears, enter the following settings:
-
Name: A name to identify the new entry in the list of recipients
-
Email: The email address to which notifications will be sent
-
Incident level: Select WARNING + CRITICAL to receive all notifications, or CRITICAL to only receive notification on critical incidents
-
Prefix: Emails from the system will contain this prefix in the Subject: field of the recipient inbox
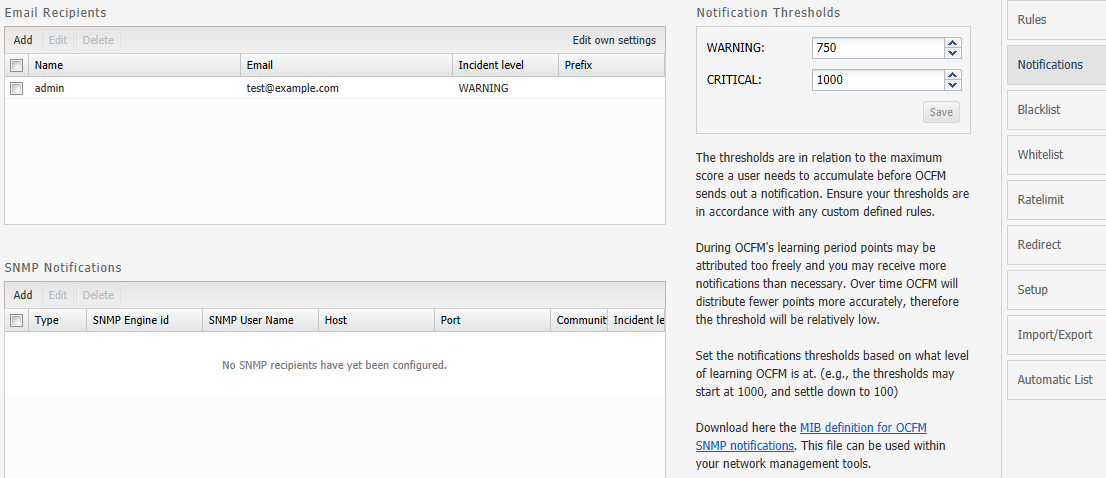
Adjusting the Notification Levels
To receive more or less notifications, you can adjust the two levels, warning and critical, in number of Incident points. The rules specified in the Rules page assign points to each user of the network. If the number of points for a user exceeds the threshold warning (1000 by default), an email is sent to all recipients of level WARNING. If it exceeds the level critical (1500 by default), the notification is sent to all recipients.
This is a global sensitivity adjustment. You can choose the amount of points each single rule attributes in the Rules section.
Specifying Blacklist
The Blacklist contains phone numbers, IP addresses, and hostnames which have been verified in fraudulent activity. You can enable and disable the Blacklist feature for specific data types in the configuration menu.
The Blacklist information provided by Oracle is in the international format. You can append a prefix to international numbers or provide a regular expression to transform the number.
The Global Blacklist is read-only and can be uploaded using the Update menu. You can also add and remove individual entries in the Custom Blacklist area.
Specifying Whitelist
You can add and remove whitelist entries. Both IP addresses and phone numbers are possible. After adding or removing white-list entries, click Save. The new rules will go into effect immediately.
Phone numbers or IP addresses matching a whitelist entry are not used for point calculation. This filtering is done before any processing by any rule.
Calls which match a whitelist entry can still raise incidents. For example, if you block a certain caller IP address a call can still trigger an incident if the callee phone number is on the blacklist.
Both the phone number and the IP address of the caller and of the callee are tested against the list. The comparison is against the complete value, so there are no regular expressions or substring comparisons. If there are alphanumeric letters in the number, these will be treated as case sensitive.
Some rules only check against the caller's IP address or phone number. Filtering based on values you would expect in the callee won't significantly effect these rules.
Specifying Ratelimit List
The Ratelimit allows you to add the custom entries. You can add Phone numbers, IP addresses, User names and SIP User Agents. You can also exempt users by removing them from the global ratelimit.
Customers may either upload the ratelimit information provided through the import menu or they can manually enter the custom entries.
Global flag is marked as True for entries uploaded through import menu such as the phone numbers, usernames, hostnames, and SIP User Agents which have been identified and verified to be involved in fraudulent activity.
Use the Configuration menu to adjust the points awarded for prefix and exact match hits from this list.
Should you want to exempt a specific entry, check the corresponding flag while adding or modifying that entry. But that exemption does not work for other lists like blacklist or redirect. If you want to exempt an entry from all lists, add the same in Whitelist. The CPS or MAC entries are not taken into account for raising incidents from ratelimit list, only presence is checked.
Entry can also come in this list via Automatic Configuration: Subscribed flag would be true for such entries and also those entries cannot be used for raising further incidents.
The Ratelimit supports all the data types supported by SBC for processing the calls. Following are the available data types:
-
from-hostname
-
to-hostname
-
from-phone-number
-
to-phone-number
-
from-username
-
to-username
-
user-agent-header
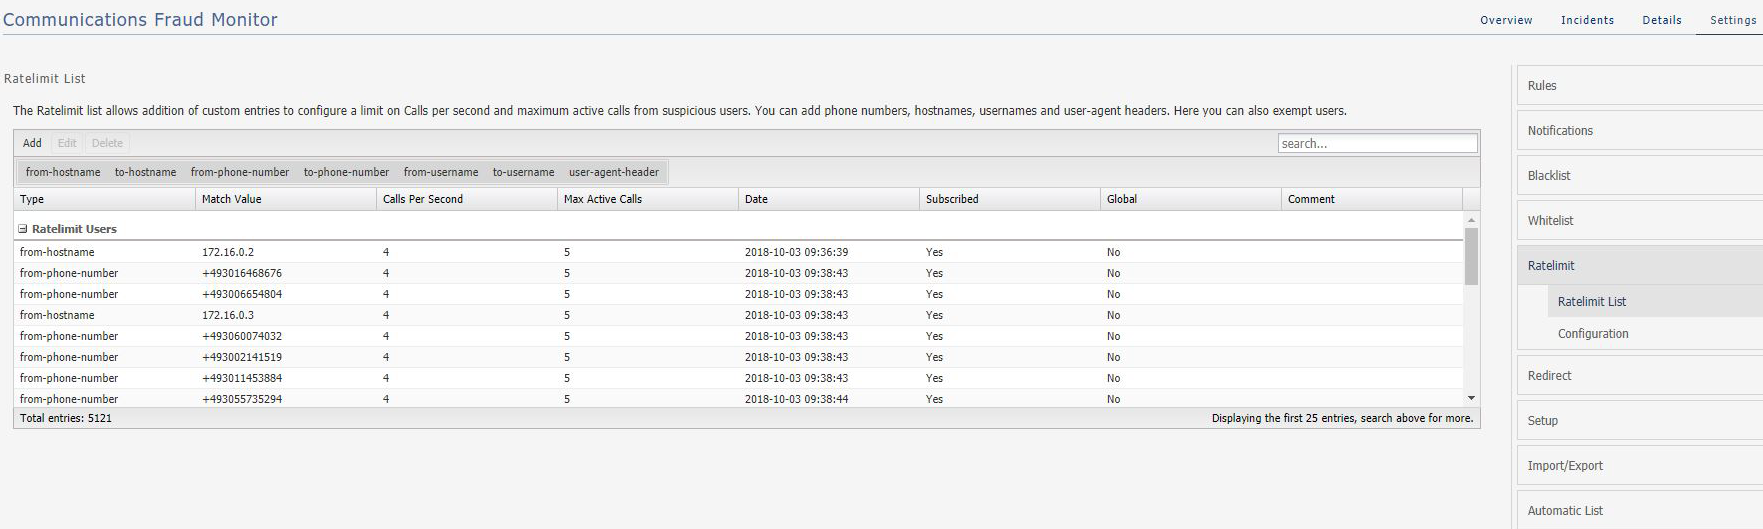
You can filter the data based on these data types. Click the required data type in the screen and data is displayed for the selected data type.
You can Add, Edit, and Delete the users. Double-click a user to edit the details.
Adding a Ratelimit User
You can add a ratelimit user and specify the data type. Fraud Monitor captures the information for the user based on the data type.
To add a ratelimit user:
-
From the Settings screen, click Ratelimit.
The Ratelimit screen appears.
-
click Add.
Add a Ratelimit User screen appears.
-
From the Type drop-down list select the data type for the user.
-
In the Match Value field, enter the value of the type selected above. The value depends on the Type.
For example, if you have selected, from-phone-number for the Type, then the Match Value must be a valid phone number.
-
In the Calls Per Second field, enter the number of seconds that call shall be allowed.
-
In the Max Active Calls field, enter the number of calls allowed for the user from the Type selected.
-
In the Comment field, enter any additional information for the user.
-
(Optional) Select User exempted from ratelimit to exempt from ratelimit.
Note:
By selecting this option, you are exempting the user from the global ratelimit. Fraud Monitor remains susceptible to accumulating points from other rules defined for the user. -
Click Save to add the user or click Cancel.
Configuring Ratelimit
Configuring Ratelimit screen allow you to enable and disable the Ratelimit feature for specific data types, such as Phone numbers, IP addresses, User Names or SIP User Agents. Disabling a data type has an effect on Ratelimit List. You may assign points for both prefix and exact hits for each data type.
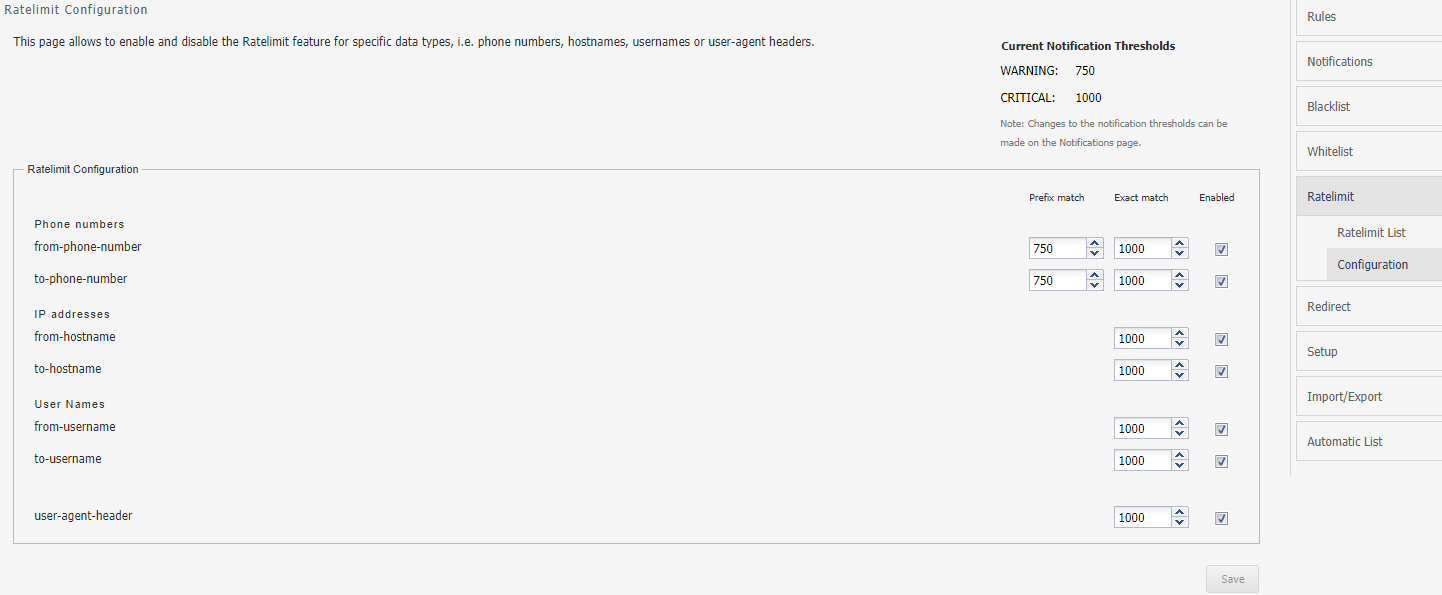
Note:
You have to modify Current Notification Thresholds from Notifications screen.Specifying Redirect List
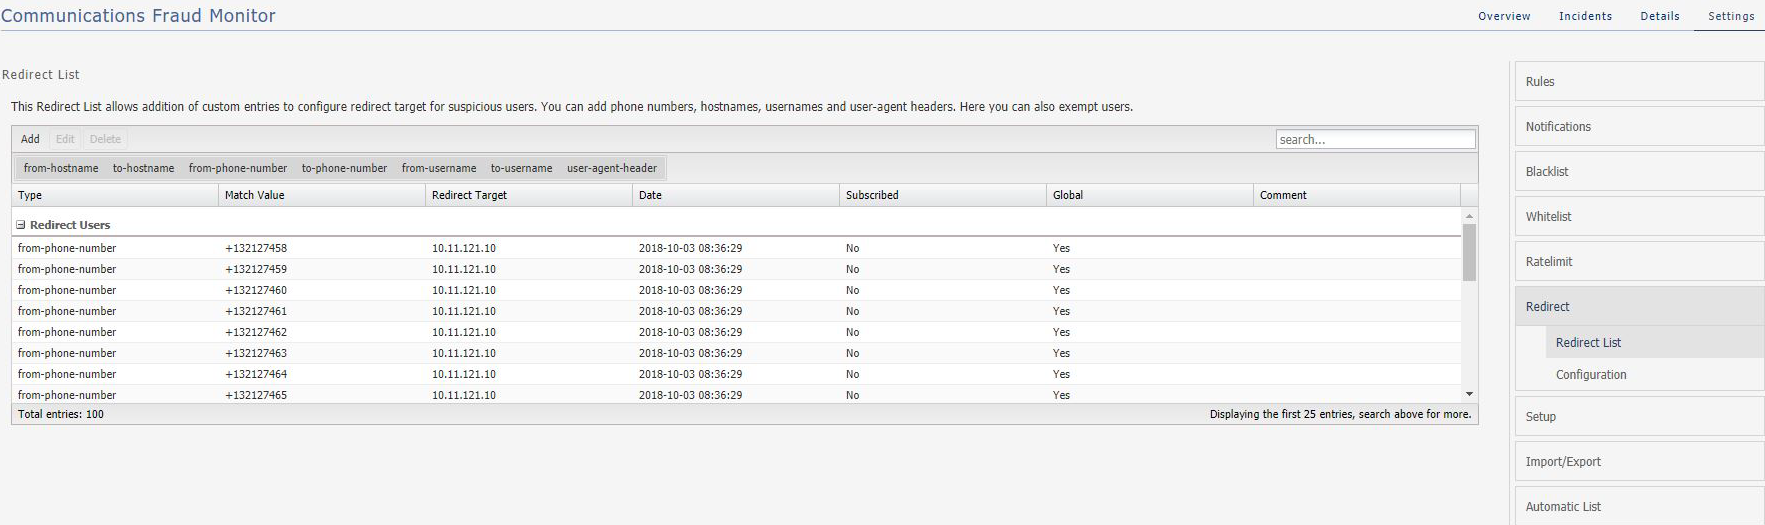
The Redirect allows you to add the addition of custom entries. You can add Phone numbers, IP addresses, User names and SIP User Agents. You can also exempt users by removing them from the global redirect list.
Customers may either upload the redirect information provided through the import menu or they can manually enter the custom entries.
Global flag is marked as True for entries uploaded through import menu such as the phone numbers/usernames, hostnames, and SIP User Agents which have been identified and verified to be involved in fraudulent activity.
Use the Configuration menu to adjust the points awarded for prefix and exact match hits from this list.
Should you want to exempt a specific entry, check the corresponding flag while adding/modifying that entry. But that exemption will not work for other lists like Blacklist or Ratelimit. To exempt an entry from all lists, add the same in Whitelist.
Entry can also come in this list via Automatic Configuration: Subscribed flag would be true for such entries and also those entries are not meant to be used for raising further incidents.
The Redirect supports all the data types supported by SBC for processing the calls. The available data type are:
-
from-hostname
-
to-hostname
-
from-phone-number
-
to-phone-number
-
from-username
-
to-username
-
user-agent-header
You can filter the data based on these data types. Click the required data type in the screen and data is displayed for the selected data type.
You can Add, Edit, and Delete the users. Double-click a user to edit the details.
Adding a Redirect User
You can add a redirect user and specify the data type. Fraud Monitor captures the information for the user based on the data type.
To add a redirect user:
-
From the Settings screen, click Redirect.
The Redirect screen appears.
-
click Add.
Add Redirect User screen appears.
-
From the Type drop-down list select the data type for the user.
-
In the Match Value field, enter the value of the type selected above. The value depends on the Type.
For example, if you have selected, from-phone-number for the Type, then the Match Value must be a valid phone number.
-
In the Redirect Target field, enter the IP address to redirect the call.
-
In the Comment field, enter any additional information for the user.
-
(Optional) Select User exempted from redirect to exempt from redirect.
Note:
By selecting this option, you are exempting the user from the global redirect. Fraud Monitor remains susceptible to accumulating points from other rules defined for the user. -
Click Save to add the user or click Cancel.
Configuring Redirect
Configuring Redirect screen allow you to enable and disable the Redirect feature for specific data types, such as Phone numbers, IP addresses, User Names or SIP User Agents. Disabling a data type has an effect on Redirect list. You may assign points for both prefix and exact hits for each data type.
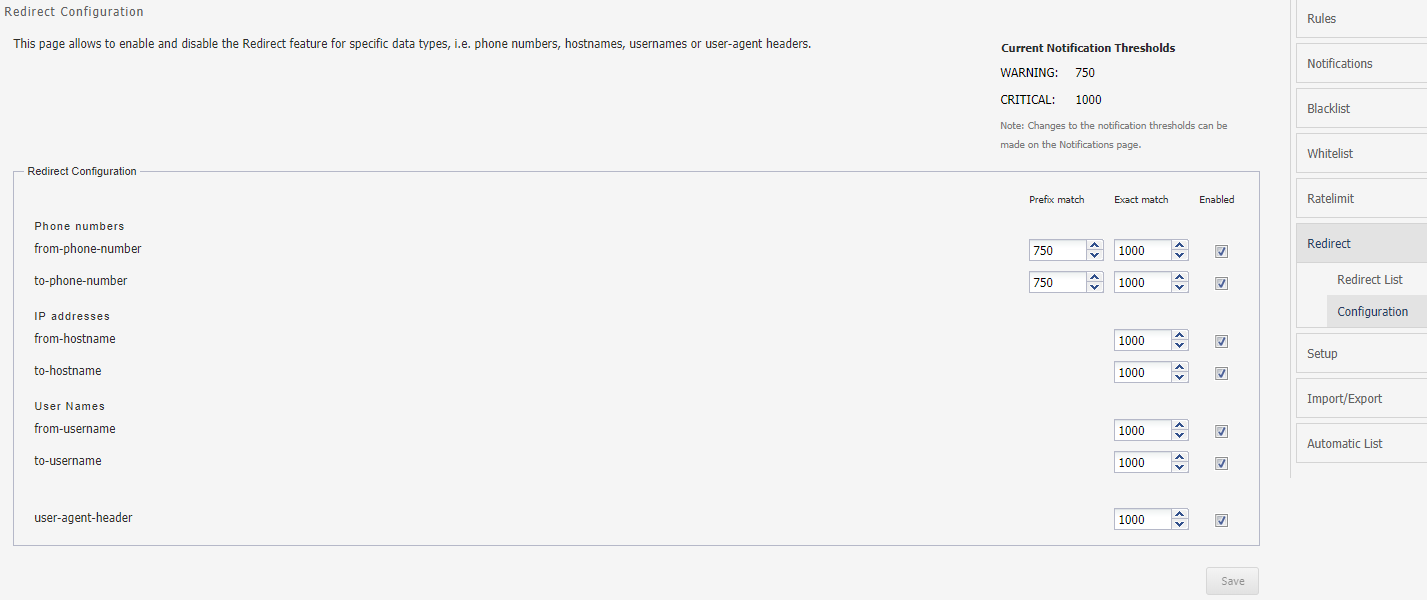
Description of the illustration ''redirect_config.png''
Note:
You have to modify Current Notification Thresholds from Notifications screen.Configuring Mediation Engine
The configuration section under Setup lists the Mediation Engine connections. Fraud Monitor analyzes the data from the connected Mediation Engines.
The Fraud Monitor details needs to be configured at Mediation Engine. See the section Configuring Fraud Monitor, in Operations Monitor User's Guide.
Once the connection is established between Mediation Engine and Fraud Monitor, the connection details are displayed in this configuration screen. You can also view the connection failures details on this page.
-
Name: Indicates the machine name.
-
IP: Indicates the IP address to which Fraud Monitor tries to connect for analyzing the data.
-
Status: Indicates whether the Mediation is connected or disconnected.
-
Date: Indicates the date and time when the Mediation Engine is connected or disconnected.
After adding or changing a connection, Fraud Monitor tests the connection. Any errors will display in a dialog box.
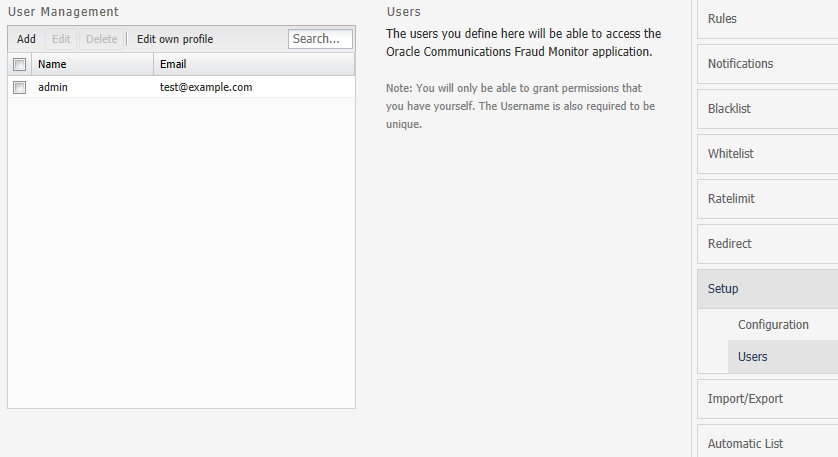
Managing Users
You can manage users and assign permission for accessing the Fraud Monitor information. You can create user accounts to work with Fraud Monitor.
By default, only the admin account exists. The admin can Add, Edit, and Delete the users.
Figure 4-5 shows an example of the users list.
To add an user:
-
From Settings page, click Setup.
-
Click Add.
The Add User screen appears.
-
In this screen, do the following:
-
In the Username field, enter the user name for the new account.
-
In the Email field, enter the e-mail address of the user.
-
In the New Password field, enter the password for the user account.
-
In the Repeat Password field, re-enter the password from the above step.
Click Next.
The Add User - Permission Settings screen appears.
-
-
Select the permissions for the user by clicking the checkbox. Alternatively, you can click check all and uncheck all options.
User is created successfully. You can edit user details by clicking the Edit button.
Note:
The new user will then be able to connect using the credentials you have chosen. It is recommended that the user change this password at the first connection.Figure 4-6 shows the user permission settings.
Figure 4-6 Granting Capabilities to the New User
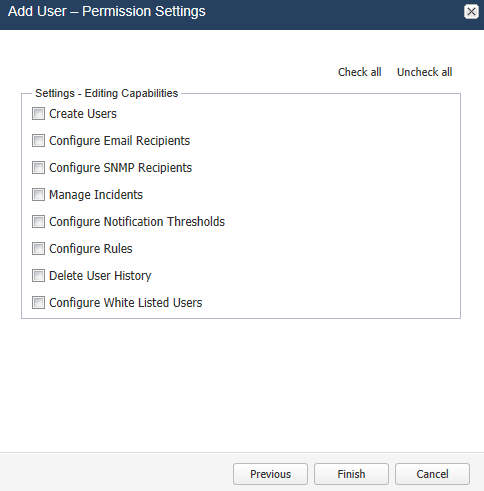
Description of ''Figure 4-6 Granting Capabilities to the New User''
Configuring Import/Export
The Import/Export allows you to import/export data in CSV format for a particular list type (Blacklist/Ratelimit/Redirect).
Note:
You can only import/export files in .csv format. Maximum file size allowed is 10 MBytes.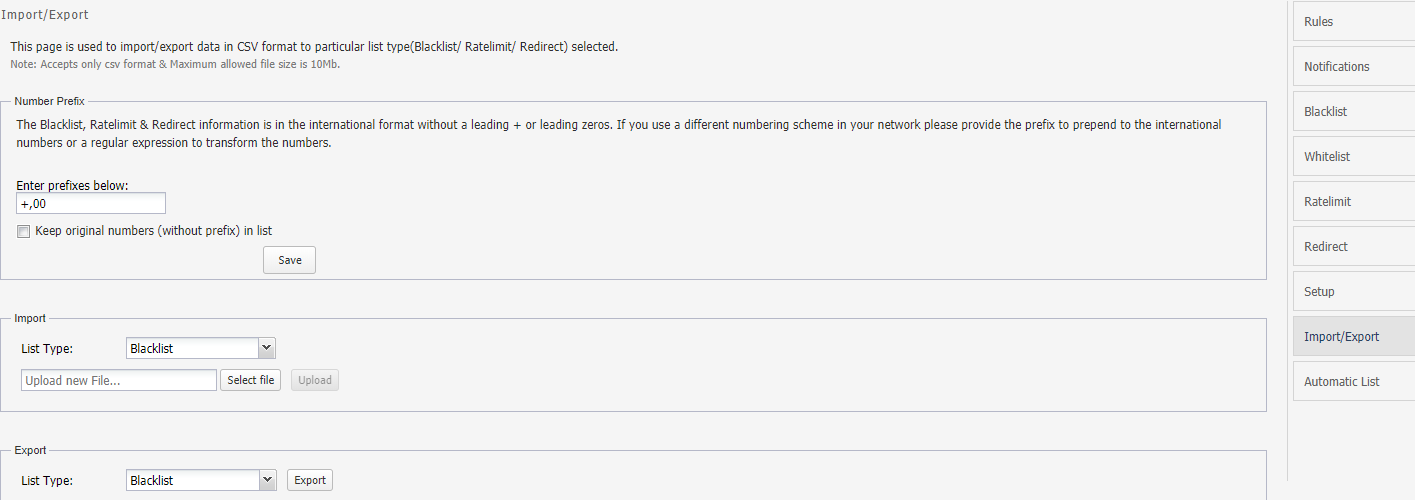
Description of the illustration ''import_export.png''
From this screen, you can:
-
Number Prefix: You can enter prefixes of the phone numbers to save the data for exporting and importing. The Blacklist information is in the international format without a leading + or leading zeros.
If you use a different numbering scheme in your network, provide the prefix to prepend to the international numbers or a regular expression to transform the numbers.
-
Import: Import either Blacklist, Ratelimit, or Redirect lists. You can select the required option from the drop-down list and Select file from your system and click Upload for importing the file.
-
Export: Export either Blacklist, Ratelimit, or Redirect lists. You can select the required option from the drop-down list and click Export for exporting the file.
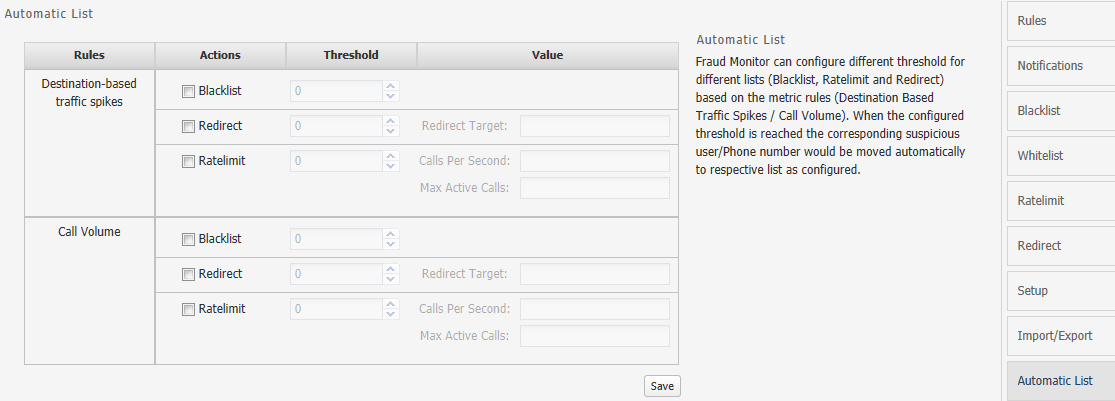
Configuring Automatic List
In Fraud Monitor, you can configure different threshold for different lists (Blacklist, Ratelimit, and Redirect) based on the metric rules, Destination Based Traffic Spikes/Call Volume.
When the configured threshold is reached, the corresponding suspicious user/Phone number is moved automatically to the respective list as configured.