|
1

|
Create Database User/Group
|
Create User with permission to access the tables on all the SQL
nodes present in the NDB cluster, by executing:
Note:
- The OCIWF uses a
MySQL database to store the configuration and run time data.
- The OCIWF deployment
using MySQL NDB cluster requires the database administrator to create user in
MYSQL DB and to provide the user with necessary permissions to access the
tables in the NDB cluster.
- Login to the server
where the ssh keys are stored and SQL nodes are accessible.
- Connect to the SQL
nodes.
ssh
						  <USERNAME>@<HOSTNAME>
- Login to the MYSQL
as a root user:
/usr/local/mysql/bin/mysql -h
						  127.0.0.1 -u root -p <password>
- Create MYSQL user:
CREATE USER '<USERNAME>'@'%' IDENTIFIED BY '<PASSWORD>';
DROP DATABASE if exists diameter;
CREATE DATABASE diameter CHARACTER SET utf8;
GRANT SELECT, INSERT, CREATE, ALTER, DROP, LOCK TABLES,
CREATE TEMPORARY TABLES, DELETE, UPDATE, EXECUTE ON diameter.* TO
'<USERNAME>'@'%';
- Execute the
following commands on one of the NDB SQL node:
- Log into the
MYSQL user created in the previous step:
/usr/local/mysql/bin/mysql -h
								127.0.0.1 -u <USERNAME> -p <PASSWORD>
- Create MYSQL
table:
USE diameter;
CREATE TABLE IF NOT EXISTS SESSION_CORRELATION (
 SESSION_ID varchar(255) NOT NULL,
 RESOURCE_ID varchar(255) NOT NULL UNIQUE,
 PEER_IDENTITY varchar(255) NOT NULL,
 PEER_REALM varchar(255) NOT NULL,
 REQUEST_COUNT int(11),
 PRIMARY KEY (SESSION_ID)
) ENGINE=NDBCLUSTER DEFAULT CHARSET=utf8;
Note:
The
<username> and
<password> is
created by the Database Administrator.
- Exit from database
and logout from SQL node.
|
|
2
|
Customize
ociwf-custom-values.yaml
file
|
Customize
ociwf-custom-values.yaml
file as per the deployment requirement:
Update service ports accordingly.
For more information, see
IWF Installation Preparation.
To configure the parameters, see section
IWF Configuration
or,
The
ociwf-custom-values-1.4.0.yaml
template can be downloaded from OHC.
Download the InterWorking and Mediation Function (IWF) Custom
Template ZIP file and Unzip to get
ociwf-custom-values-1.4.0.yaml
file.
|
|
3
|
Perform the Diameter configuration
|
Configure diameter peer(s) in the following
file:
ociwf/charts/pcf/templates/configmap-pcf-diam-gateway-service-diameter.yaml
Refer,
IWF User
guide for diameter peer configuration details.
|
|
4
|
Deploy IWF from Helm repository
|
To deploy IWF from helm repository, execute:
helm
					 install ociwf/ -f <ociwf-custom-values.yaml> --name <helm-release>
					 --namespace <k8s namespace> --version <ociwf version>
For
example:
helm
					 install ociwf-helm-repo/ociwf -f ociwf-custom-values.yaml --name ociwf
					 --namespace iwfsvc --version <ociwf version>
or,
|
|
5
|
Deploy IWF from local repository
|
To deploy IWF from local repository, execute:
helm
					 install ociwf -f <ociwf-custom-values.yaml> --name <helm-release>
					 --namespace <k8s namespace>
For
example:
helm
					 install ociwf -f ociwf-custom-values.yaml --name ociwf --namespace
					 iwfsvc
|
|
6
|
Check status of the services
|
Execute the following command:
kubectl
					 get services -n <namespace>
For
example:
kubectl
					 get services -n iwfsvc
Note: If
metallb is used,
EXTERNAL-IP is assigned
to
ociwf-endpoint.
|
|
7
|
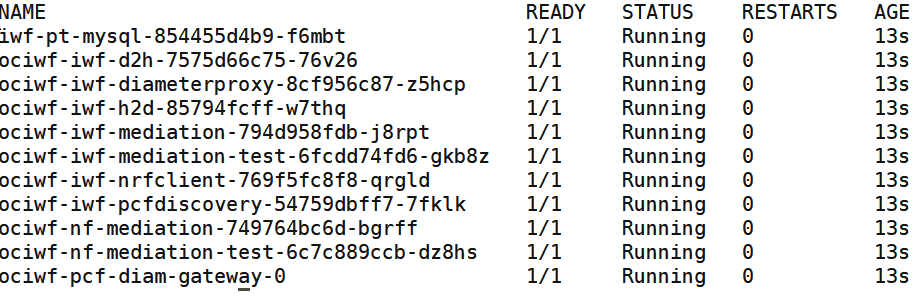
Check status of the pods
|
Execute the following command:
 kubectl
					 get pods -n <ociwf_namespace>
Status column of all the pods should be 'Running'.
Ready column of all the pods should be n/n, where n is number of
containers in the pod.
For
example:
kubectl
					 get pods -n iwfsvc
|


