8 Using Oracle Clusterware to Manage Active Standby Pairs
Oracle Clusterware monitors and controls applications to provide high availability. Oracle Clusterware is a general purpose cluster manager that manages and monitors the availability of software components that participate in a cluster. The following sections describe how to use Oracle Clusterware to manage availability for the databases in an active standby pair replication scheme.
Note:
For more information about Oracle Clusterware, see the Oracle Clusterware Administration and Deployment Guide in the Oracle Database documentation.-
Requirements, considerations, and installation for your cluster
-
Configuring Oracle Clusterware management with the cluster.oracle.ini file
Overview of how Oracle Clusterware can manage TimesTen
Use Oracle Clusterware to manage only the following configurations:
-
Active standby pair with or without read-only subscribers
-
Active standby pair (with or without read-only subscribers) with AWT cache groups and read-only cache groups
Figure 8-1 shows an active standby pair with one read-only subscriber in the same local network. The active master, the standby master and the read-only subscriber are on different nodes. There are two nodes that are not part of the active standby pair that are also running TimesTen. An application updates the active database. An application reads from the standby and the subscriber. All of the nodes are connected to shared storage.
Figure 8-1 Active standby pair with one subscriber
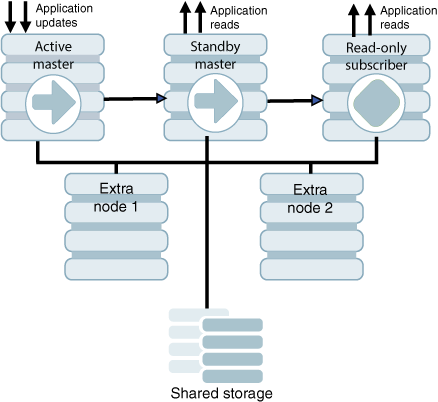
Description of ''Figure 8-1 Active standby pair with one subscriber''
You can use Oracle Clusterware to start, monitor, and automatically fail over TimesTen databases and applications in response to node failures and other events. See "Clusterware management" and "Recovering from failures" for details.
Oracle Clusterware can be implemented at two levels of availability for TimesTen.
-
The basic level of availability manages two master nodes configured as an active standby pair and up to 127 read-only subscriber nodes in the cluster. The active standby pair is defined with local host names or IP addresses. If both master nodes fail, user intervention is necessary to migrate the active standby scheme to new hosts. When both master nodes fail, Oracle Clusterware notifies the user.
-
The advanced level of availability uses virtual IP addresses for the active, standby, and read-only subscriber databases. Extra nodes can be included in the cluster that are not part of the initial active standby pair. If a failure occurs, the use of virtual IP addresses enables one of the extra nodes to take on the role of a failed node automatically.
Note:
If your applications connect to TimesTen in a client/server configuration, automatic client failover enables the client to reconnect automatically to the active database after a failure. See "Using automatic client failover for an active standby pair" for more details. In addition, more information can be found in "TTC_FailoverPortRange" in the Oracle TimesTen In-Memory Database Reference.The ttCWAdmin utility is used to administer TimesTen active standby pairs in a cluster that is managed by Oracle Clusterware. The configuration for each active standby pair is manually created in an initialization file called cluster.oracle.ini. The information in this file is used to create Oracle Clusterware resources. Resources are used to manage the TimesTen daemon, TimesTen databases, TimesTen processes, user applications, and virtual IP addresses. You can run the ttCWAdmin utility from any host in the cluster, as long as the cluster.oracle.ini file is reachable and readable from this host. For more information about the ttCWAdmin utility, see "ttCWAdmin" in Oracle TimesTen In-Memory Database Reference. For more information about the cluster.oracle.ini file, see "Configuring Oracle Clusterware management with the cluster.oracle.ini file".
Requirements, considerations, and installation for your cluster
The following sections describe the requirements and installation steps to create your cluster:
Required privileges
See "ttCWAdmin" in Oracle TimesTen In-Memory Database Reference for information about the privileges required to run ttCWAdmin commands.
Hardware and software requirements
TimesTen supports Clusterware on Linux platforms; TimesTen does not support Clusterware on Windows platforms.
TimesTen supports Oracle Clusterware with TimesTen active standby pair replication. See Oracle Clusterware Administration and Deployment Guide for network and storage requirements and information about Oracle Clusterware configuration files.
Oracle Clusterware and TimesTen should be installed in the same location on all nodes. The TimesTen instance administrator must belong to the same UNIX or Linux primary group as the Oracle Clusterware installation owner.
Note:
The/tmp directory contains essential TimesTen Oracle Clusterware directories. Their names have the prefix crsTT. Do not delete them.All hosts should use Network Time Protocol (NTP) or a similar system so that clocks on the hosts remain within 250 milliseconds of each other. When adjusting the system clocks on any nodes to be synchronized with each other, do not set any clock backward in time.
Install Oracle Clusterware
Install Oracle Clusterware. By default, the installation occurs on all hosts concurrently. See Oracle Clusterware installation documentation for your platform. For example, see the Grid Infrastructure Installation Guide for Linux.
Oracle Clusterware starts automatically after successful installation.
Note:
You can verify whether Oracle Clusterware is running on all hosts in the cluster by executing the following:crsctl check crs -all
Install TimesTen on each host
Use the ttInstanceCreate command to install TimesTen in the same location on each host in the cluster, including extra hosts. See "Create an instance interactively for Oracle Clusterware" in the Oracle TimesTen In-Memory Database Installation, Migration, and Upgrade Guide for full details on how to follow the prompts from the ttInstanceCreate command.
When responding to the various prompts, note that:
-
The instance name must be the same on each host.
-
The user name of the instance administrator must be the same on all hosts.
-
The TimesTen instance administrator must belong to the same UNIX or Linux primary group as the Oracle Clusterware installation owner.
In addition, when you respond yes to the following question:
Would you like to use TimesTen Replication with Oracle Clusterware?
Then, the ttInstanceCreate command prompts you for values used for Oracle Clusterware, each of which is stored in the ttcrsagent.options file:
-
The TCP/IP port number associated with the TimesTen cluster agent (
ttCRSAgent). The port number must be the same on all nodes of the cluster. If you do not provide a port number, then TimesTen adds six to the default TimesTen daemon port number to be the TCP/IP port number associated with the TimesTen cluster agent. Thus, the default daemon port number associated with the TimesTen cluster agent is 3754 for 64-bit systems. -
The Oracle Clusterware location. The location must be the same on each host.
-
The hosts included in the cluster, including spare hosts, with host names separated by commas. This list must be the same on each host.
For more information, see "Installing Oracle Clusterware for use with TimesTen" and "Create an instance interactively for Oracle Clusterware" in the Oracle TimesTen In-Memory Database Installation, Migration, and Upgrade Guide.
See "Create an instance interactively for Oracle Clusterware" in the Oracle TimesTen In-Memory Database Installation, Migration, and Upgrade Guide for details on enabling Oracle Clusterware support for the TimesTen instance.
The ttCWAdmin –init and ttCWAdmin –shutdown commands use the ttcrsagent.options file to initiate and shut down the TimesTen cluster. The ttcrsagent.options file is located in the TimesTen daemon home directory.
You should not manually alter the ttcrsagent.options file. Instead, use the ttInstanceModify -crs command to create or modify the information in this file after the TimesTen cluster has been initiated. You can also use the -record and -batch options for setup.sh to perform identical installations on additional hosts.
Note:
For details on modifying the TimesTen configuration to use Oracle Clusterware for replication, see "Change the Oracle Clusterware configuration for an instance" in the Oracle TimesTen In-Memory Database Installation, Migration, and Upgrade Guide.The current home location of Oracle Clusterware is set in the CRS_HOME environment variable. In addition, the ttInstanceModify -crs command shows the current location of the Oracle Clusterware home as part of the prompts.
Note:
See "Start the TimesTen cluster agent" for more information on thettcrsagent.options file. For more information about ttInstanceCreate and ttInstanceModify, see "ttInstanceCreate" and "ttInstanceModify" respectively in Oracle TimesTen In-Memory Database Reference.The following example shows how the ttInstanceModify -crs prompts for you to modify each item in the ttcrsagent.options file:
% ttInstanceModify -crs

Cannot find instance_info file : /etc/TimesTen/instance_info

Would you like to modify the existing TimesTen Replication with Oracle
Clusterware configuration? [ no ] yes

This TimesTen instance is configured to use an Oracle Clusterware installation
located in : /mydir/oracle/crs/app/11.2.0
Would you like to change this value? [ no ] no

The TimesTen Clusterware agent is configured to use port 54504
Would you like to change this value? [ no ] no

The TimesTen Clusterware agent is currently configured with these nodes :

node1
node2
node3
node4

Would you like to change these values? [ no ]

Overwrite the existing TimesTen Clusterware options file? [ no ] no
Restricted commands and SQL statements
When you use Oracle Clusterware with TimesTen, the active standby pair replication scheme is created on the active database with the ttCWAdmin -create command and dropped with the ttCWAdmin -drop command. In between the ttCWAdmin -create and ttCWAdmin -drop commands, you cannot execute any of the following commands or SQL statements. However, you can perform these commands or SQL statements when you use the ttCWAdmin -beginAlterSchema and the ttCWAdmin -endAlterSchema commands, as described in "Changing the schema".
-
Creating, altering, or dropping the active standby pair with the
CREATE ACTIVE STANDBY PAIR,ALTER ACTIVE STANDBY PAIR, andDROP ACTIVE STANDBY PAIRSQL statements. -
Starting or stopping the replication agent with either the
-repStartand-repStopoptions of thettAdminutility or thettRepStartorttRepStopbuilt-in procedures. For more information, see "Starting and stopping the replication agents". -
Starting or stopping the cache agent after the active standby pair has been created with either the
-cacheStartand-cacheStopoptions of thettAdminutility or thettCacheStartandttCacheStopbuilt-in procedures. -
Duplicating the database with the
-duplicateoption of thettRepAdminutility.
In addition, do not call ttDaemonAdmin -stop before calling ttCWAdmin -shutdown.
The TimesTen integration with Oracle Clusterware accomplishes these operations with the ttCWAdmin utility and the attributes specified in the cluster.oracle.ini file.
For more information about the built-ins and utilities, see Oracle TimesTen In-Memory Database Reference. For more information about the SQL statements, see Oracle TimesTen In-Memory Database SQL Reference.
Creating and initializing a cluster
To create and initialize a cluster, perform these tasks:
-
Create the Oracle Clusterware resources to manage virtual IP addresses
-
Configure an Oracle database as a disaster recovery subscriber
-
Configure a read-only subscriber that is not managed by Oracle Clusterware
If you plan to have more than one active standby pair in the cluster, see "Include more than one active standby pair in a cluster".
If you want to configure an Oracle database as a remote disaster recovery subscriber, see "Configure an Oracle database as a disaster recovery subscriber".
If you want to set up a read-only subscriber that is not managed by Oracle Clusterware, see "Configure a read-only subscriber that is not managed by Oracle Clusterware".
Start the TimesTen cluster agent
Start a TimesTen cluster agent (ttCRSAgent) and TimesTen cluster daemon monitor (ttCRSDaemon) on all hosts in the cluster by executing the ttCWAdmin -init command. You can execute this command on any host in the cluster that is defined in the ttcrsagent.options file.
For example:
ttCWAdmin -init
The ttCWAdmin -init command performs the following:
-
Reads the
ttcrsagent.optionsfile and launches the TimesTen main daemon on each of the hosts defined in this file. -
Starts and registers the TimesTen cluster agent (
ttCRSAgent) and the TimesTen cluster daemon monitor (ttCRSDaemon) on the all hosts in the cluster. There is one TimesTen cluster agent and one TimesTen cluster daemon monitor for the TimesTen installation on each host. When the TimesTen cluster agent has started, Oracle Clusterware begins monitoring the TimesTen daemon on each host and restarts a TimesTen daemon if it fails.
To start and register the TimesTen cluster agent and the TimesTen cluster daemon monitor on specific hosts in the cluster, use the -hosts command to specify the desired hosts in the cluster to start.
ttCWAdmin -init -hosts "host1, host2"
Create and populate a TimesTen database on one host
Create a database on the host where you intend the active database to reside. The DSN must be the same as the database file name.
Create schema objects (such as tables, AWT cache groups, and read-only cache groups) and populate with data as appropriate. However, before you create cache groups, you must first decide when to load the cache groups.
-
For best performance, load the cache group tables from the Oracle database tables before the
ttCWAdmin -createcommand. There is less performance overhead when cache groups are loaded with initial data before the duplicate is performed on the active database to create the standby database (and any subscriber databases).For this option, perform the following:
-
Start the cache agent as follows:
Command> call ttCacheStart;
Note:
Since this is before thettCWAdmin -startcommand, you can start the cache agent at this time. ThettCWAdmin -startcommand notes that the cache agent is already started and continues. -
Use the
LOAD CACHE GROUPstatement to load the cache group tables from the Oracle database tables. -
If using autorefresh cache groups, set the autorefresh state to pause with the
ALTER CACHE GROUP SET AUTOREFRESH STATE PAUSEDstatement. The autorefresh state will be set toONas part of thettCWAdmin -startcommand.
The following example demonstrates how to create a read-only autorefresh cache group, load the data, and then set the autorefresh state to pause:
Command> call ttCacheStart;
Command> CREATE READONLY CACHE GROUP my_cg
  AUTOREFRESH MODE INCREMENTAL INTERVAL 60 SECONDS
  FROM t1 (c1 NUMBER(22) NOT NULL PRIMARY KEY, c2 DATE, c3 VARCHAR(30));

Command> LOAD CACHE GROUP my_cg COMMIT EVERY 100 ROWS PARALLEL 4;
Command> ALTER CACHE GROUP my_cg SET AUTOREFRESH STATE PAUSED;
-
-
Alternatively, wait to load the cache group tables after the
ttCWAdmin -startas described in "Load cache groups". The data will be replicated to the standby database and any subscriber databases.
Create system DSN files on other hosts
On all hosts that are to be included in the cluster, create the system DSN (sys.odbc.ini) files. The DataStore attribute and the Data Source Name must be the same as the entry name for the cluster.oracle.ini file. See "Configuring Oracle Clusterware management with the cluster.oracle.ini file" for information about the contents of the sys.odbc.ini files.
Create a cluster.oracle.ini file
Create a cluster.oracle.ini file as a text file. See "Configuring Oracle Clusterware management with the cluster.oracle.ini file" for details about its contents and acceptable locations for the file.
Create the Oracle Clusterware resources to manage virtual IP addresses
Advanced availability involves configuring spare master or subscriber hosts that are idle until needed to replace master or subscriber hosts (used in the active standby pair replication scheme) that either shut down unexpectedly or experience an unrecoverable error. This is an optional step that is only necessary if you decide to configure advanced availability.
If you are planning on providing additional master or subscriber hosts for advanced availability, then you need to configure virtual IP addresses (one for each master host and subscriber actively used in the active standby pair). See "Configuring advanced availability" for more details on how many virtual IP addresses should be created.
In this case, perform the following:
-
Designate (or create) new virtual IP addresses on the network that are to be used solely for managing multiple hosts in a TimesTen replication environment managed by Oracle Clusterware.
-
Configure these VIP addresses for use to manage multiple hosts for advanced availability in the
cluster.oracle.inifile, as described in "Configuring advanced availability". -
Create the Oracle Clusterware resources that manage these VIP addresses by executing the
ttCWAdmin -createVIPscommand as therootuser on any host in the cluster.For example:
ttCWAdmin -createVIPs -dsn myDSN
The VIP address names created by this command start with
network_followed by the TimesTen instance name, TimesTen instance administrator, and the DSN. Whereas, the VIP addresses created for use by Oracle Clusterware are prefixed withora.Note:
ThettCWAdmin -createVIPscommand must be executed before thettCWAdmin -createcommand. If you decide that you want to use VIP addresses for advanced availability after you have executed thettCWAdmin -createcommand, you must perform the following:-
Execute
ttCWadmin -dropto drop the active standby pair replication scheme. -
Add VIP addresses into
cluster.oracle.inifile. -
Execute
ttCWadmin -createVIPsto create the resources to manage the VIP addresses. -
Execute
ttCWAdmin -createto create the active standby pair replication scheme managed by Oracle Clusterware.
-
Once created, the only way to drop the Oracle Clusterware resources that manage the VIP addresses is to execute the ttCWAdmin -dropVIPs command. Before you can drop the virtual IP addresses, you must first execute the ttCWAdmin -drop command.
The following is an example of how to drop the virtual IP addresses:
ttCWAdmin -dropVIPs -dsn myDSN
For an example of when to use the ttCWAdmin -dropVIPs command, see "Removing an active standby pair from a cluster".
Create an active standby pair replication scheme
Create an active standby pair replication scheme by executing the ttCWAdmin -create command on any host in the cluster.
Note:
Thecluster.oracle.ini file contains the configuration needed to perform the ttCWAdmin -create command and so must reachable by the ttCWAdmin executable. See "Configuring Oracle Clusterware management with the cluster.oracle.ini file" for more details.For example:
ttCWAdmin -create -dsn myDSN
The ttCWAdmin -create command prompts for the following:
-
Prompts for the name of a TimesTen user with
ADMINprivileges. If cache groups are being managed by Oracle Clusterware, enter the TimesTen cache manager user name. -
Prompts for the TimesTen password for the previously entered user name.
-
If cache groups are being used, prompts for the password for the Oracle user that has the same name as the cache manager user. This password is provided in the
OraclePWDconnection attribute when the cache manager user connects. -
Prompts for a random string used to encrypt the above information.
If you want to specify the path and name of a file to be used as the cluster.oracle.ini file, use the -ttclusterini option of the ttCWAdmin -create command.
ttCWAdmin -create -dsn myDSN -ttclusterini path/to/cluster/mycluster.ini
To drop the active standby pair, use the ttCWAdmin -drop command, as follows:
ttCWAdmin -drop -dsn myDSN
Note:
If your application connects to the TimesTen database using the virtual IP address, then this connection drops with thettCWAdmin -drop command, since the virtual IP address is managed by Oracle Clusterware. However, if your application connects to the TimesTen database using the host name, the connection is not dropped.For examples showing the sequence in which to use the ttCWAdmin -create and ttCWAdmin -drop commands, see "Managing active standby pairs in a cluster" and "Managing read-only subscribers in the active standby pair".
Start the active standby pair and the applications
Start the cluster with the active standby pair replication scheme by executing the ttCWAdmin -start command on any host. This starts the cache agent (if not already started) and replication agent on the active database, performs the duplicate to create the standby database (and any subscriber databases), and starts the cache agent and replication agent on the standby (and any subscribers).
If you do not specify -noApp option, the applications are also started. If you do specify -noApp option, then you can start and stop the applications with the -startApps and -stopApps options respectively.
For example:
ttCWAdmin -start -dsn myDSN
This command starts the following processes for the active standby pair:
-
Monitor for application
AppName
The following example starts the cache and replication agents, but does not start the applications because of the inclusion of the -noapp option:
ttCWAdmin -start -noapp -dsn myDSN
To start and stop applications, use the ttCWAdmin -startApps and -stopApps commands as shown below:
ttCWAdmin -startapps -dsn myDSN
...
ttCWAdmin -stopapps -dsn myDSN
To stop the TimesTen database monitor (ttCRSMaster), cache agent and replication agent and disconnect the application from both databases, execute the ttCWAdmin -stop command.
ttCWAdmin -stop -dsn myDSN
Note:
If your application connects to the TimesTen database using a virtual IP address, then this connection drops with thettCWAdmin -stop command, since the virtual IP address is managed by Oracle Clusterware. However, if your application connects to the TimesTen database using the host name, the connection is not dropped; however, replication to the standby does not occur.See "Managing active standby pairs in a cluster" and "Managing read-only subscribers in the active standby pair" for examples showing the sequence in which to use the ttCWAdmin -start and -stop commands.
Load cache groups
If the active standby pair includes cache groups and you have not already loaded the cache group (as described in "Create and populate a TimesTen database on one host"), use the LOAD CACHE GROUP statement to load the cache group tables from the Oracle database tables.
For more information on when to load cache groups, see "Create and populate a TimesTen database on one host".
Include more than one active standby pair in a cluster
If you want to use Oracle Clusterware to manage more than one active standby pair in a cluster, include additional configuration in the cluster.oracle.ini file. Oracle Clusterware can only manage more than one active standby pair in a cluster if all TimesTen databases are a part of the same TimesTen instance on a single host.
For example, the following cluster.oracle.ini file contains configuration information for two active standby pair replication schemes on the same host:
Note:
See Appendix A, "TimesTen Configuration Attributes for Oracle Clusterware" for details on configuration attributes in thecluster.oracle.ini file.[advancedSubscriberDSN] MasterHosts=host1,host2,host3 SubscriberHosts=host4, host5 MasterVIP=192.168.1.1, 192.168.1.2 SubscriberVIP=192.168.1.3 VIPInterface=eth0 VIPNetMask=255.255.255.0 [advSub2DSN] MasterHosts=host1,host2,host3 SubscriberHosts=host4, host5 MasterVIP=192.168.1.4, 192.168.1.5 SubscriberVIP=192.168.1.6 VIPInterface=eth0 VIPNetMask=255.255.255.0
Perform these tasks for additional replication schemes:
-
Create and populate the databases.
-
Create the virtual IP addresses. Use the
ttCWAdmin -createVIPscommand. -
Create the active standby pair replication scheme. Use the
ttCWAdmin -createcommand. -
Start the active standby pair. Use the
ttCWAdmin -startcommand.
Configure an Oracle database as a disaster recovery subscriber
You can create an active standby pair on the primary site with an Oracle database as a remote disaster recovery subscriber. (See "Using a disaster recovery subscriber in an active standby pair" for details.) Oracle Clusterware manages the active standby pair, but does not manage the disaster recovery subscriber. The user must explicitly switch to use the remote site if the primary site fails.
To use Oracle Clusterware to manage an active standby pair that has a remote disaster recovery subscriber, perform these tasks:
-
Use the
RepDDLorRemoteSubscriberHostsClusterware attribute to provide information about the remote disaster recovery subscriber. For example:[advancedDRsubDSN] MasterHosts=host1,host2,host3 SubscriberHosts=host4, host5 RemoteSubscriberHosts=host6 MasterVIP=192.168.1.1, 192.168.1.2 SubscriberVIP=192.168.1.3 VIPInterface=eth0 VIPNetMask=255.255.255.0 CacheConnect=y
-
Use
ttCWAdmin -createto create the active standby pair replication scheme on the primary site. This does not create the disaster recovery subscriber. -
Use
ttCWAdmin -startto start the active standby pair replication scheme. -
Load the cache groups that are replicated by the active standby pair.
-
Set up the disaster recovery subscriber using the procedure in "Rolling out a disaster recovery subscriber".
Configure a read-only subscriber that is not managed by Oracle Clusterware
You can include a read-only TimesTen subscriber database that is not managed by Oracle Clusterware. Perform these tasks:
-
Include the
RemoteSubscriberHostsClusterware attribute in thecluster.oracle.inifile. For example:[advancedROsubDSN] MasterHosts=host1,host2,host3 RemoteSubscriberHosts=host6 MasterVIP=192.168.1.1, 192.168.1.2 SubscriberVIP=192.168.1.3 VIPInterface=eth0 VIPNetMask=255.255.255.0
-
Use
ttCWAdmin -createto create the active standby pair replication scheme on the primary site. -
Use
ttCWAdmin -startto start the active standby pair replication scheme. This does not create the read-only subscriber. -
Use the
ttRepStateGetbuilt-in procedure to verify that the state of the standby database isSTANDBY. -
On the subscriber host, use
ttRepAdmin -duplicateoption to duplicate the standby database to the read-only subscriber. See "Duplicating a database" for details. -
Start the replication agent on the subscriber host.
See "Adding or dropping a read-only subscriber not managed by Oracle Clusterware" to add or drop a read-only subscriber to or from an existing configuration.
See "Rebuilding a read-only subscriber not managed by Oracle Clusterware" to rebuild a read-only subscriber.
Configuring Oracle Clusterware management with the cluster.oracle.ini file
The information in the cluster.oracle.ini file is used to create Oracle Clusterware resources that manage TimesTen databases, TimesTen processes, user applications, and virtual IP addresses. Create an initialization file called cluster.oracle.ini as a text file.
Note:
See Appendix A, "TimesTen Configuration Attributes for Oracle Clusterware" for details on all of the attributes that can be used in thecluster.oracle.ini file.The ttCWAdmin -create command reads this file for configuration information, so the location of the text file must be reachable and readable by ttCWAdmin. The ttCWAdmin utility is used to administer TimesTen active standby pairs in a cluster that is managed by Oracle Clusterware.
It is recommended that you place this file in the TimesTen daemon home directory on the host for the active database. However, you can place this file in any directory or shared drive on the same host as where you run the ttCWAdmin -create command.
The default location for this file is in the timesten_home/conf directory. If you place this file in another location, identify the path of the location with the -ttclusterini option.
The entry name in the cluster.oracle.ini file must be the same as an existing system DSN in the sys.odbc.ini file. For example, [basicDSN] is the entry name in the cluster.oracle.ini file described in "Configuring basic availability". [basicDSN] must also be the DataStore and Data Source Name data store attributes in the sys.odbc.ini files on each host. For example, the sys.odbc.ini file for the basicDSN DSN on host1 might be:
[basicDSN]
DataStore=/path1/basicDSN
LogDir=/path1/log
DatabaseCharacterSet=AL32UTF8
ConnectionCharacterSet=AL32UTF8
The sys.odbc.ini file for basicDSN on host2 can have a different path, but all other attributes should be the same:
[basicDSN]
DataStore=/path2/basicDSN
LogDir=/path2/log
DatabaseCharacterSet=AL32UTF8
ConnectionCharacterSet=AL32UTF8
The following sections demonstrate sample configurations of the cluster.oracle.ini file:
Configuring basic availability
This example shows an active standby pair with no subscribers. The host for the active database is the first MasterHost defined (host1) and the standby database is the second MasterHost in the list (host2). Each host in the list is delimited by commas. You can include spaces for readability, if desired.
[basicDSN]
MasterHosts=host1,host2
The following is an example of a cluster.oracle.ini file for an active standby pair with one subscriber on host3:
[basicSubscriberDSN]
MasterHosts=host1,host2
SubscriberHosts=host3
Configuring advanced availability
Advanced availability involves configuring spare master or subscriber hosts that are idle until needed to replace master or subscriber hosts (used in the active standby pair replication scheme) that either shut down unexpectedly or experience an unrecoverable error.
As mentioned in "Configuring basic availability", the MasterHosts attribute in the cluster.oracle.ini file configures the hosts that are used as the master nodes. For an active standby pair replication scheme, you only need two master hosts (one to become the active and one to become the standby). In the event of a failure, the host that did not fail becomes the active (if not already the active) and the failed host is recovered and becomes the standby. However, if the failed host cannot be recovered and if you specified more than two hosts as master hosts in the cluster.oracle.ini file, then the next master host in the list can be instantiated to take the place of an unrecoverable master host.
For example, the following shows a configuration of several master hosts. The first two master hosts (host1 and host2) become the active and the standby; the latter two master hosts (host3 and host4) can be used to take the place of either host1 or host2 if either encounter an unrecoverable failure.
MasterHosts=host1,host2,host3,host4
When you configure more than two multiple hosts, you should also configure two virtual IP (VIP) addresses used only by Oracle Clusterware resources that manage TimesTen resources. With these VIP addresses, TimesTen internal processes (those that manage replication) are isolated from any master host changes that may occur because of an unrecoverable host error.
Note:
As described in "Create the Oracle Clusterware resources to manage virtual IP addresses", the Oracle Clusterware resource that manage these VIP addresses (used in advanced availability) are created with thettCWAdmin -createVIPs command.These VIP addresses must be different from any other VIP addresses defined for Oracle Clusterware use or any VIP addresses that are to be used by user applications. Furthermore, if an application does use these VIP addresses, then the application may encounter errors when a master host fails (either recoverable or unrecoverable). These VIP addresses cannot be used by a user application as a method for client failover or as a method to isolate themselves if an active database and standby database switch.
Specify two VIP addresses in the MasterVIP parameter, one for each master host in the active standby pair replication scheme. The VIP addresses specified for the TimesTen cluster must be different from any VIP addresses already defined and used by Oracle Clusterware. In particular, the VIP addresses that are created during the Oracle Clusterware install cannot be used with TimesTen.
MasterVIP=192.168.1.1, 192.168.1.2
The following parameters are also associated with advanced availability in the cluster.oracle.ini file:
-
SubscriberHosts, similar toMasterHostslists the host names that can contain subscriber databases. -
SubscriberVIP, similar toMasterVIP, provides VIP addresses that can be used by TimesTen internally to manage a subscriber node. -
VIPInterfaceis the name of the public network adaptor. -
VIPNetMaskdefines the netmask of the virtual IP addresses.
In the following example, the hosts for the active database and the standby database are host1 and host2. The hosts available for instantiation in case of an unrecoverable error are host3 and host4. There are no subscriber nodes. VIPInterface is the name of the public network adaptor. VIPNetMask defines the netmask of the virtual IP addresses.
[advancedDSN]
MasterHosts=host1,host2,host3,host4
MasterVIP=192.168.1.1, 192.168.1.2
VIPInterface=eth0
VIPNetMask=255.255.255.0
The following example configures a single subscriber on host4. There is one extra host defined in SubscriberHosts that can be used for failover of the master databases and one extra node that can be used for failover of the subscriber database. MasterVIP and SubscriberVIP specify the virtual IP addresses defined for the master and subscriber hosts.
[advancedSubscriberDSN]
MasterHosts=host1,host2,host3
SubscriberHosts=host4,host5
MasterVIP=192.168.1.1, 192.168.1.2
SubscriberVIP=192.168.1.3
VIPInterface=eth0
VIPNetMask=255.255.255.0
Ensure that the extra master nodes:
-
Have TimesTen installed
-
Have the direct mode application installed if this is part of the configuration. See "Implementing application failover".
Including cache groups in the active standby pair
If the active standby pair replicates one or more AWT or read-only cache groups, set the CacheConnect attribute to y.
This example specifies an active standby pair with one subscriber in an advanced availability configuration. The active standby pair replicates one or more cache groups.
[advancedCacheDSN]
MasterHosts=host1,host2,host3
SubscriberHosts=host4, host5
MasterVIP=192.168.1.1, 192.168.1.2
SubscriberVIP=192.168.1.3
VIPInterface=eth0
VIPNetMask=255.255.255.0
CacheConnect=y
Implementing application failover
TimesTen integration with Oracle Clusterware can facilitate the failover of a TimesTen application that is linked to any of the databases in the active standby pair. TimesTen can manage both direct and client/server mode applications that are on the same host as Oracle Clusterware and TimesTen.
The required attributes in the cluster.oracle.ini file for failing over a TimesTen application are as follows:
-
AppName- Name of the application to be managed by Oracle Clusterware -
AppStartCmd- Command line for starting the application -
AppStopCmd- Command line for stopping the application -
AppCheckCmd- Command line for executing an application that checks the status of the application specified byAppName -
AppType- Determines the database to which the application is linked. The possible values areActive,Standby,DualMaster,Subscriber (all)andSubscriber[index].
There are also several optional attributes that you can configure, such as AppFailureThreshold, DatabaseFailoverDelay, and AppScriptTimeout. Table A-3, "Optional attributes" lists and describes all optional attributes and their default values.
The TimesTen application monitor process uses the user-supplied script or program specified by AppCheckCmd to monitor the application. The script that checks the status of the application must be written to return 0 for success and a nonzero number for failure. When Oracle Clusterware detects a nonzero value, it takes action to recover the failed application.
This example shows advanced availability configured for an active standby pair with no subscribers. The reader application is an application that queries the data in the standby database. AppStartCmd, AppStopCmd and AppCheckCmd can include arguments such as start, stop and check commands.
Note:
Do not use quotes in the values forAppStartCmd, AppStopCmd and AppCheckCmd.[appDSN] MasterHosts=host1,host2,host3,host4 MasterVIP=192.168.1.1, 192.168.1.2 VIPInterface=eth0 VIPNetMask=255.255.255.0 AppName=reader AppType=Standby AppStartCmd=/mycluster/reader/app_start.sh start AppStopCmd=/mycluster/reader/app_stop.sh stop AppCheckCmd=/mycluster/reader/app_check.sh check
You can configure failover for more than one application. Use AppName to name the application and provide values for AppType, AppStartCmd, AppStopCmd and AppCheckCmd immediately following the AppName attribute. You can include blank lines for readability. For example:
[app2DSN]
MasterHosts=host1,host2,host3,host4
MasterVIP=192.168.1.1, 192.168.1.2
VIPInterface=eth0
VIPNetMask=255.255.255.0

AppName=reader
AppType=Standby
AppStartCmd=/mycluster/reader/app_start.sh
AppStopCmd=/mycluster/reader/app_stop.sh
AppCheckCmd=/mycluster/reader/app_check.sh

AppName=update
AppType=Active
AppStartCmd=/mycluster/update/app2_start.sh
AppStopCmd=/mycluster/update/app2_stop.sh
AppCheckCmd=/mycluster/update/app2_check.sh
If you set AppType to DualMaster, the application starts on both the active and the standby hosts. The failure of the application on the active host causes the active database and all other applications on the host to fail over to the standby host. You can configure the failure interval, the number of restart attempts, and the uptime threshold by setting the AppFailureInterval, AppRestartAttempts and AppUptimeThreshold attributes. These attributes have default values. For example:
[appDualDSN]
MasterHosts=host1,host2,host3,host4
MasterVIP=192.168.1.1, 192.168.1.2
VIPInterface=eth0
VIPNetMask=255.255.255.0
AppName=update
AppType=DualMaster
AppStartCmd=/mycluster/update/app2_start.sh
AppStopCmd=/mycluster/update/app2_stop.sh
AppCheckCmd=/mycluster/update/app2_check.sh
AppRestartAttempts=5
AppUptimeThreshold=300
AppFailureInterval=30
Note:
See Appendix A, "TimesTen Configuration Attributes for Oracle Clusterware" for a full description of all configuration attributes.Configuring for recovery when both master nodes permanently fail
If both master nodes fail and then come back up, Oracle Clusterware can automatically recover the master databases. Automatic recovery of a temporary dual failure requires the following:
-
RETURN TWOSAFEis not specified for the active standby pair. -
AutoRecoveris set toy. -
RepBackupDirspecifies a directory on shared storage. -
RepBackupPeriodis set to a value greater than0.
If both master nodes fail permanently, Oracle Clusterware can automatically recover the master databases to two new nodes if the following is true:
-
Advanced availability is configured (virtual IP addresses and at least four hosts).
-
The active standby pair does not replicate cache groups.
-
RETURN TWOSAFEis not specified. -
AutoRecoveris set toy. -
RepBackupDirspecifies a directory on shared storage. -
RepBackupPeriodmust be set to a value greater than0.
TimesTen first performs a full backup of the active database and then performs incremental backups. You can specify the optional attribute RepFullBackupCycle to manage when TimesTen performs subsequent full backup. By default, TimesTen performs a full backup after every five incremental backups.
If RepBackupDir and RepBackupPeriod are configured for backups, TimesTen performs backups for any master database that becomes active. It does not delete backups that were performed for a database that used to be the active and has become the standby unless the database becomes the active again. Ensure that the shared storage has enough space for two complete database backups. The ttCWAdmin -restore command automatically chooses the correct backup files.
Incremental backups increase the amount of log records in the transaction log files. Ensure that the values of RepBackupPeriod and RepFullBackupCycle are small enough to prevent a large amount of log records in the transaction log file.
This example shows attribute settings for automatic recovery.
[autorecoveryDSN]
MasterHosts=host1,host2,host3,host4
MasterVIP=192.168.1.1, 192.168.1.2
VIPInterface=eth0
VIPNetMask=255.255.255.0
AutoRecover=y
RepBackupDir=/shared_drive/dsbackup
RepBackupPeriod=3600
If you have cache groups in the active standby pair or prefer to recover manually from failure of both master hosts, ensure that AutoRecover is set to n (the default). Manual recovery requires the following:
-
RepBackupDirspecifies a directory on shared storage -
RepBackupPeriodmust be set to a value greater than0
This example shows attribute settings for manual recovery. The default value for AutoRecover is n, so it is not included in the file.
[manrecoveryDSN]
MasterHosts=host1,host2,host3
MasterVIP=192.168.1.1, 192.168.1.2
VIPInterface=eth0
VIPNetMask=255.255.255.0
RepBackupDir=/shared_drive/dsbackup
RepBackupPeriod=3600
Using the RepDDL attribute
The RepDDL attribute represents the SQL statement that creates the active standby pair. The RepDDL attribute is optional. You can use it to exclude tables, cache groups and sequences from the active standby pair.
If you include RepDDL in the cluster.oracle.ini file, do not specify ReturnServiceAttribute, MasterStoreAttribute or SubscriberStoreAttribute in the cluster.oracle.ini file. Include those replication settings in the RepDDL attribute.
When you specify a value for RepDDL, use the <DSN> macro for the database file name prefix. Use the <MASTERHOST[1]> and <MASTERHOST[2]> macros to specify the master host names. TimesTen substitutes the correct values from the MasterHosts or MasterVIP attributes, depending on whether your configuration uses virtual IP addresses. Similarly, use the <SUBSCRIBERHOST[n]> macro to specify subscriber host names, where n is a number from 1 to the total number of SubscriberHosts attribute values or 1 to the total number of SubscriberVIP attribute values if virtual IP addresses are used.
Use the RepDDL attribute to exclude tables, cache groups, and sequences from the active standby pair:
[excludeDSN]
MasterHosts=host1,host2,host3,host4
SubscriberHosts=host5,host6
MasterVIP=192.168.1.1, 192.168.1.2
SubscriberVIP=192.168.1.3
VIPInterface=eth0
VIPNetMask=255.255.255.0
RepDDL=CREATE ACTIVE STANDBY PAIR \
<DSN> ON <MASTERHOST[1]>, <DSN> ON <MASTERHOST[2]>
SUBSCRIBER <DSN> ON <SUBSCRIBERHOST[1]>\
EXCLUDE TABLE pat.salaries, \
EXCLUDE CACHE GROUP terry.salupdate, \
EXCLUDE SEQUENCE ttuser.empcount
The replication agent transmitter obtains route information as follows, in order of priority:
-
From the
ROUTEclause in theRepDDLsetting, if aROUTEclause is specified. Do not specify aROUTEclause if you are configuring advanced availability. -
From Oracle Clusterware, which provides the private host names and public host names of the local and remote hosts as well as the remote daemon port number. The private host name is preferred over the public host name. If the replication agent transmitter cannot connect to the IPC socket, it attempts to connect to the remote daemon using information that Oracle Clusterware maintains about the replication scheme.
-
From the active and standby hosts. If they fail, then the replication agent chooses the connection method based on host name.
This is an example of specifying the ROUTE clause in RepDDL:
[routeDSN]
MasterHosts=host1,host2,host3,host4
RepDDL=CREATE ACTIVE STANDBY PAIR \
<DSN> ON <MASTERHOST[1]>, <DSN> ON <MASTERHOST[2]>\
ROUTE MASTER <DSN> ON <MASTERHOST[1]>  SUBSCRIBER <DSN> ON <MASTERHOST[2]>\
MASTERIP "192.168.1.2" PRIORITY 1\
SUBSCRIBERIP "192.168.1.3" PRIORITY 1\
MASTERIP "10.0.0.1" PRIORITY 2\
SUBSCRIBERIP "10.0.0.2" PRIORITY 2\
MASTERIP "140.87.11.203" PRIORITY 3\
SUBSCRIBERIP "140.87.11.204" PRIORITY 3\
ROUTE MASTER <DSN> ON <MASTERHOST[2]>  SUBSCRIBER <DSN> ON <MASTERHOST[1]>\
MASTERIP "192.168.1.3" PRIORITY 1\
SUBSCRIBERIP "192.168.1.2" PRIORITY 1\
MASTERIP "10.0.0.2" PRIORITY 2\
SUBSCRIBERIP "10.0.0.1" PRIORITY 2\
MASTERIP "140.87.11.204" PRIORITY 3\
SUBSCRIBERIP "140.87.11.203" PRIORITY 3\
Monitoring cluster status
The following sections describe how to retrieve the status of the cluster:
Obtaining cluster status
The ttCWAdmin -status command reports information about all of the active standby pairs in a TimesTen instance that are managed by the same instance administrator. If you specify the DSN, the utility reports information for the active standby pair with that DSN.
Example 8-1 Status after creating an active standby pair
When you execute the ttCWAdmin -status command after you have created an active standby pair replication scheme but have not yet started replication, the status appears as follows:
% ttCWAdmin -status
TimesTen Cluster status report as of Thu Nov 11 13:54:35 2010

====================================================================
TimesTen daemon monitors:
Host:HOST1 Status: online
Host:HOST2 Status: online

====================================================================
====================================================================
TimesTen Cluster agents
Host:HOST1 Status: online
Host:HOST2 Status: online

====================================================================

Status of Cluster related to DSN MYDSN:
====================================================================
1. Status of Cluster monitoring components:
Monitor Process for Active datastore:NOT RUNNING
Monitor Process for Standby datastore:NOT RUNNING
Monitor Process for Master Datastore 1 on Host host1: NOT RUNNING
Monitor Process for Master Datastore 2 on Host host2: NOT RUNNING

2.Status of  Datastores comprising the cluster
Master Datastore 1:
Host:host1
Status:AVAILABLE
State:ACTIVE
Master Datastore 2:
Host:host2
Status:UNAVAILABLE
State:UNKNOWN
====================================================================
The cluster containing the replicated DSN is offline
Example 8-2 Status when the active database is running
After you have started the replication scheme and the active database is running but the standby database is not yet running, ttCWAdmin -status returns:
% ttCWAdmin -status
TimesTen Cluster status report as of Thu Nov 11 13:58:25 2010

====================================================================
TimesTen daemon monitors:
Host:HOST1 Status: online
Host:HOST2 Status: online

====================================================================
====================================================================
TimesTen Cluster agents
Host:HOST1 Status: online
Host:HOST2 Status: online

====================================================================

Status of Cluster related to DSN MYDSN:
====================================================================
1. Status of Cluster monitoring components:
Monitor Process for Active datastore:RUNNING on Host host1
Monitor Process for Standby datastore:RUNNING on Host host1
Monitor Process for Master Datastore 1 on Host host1: RUNNING
Monitor Process for Master Datastore 2 on Host host2: RUNNING

2.Status of  Datastores comprising the cluster
Master Datastore 1:
Host:host1
Status:AVAILABLE
State:ACTIVE
Master Datastore 2:
Host:host2
Status:AVAILABLE
State:IDLE
====================================================================
The cluster containing the replicated DSN is online
Example 8-3 Status when the active and the standby databases are running
After you have started the replication scheme and the active database and the standby database are both running, ttCWAdmin -status returns:
% ttcwadmin -status
TimesTen Cluster status report as of Thu Nov 11 13:59:20 2010

====================================================================
TimesTen daemon monitors:
Host:HOST1 Status: online
Host:HOST2 Status: online

====================================================================
====================================================================
TimesTen Cluster agents
Host:HOST1 Status: online
Host:HOST2 Status: online

====================================================================

Status of Cluster related to DSN MYDSN:
====================================================================
1. Status of Cluster monitoring components:
Monitor Process for Active datastore:RUNNING on Host host1
Monitor Process for Standby datastore:RUNNING on Host host2
Monitor Process for Master Datastore 1 on Host host1: RUNNING
Monitor Process for Master Datastore 2 on Host host2: RUNNING

2.Status of  Datastores comprising the cluster
Master Datastore 1:
Host:host1
Status:AVAILABLE
State:ACTIVE
Master Datastore 2:
Host:host2
Status:AVAILABLE
State:STANDBY
====================================================================
The cluster containing the replicated DSN is online
Message log files
The monitor processes report events and errors to the ttcwerrors.log and ttcwmsg.log files. The files are located in the daemon_home/info directory. The default size of these files is the same as the default maximum size of the user log. The maximum number of log files is the same as the default number of files for the user log. When the maximum number of files has been written, additional errors and messages overwrite the files, beginning with the oldest file.
For the default values for number of log files and log file size, see "Error, warning, and informational messages" in Oracle TimesTen In-Memory Database Operations Guide.
Shutting down a cluster
Perform the following to gracefully shut down a cluster:
-
Stop the TimesTen daemon monitor (
ttCRSmaster), cache agent and replication agent and unload the database (if not in use) with thettCWAdmin -stopcommand:% ttCWAdmin -stop -dsn myDSN
-
Drop the active standby pair with the
ttCWAdmin -dropcommand. This command also deregisters the TimesTen daemon monitor (ttCRSmaster) resource from Clusterware.% ttCWAdmin -drop -dsn myDSN
-
Stop the TimesTen cluster agent (
ttCRSAgent) and TimesTen cluster daemon monitor (ttCRSDaemon) on all hosts with thettCWAdmin -shutdowncommand:% ttCWAdmin -shutdown
Note:
By default, the
ttCWAdmin -shutdowncommand shuts down the set of hosts defined within thettcrsagent.optionsfile. However, you can specifically identify the hosts you want shut down with the optional-hostsargument.The default behavior is to deregister from Clusterware all TimesTen processes that are registered as Clusterware resources for cluster agents (
ttCRSAgent) and TimesTen daemon monitors (ttCRSdaemon). If the optional-noderegisterargument is included, TimesTen Clusterware resources will not be deregistered. -
Prevent the automatic startup of Oracle Clusterware when the server boots by executing the Oracle Clusterware
crsctl disable crscommand as root or OS administrator:% crsctl disable crs
-
Optionally, you can gracefully shutdown each TimesTen database on the active, standby and subscriber hosts by disconnecting all applications and then executing the following command on each host:
% ttDaemonAdmin -stop
Recovering from failures
Oracle Clusterware can recover automatically from many kinds of failures. The following sections describe several failure scenarios and how Oracle Clusterware manages the failures.
-
How TimesTen performs recovery when Oracle Clusterware is configured
-
Perform a forced switchover after failure of the active database or host
How TimesTen performs recovery when Oracle Clusterware is configured
The TimesTen database monitor (the ttCRSmaster process) performs recovery. It attempts to connect to the failed database without using the forceconnect option. If the connection fails with error 994 ("Data store connection terminated"), the database monitor tries to reconnect 10 times. If the connection fails with error 707 ("Attempt to connect to a data store that has been manually unloaded from RAM"), the database monitor changes the RAM policy and tries to connect again. If the database monitor cannot connect, it returns a connection failure.
If the database monitor can connect to the database, then it performs these tasks:
-
It queries the
CHECKSUMcolumn in theTTREP.REPLICATIONSreplication table. -
If the value in the
CHECKSUMcolumn matches the checksum stored in the Oracle Cluster Registry, then the database monitor verifies the role of the database. If the role isACTIVE, then recovery is complete.If the role is not
ACTIVE, then the database monitor queries the replication Commit Ticket Number (CTN) in the local database and the CTN in the active database to find out whether there are transactions that have not been replicated. If all transactions have been replicated, then recovery is complete. -
If the checksum does not match or if some transactions have not been replicated, then the database monitor performs a duplicate operation from the remote database to re-create the local database.
If the database monitor fails to connect with the database because of error 8110 or 8111 (master catchup required or in progress), then it uses the forceconnect=1 option to connect and starts master catchup. Recovery is complete when master catchup has been completed. If master catchup fails with error 8112 ("Operation not permitted"), then the database monitor performs a duplicate operation from the remote database. See "Automatic catch-up of a failed master database" for more information about master catchup.
If the connection fails because of other errors, then the database monitor tries to perform a duplicate operation from the remote database.
The duplicate operation verifies that:
-
The remote database is available.
-
The replication agent is running.
-
The remote database has the correct role. The role must be
ACTIVEwhen the duplicate operation is attempted for creation of a standby database. The role must beSTANDBYorACTIVEwhen the duplicate operation is attempted for creation of a read-only subscriber.
When the conditions for the duplicate operation are satisfied, the existing failed database is destroyed and the duplicate operation starts.
When an active database or its host fails
If there is a failure on the node where the active database resides, Oracle Clusterware automatically changes the state of the standby database to ACTIVE. If application failover is configured, then the application begins updating the new active database.
Figure 8-2 shows that the state of the old standby database has changed to ACTIVE and that the application is updating the new active database.
Figure 8-2 Standby database becomes active

Description of ''Figure 8-2 Standby database becomes active''
Oracle Clusterware tries to restart the database or host where the failure occurred. If it is successful, then that database becomes the standby database.
Figure 8-3 shows a cluster where the former active master becomes the standby master.
Figure 8-3 Standby database starts on former active host

Description of ''Figure 8-3 Standby database starts on former active host''
If the failure of the former active master is permanent and advanced availability is configured, Oracle Clusterware starts a standby master on one of the extra nodes.
Figure 8-4 shows a cluster in which the standby master is started on one of the extra nodes.
Figure 8-4 Standby database starts on extra host
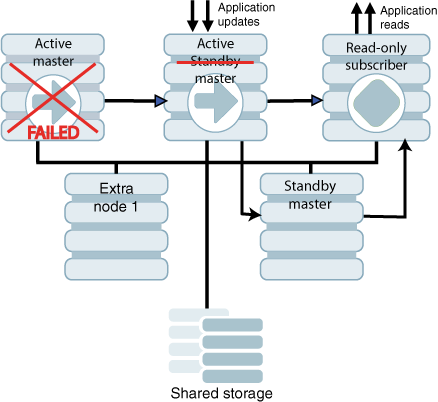
Description of ''Figure 8-4 Standby database starts on extra host''
See "Perform a forced switchover after failure of the active database or host" if you do not want to wait for these automatic actions to occur.
When a standby database or its host fails
If there is a failure on the standby master, Oracle Clusterware first tries to restart the database or host. If it cannot restart the standby master on the same host and advanced availability is configured, Oracle Clusterware starts the standby master on an extra node.
Figure 8-5 shows a cluster in which the standby master is started on one of the extra nodes.

When read-only subscribers or their hosts fail
If there is a failure on a subscriber node, Oracle Clusterware first tries to restart the database or host. If it cannot restart the database on the same host and advanced availability is configured, Oracle Clusterware starts the subscriber database on an extra node.
When failures occur on both master nodes
This section includes these topics:
Automatic recovery
Oracle Clusterware can achieve automatic recovery from temporary failure on both master nodes after the nodes come back up if:
-
RETURN TWOSAFEis not specified for the active standby pair. -
AutoRecoveris set toy. -
RepBackupDirspecifies a directory on shared storage. -
RepBackupPeriodis set to a value greater than0.
Oracle Clusterware can achieve automatic recovery from permanent failure on both master nodes if:
-
Advanced availability is configured (virtual IP addresses and at least four hosts).
-
The active standby pair does not replicate cache groups.
-
RETURN TWOSAFEis not specified for the active standby pair. -
AutoRecoveris set toy. -
RepBackupDirspecifies a directory on shared storage. -
RepBackupPeriodis set to a value greater than0.
See "Configuring for recovery when both master nodes permanently fail" for examples of cluster.oracle.ini files.
Manual recovery for advanced availability
This section assumes that the failed master nodes are recovered to new hosts on which TimesTen and Oracle Clusterware are installed. These steps use the manrecoveryDSN database and cluster.oracle.ini file for examples.
To perform manual recovery in an advanced availability configuration, perform these tasks:
-
Ensure that the TimesTen cluster agent (
ttCRSAgent) is running on the local host.ttCWAdmin -init -hosts localhost
-
Restore the backup database. Ensure that there is not already a database on the host with the same DSN as the database you want to restore.
ttCWAdmin -restore -dsn manrecoveryDSN
-
If there are cache groups in the database, drop and re-create the cache groups.
-
If the new hosts are not already specified by
MasterHostsandSubscriberHostsin thecluster.oracle.inifile, then modify the file to include the new hosts.These steps use
manrecoveryDSN. This step is not necessary formanrecoveryDSNbecause extra hosts are already specified in thecluster.oracle.inifile. -
Re-create the active standby pair replication scheme.
ttCWAdmin -create -dsn manrecoveryDSN
-
Start the active standby pair replication scheme.
ttCWAdmin -start -dsn manrecoveryDSN
Manual recovery for basic availability
This section assumes that the failed master nodes are recovered to new hosts on which TimesTen and Oracle Clusterware are installed. These steps use the basicDSN database and cluster.oracle.ini file for examples.
To perform manual recovery in a basic availability configuration, perform these steps:
-
Acquire new hosts for the databases in the active standby pair.
-
Ensure that the TimesTen cluster agent (
ttCRSAgent) is running on the local host.ttCWAdmin -init -hosts localhost
-
Restore the backup database. Ensure that there is not already a database on the host with the same DSN as the database you want to restore.
ttCWAdmin -restore -dsn basicDSN
-
If there are cache groups in the database, drop and re-create the cache groups.
-
Update the
MasterHostsandSubscriberHostsentries in thecluster.oracle.inifile. This example uses thebasicDSNdatabase. TheMasterHostsentry changes fromhost1tohost10. TheSubscriberHostsentry changes fromhost2tohost20.[basicDSN] MasterHosts=host10,host20
-
Re-create the active standby pair replication scheme.
ttCWAdmin -create -dsn basicDSN
-
Start the active standby pair replication scheme.
ttCWAdmin -start -dsn basicDSN
Manual recovery to the same master nodes when databases are corrupt
Failures can occur on both master nodes so that the databases are corrupt. If you want to recover to the same master nodes, perform the following steps:
-
Ensure that the TimesTen daemon monitor (
ttCRSmaster), replication agent and the cache agent are stopped and that applications are disconnected from both databases. This example uses thebasicDSNdatabase.ttCWAdmin -stop -dsn basicDSN
-
On the node where you want the new active database to reside, destroy the databases by using the
ttDestroyutility.ttDestroy basicDSN
-
Restore the backup database.
ttCWAdmin -restore -dsn basicDSN
-
If there are cache groups in the database, drop and re-create the cache groups.
-
Re-create the active standby pair replication scheme.
ttCWAdmin -create -dsn basicDSN
-
Start the active standby pair replication scheme.
ttCWAdmin -start -dsn basicDSN
Manual recovery when RETURN TWOSAFE is configured
You can configure an active standby pair to have a return service of RETURN TWOSAFE by using the ReturnServiceAttribute Clusterware attribute in the cluster.oracle.ini file. When RETURN TWOSAFE is configured, the database logs may be available on one or both nodes after both nodes fail.
This cluster.oracle.ini example includes backup configuration in case the database logs are not available:
[basicTwosafeDSN]
MasterHosts=host1,host2
ReturnServiceAttribute=RETURN TWOSAFE
RepBackupDir=/shared_drive/dsbackup
RepBackupPeriod=3600
Perform these recovery tasks:
-
Ensure that the TimesTen daemon monitor (
ttCRSmaster), replication agent and cache agent are stopped and that applications are disconnected from both databases.ttCWAdmin -stop -dsn basicTwosafeDSN
-
Drop the active standby pair.
ttCWAdmin -drop -dsn basicTwosafeDSN
-
Decide whether the former active or standby database is more up to date and re-create the active standby pair using the chosen database. The command prompts you to choose the host on which the active database resides.
ttCWAdmin -create -dsn basicTwosafeDSN
If neither database is usable, restore the database from backups.
ttCWAdmin -restore -dsn basicTwosafeDSN
-
Start the active standby pair replication scheme.
ttCWAdmin -start -dsn basicTwosafeDSN
When more than two master hosts fail
Approach a failure of more than two master hosts as a more extreme case of dual host failure. Use these guidelines:
-
Address the root cause of the failure if it is something like a power outage or network failure.
-
Identify or obtain at least two healthy hosts for the active and standby databases.
-
Update the
MasterHostsandSubscriberHostsentries in thecluster.oracle.inifile. -
See "Manual recovery for advanced availability" and "Manual recovery for basic availability" for guidelines on subsequent actions to take.
Perform a forced switchover after failure of the active database or host
If you want to force a switchover to the standby database without waiting for automatic recovery to be performed by TimesTen and Oracle Clusterware, you can write an application that uses Oracle Clusterware commands.
Perform the following:
-
Use the
crsctl stop resourcecommand to stop the TimesTen daemon monitor (ttCRSmaster) resource on the active database. This causes the role of the standby database to change to active. -
Use the
crsctl start resourcecommand to restart thettCRSmasterresource on the former active database. This causes the database to recover and become the standby database.
The following example demonstrates a forced switchover from the active database on host1 to the standby database on host2.
-
Find all TimesTen resources using the
crsctl status resourcecommand.% crsctl status resource | grep TT NAME=TT_Activeservice_tt181_ttadmin_REP1 NAME=TT_Agent_tt181_ttadmin_HOST1 NAME=TT_Agent_tt181_ttadmin_HOST2 NAME=TT_App_tt181_ttadmin_REP1_updateemp NAME=TT_Daemon_tt181_ttadmin_HOST1 NAME=TT_Daemon_tt181_ttadmin_HOST2 NAME=TT_Master_tt181_ttadmin_REP1_0 NAME=TT_Master_tt181_ttadmin_REP1_1 NAME=TT_Subservice_tt181_ttadmin_REP1
-
Find the host where the active database resides by retrieving the status of the
ttCRSActiveServiceresource.% crsctl status resource TT_Activeservice_tt181_ttadmin_REP1 NAME=TT_Activeservice_tt181_ttadmin_REP1 TYPE=application TARGET=ONLINE STATE=ONLINE on host1
-
There are two
ttCRSmasterresources listed in the initial status report. Discover whichttCRSmasterresource is on the same host as the active database.% crsctl status resource TT_Master_tt181_ttadmin_REP1_0 NAME=TT_Master_tt181_ttadmin_REP1_0 TYPE=application TARGET=ONLINE STATE=ONLINE on host1 % crsctl status resource TT_Master_tt181_ttadmin_REP1_1 NAME=TT_Master_tt181_ttadmin_REP1_1 TYPE=application TARGET=ONLINE STATE=ONLINE on host2
-
Stop the
ttCRSmasterresource on the host where the active database resides.% crsctl stop resource TT_Master_tt181_ttadmin_REP1_0 CRS-2673: Attempting to stop 'TT_Master_tt181_ttadmin_REP1_0' on 'host1' CRS-2677: Stop of 'TT_Master_tt181_ttadmin_REP1_0' on 'host1' succeeded
-
Restart the
ttCRSmasterresource on the former active database.% crsctl start resource TT_Master_tt181_ttadmin_REP1_0 CRS-2672: Attempting to start 'TT_Master_tt181_ttadmin_REP1_0' on 'host1' CRS-2676: Start of 'TT_Master_tt181_ttadmin_REP1_0' on 'host1' succeeded
-
Confirm that the forced switchover succeeds by checking where the active service
ttCRSActiveServiceand standby servicettCRSsubserviceresources are located.% crsctl status resource TT_Activeservice_tt181_ttadmin_REP1 NAME=TT_Activeservice_tt181_ttadmin_REP1 TYPE=application TARGET=ONLINE STATE=ONLINE on host2 % crsctl status resource TT_Subservice_tt181_ttadmin_REP1 NAME=TT_Subservice_tt181_ttadmin_REP1 TYPE=application TARGET=ONLINE STATE=ONLINE on host1
See Oracle Clusterware Administration and Deployment Guide for more information about the crsctl start resource and crsctl stop resource commands.
Clusterware management
This section includes the following topics:
Changing user names or passwords when using Oracle Clusterware
When you create the active standby pair replication scheme with the ttCWAdmin -create command, Oracle Clusterware prompts for the required user names and passwords in order to manage the TimesTen environment. Oracle Clusterware stores these user names and passwords. After modifying any user name or password, you must execute the ttCWAdmin -reauthenticate command to enable Oracle Clusterware to store these new user names and passwords.
-
Ensure that the
DDLReplicationLevelconnection attribute is set to 3. This value replicates changes to the user names or passwords on the active database to the standby database. -
Modify any of the user names or passwords in the same manner (and with the same restrictions) as described in "Changing user names or passwords used by replication".
-
Ensure that all password changes are replicated to the standby database by calling the
ttRepSubscriberWaitbuilt-in procedure (or thettRepAdmin -waitcommand) on the active database using the DSN and host of the standby database. For example, to ensure that all transactions are replicated to themaster2standby database on thehost2host:Command> CALL ttRepSubscriberWait(NULL, NULL, 'master2', 'host2', -1);
-
Store the new passwords in Oracle Clusterware by executing the
ttCWAdmin -reauthenticatecommand.ttCWAdmin -reauthenticate -dsn myDSN
This command prompts for the same information as requested for the
ttCWAdmin -createcommand, which is discussed in "Create an active standby pair replication scheme".
Managing hosts in the cluster
The following sections describe how to add or remove hosts when using a cluster:
Adding a host to the cluster
Adding a host requires that the cluster be configured for advanced availability. The examples in this section use the advancedSubscriberDSN.
To add two spare master hosts to a cluster, enter a command similar to the following:
ttCWAdmin -addMasterHosts -hosts "host8,host9" -dsn advancedSubscriberDSN
To add a spare subscriber host to a cluster, enter a command similar to the following:
ttCWAdmin -addSubscriberHosts -hosts "subhost1" -dsn advancedSubscriberDSN
Removing a host from the cluster
Removing a host from the cluster requires that the cluster be configured for advanced availability. MasterHosts must list more than two hosts if one of the master hosts is to be removed. SubscriberHosts must list at least one more host than the number of subscriber databases if one of the subscriber hosts is to be removed.
The examples in this section use the advancedSubscriberDSN.
To remove two spare master host from the cluster, enter a command similar to the following:
ttCWAdmin -delMasterHosts "host8,host9" -dsn advancedSubscriberDSN
To remove a spare subscriber hosts from the cluster, enter a command similar to the following:
ttCWAdmin -delSubscriberHosts "subhost1" -dsn advancedSubscriberDSN
Managing active standby pairs in a cluster
The following sections describe how to add or remove an active standby pair to a cluster:
Adding an active standby pair to a cluster
To add an active standby pair (with or without subscribers) to a cluster that is already managing an active standby pair, perform these tasks:
-
Create and populate a database on the host where you intend the active database to reside initially. See "Create and populate a TimesTen database on one host" for details.
-
Modify the
cluster.oracle.inifile. This example addsadvSub2DSNto thecluster.oracle.inifile that already contains the configuration foradvancedSubscriberDSN. The new active standby pair is on different hosts from the original active standby pair.[advancedSubscriberDSN] MasterHosts=host1,host2,host3 SubscriberHosts=host4, host5 MasterVIP=192.168.1.1, 192.168.1.2 SubscriberVIP=192.168.1.3 VIPInterface=eth0 VIPNetMask=255.255.255.0 [advSub2DSN] MasterHosts=host6,host7,host8 SubscriberHosts=host9, host10 MasterVIP=192.168.1.4, 192.168.1.5 SubscriberVIP=192.168.1.6 VIPInterface=eth0 VIPNetMask=255.255.255.0
-
Create new virtual IP addresses as the
rootuser.ttCWAdmin -createVIPs -dsn advSub2DSN
-
Create the new active standby pair replication scheme.
ttCWAdmin -create -dsn advSub2DSN
-
Start the new active standby pair replication scheme.
ttCWAdmin -start -dsn advSub2DSN
Removing an active standby pair from a cluster
To remove an active standby pair (with or without subscribers) from a cluster, perform these tasks:
-
Stop the replication agents on all databases in the active standby pair. This example uses
advSub2DSN, which was added in "Adding an active standby pair to a cluster".ttCWAdmin -stop -dsn advSub2DSN
-
Drop the active standby replication scheme.
ttCWAdmin -drop -dsn advSub2DSN
-
Drop the virtual IP addresses for the active standby pair.
ttCWAdmin -dropVIPs -dsn advSub2DSN
-
Modify the
cluster.oracle.inifile (optional). Remove the entries foradvSub2DSN. -
If you want to destroy the databases, log onto each host that was included in the configuration for this active standby pair and use the
ttDestroyutility.ttDestroy advSub2DSN
For more information about
ttDestroy, see "ttDestroy" in Oracle TimesTen In-Memory Database Reference.
Managing read-only subscribers in the active standby pair
The following sections describe how to manage read-only subscribers in the active standby pair that is managed by Oracle Clusterware:
-
Removing a read-only subscriber managed by Oracle Clusterware
-
Adding or dropping a read-only subscriber not managed by Oracle Clusterware
-
Rebuilding a read-only subscriber not managed by Oracle Clusterware
Adding a read-only subscriber managed by Oracle Clusterware
To add a read-only subscriber that is to be managed by Oracle Clusterware to an active standby pair replication scheme, perform these steps:
-
Stop the replication agents on all databases. This example uses the
advancedSubscriberDSN, which already has a subscriber and is configured for advanced availability.ttCWAdmin -stop -dsn advancedSubscriberDSN
-
Drop the active standby pair.
ttCWAdmin -drop -dsn advancedSubscriberDSN
-
Modify the
cluster.oracle.inifile.-
Add the subscriber to the
SubscriberHostsattribute. -
If the cluster is configured for advanced availability, add a virtual IP address to the
SubscriberVIPattribute.
See "Configuring advanced availability" for an example using these attributes.
-
-
Create the active standby pair replication scheme.
ttCWAdmin -create -dsn advancedSubscriberDSN
-
Start the active standby pair replication scheme.
ttCWAdmin -start -dsn advancedSubscriberDSN
Removing a read-only subscriber managed by Oracle Clusterware
To remove a read-only subscriber that is managed by Oracle Clusterware from an active standby pair, perform these steps:
-
Stop the replication agents on all databases. This example uses the
advancedSubscriberDSN, which has a subscriber and is configured for advanced availability.ttCWAdmin -stop -dsn advancedSubscriberDSN
-
Drop the active standby pair.
ttCWAdmin -drop -dsn advancedSubscriberDSN
-
Modify the
cluster.oracle.inifile.-
Remove the subscriber from the
SubscriberHostsattribute or remove the attribute altogether if there are no subscribers left in the active standby pair. -
Remove a virtual IP from the
SubscriberVIPattribute or remove the attribute altogether if there are no subscribers left in the active standby pair.
-
-
Create the active standby pair replication scheme.
ttCWAdmin -create -dsn advancedSubscriberDSN
-
Start the active standby pair replication scheme.
ttCWAdmin -start -dsn advancedSubscriberDSN
Adding or dropping a read-only subscriber not managed by Oracle Clusterware
You can add or drop a read-only subscriber that is not managed by Oracle Clusterware to or from an existing active standby pair replication scheme that is managed by Oracle Clusterware. Using the ttCWAdmin -beginAlterSchema command enables you to add a subscriber without dropping and re-creating the replication scheme. Oracle Clusterware does not manage the subscriber, because it is not part of the configuration that was set up for Oracle Clusterware management.
Perform these steps:
-
Execute the
ttCWAdmin -beginAlterSchemacommand to stop the replication agent on the active and standby databases. -
Using
ttIsqlto connect to the active database, you can add or drop the subscriber to or from the replication scheme by using anALTER ACTIVE STANDBY PAIRstatement. For example, to add a subscriber:ALTER ACTIVE STANDBY PAIR ADD SUBSCRIBER ROsubDSN ON host6;
To drop a subscriber:
ALTER ACTIVE STANDBY PAIR DROP SUBSCRIBER ROsubDSN ON host6;
-
Execute the
ttCWAdmin -endAlterSchemacommand that registers the altered replication scheme and starts replication. If you are adding a subscriber, this also initiates a duplicate to the standby database. -
Execute the
ttIsql repschemescommand to verify that the read-only subscriber has been added to or dropped from the replication scheme. -
Use the
ttRepStateGetbuilt-in procedure to verify that the state of the standby database isSTANDBY. -
If you added a subscriber, then execute
ttRepAdmin -duplicateon the subscriber host to duplicate the standby database to the read-only subscriber. See "Duplicating a database". -
If you added a subscriber, start the replication agent on the subscriber host.
If you added a subscriber, ensure that the read-only subscriber is included if the cluster is dropped and re-created by adding the RemoteSubscriberHosts Oracle Clusterware attribute for the read-only subscriber in the cluster.oracle.ini file as described in Step 1 in "Configure a read-only subscriber that is not managed by Oracle Clusterware". Alternatively, if you dropped a subscriber, remove the RemoteSubscriberHosts Oracle Clusterware attribute for the dropped subscriber in the cluster.oracle.ini file (if it is configured).
Rebuilding a read-only subscriber not managed by Oracle Clusterware
Perform the following tasks to destroy and rebuild a read-only subscriber that is not managed by Oracle Clusterware:
-
Stop the replication agent on the subscriber host.
-
Use the
ttDestroyutility to destroy the subscriber database. -
On the subscriber host, use
ttRepAdmin -duplicateto duplicate the standby database to the read-only subscriber. See "Duplicating a database" for details.
Reversing the roles of the master databases
After a failover, the active and standby databases are on different hosts than they were before the failover. You can use the -switch option of the ttCWAdmin utility to restore the original configuration. Optionally, you can also use the -timeout option with the -switch option to set a timeout for the number of seconds to wait for the active and standby database switch to complete.
For example:
ttCWAdmin -switch -dsn basicDSN
Ensure that there are no open transactions before using the -switch option. If there are open transactions, the command fails.
Note:
For more details on the-switch and -timeout options, see "ttCWAdmin" in the Oracle TimesTen In-Memory Database Reference.Figure 8-6 shows the hosts for an active standby pair. The active database resides on host A, and the standby database resides on host B.
Figure 8-6 Hosts for an active standby pair
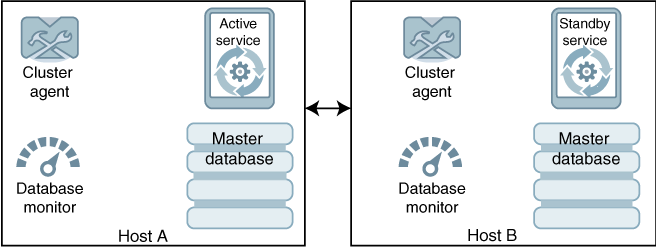
Description of ''Figure 8-6 Hosts for an active standby pair''
The ttCWAdmin -switch command performs these tasks:
-
Deactivates the TimesTen cluster agent (
ttCRSAgent) on host A (the active master). -
Disables the TimesTen database monitor (
ttCRSmaster) on host A. -
Calls the
ttRepSubscriberWait,ttRepStopandttRepDeactivatebuilt-in procedures on host A. -
Stops the active service (
ttCRSActiveService) on host A and reports a failure event to the Oracle ClusterwareCRSDprocess. -
Enables monitoring on host A and moves the active service to host B.
-
Starts the replication agent on host A, stops the standby service (
ttCRSsubservice) on host B and reports a failure event to the Oracle ClusterwareCRSDprocess on host B. -
Starts the standby service (
ttCRSsubservice) on host A.
Modifying connection attribute values
When you modify connection attributes across an active standby pair with subscribers, the connection attributes must be modified on all hosts within this configuration.
Note:
You cannot modify anyDATASTORE connection attributes since they are only allowed to be set at data store creation time. For example, this procedure can be used to change the PermSize value.Use the ttCWAdmin -beginAlterSchema and -endAlterSchema commands to facilitate the change of any connection attribute values on the active and standby databases and any subscribers.
-
The
ttCWAdmin -beginAlterSchemacommand suspends the Oracle Clusterware management and stops the replication agents on the active and standby databases and any subscriber databases in preparation for any changes. -
After you complete all changes, the
ttCWAdmin -endAlterSchemacommand resumes Oracle Clusterware management and restarts all replication agents on the active and standby databases and any subscriber databases.
Perform the following tasks when altering any connection attributes for the active standby pair when using Oracle Clusterware:
-
Suspend Oracle Clusterware and stop all replication agents for the active and standby databases with the
ttCWAdmin -beginAlterSchemacommand.The active database continues to accept requests and updates, but any changes are not propagated to the standby database and any subscribers until the replication agents are restarted.
The
ttCWAdmin -beginAlterSchemacommand also changes the RAM policy temporarily for the standby database and all subscriber databases to InUse with RamGrace where the grace period is set for 60 seconds to enable these databases to be unloaded by TimesTen. Once the standby and subscriber databases are unloaded from memory, the connection attributes for these databases can be modified.ttCWAdmin -beginAlterSchema -dsn advancedDSN
-
Disconnect any application connections and wait for the standby and subscriber databases to unload from memory (based on the RAM policy).
Once the standby and subscriber databases are unloaded from memory, alter any connection attributes, such as
PermSize, on the hosts for the standby and all subscriber databases in their respectivesys.odbc.inifiles. -
Resume Oracle Clusterware and restart all replication agents for the active and standby databases with the
ttCWAdmin -endAlterSchemacommand. The configured RAM policy for each TimesTen database is set back to always. The active database propagates any transactions that occurred while the standby database and subscribers were down.ttCWAdmin -endAlterSchema -dsn advancedDSN
Note:
Wait an appropriate amount of time for all changes to propagate from the active database to the standby database and all subscribers before performing the next step.The only host that has not had the connection attribute change is the active database. You will switch the active database with the standby database so that you can modify the connection attributes on this host.
-
Suspend all application workload and disconnect all applications on the active database.
-
Switch the active and standby databases with the
ttCWAdmin -switchcommand.ttCWAdmin -switch -dsn advancedDSN
Note:
See "Reversing the roles of the master databases" for more details on thettCWAdmin -switchcommand. -
Suspend Oracle Clusterware and stop all replication agents for all databases with the
ttCWAdmin -beginAlterSchemacommand.The new active database may still accept requests and updates, but any changes are not propagated to the new standby database and any subscribers.
The RAM policy changes for the new standby database (and all subscriber databases) to inUse with RamGrace where the grace period is set for 60 seconds to enable these databases to be unloaded by TimesTen.
ttCWAdmin -beginAlterSchema -dsn advancedDSN
-
Wait for the new standby database to unload from memory. Once unloaded, alter the same connection attributes, such as
PermSize, on the new standby database in itssys.odbc.inifile. The connection attributes are now modified on all hosts. -
Run the
ttCWAdmin -endAlterSchemacommand to resume Oracle Clusterware management and restart the replication agents on the active and standby databases. The configured RAM policy resumes to always.ttCWAdmin -endAlterSchema -dsn advancedDSN
-
Suspend all application workload and disconnect all applications on the active database.
-
If desired, you can switch the active and standby databases with the
ttCWAdmin -switchcommand to restore the active standby pair to the original configuration.ttCWAdmin -switch -dsn advancedDSN
Managing the TimesTen database RAM policy
By default, the TimesTen database RAM policy is set to always when Oracle Clusterware manages the TimesTen database. However, if you stop Oracle Clusterware management, the TimesTen database RAM policy is set to inUse.
If you no longer use Oracle Clusterware to manage TimesTen, you should set the TimesTen RAM policy to what is appropriate for your environment. Typically, the recommended setting is manual.
For more information on the TimesTen database RAM policy, see "Specifying a RAM policy" in the Oracle TimesTen In-Memory Database Operations Guide.
Changing the schema
When using Oracle Clusterware to manage an active standby pair, you can modify the schema by executing DDL statements as in a normal replication environment, except that Oracle Clusterware must start and stop all replication agents, when it is necessary to do so.
Thus, when you change the schema, note the following:
-
For those DDL statements on objects that are automatically replicated, you do not need to stop the replication agents. In this case, no further action is required, since these DDL statements are automatically propagated and applied to the standby database and any subscribers. The
DDLReplicationLevelconnection attribute controls what DDL statements are replicated. -
For those objects that are a part of the replication scheme, but any DDL statements executed on these objects are not replicated (these objects are listed in "Making other changes to an active standby pair"), run the Oracle Clusterware
ttCWAdmin -beginAlterSchemacommand on the active database, which suspends any Oracle Clusterware management and stops the replication agents on each node in the replication scheme. Then, execute the DDL statement on the active database in the replication scheme. Finally, run the Oracle ClusterwarettCWAdmin -endAlterSchemacommand on the active database to restart all replication agents.Because these objects are a part of the replication scheme, but the DDL statements are not replicated, a duplicate occurs after the
ttCWAdmin -endAlterSchemacommand to propagate these schema changes to the standby database and any subscribers. This is the only scenario when a duplicate is used to propagate the schema changes.Follow the instructions described in "Facilitating schema change for Oracle Clusterware".
-
For those DDL statements on objects that are not automatically replicated and are not part of the replication scheme, run the Oracle Clusterware
ttCWAdmin -beginAlterSchemacommand on the active database, which suspends any Oracle Clusterware management and stops and the replication agents on all nodes. Then, you can synchronize all nodes by manually executing these DDL statements as indicated in "Making DDL changes in an active standby pair". Finally, run the Oracle ClusterwarettCWAdmin -endAlterSchemacommand on the active database to restart all replication agents.Follow the instructions described in "Facilitating schema change for Oracle Clusterware".
Note:
The "Making DDL changes in an active standby pair" and "Making other changes to an active standby pair" sections describe which DDL statements are and are not automatically replicated for an active standby pair. These sections also describe what objects are a part of the replication scheme.Facilitating schema change for Oracle Clusterware
Use the ttCWAdmin -beginAlterSchema and -endAlterSchema commands to facilitate a schema change on the active and standby databases.
-
The
ttCWAdmin -beginAlterSchemacommand suspends the Oracle Clusterware management and stops replication agents on both the active and standby databases in preparation for any schema changes. -
After you complete all schema changes, run the
ttCWAdmin -endAlterSchemacommand. For those objects that are a part of the replication scheme, but any DDL statements executed on these objects are not automatically replicated, a duplicate occurs after thettCWAdmin -endAlterSchemacommand to propagate only these schema changes to the standby database and any subscribers. This command registers the altered replication scheme, restarts the replication agents on the active and standby databases, and reinstates Oracle Clusterware control.
Perform the following tasks when altering the schema of the active standby pair when using Oracle Clusterware:
-
Suspend Oracle Clusterware and stop the replication agents on both the active and standby databases.
ttCWAdmin -beginAlterSchema -dsn advancedDSN
-
Make any desired schema changes.
If you create, alter, or drop any objects where the DDL for these objects are not replicated, you should also manually create, alter, or drop the same objects on the standby database and subscribers while the replication agents are inactive to ensure that the same objects exist on all databases in the replication scheme. For example, if you create a materialized view on the active database, create the materialized view on the standby and subscriber databases at this time.
-
If the object is not automatically replicated but is a part of the replication scheme, (such as a sequence) and you want to include it in the active standby pair replication scheme, alter the active standby pair.
ALTER ACTIVE STANDBY PAIR INCLUDE samplesequence;
-
If the object is a cache group, see "Making schema changes to cache groups" for instructions to create, alter, or drop a cache group.
-
Run the
ttCWAdmin -endAlterSchemacommand to resume Oracle Clusterware and restart the replication agents on the active and standby databases. If you modified objects that are a part of the replication scheme, but any DDL statements executed on these objects are not automatically replicated, a duplicate occurs after thettCWAdmin -endAlterSchemacommand to propagate only these schema changes to the standby database and any subscribers.ttCWAdmin -endAlterSchema -dsn advancedDSN
Making schema changes to cache groups
Use the ttCWAdmin -beginAlterSchema and -endAlterSchema commands to facilitate the schema changes on cache groups.
Add a cache group
Perform these steps on the active database of the active standby pair.
-
Suspend Oracle Clusterware management and stop the replication agents with the
ttCWAdmin -beginAlterSchemacommand.ttCWAdmin -beginAlterSchema -dsn advancedDSN
-
Create the cache group.
-
If the cache group is a read-only cache group, alter the active standby pair to include the cache group.
ALTER ACTIVE STANDBY PAIR INCLUDE CACHE GROUP samplecachegroup;
-
Resume Oracle Clusterware and start the replication agents by executing the
ttCWAdmin -endAlterSchemacommand. Since you added a cache group object, a duplicate occurs to propagate these schema changes to the standby database.ttCWAdmin -endAlterSchema -dsn advancedDSN
You can load the cache group at any time after you create the cache group.
Drop a cache group
Perform these steps to drop a cache group.
-
Unload the cache group.
UNLOAD CACHE GROUP samplecachegroup;
-
On the active database of an active standby pair, enable dropping the cache group.
ttCWAdmin -beginAlterSchema -dsn advancedDSN
-
If the cache group is a read-only cache group, alter the active standby pair to exclude the cache group.
ALTER ACTIVE STANDBY PAIR EXCLUDE CACHE GROUP samplecachegroup;
-
If the cache group is a read-only cache group, set the autorefresh state to
PAUSED.ALTER CACHE GROUP samplecachegroup SET AUTOREFRESH STATE PAUSED;
-
Drop the cache group.
DROP CACHE GROUP samplecachegroup;
-
If the cache group was a read-only cache group, run the
timesten_home/install/oraclescripts/cacheCleanUp.sqlSQL*Plus script as the cache administration user on the Oracle database to drop the Oracle database objects used to implement autorefresh operations. -
Resume Oracle Clusterware and restart the replication agents by executing the
ttCWAdmin -endAlterSchemacommand. Since you dropped a cache group object, a duplicate occurs to propagate these schema changes to the standby database.ttCWAdmin -endAlterSchema -dsn advancedDSN
Change an existing cache group
To change an existing cache group, first drop the existing cache group as described in "Drop a cache group". Then add the cache group with the desired changes as described in "Add a cache group".
Moving a database to a different host
When a cluster is configured for advanced availability, you can use the ttCWAdmin -relocate command to move a database from the local host to the next available spare host specified in the MasterHosts attribute in the cluster.oracle.ini file. If the database on the local host has the active role, the -relocate option first reverses the roles. Thus, the newly migrated active database becomes the standby database and the old standby database becomes the new active database.
The ttCWAdmin -relocate command is useful for relocating a database if you decide to take the host offline. Ensure that there are no open transactions before you use the command.
If the ttCWAdmin -relocate command requires a role switch, then you can optionally use the -timeout option with the -relocate option to set a timeout for the number of seconds to wait for the role switch.
For example:
ttCWAdmin -relocate -dsn advancedDSN
Note:
For more details on thettCWAdmin -relocate and -timeout options, see "ttCWAdmin" in the Oracle TimesTen In-Memory Database Reference.Performing a rolling upgrade of Oracle Clusterware software
If you want to perform a rolling upgrade of the Oracle Clusterware software, see Oracle Clusterware Administration and Deployment Guide for full instructions.
Upgrading TimesTen when using Oracle Clusterware
See the following for more information on how to upgrade TimesTen on all hosts when using Oracle Clusterware:
-
"Performing an offline TimesTen upgrade when using Oracle Clusterware" in the Oracle TimesTen In-Memory Database Installation, Migration, and Upgrade Guide.
-
"Performing an online TimesTen upgrade when using Oracle Clusterware" in the Oracle TimesTen In-Memory Database Installation, Migration, and Upgrade Guide.
Performing host or network maintenance
When you need to perform host or network maintenance, you need to stop the Oracle Clusterware resources and take down one or more of the TimesTen databases in the cluster. In order to maintain data consistency for the database, you need to ensure that the TimesTen databases included in the active standby pair are brought down properly so that no transactions are lost.
One of the decisions you will make during performing maintenance is whether you should leave Oracle Clusterware enabled or disabled. If you leave Oracle Clusterware enabled, then all Oracle Clusterware and TimesTen processes restart automatically after a system reboot. If you disable Oracle Clusterware, none of these processes restart automatically.
The following sections describe
Perform maintenance on all hosts in the cluster simultaneously
To have minimal down time while performing maintenance on all hosts in the cluster, you can perform the following:
Note:
If you have an active, standby and one or more subscriber databases, you need to execute some of these tasks on each host that contains the designated database.-
Stop Oracle Clusterware and the replication agents by executing the Oracle Clusterware
crsctl stop crscommand asrootor OS administrator on each of the hosts that contain the active, standby, and subscriber databases.Since the active database is down, all requests are refused until the replication agents are restarted.
% crsctl stop crs
The
crsctl stop crscommand changes the RAM policy temporarily for the active, standby, and all subscriber databases to inUse with RamGrace where the grace period is set for 60 seconds to enable these databases to be unloaded by TimesTen. -
Optionally, you can prevent the automatic startup of Oracle Clusterware and TimesTen when the server boots by executing the Oracle Clusterware
crsctl disable crscommand asrootor OS administrator on all hosts in the cluster:% crsctl disable crs
-
Disconnect any application connections and wait for the active, standby, and subscriber databases to unload from memory.
-
To gracefully shutdown each TimesTen database in the active standby pair, execute the following command on each of the hosts that contain the active, standby, and subscriber databases:
% ttDaemonAdmin -stop
Note:
The TimesTen main daemon process manages all databases under the same TimesTen installation, be sure to disconnect from all databases before running the above command.See "Shutting down a TimesTen application" in Oracle TimesTen In-Memory Database Operations Guide.
-
Perform maintenance on the hosts that contain the active, standby, and subscriber databases.
-
After the maintenance is complete, either:
-
Reboot all hosts, then wait until the Oracle Clusterware and TimesTen processes are running (which can take several minutes) if you did not disable the automatic startup of Oracle Clusterware and TimesTen.
-
Perform the following tasks on each host in the cluster if you disabled the automatic startup of Oracle Clusterware and TimesTen after a reboot or if you are not rebooting the hosts after maintenance when automatic startup is enabled:
-
Start the TimesTen database by executing the following command:
% ttDaemonAdmin -start
-
Enable the automatic startup of Oracle Clusterware when the server boots by executing
crsctl enable crsasrootor OS administrator:% crsctl enable crs
-
Start Oracle Clusterware on the local server by executing
crsctl start crsasrootor OS administrator. Wait until all of the Oracle Clusterware resources come up before continuing to the next step.% crsctl start crs
-
Once everything is up, you can reconnect with your applications and the active starts to replicate all updates to the standby and subscriber databases. The configured RAM policy resumes to always.
-
Perform maintenance while still accepting requests
To have minimal down time while performing maintenance on all hosts in the cluster, you can perform the following:
Note:
If you have an active, standby and one or more subscriber databases, you need to execute some of these tasks on each host that contains the designated database.-
Stop Oracle Clusterware and the replication agents by executing the Oracle Clusterware
crsctl stop crscommand asrootor OS administrator on each of the hosts that contain the standby and subscriber databases.The active database continues to accept requests and updates, but any changes are not propagated to the standby database and any subscribers until the replication agents are restarted.
% crsctl stop crs
The
crsctl stop crscommand also changes the RAM policy temporarily for the standby and all subscriber databases to inUse with RamGrace where the grace period is set for 60 seconds to enable these databases to be unloaded by TimesTen. -
Optionally, you can prevent the automatic startup of Oracle Clusterware and TimesTen when the server boots by executing the Oracle Clusterware
crsctl disable crscommand asrootor OS administrator on each of the hosts that contain the standby and subscriber databases.% crsctl disable crs
-
Disconnect any application connections and wait for the standby and subscriber databases to unload from memory.
-
To gracefully shutdown a TimesTen database, execute the following command on each of the hosts that contain the standby and subscriber databases:
% ttDaemonAdmin -stop
Note:
The TimesTen main daemon process manages all databases under the same TimesTen installation, be sure to disconnect from all databases before running the above command.See "Shutting down a TimesTen application" in Oracle TimesTen In-Memory Database Operations Guide.
-
Perform maintenance on the hosts that contain the standby and subscriber databases.
-
After the maintenance is complete, either:
-
Reboot all hosts, then wait until the Oracle Clusterware and TimesTen processes are running (which can take several minutes) if you did not disable the automatic startup of Oracle Clusterware and TimesTen.
-
Perform the following tasks on each host in the cluster if you disabled the automatic startup of Oracle Clusterware and TimesTen after a reboot or if you are not rebooting the hosts after maintenance when automatic startup is enabled:
-
Start the TimesTen database by executing the following command:
% ttDaemonAdmin -start
-
Enable the automatic startup of Oracle Clusterware when the server boots by executing
crsctl enable crsasrootor OS administrator:% crsctl enable crs
-
Start Oracle Clusterware on the local server by executing
crsctl start crsasrootor OS administrator. Wait until all of the Oracle Clusterware resources come up before continuing to the next step.% crsctl start crs
-
Once everything is up, the active replicates all updates to the standby and subscriber databases.
-
-
Switch the active and standby databases with the
ttCWAdmin -switchcommand so you can perform the same maintenance on the host with the active database.ttCWAdmin -switch -dsn advancedDSN
Note:
See "Reversing the roles of the master databases" for more details on thettCWAdmin -switchcommand. -
Stop Oracle Clusterware and the replication agents by executing the Oracle Clusterware
crsctl stop crscommand asrootor OS administrator on the host with the new standby database.The new active database continues to accept requests and updates, but any changes are not propagated to the new standby database and any subscribers until the replication agents are restarted.
% crsctl stop crs
-
Disconnect any application connections and wait for the standby and subscriber databases to unload from memory.
-
To gracefully shutdown the TimesTen database, execute the following command on the host that contains the new standby database:
% ttDaemonAdmin -stop
-
Perform maintenance on the host that contains the new standby database. Now the maintenance has been performed on all hosts in the cluster.
-
After the maintenance is complete, either:
-
Reboot all hosts, then wait until the Oracle Clusterware and TimesTen processes are running (which can take several minutes) if you did not disable the automatic startup of Oracle Clusterware and TimesTen.
-
Perform the following tasks on each host in the cluster if you disabled the automatic startup of Oracle Clusterware and TimesTen after a reboot or if you are not rebooting the hosts after maintenance when automatic startup is enabled:
-
Start the TimesTen database by executing the following command:
% ttDaemonAdmin -start
-
Enable the automatic startup of Oracle Clusterware when the server boots by executing
crsctl enable crsasrootor OS administrator:% crsctl enable crs
-
Start Oracle Clusterware on the local server by executing
crsctl start crsasrootor OS administrator. Wait until all of the Oracle Clusterware resources come up before continuing to the next step.% crsctl start crs
-
Once everything is up, the active replicates all updates to the standby and subscriber databases. The RAM policy resumes to always.
-
-
Switch back to the original configuration for the active and standby roles for the active standby pair with the
ttCWAdmin -switchcommand.ttCWAdmin -switch -dsn advancedDSN
Note:
See Oracle Clusterware Administration and Deployment Guide for more information about the Oracle Clusterwarecrsctl commands.