Cloud Shell
Oracle Cloud Infrastructure (OCI) Cloud Shell is a web browser-based terminal accessible from the Oracle Cloud Console.
Cloud Shell provides access to the public internet only if appropriate security policies are in place. See Cloud Shell Networking for more information.
Cloud Shell provides:
-
An ephemeral machine to use as a host for a Linux shell, pre-configured with the latest version of the OCI Command Line Interface (CLI) and many useful tools
-
5GB of encrypted persistent storage for the home directory
-
A persistent frame of the Console which stays active as you navigate to different pages of the Console
How Cloud Shell Works
Cloud Shell provides access to the public internet only if appropriate security policies are in place. See Cloud Shell Networking for more information.
Cloud Shell comes with 5GB of encrypted persistent storage for the home directory, so you can make local changes to your home directory, and then continue working on your project when you come back to Cloud Shell.
Cloud Shell is free to use (within your tenancy's monthly limits) and doesn't require any setup or prerequisites other than an IAM policy granting access to Cloud Shell. Your Cloud Shell includes a VM provisioned for you that executes in its own tenancy (so it doesn't use any of your tenancy's resources) and hosts your shell in an Oracle Linux OS while you're actively using Cloud Shell.
To understand how to access and use Cloud Shell, see Using Cloud Shell.
What's Included With Cloud Shell
Cloud Shell runs on Oracle Linux 8.
In addition to the OCI CLI, the Cloud Shell VM running Oracle Linux 8 comes with current versions of many useful tools and utilities, including:
- Git
-
Java
Note
Cloud Shell now enables you to install an Oracle Java release by using the Toolkit for Java Download. For more information, see Toolkit for Java Download.
- PythonNote
Multiple versions of Python are included in Cloud Shell. Usecsruntimectlto switch Python versions. For example: run "csruntimectl python list" to get a list of available Python version, and "csruntimectl python set <python-alias>" to switch the Python version. - Oracle GraalVM JDK 17 and Native Image
- Most OCI SDKs, including:
- Java
- Python
- Go
- TypeScript and JavaScript
- SQLcl
- kubectl
- helm
- maven
- terraform
- ansible
- nodes
-
podman
Note
Docker Engine is no longer installed on Oracle Linux 8-based Cloud Shell. Podman provides a similar container management experience with a daemonless architecture. For backward compatibility, Cloud Shell provides a "docker" alias which is a wrapper of the command "podman". You can use either the "podman" or "docker" command to run containers with commands largely compatible with Docker. For more information on podman, see the Oracle Linux Podman User's Guide.When you run the
podman loginordocker logincommand to sign in to a container registry, the auth.json file is written at the following location,/run/user/<uid>/containers/auth.jsonfor example,/run/user/1101/containers/auth.json. - buildah
- skopeo
- runc
- iputils
- jqmake
- tmux
- vim
- NPM
- wget
- zip/unzip
- nano
- emacs
- pip
- bash
- sh
- tar
- nvm
- mysql-community-client
- mysqlsh
- ipython
- OCI-powershell-modules (x86_64 only)
- GoldenGate Admin client (x86_64 only)
-
Fn Project CLI
Required to work with OCI Functions.
Note
When using the Fn CLI in Cloud Shell, OCI Functions doesn't support the creation and deployment of functions based on multi-architecture images and doesn't support applications with multi-architecture shapes. The architecture of the Cloud Shell session must match the architecture of the application.
Required IAM Policy
To allow users to access the Cloud Shell managed Public Network, you'll need to grant user access via an Identity policy. For more information, see Cloud Shell Public Network.
To use Oracle Cloud Infrastructure, you must be given the required type of access in a policy written by an administrator in the tenancy's root compartment, whether you're using the Console or the REST API with an SDK, CLI, or other tool. If you try to perform an action and get a message that you don't have permission or are unauthorized, confirm with your administrator that you have been granted access.
Cloud Shell doesn't support policies at the compartment level, only at the tenancy level.
allow group <GROUP-NAME> to use cloud-shell in tenancyallow group <DOMAIN-NAME>/<GROUP-NAME> to use cloud-shell in tenancyIf you're new to policies, see Managing Identity Domains and Common Policies and Creating a Policy and Dynamic Group.
Cloud Shell Limitations
Keep the following limitations in mind when using Cloud Shell:
- Docker Engine is no longer installed on Oracle Linux 8-based Cloud Shell. Podman provides a similar container management experience with a daemonless architecture. For backward compatibility, Cloud Shell provides a "docker" alias which is a wrapper of the command "podman". You can use either the "podman" or "docker" command to run containers with commands largely compatible with Docker. For more information on podman, see the Oracle Linux Podman User's Guide.
- By default, Cloud Shell limits network access to OCI internal resources in your tenancy home region only unless you have enabled the Cloud Shell Public Network. Your administrator must configure an Identity policy to enable Cloud Shell Public Network. For more information, see Cloud Shell Networking.
- Cloud Shell comes with 5GB of storage for the VM's home directory. This storage is persistent from session to session, but after 6-months of non-use, the administrator for your tenancy will receive a notification that the storage will be removed in 60 days. Starting a Cloud Shell session resets the storage removal timer.
- Cloud Shell does not support mounting additional storage.
- Cloud Shell does not scan user files for malware or viruses.
- Cloud Shell sessions do not allow for any incoming connections, and there is no public IP address available.
- The OCI CLI will execute commands against the region selected in the Console's Region selection menu when the Cloud Shell was started. Changing the region selection in the Console will not change the region for existing Cloud Shell instances; you will need to open a new Cloud Shell instance to change regions.
- Cloud Shell sessions have a maximum length of 24 hours, and time out after 60 minutes of inactivity.
- Cloud Shell uses websockets to communicate between your browser and the service. If your browser has websockets disabled or uses a corporate proxy that has websockets disabled you will see an error message ("An unexpected error occurred") when attempting to start Cloud Shell from the Console.
- Cloud Shell is designed for interactive use with Oracle Cloud Infrastructure resources. Users who need additional storage for Cloud Shell or want to run non-interactive long-running tasks are encouraged to use Compute and Storage resources in their tenancy.
- For maximum compatibility, Cloud Shell includes Python version 2 and Python version 3. Python 2 is the default that will run when you enter 'python' at the command line. To run Python 3, enter 'python3' at the command line.
- The following reserved words can't be used as the user name for a Cloud Shell user:
oci,root,bin,daemon,adm,lp,sync,shutdown,halt,mai,operator,games,ftp,nobody,oci,systemd-network,dbus,polkitd,tss, andapache. Attempting to create a Cloud Shell session when logged in with a user name (or the part of the name before the @ sign if the user name is an email address) that's one of these reserved words will result in an "Unexpected Error" message. - Entirely numerical user names (for example, "1234") aren't supported by Cloud Shell.
- The Cloud Shell session time zone is UTC, and can't be changed.
- In a Cloud Shell terminal, root access and
sudoaren't allowed, so packages requiring root privileges can't be installed. However, many packages offer versions that don't need root permissions. These can be unpacked and installed directly in the home directory. - In a Cloud Shell terminal,
pingcommand isn't allowed. - Cloud Shell boots in FIPS mode, which might affect the behavior of some commands.
-
Cloud Shell can't generate PKCS#1 keys when using the
opensslcommand, because Cloud Shell boots in FIPS mode. FIPS mode requires that Cloud Shell generates PKCS#8 keys. - Network Sources aren't supported for the Cloud Shell Service.
- For more information on Cloud Shell limits, see the Cloud Shell section in Limits by Service.
Cloud Shell Access and Other Restrictions
Cloud Shell uses websockets to communicate between your browser and the service. If your browser has websockets disabled or uses a corporate proxy that has websockets disabled you will see an error message ("An unexpected error occurred") when attempting to start Cloud Shell from the Console.
While Cloud Shell provides access to the internet, there is no ingress from the outside world into Cloud Shell (for example: you can't ssh in to Cloud Shell) and no public IP address available. If your tenancy admin doesn't want to enable access to the internet from OCI, they should not grant access to Cloud Shell with an IAM policy.
Cloud Shell Resource Location and Ownership
When you first start Cloud Shell, the service creates a persistent block storage volume (5GB) for your home directory. The home directory volume is located in your tenancy home region. The machine running your Cloud Shell session is also located in your tenancy home region.
Cloud Shell uses your user OCID to create your home directory. If you have multiple accounts in a tenancy (for example, you have a federated and a non-federated user account), you will get a separate, unique Cloud Shell home directory for each account.
Changing the Console region selection, or logging in to the Console via a different regional URL will have no effect on where your Cloud Shell machine and home directory volume are located. To confirm your tenancy home region, view your Tenancy Details page in the Console.
Cloud Shell resources (including the VM used for your Cloud Shell session) are owned by the Cloud Shell service and do not exist in your tenancy. Because of this, you cannot add the Cloud Shell VM you are using to a dynamic group in your tenancy, or use the instance principle of the instance used for your Cloud Shell session.
Cloud Shell and Regions
When you start Cloud Shell, the service configures your Cloud Shell session with the currently selected region in the Console so that the OCI CLI is interacting with the selected Console region.
In the default bash prompt in Cloud Shell, the region that the OCI CLI is interacting with is echoed in the Cloud Shell command line prompt:
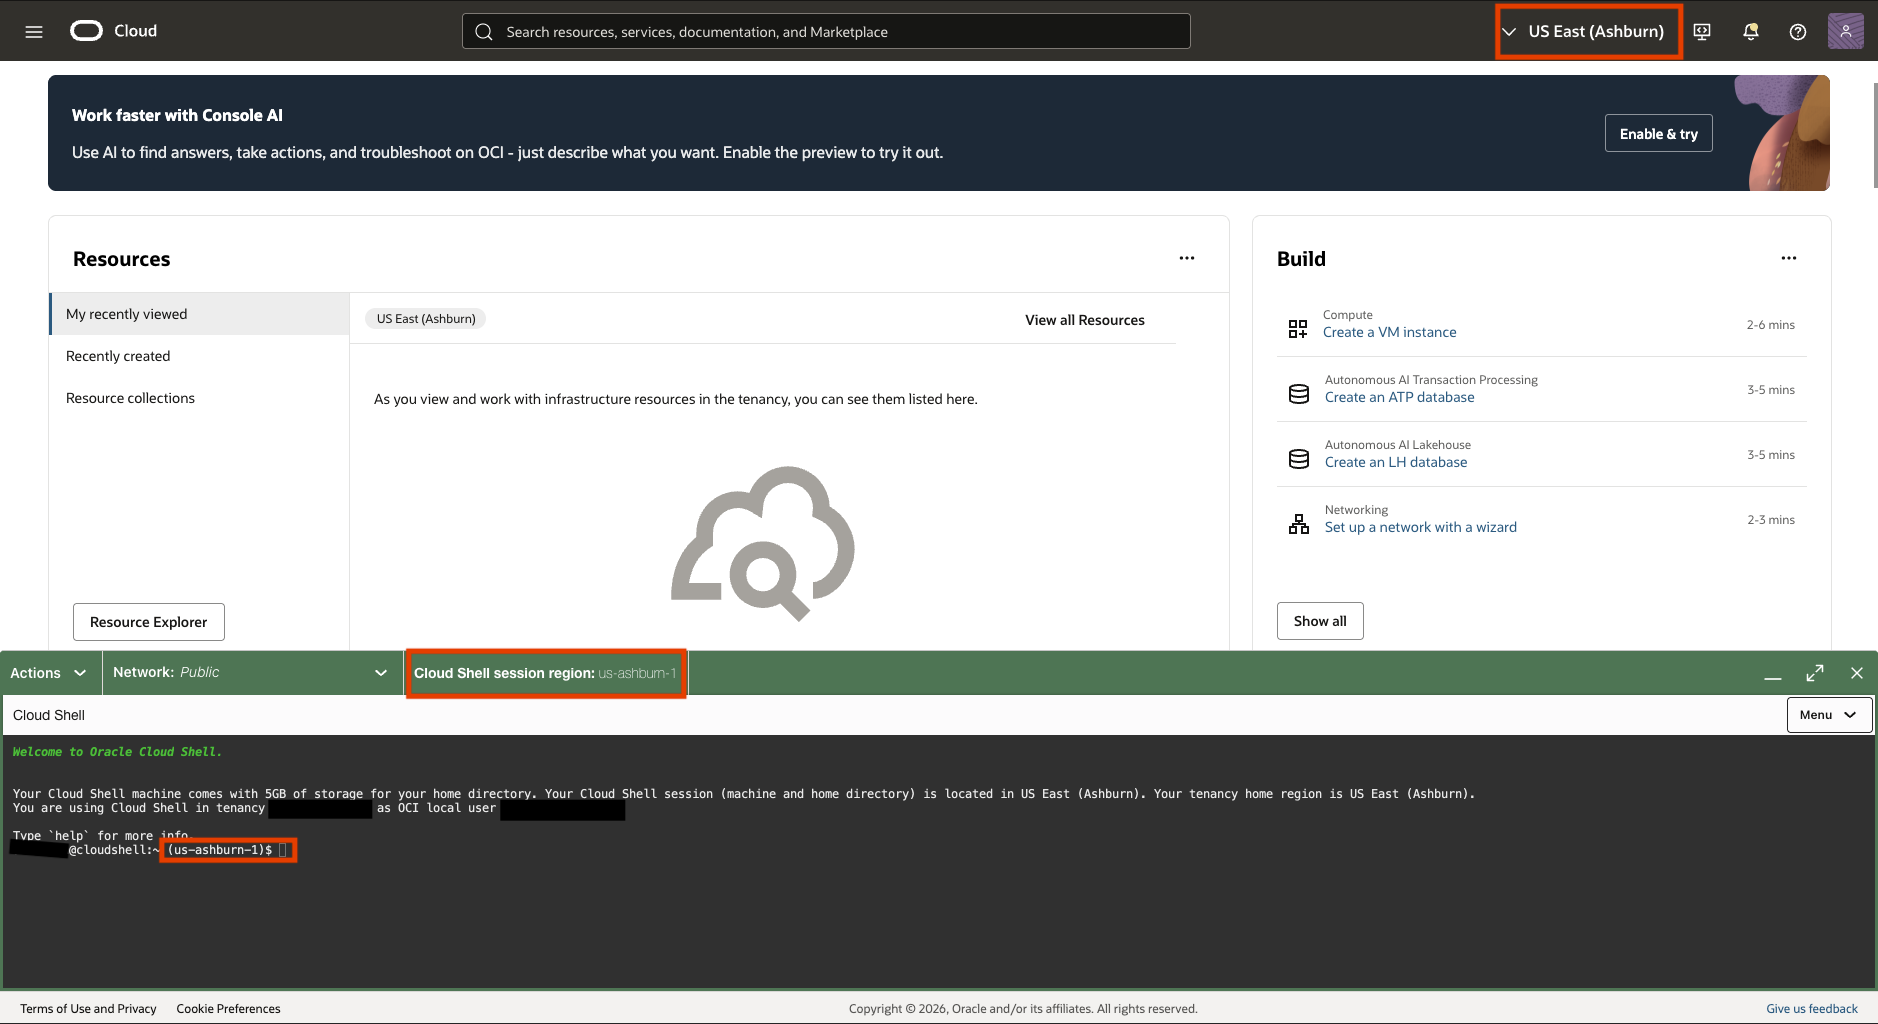
Any changes to the selected region in Console after you have started the Cloud Shell session doesn't affect the active Cloud Shell session. To change the region that the OCI CLI is interacting with, in Cloud Shell, you can either:
- Exit the current Cloud Shell session, then change the selected region in the Console, then start a new Cloud Shell session.
- Change the selected OCI CLI profile by using the OCI_CLI_PROFILE environment variable
For more information, see the "Managing Regions" section in Using Cloud Shell.
Cloud Shell Architecture
If you're a paid tier user, you can select a default architecture (ARM (aarch64), x86_64 or No Preference) for the Cloud Shell sessions.
By default, the architecture preference is set to No Preference. When this is selected, your Cloud Shell sessions will be based on either the x86_64 or ARM (aarch64) architecture, depending on the hardware available in the region.
Selecting an architecture
To select an architecture:
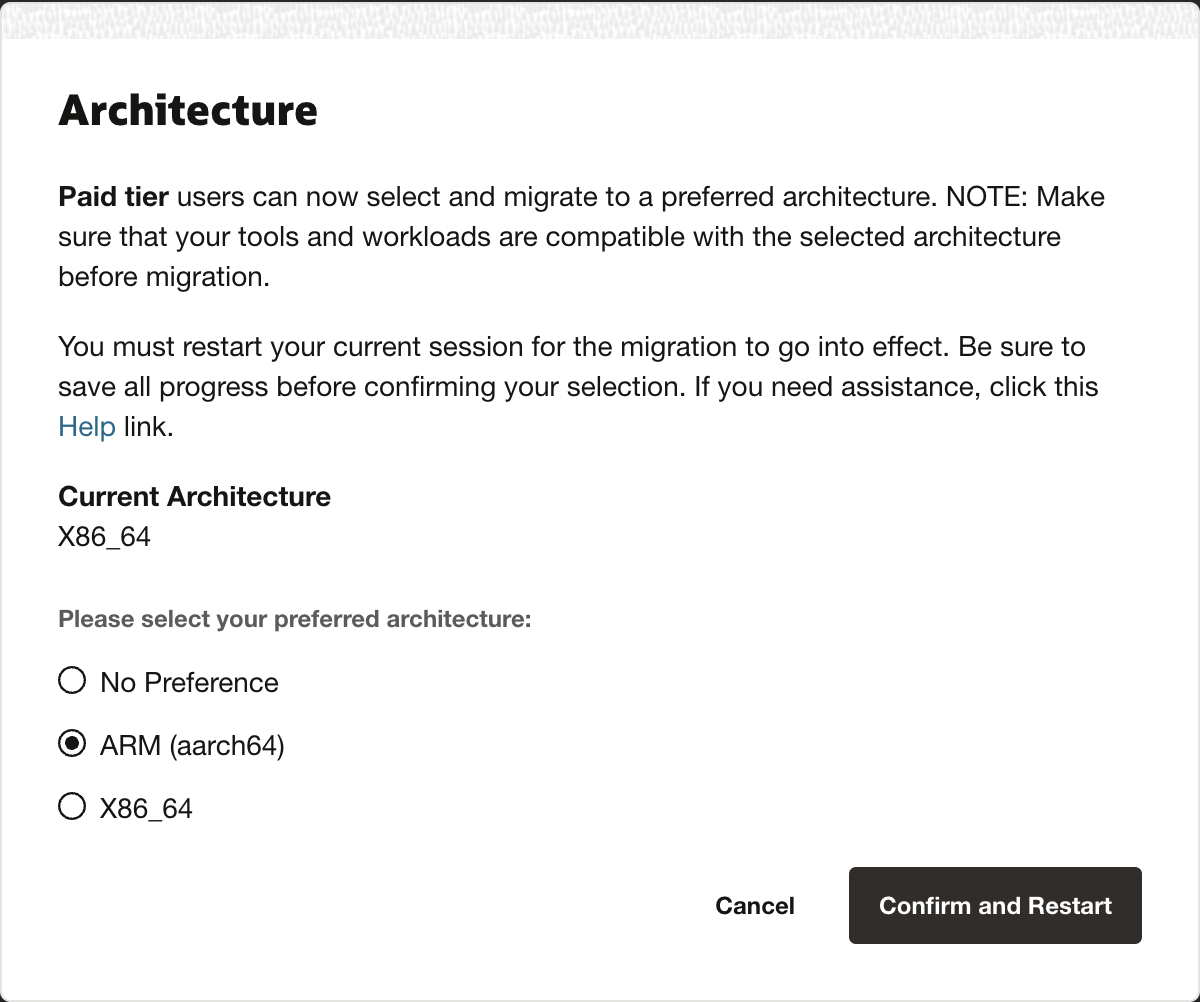
Open the Actions menu, which is accessible from within Cloud Shell or Code Editor, and select Architecture.

This displays the Architecture dialog:
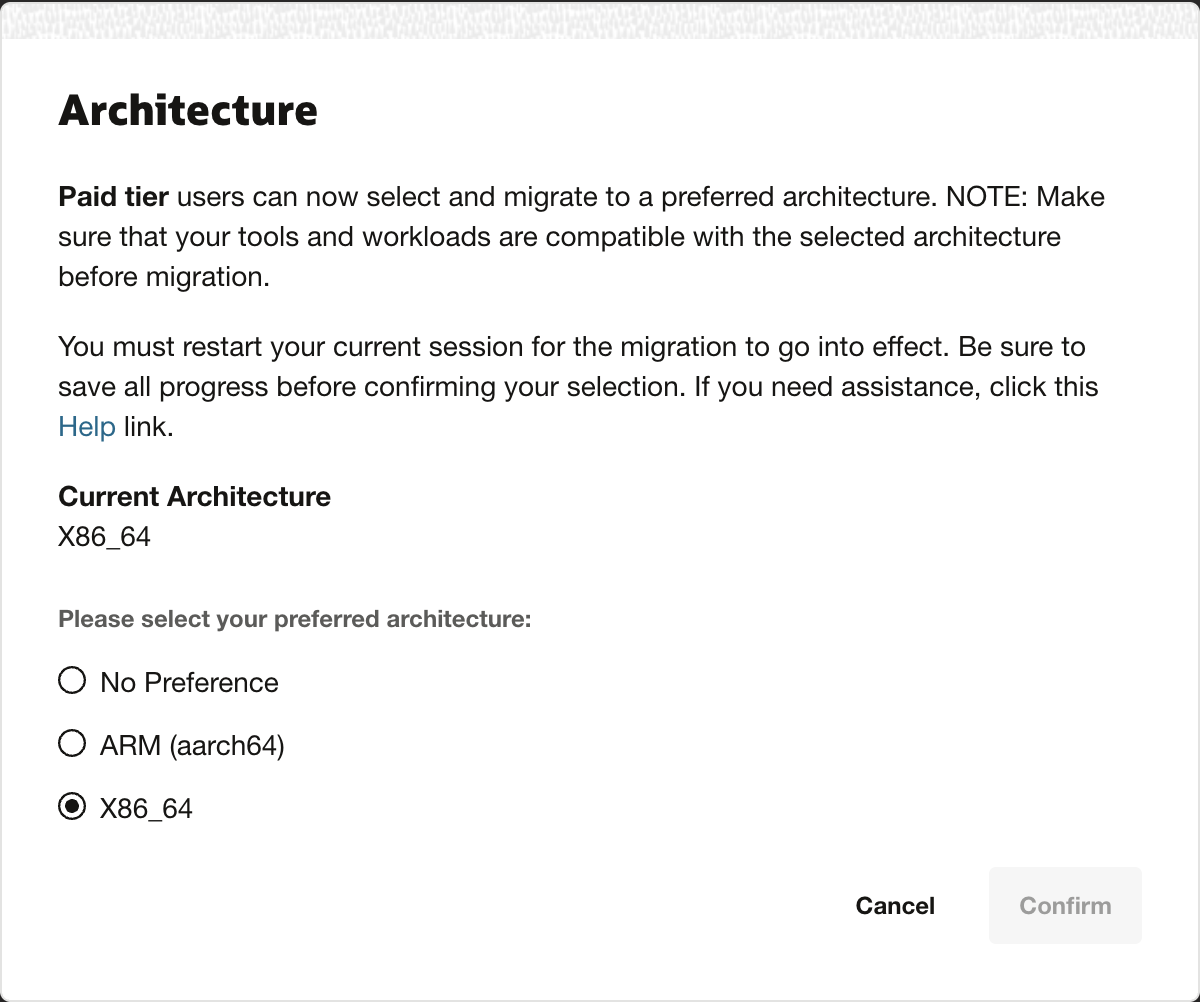
The Architecture dialog shows the selected architecture.
If a region doesn't support a particular architecture, you can't select that architecture.
Before switching the Cloud Shell architecture, ensure that the tools and workloads are compatible with the architecture you're about to select.
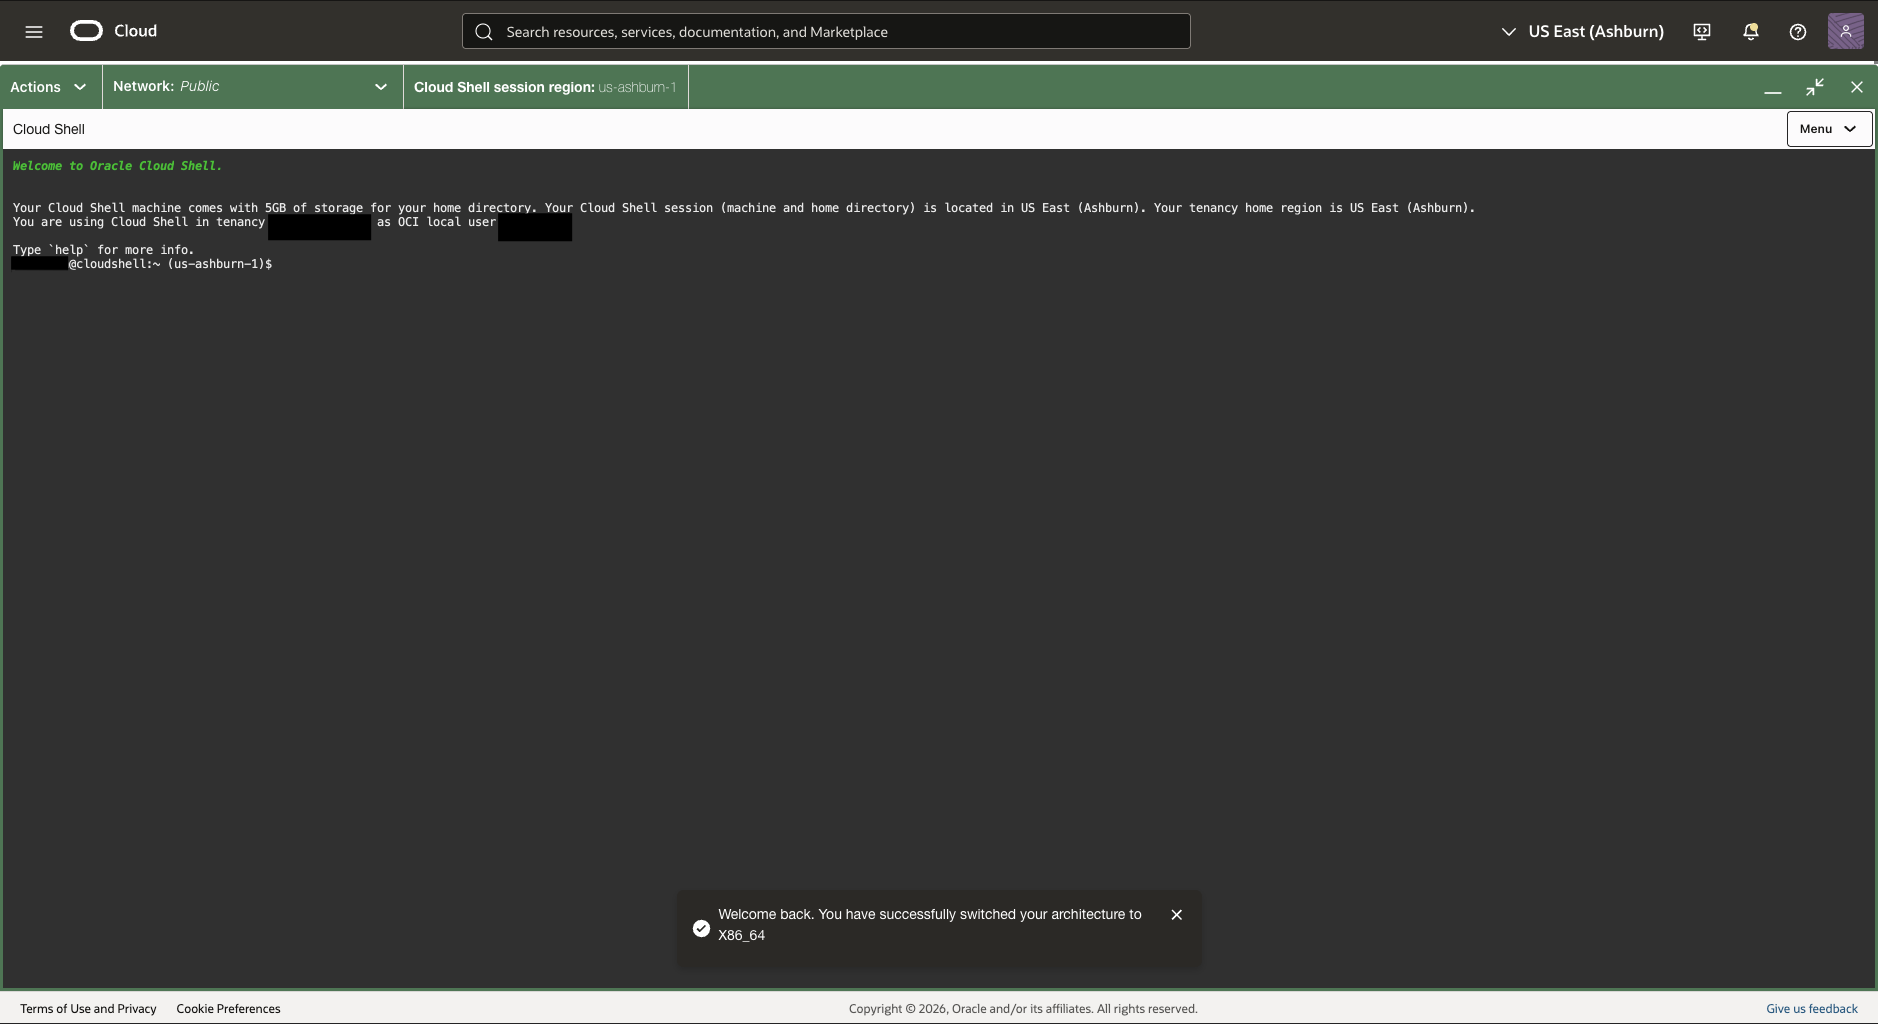
After a successful architecture migration, you see the following notification: