Secrets (Optional)
Note
Note: AWS Secrets Manager integration is supported only with Oracle Autonomous AI Database Serverless.
Complete the following steps.
-
Create OCI Owned Service Role
-
From the AWS Console, select Oracle AI Database@AWS.
-
From the left menu, select Settings.
-
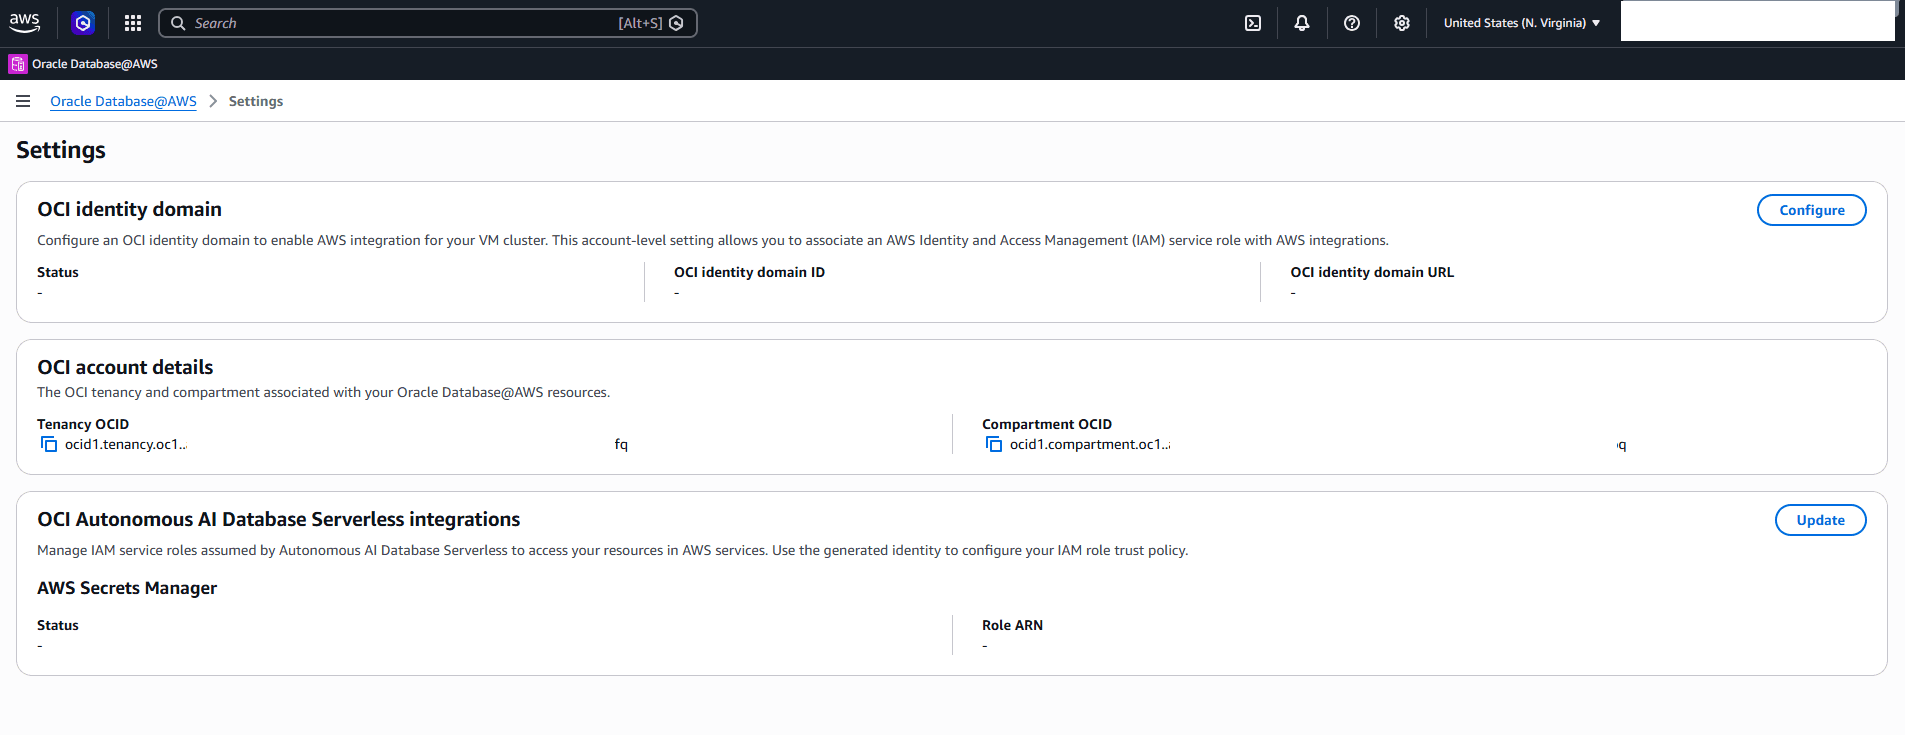
From the Settings page, scroll down to the OCI Autonomous AI Database Serverless integrations.
-
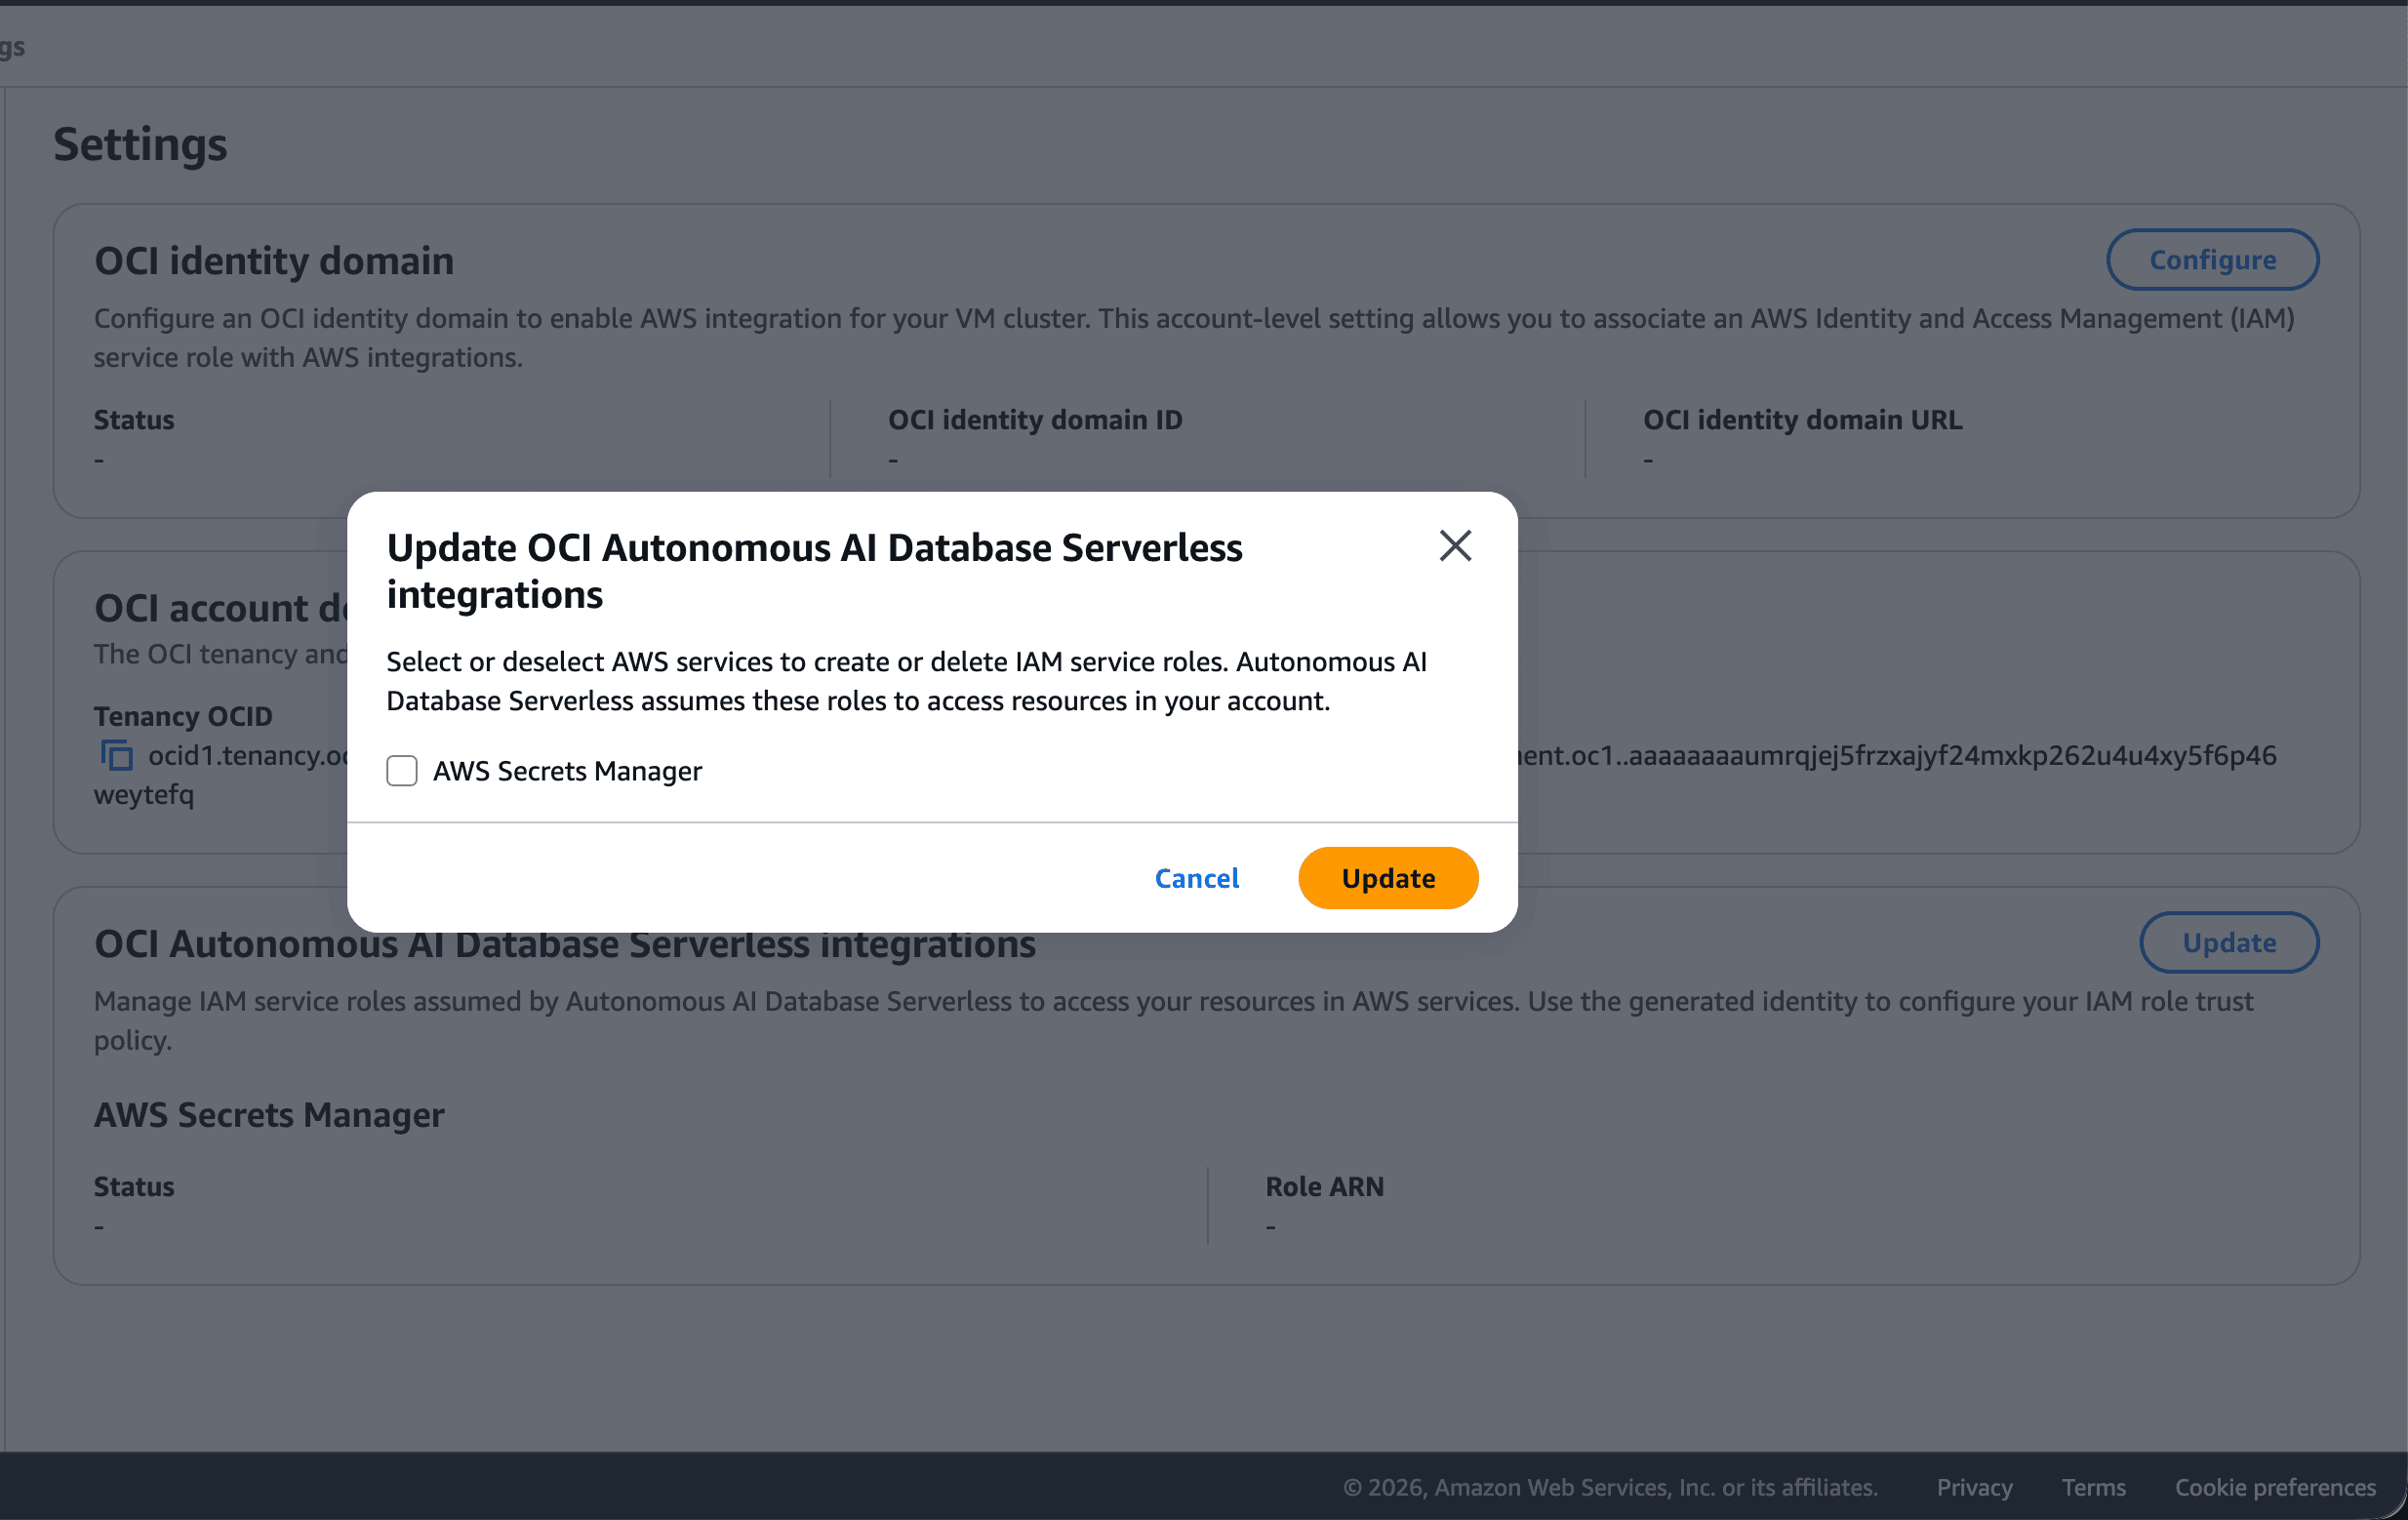
Select the Update button, and select the AWS Secrets Manager checkbox.
-
To confirm your settings, select the Update button. This action creates the IAM service role.
-
Once the process is complete, review the Status and the Role ARN fields. Record the service Account ID from the Role ARN field. For example, the service Account ID is 4177557XXXXX:
arn:aws:iam::4177557XXXXX:role/ADBSSecretManagerServiceRole-XXXXXXXXXXXX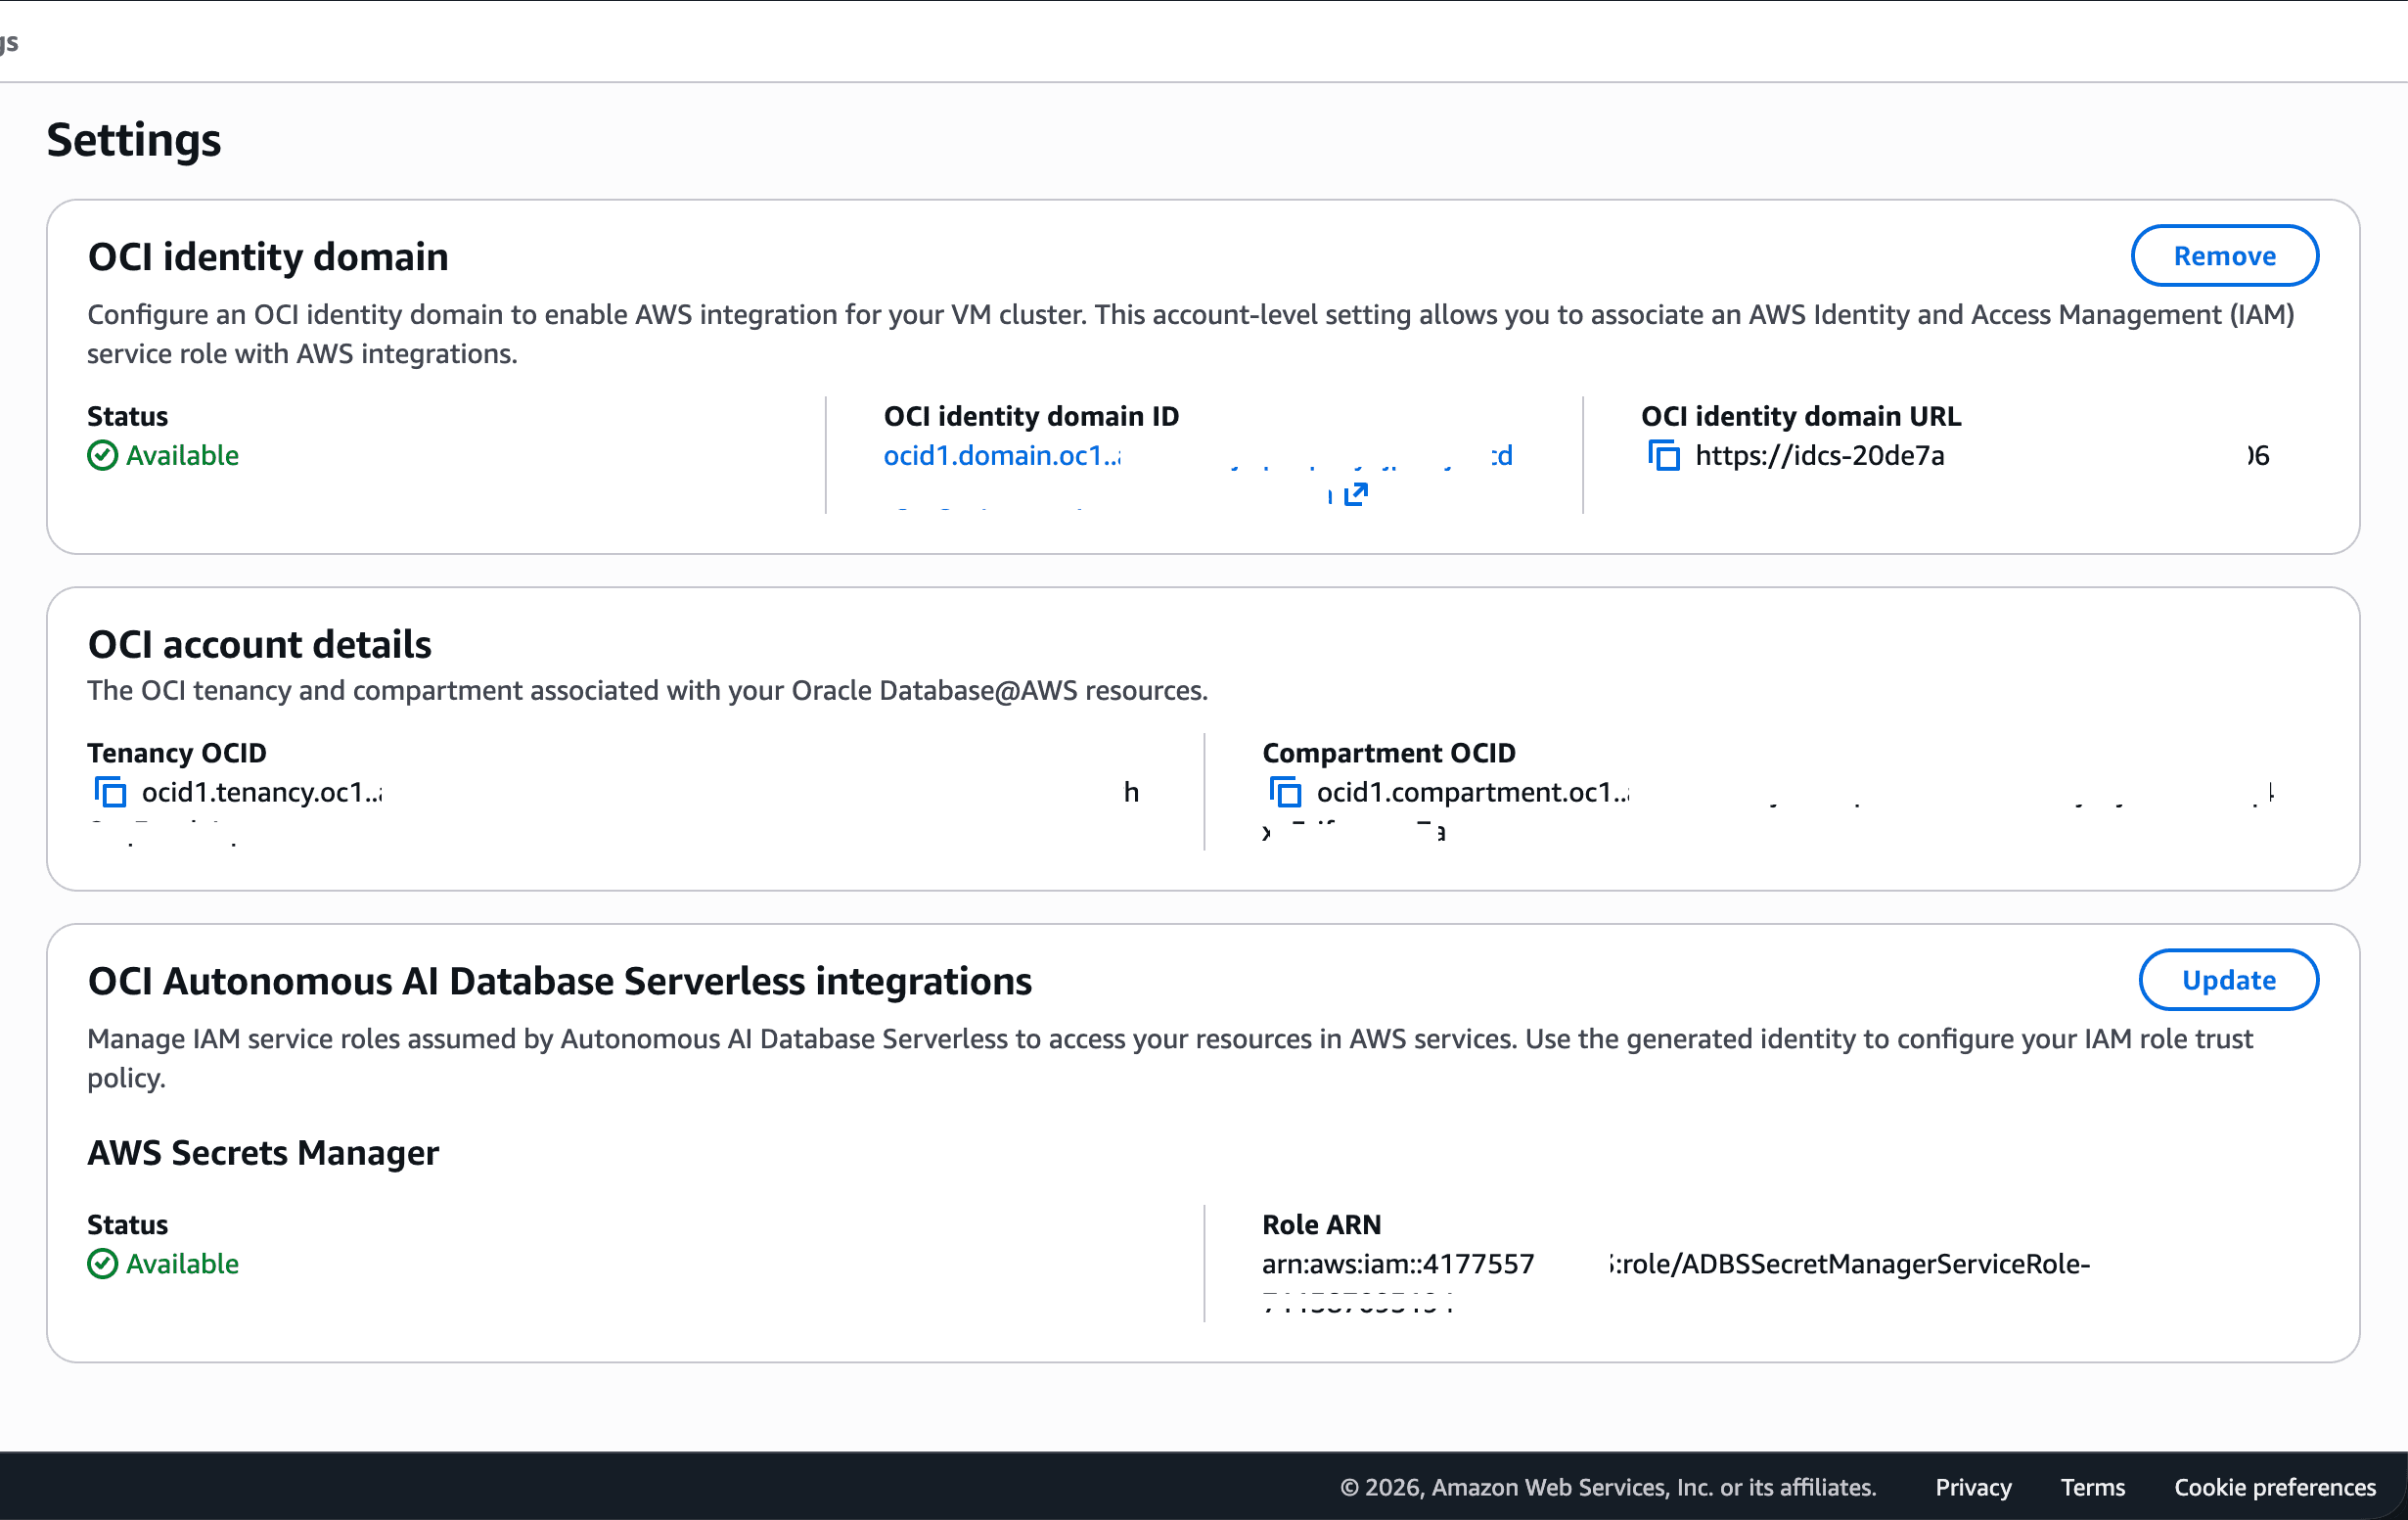
-
-
Create a Secret
-
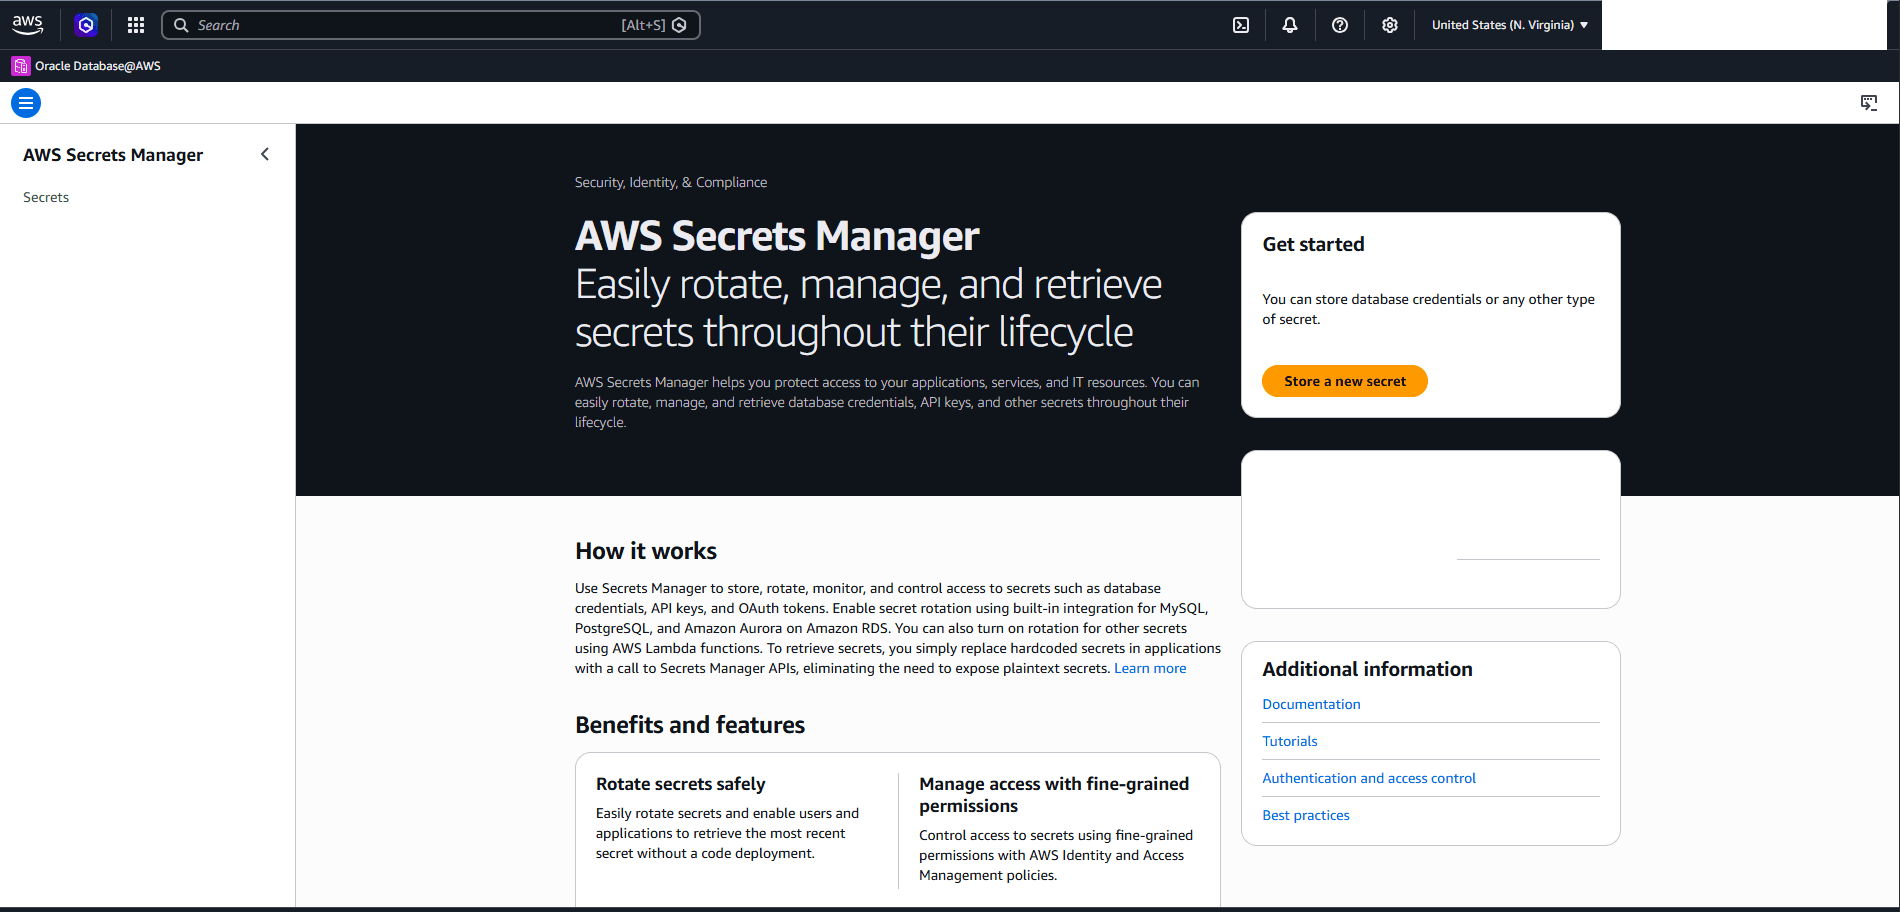
From the AWS Console, navigate to AWS Secrets Manager.
-
Select the Store a new secret button.
-
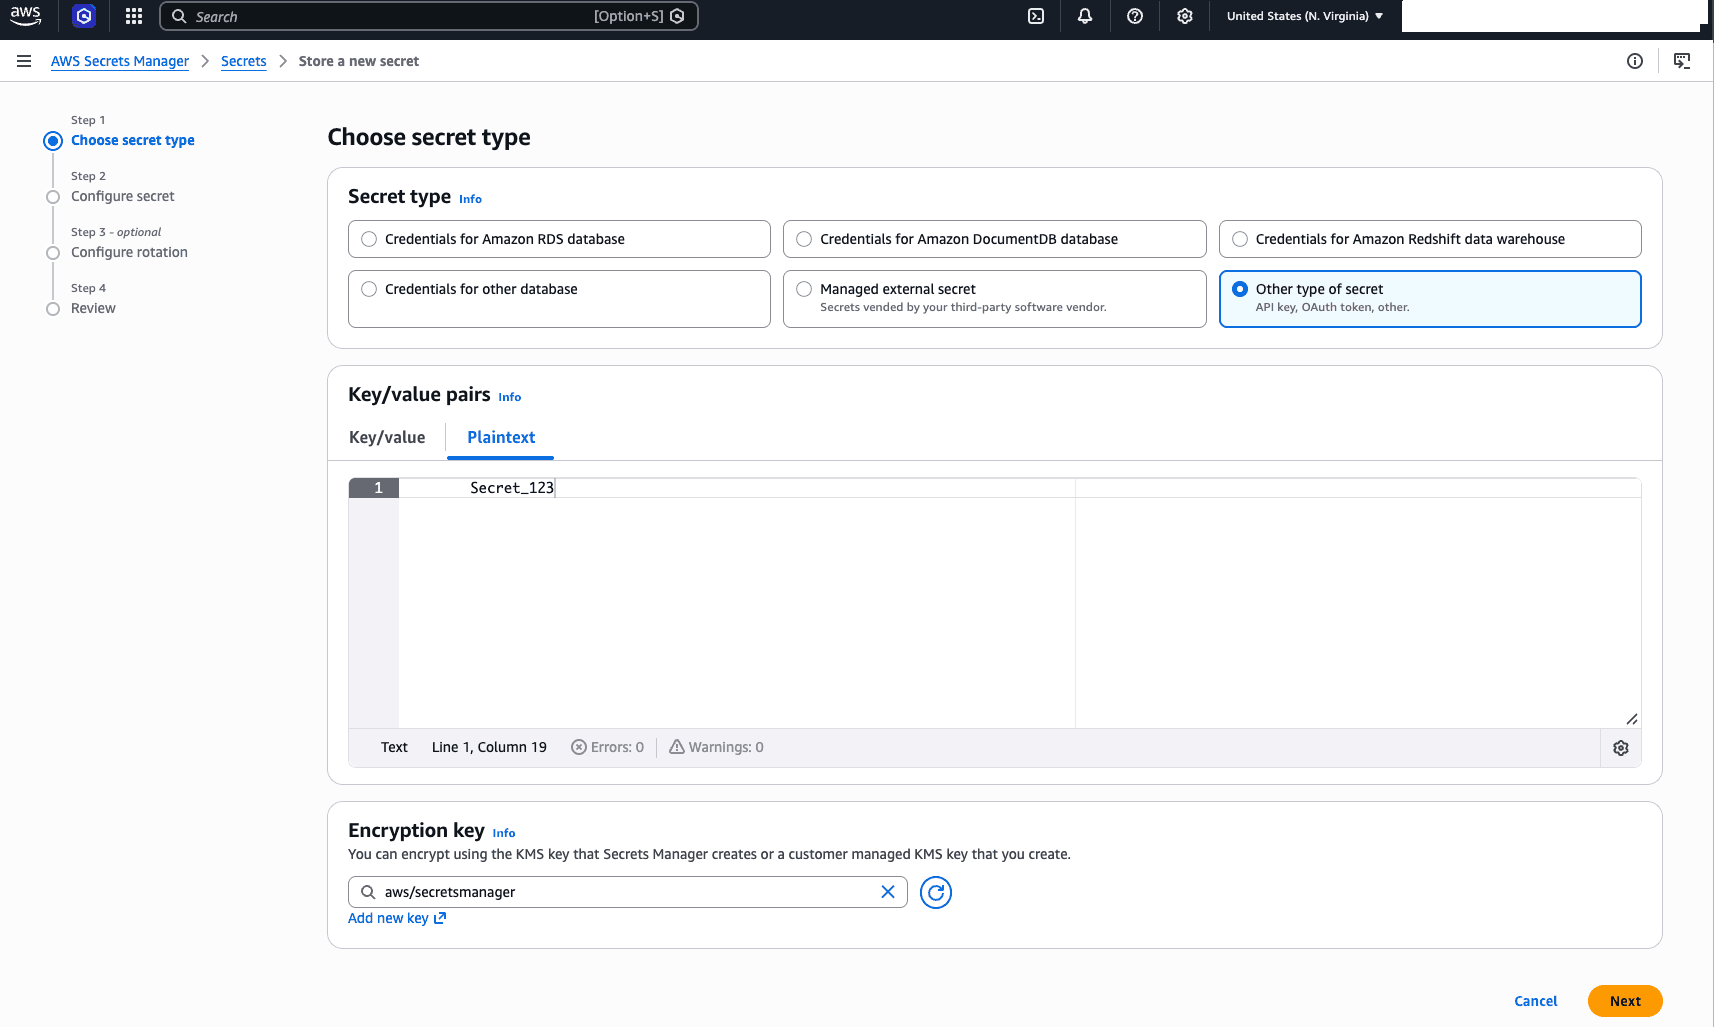
In the Choose secret type step, enter the following information:
-
From the Choose secret type section, select the Other type of secret option.
-
In the Key/value pairs section, select the Plaintext tab, and then enter your ADMIN password in the field.
-
In the Encryption key section, select or add an encryption key.
-
Select the Next button.
-
-
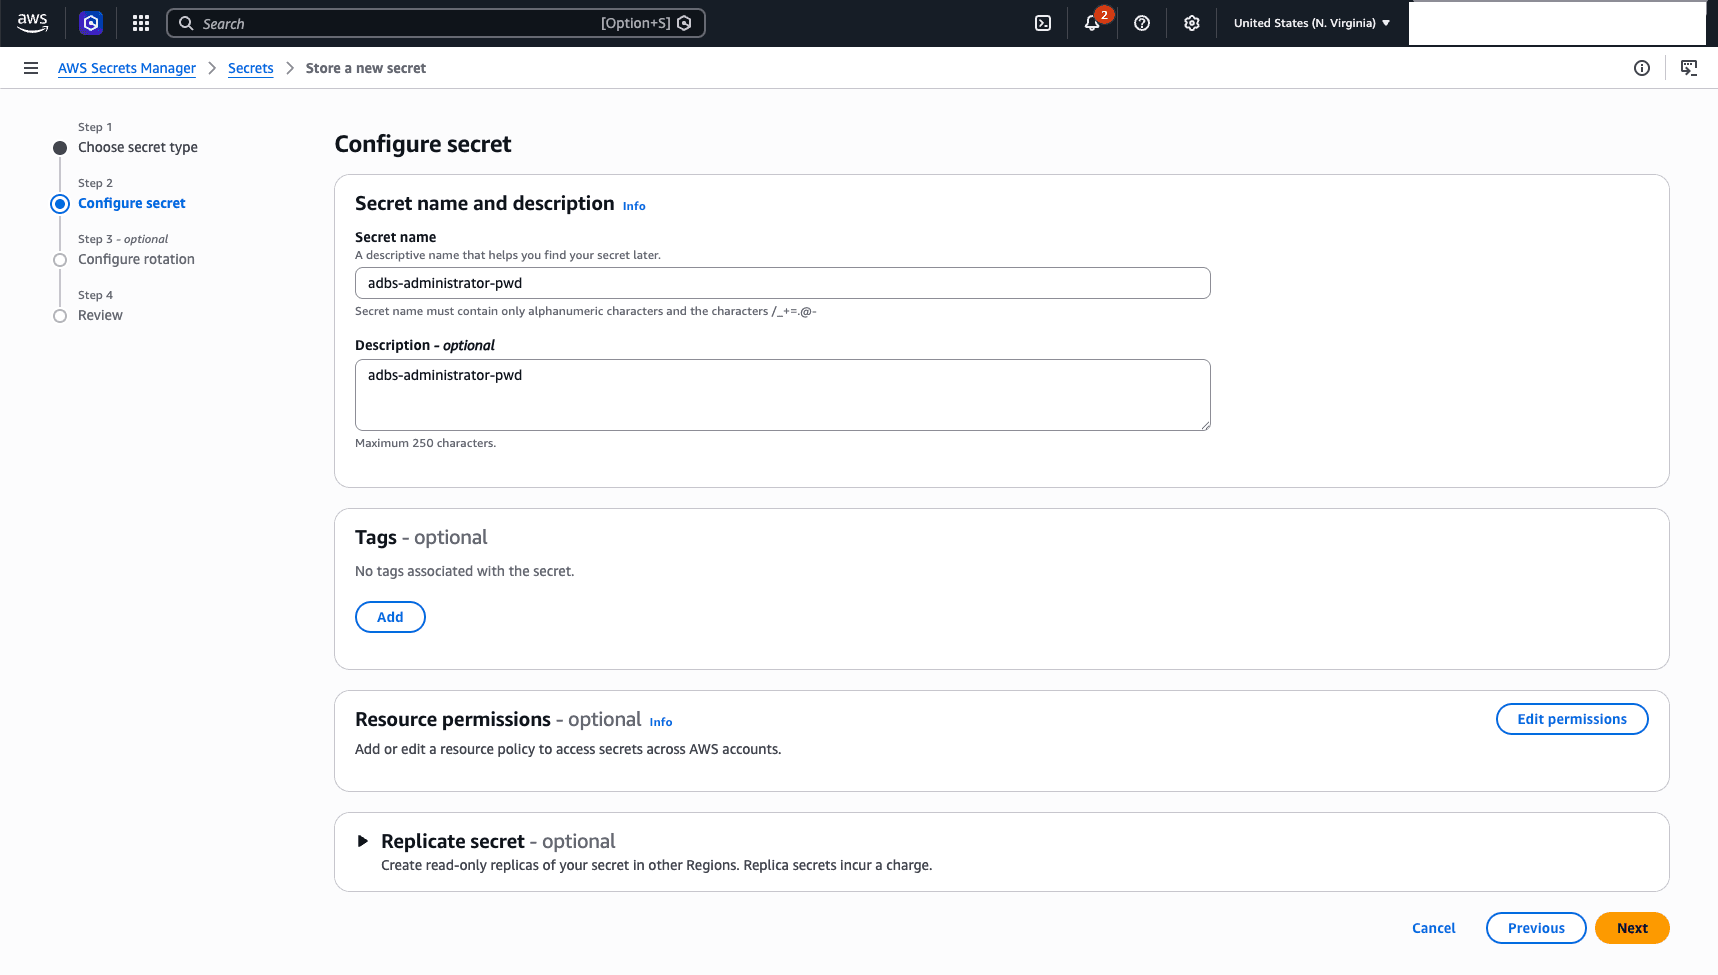
In the Configure secret step, enter the following information.
-
Secret name: Enter a descriptive name for the secret. The name must contain only alphanumeric characters and the characters (
/, _ ,+, = ,. ,@, -). -
Description: This field is optional.
-
Tags: If you want to add a new tag, select the Add button. This field is optional.
-
Resource permissions: This field is optional. If you want to add or edit a resource policy to access secrets across your AWS accounts, select the Edit permissions.
-
Replicate secret: This section is optional.
-
Select the Next button.
-
-
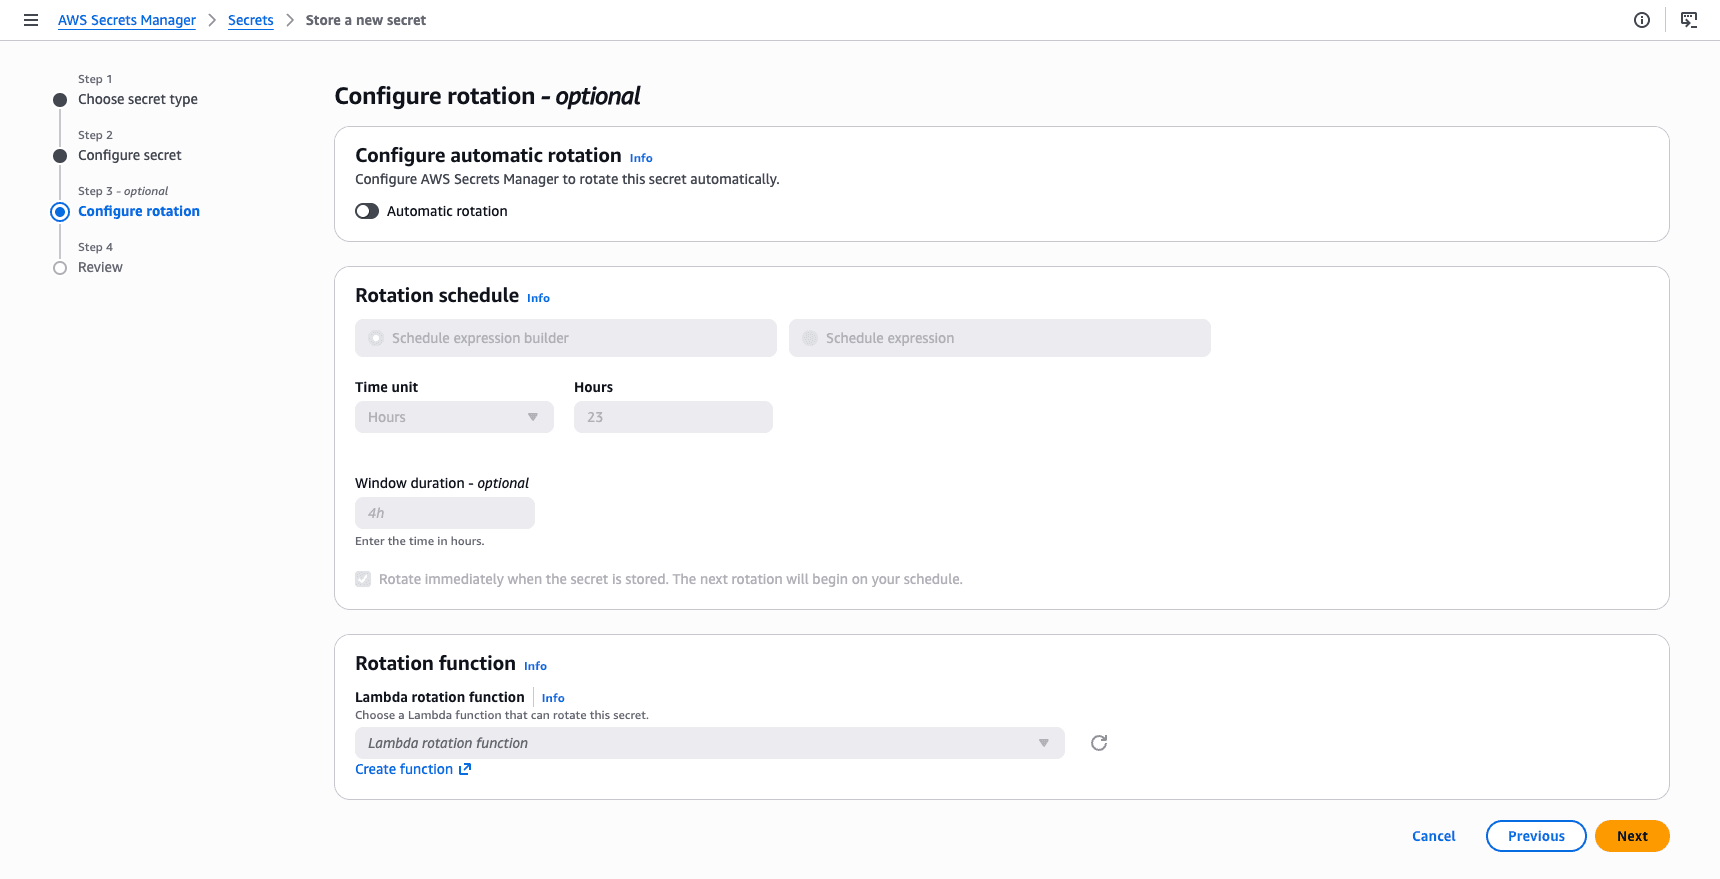
In the Configure automatic Rotation step, the Automatic rotation toggle is not enabled by default. To rotate the secret automatically, enable the toggle. This is an optional step. Select the Next button.
-
In the Review step, validate the information, and then select Store.
-
After the secret is created, open the secret, and then copy the ARN. Take a note of the ARN as it is required for creating an Autonomous AI Database Serverless.
-
-
Create an IAM Policy and Role
-
Create a IAM policy that grants permission to read the secret.
-
From the AWS Console, navigate to IAM. Select Policies, and then select the Create policy button.
-
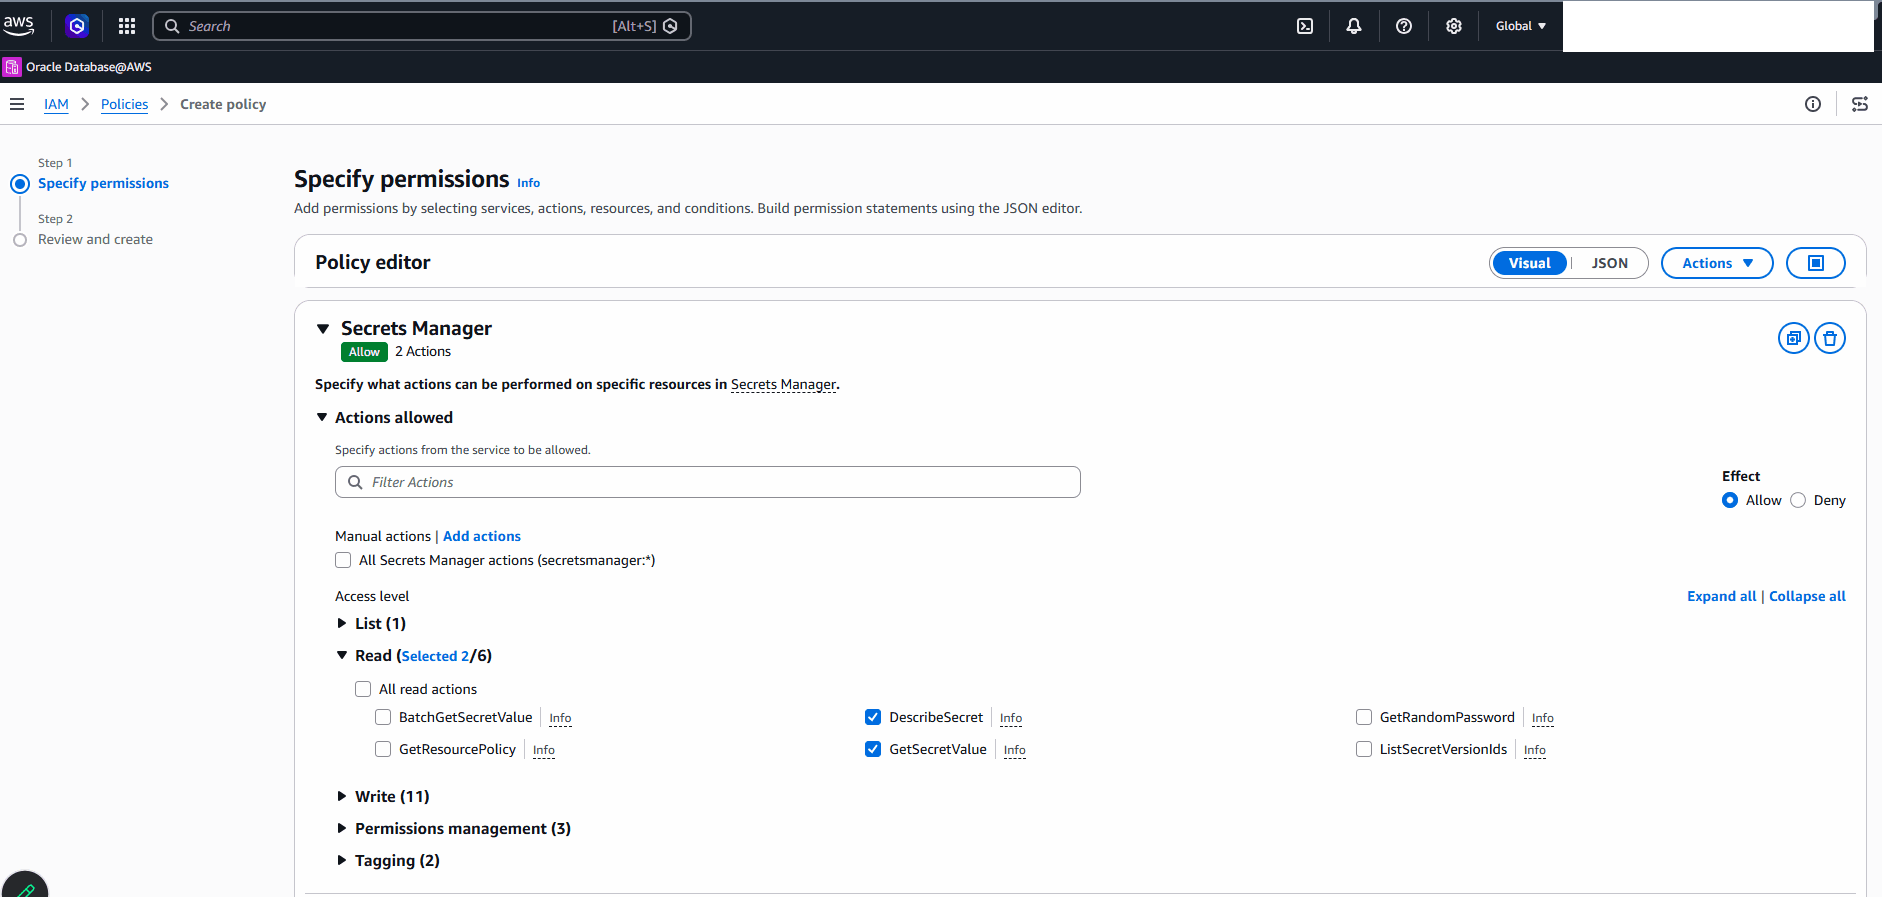
In the Specify permissions step, enter the following information:
-
Policy editor: Select the Visual tab .
-
Service: Select Secrets Manager from the list.
-
Expand the Actions allowed section to allow permission to retrieve the secret value.
-
Choose the Allow option under Effect.
-
Expand the Read section, and then select the GetSecretValue and DescribeValue checkbox.
-
-
Resources: Specify the required secret. Select the Add ARNsbutton to add your ARN that you previously created and copied.
-
-
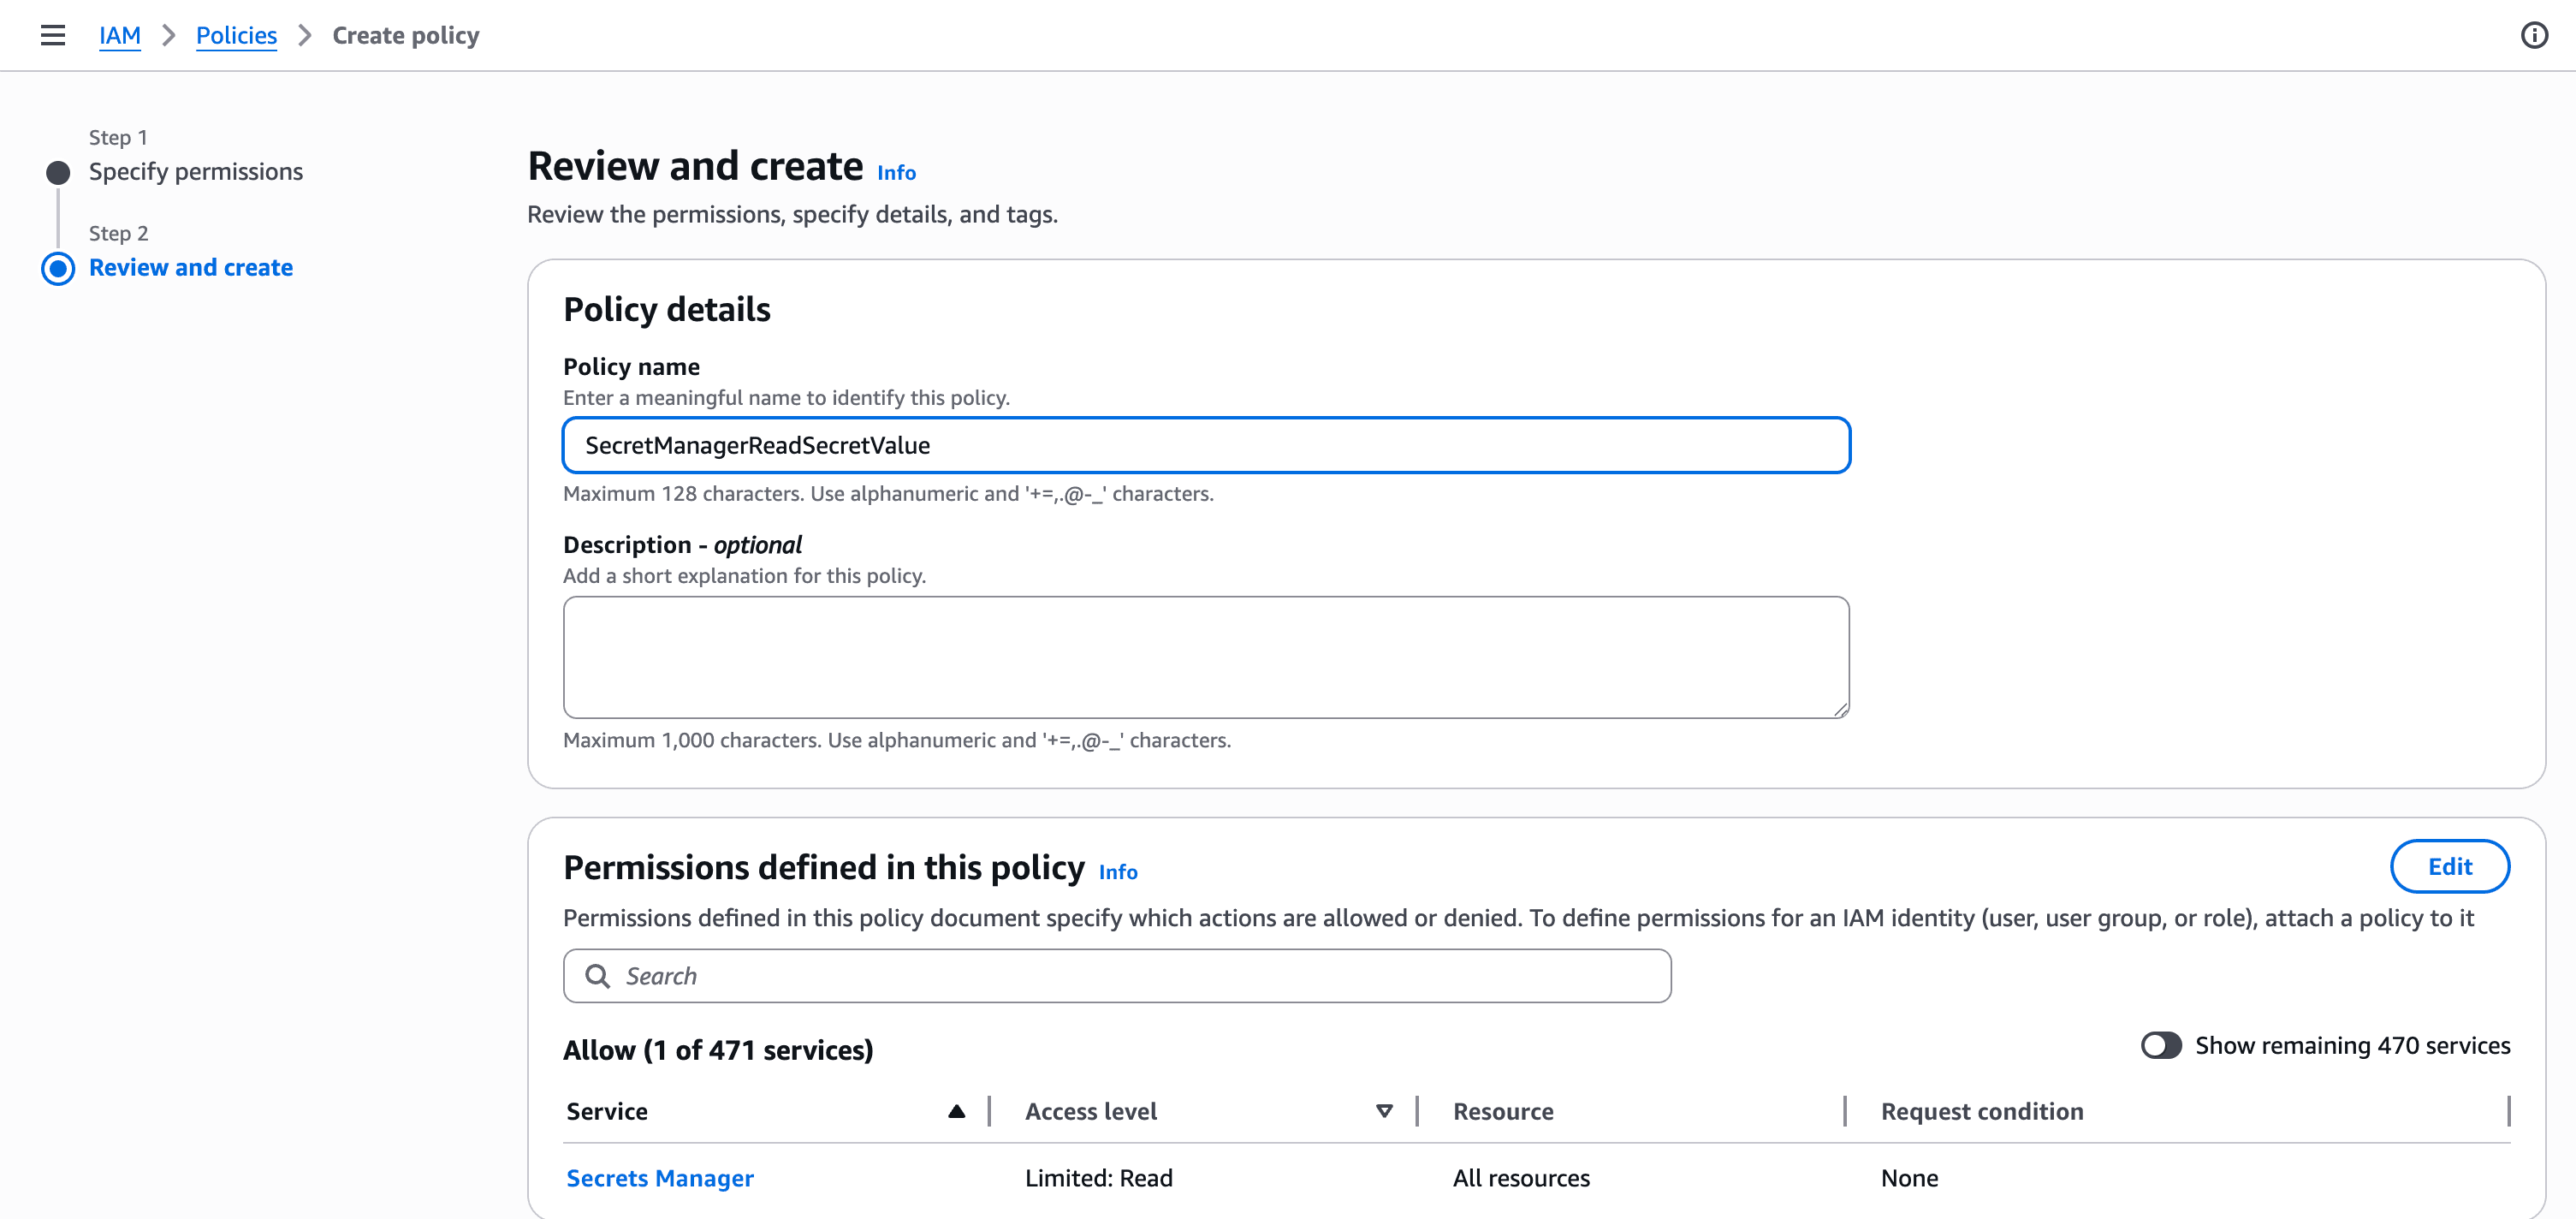
In the Review and create step, enter the following information:
-
Provide a policy name.
-
Provide a description. This step is optional.
-
-
Select Create policy.
-
Once it is created, you can review your policy details from the list.
-
-
Create an IAM Role for accessing the secret.
-
From the AWS Console, navigate to IAM. Select Roles, and then select the Create role button.
-
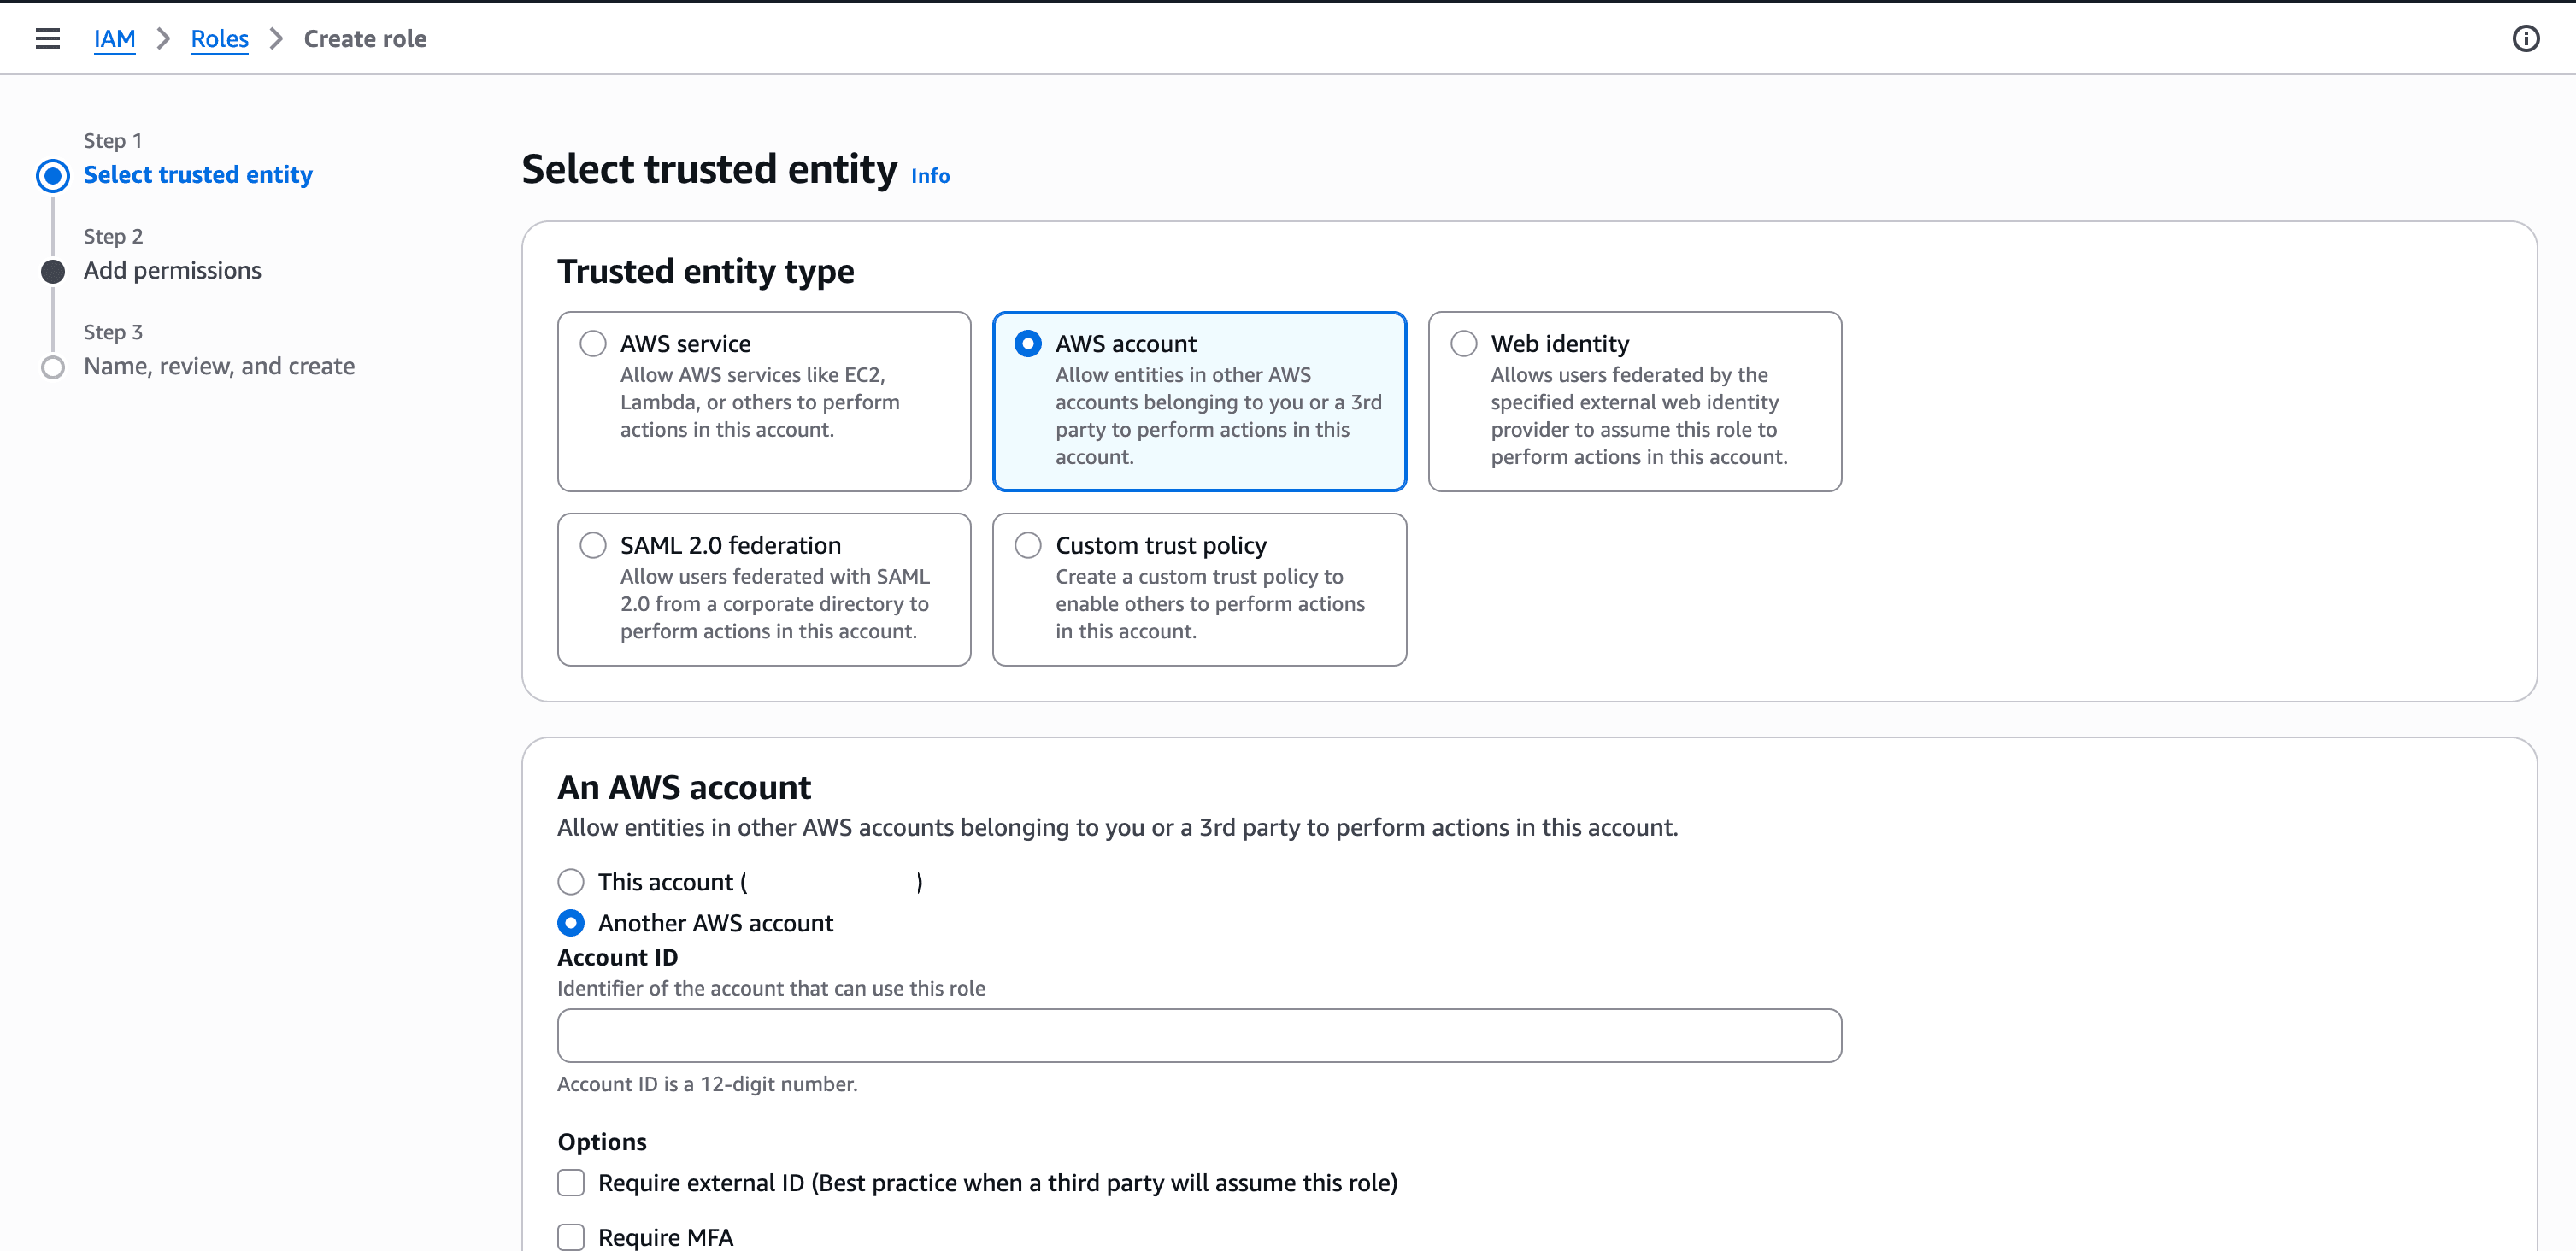
In the Select trusted entity step, enter the following information:
-
Trusted entity type: Choose AWS account.
-
An AWS account:Choose the AWS account option and then enter the service Account ID associated with the OCI owned service role.
Note
Note: Obtain your service Account ID from the Create OCI Owned Service Role (step 1f). -
Select Next.
-
-
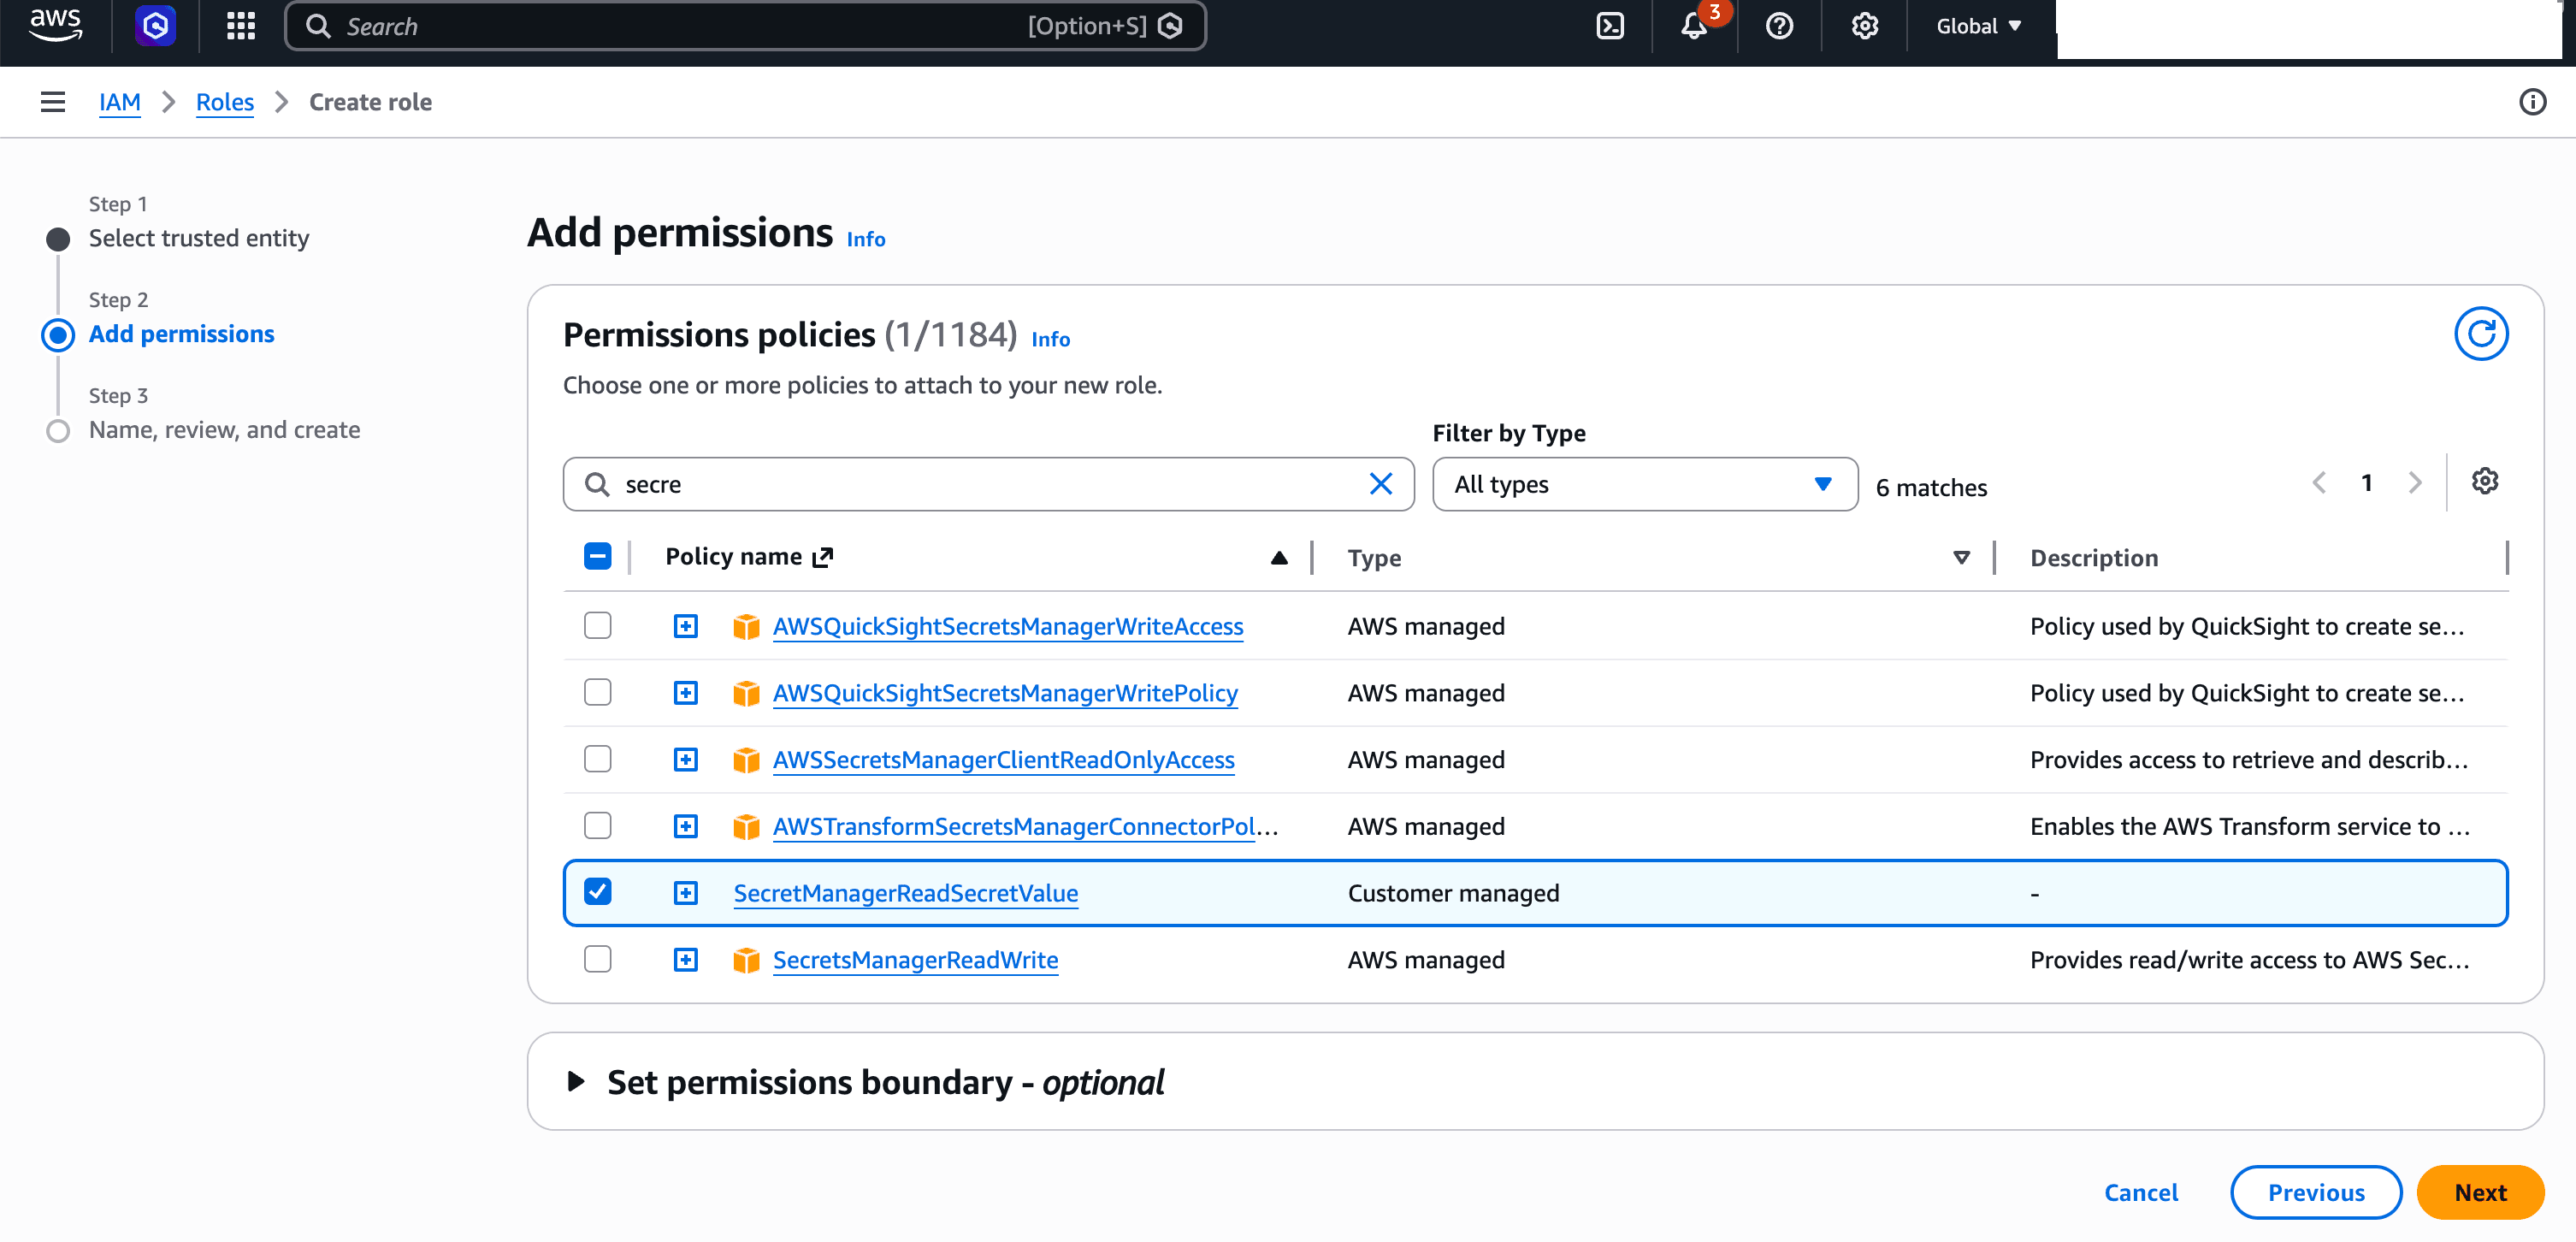
In the Add permissions step, enter the following information:
-
Select the IAM policy created in the previous step.
-
You can create more granular trust relationships to improve the security posture. Examples of trust relationships that you can use:
-
Trust relationship with conditions: It restricts
AssumeRoleby usingExternalIdto help prevent the confused deputy problem.AssumeRolegrants OCI customer credentials. It also restrictsSourceIdentityto the service role that you create in the first step on the Settings page.Currently supported values for
ExternalIdin trust policy are the OCID of the database, the OCID of the compartment, and the OCID of the tenancy.{ "Version": "2012-10-17", "Statement": [ { "Effect": "Allow", "Principal": { "AWS": "arn:aws:iam::4177557XXXXX:root" }, "Action": "sts:AssumeRole", "Condition": { "StringEquals": { "sts:ExternalId": "ocid1.tenancy.oc1..XXXXXXXXXXXXXXXXXXXXXXXXXXXXXXXXXXXXXXXXXXXXXXXXXXXXXXXXXXXX" }, "ArnLike": { "aws:PrincipalArn": "arn:aws:iam::4177557XXXXX:role/ADBSSecretManagerServiceRole-XXXXXXXXXXXX" } } }, { "Effect": "Allow", "Principal": { "AWS": "arn:aws:iam::4177557XXXXX:root" }, "Action": [ "sts:SetSourceIdentity", "sts:TagSession" ], "Condition": { "ArnLike": { "aws:PrincipalArn": "arn:aws:iam::4177557XXXXX:role/ADBSSecretManagerServiceRole-XXXXXXXXXXXX" } } } ] }Replace the service Account ID information with the Account ID obtained in the Create OCI Owned Service Role (step 1f).
-
-
Select Next.
-
-
In the Name, review and create section, enter the following information:
-
Provide a role name. The name can be up to 64 characters. You can use alphanumeric and (
+ = , . @ - _) characters. -
Enter a description to add a short explanation for this role. This step is optional.
-
Review your information, and then select the Create role button.
-
-
-
-
AWS Secrets creation is available through the AWS Console and AWS CLI.
There is currently no content for this page. Oracle AI Database@AWS team intends to add content here, and this placeholder text is provided until that text is added. The Oracle AI Database@AWS team is excited about future new features, enhancements, and fixes to this product and this accompanying documentation. We strongly recommend you watch this page for those updates.
AWS Secrets creation is available through the AWS Console and AWS CLI.
AWS Secrets creation is available through the AWS Console and AWS CLI.