Billing
Learn how to view cost and usage reports for Oracle Database@AWS.
You can perform resource metering using both the AWS Console and the OCI Console.
AWS Billing and Cost Management console is a centralized platform for managing billing, cost analysis, budgeting, and cost optimization across AWS accounts. AWS Billing and Cost Management allows you to control and monitor your cloud spending.
This page provides the required steps to view your monthly charges using AWS Billing and Cost Management console.
Note
- Once the Private Offer is accepted and provisioning is completed, billing records start flowing from the OCI Metering service into AWS, where you can view them in the Billing and Cost Management console.
- It takes up to 24 hours for an hourly billing record sent from OCI to the Billing and Cost Management console.
- From the AWS console, navigate to Billing and Cost Management.
- From the Billing and Payments section, choose Bills, and then select a Billing period.

- From the Bills page, you can view your AWS bill summary.
- If you want to download the document, select the Download all to CSV button.
- If you want to see charges by service, scroll down to Amazon Web Services, Inc. - Marketplace charges by service to view the details of it.
Note
It displays two types of quantities.- Usage: This quantity is charged as
0 USD per unitas it represents usage within committed amount. - Overage: This quantity is charged at
0.01 USD per unitas it represents usage beyond the committed amount.
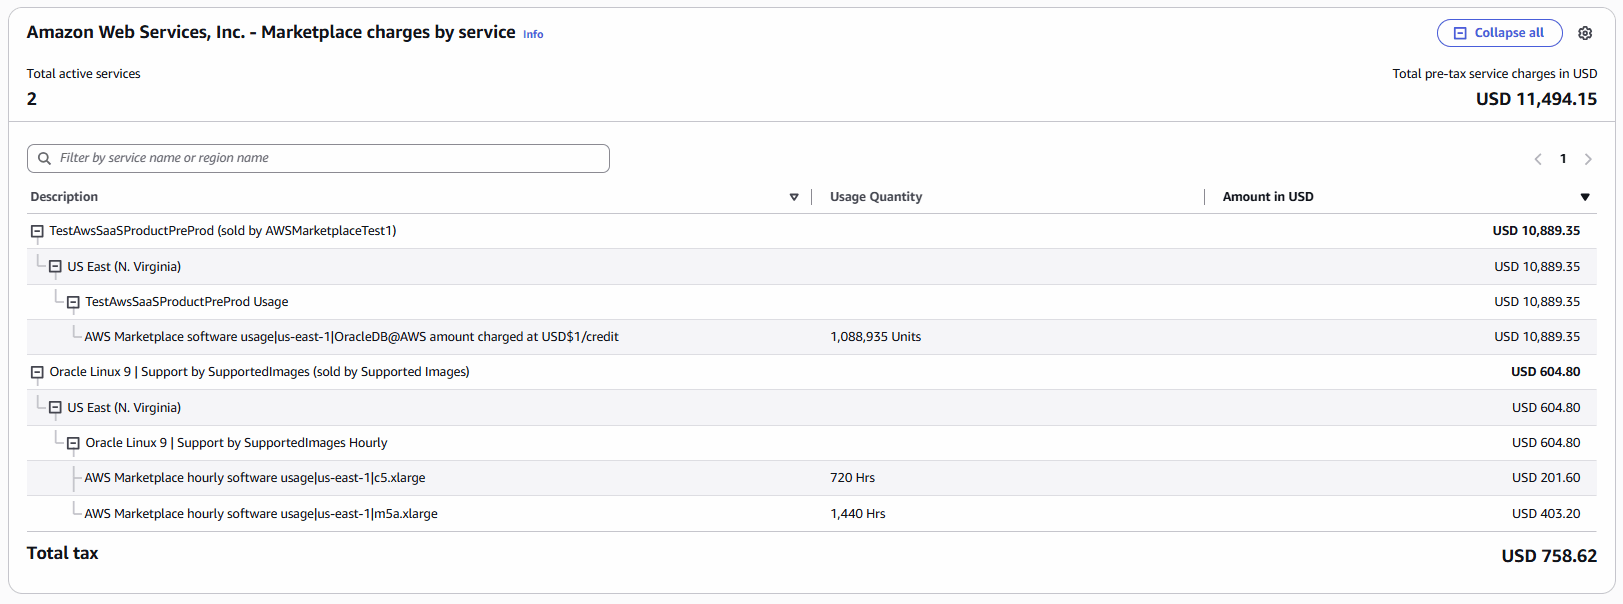
- Usage: This quantity is charged as
Monitor Usage with Cost Allocation Tags
This topic explains how to use AWS cost allocation tags to monitor and review usage of Oracle Database@AWS resources.
The following permissions are required on the AWS console.- ce:UpdateCostAllocationTagsStatus
- ce:ListCostAllocationTags
- ce:GetTags
- ce:DescribeReport
- ce:GetDimensionValues
- ce:GetCostAndUsage
Oracle Database@AWS supports cost allocation tags for the following usage groups:- Exadata infrastructure usage
- Exadata Database cloud service usage
- Autonomous AI Database on Dedicated Exadata Infrastructure usage
- Backup and recovery usage
- Data usage
- Networking Usage
To use the tags for these usage groups, you need to activate them in the AWS Management Console. After you activate the tags, you can view Oracle Database@AWS usage data by tag group in the AWS Billing and Cost Management service. You don't need to manually create any usage tags for Oracle Database@AWS. You only need to activate the pre-created tags for the service to use this feature.
Activate Oracle Database@AWS Cost Allocation Tags- Sign in to the AWS Management Console and navigate the AWS Billing and Cost Management console.
- In the navigation pane, choose Cost allocation tags.
- Under AWS-generated cost allocation tags, select the
"aws:marketplace:isv:Product"tag, then select Activate. Note that it can take up to 24 hours for tags to activate and show the Active status in the AWS console.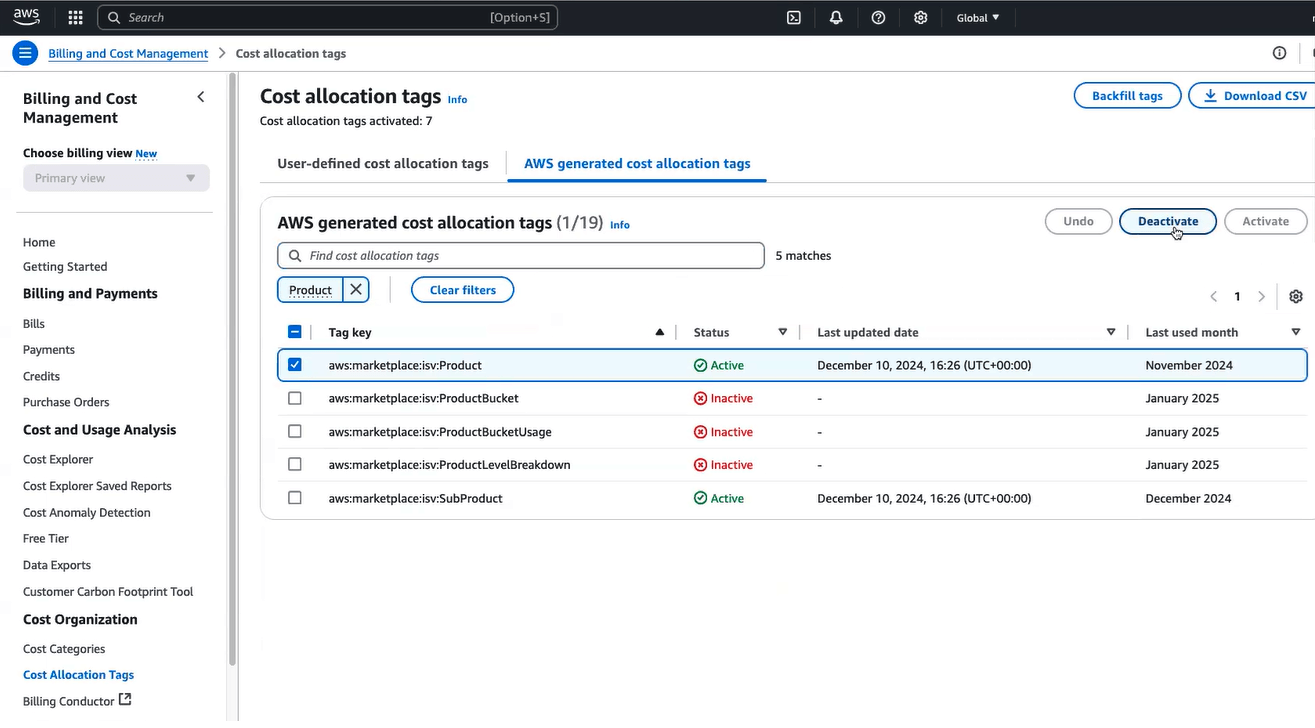
- To retrieve historical usage data, follow the directions described in the Retrieve Historical Usage Data documentation. See Backfill cost allocation tags in the AWS documentation for more information.
Note
Tags used before activation won't have their historical usage automatically backfilled.
Retrieve Historical Usage Data- Use the Backfill Tags option and select the appropriate month to backfill to retrieve historical usage data.
- Sign in to the AWS Management Console and navigate to the AWS Billing and Cost Management console.
- In the navigation pane, select Cost allocation tags.
- At the top right of the page, select Backfill tags.
- In the Backfill tags dialog box, select the month you want the backfill to start from.
- Select Confirm.
Visualizing Usage
You can visualize the total usage of top-level SKUs (for example, usage and overage pricing dimensions) on the AWS Billing Console for Oracle Database@AWS. For a detailed analysis of usage at the product SKU level, you must use the AWS Cost Explorer.
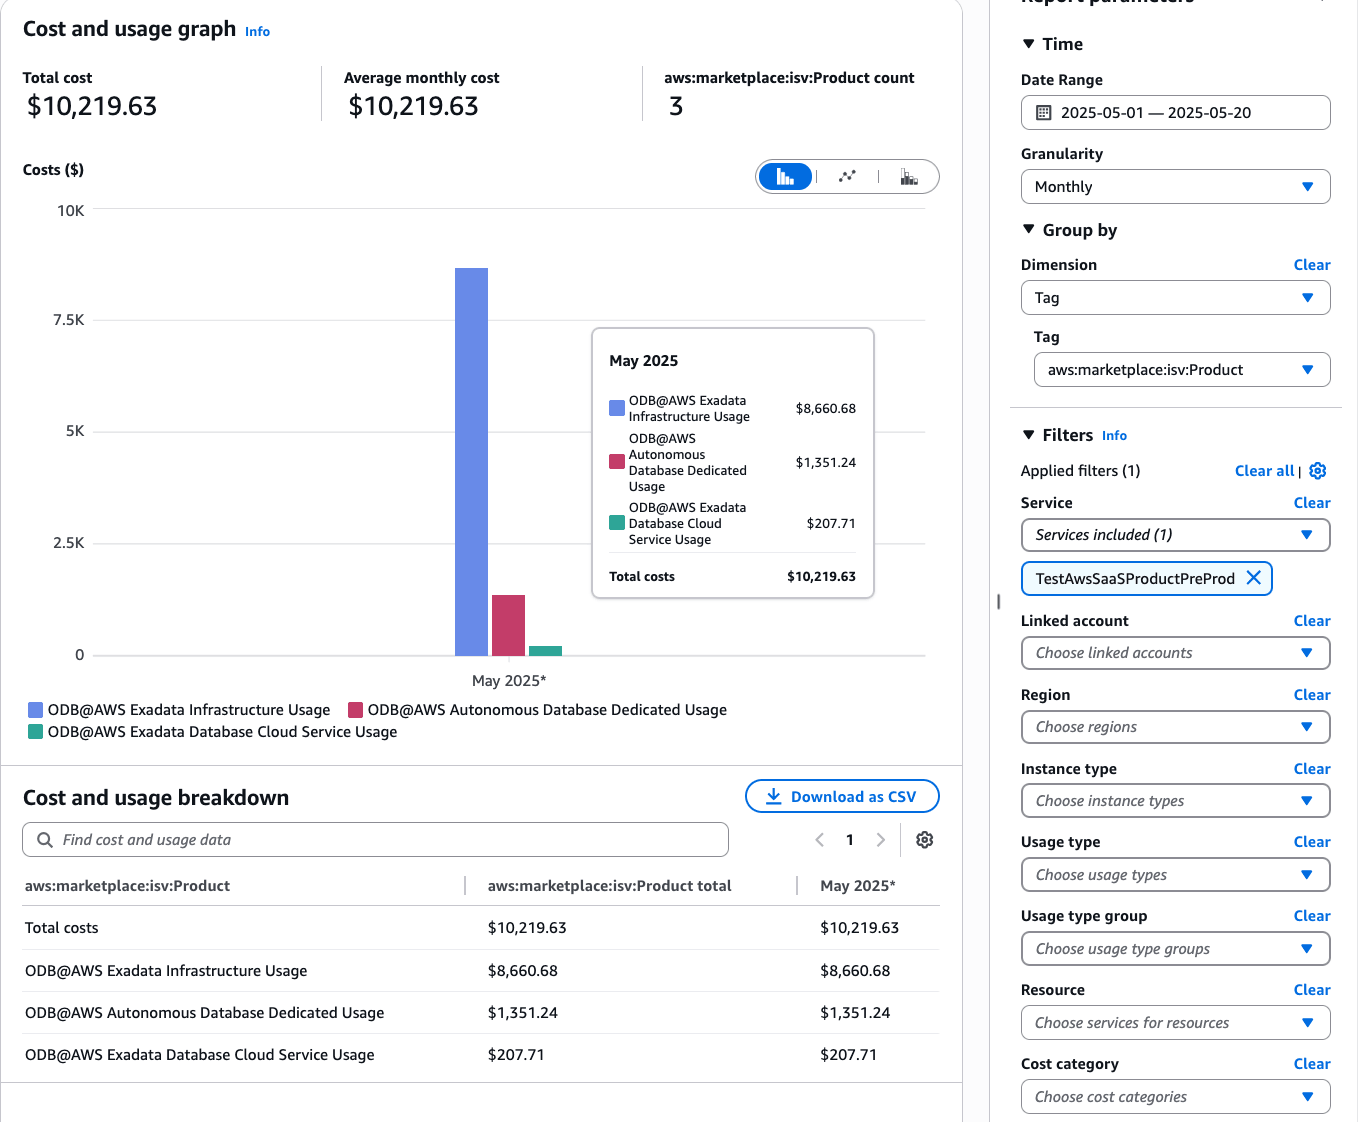
Group by tags:- Go to Cost Explorer and find the Group by parameter in the report settings.
- Select the Dimension drop down option, then select Tag.
- From the Tag option, select an activated tag. The tag name usually follows the format
aws:marketplace:isv:Product.
Filter by Service and Usage Type:- In the Filters section of the Cost Explorer, select the Service drop down option, then select the service corresponding to your product name.
- Under Usage Type, select the relevant dimensions. For example:
MP:Usage-Units (Units)MP:Overage-Units (Units)
Optional Tag Filtering: You can further refine your report by applying a Tag filter to focus on specific tags.
Sample Reports
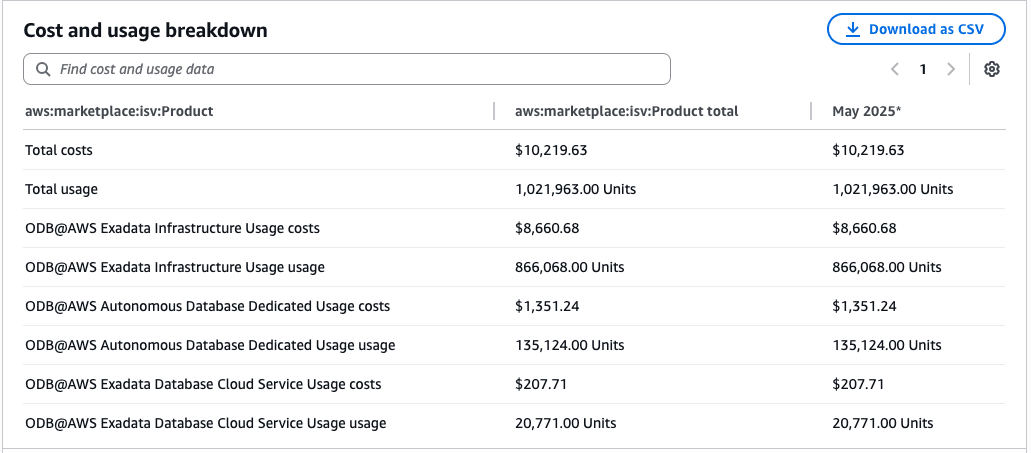
In the following example, you can see the cost and usage graph in AWSCost Management for the usage groups: described in this top. Note that the tags for these usage groups must be activated as detailed in the Activate Oracle Database@AWS cost allocation tags documentation to see the granular usage details this report. You can optionally download the usage report in CSV format.
- These are the steps to monitor resource metering in the OCI console.Note
- To view cost and usage reports in OCI, you must have a Billing and Cost Management IAM policy configured. For more information, see Required IAM Policy.
- It can take up to 8 hours for billing data to appear in OCI.
- From the OCI console, navigate to Billing & Cost Management, and then select Cost Management.
- From the left menu, select Cost analysis.
- Select your Start date (UTC) and End date (UTC).
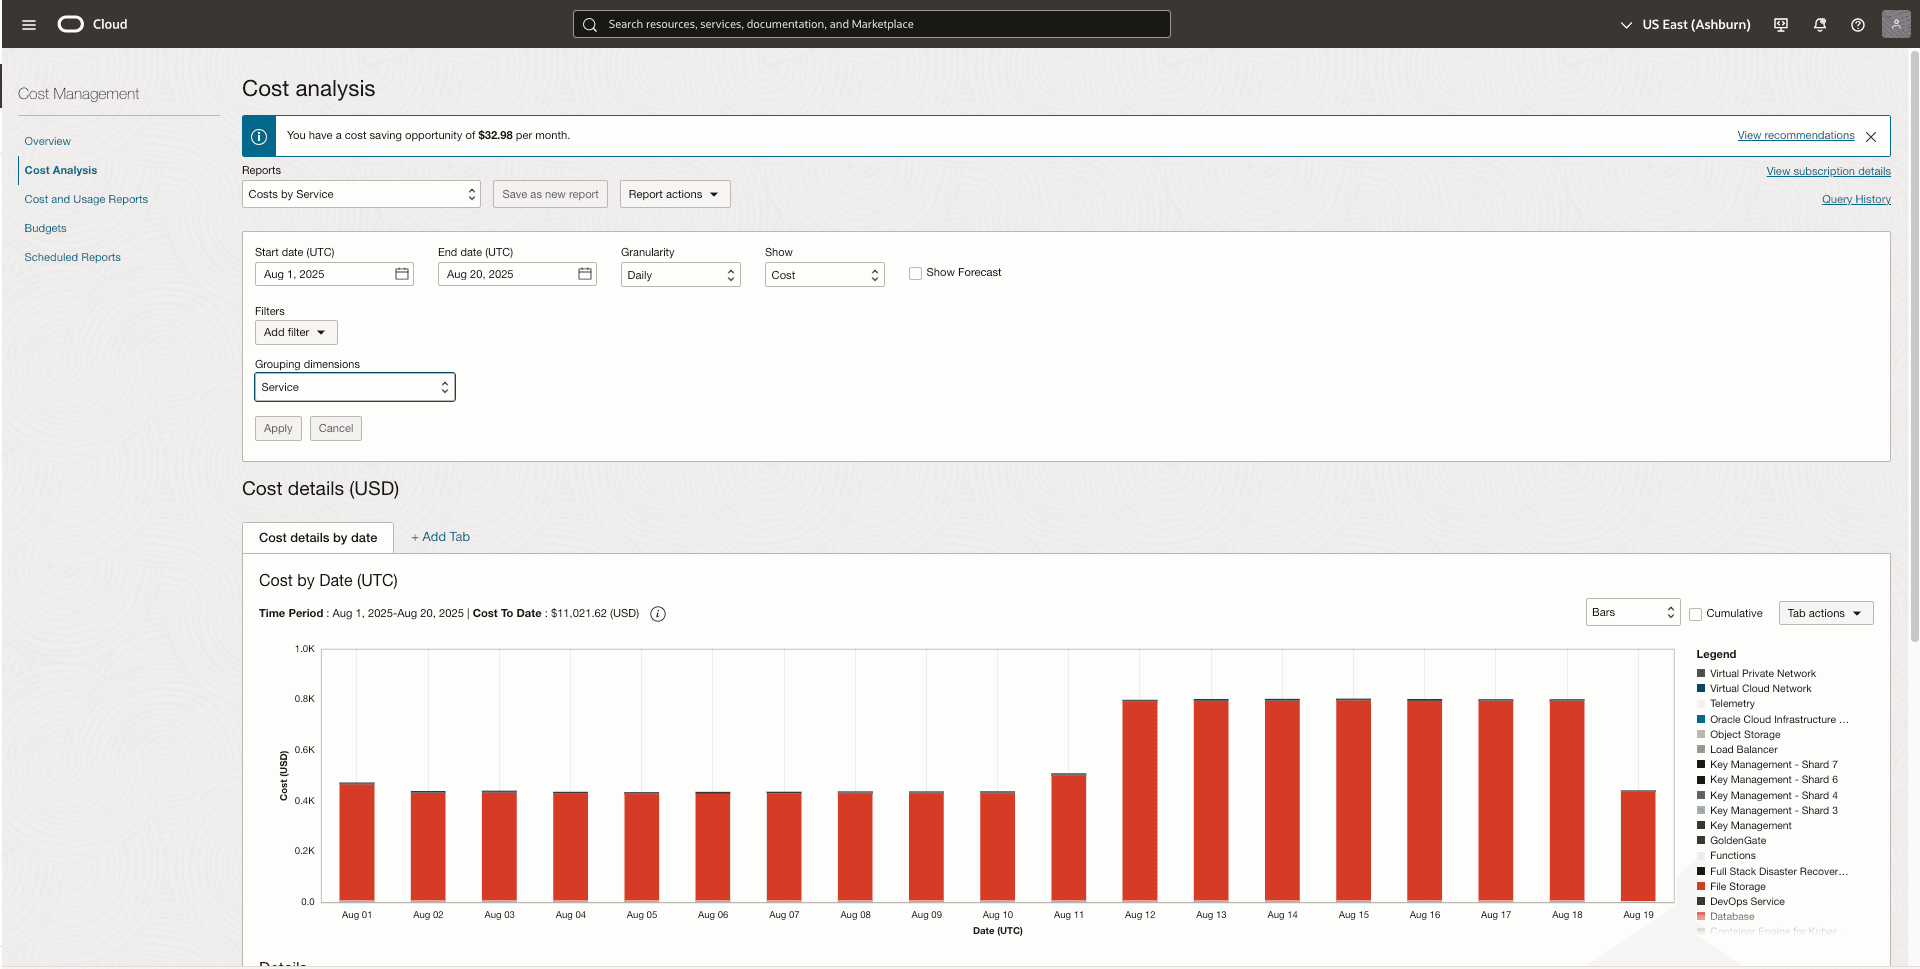
- Select the Add filter button to add a tag-based filter to focus on resources having specific AWS attribute including Subscription ID, Location and Resource Group.
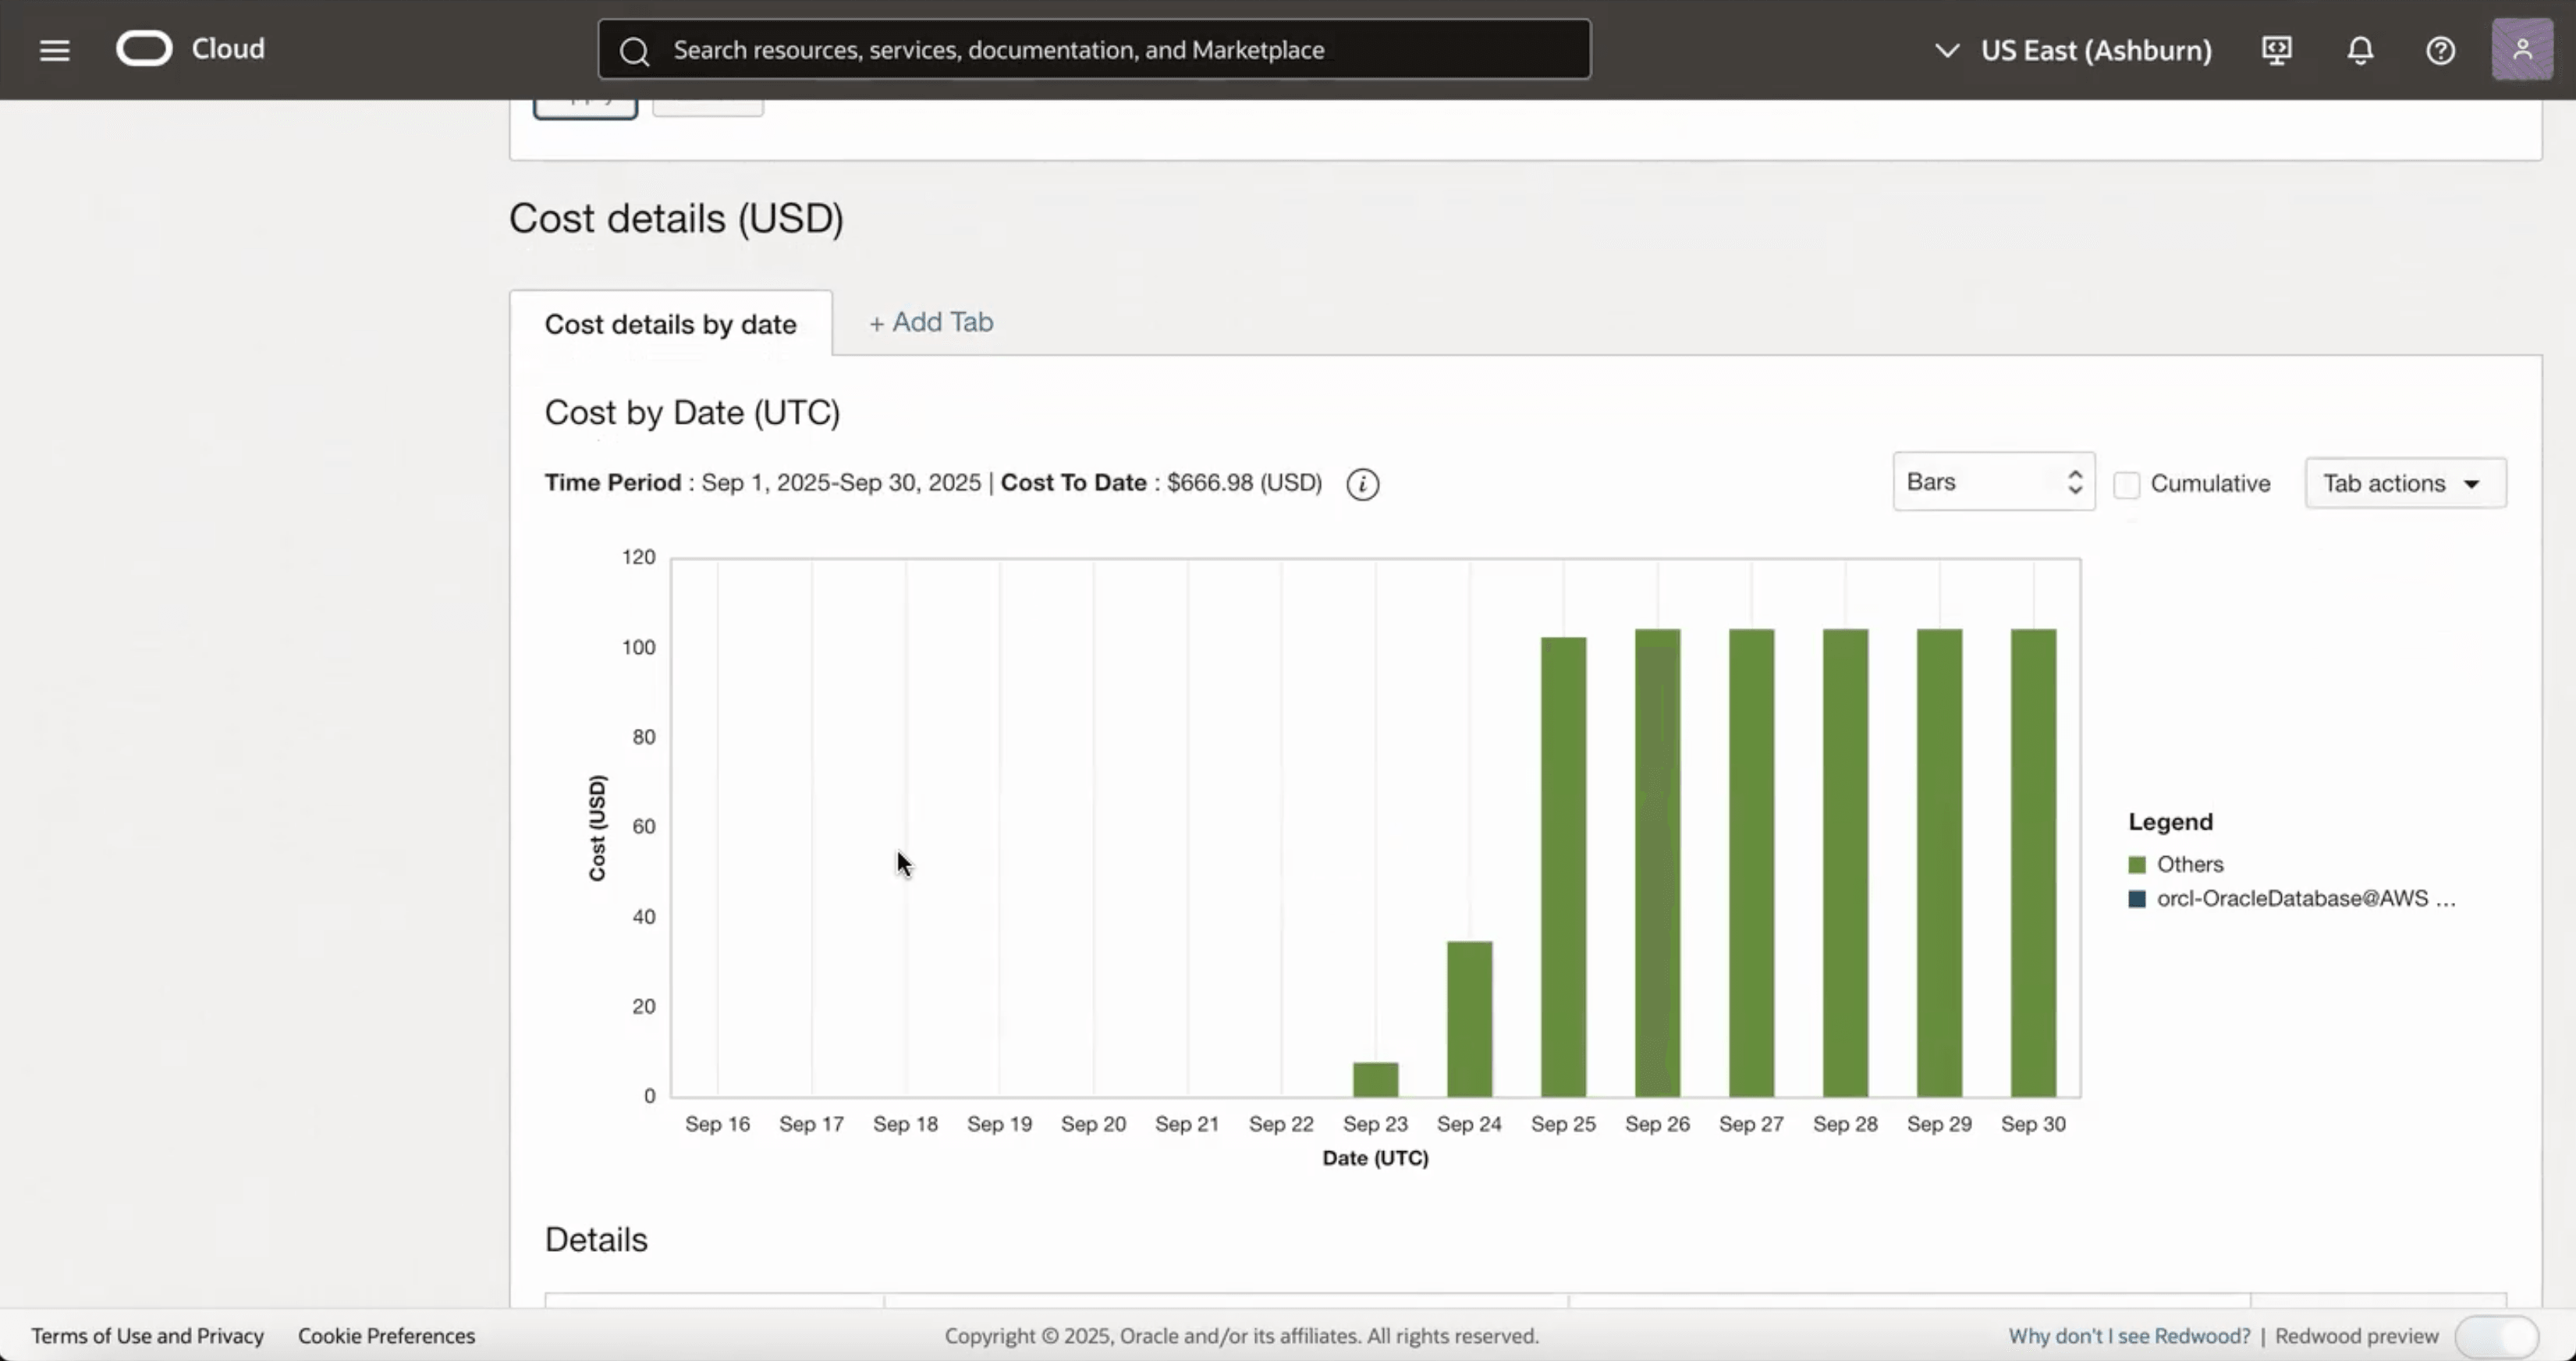
- If you want to group or filter resources based on specific AWS attributes, including Subscription ID, Location, and Resource Group, select Tags from the Grouping dimensions dropdown list. Then, select the orcl-OracleDatabase@AWS option from the Tag Namespace dropdown list, and ResourceAnchorId from the Tag Key dropdown list. Once you have made your selections, select the Apply button.

- If you want to check usage at a more granular level, select Show as Usage and use Grouping Dimensions as Tags, Tag Namespace as orcl-OracleDatabase@AWS, Tag Key as ResourceAnchorId, and Second grouping dimensions as Service and Product Description. Select the Apply button.

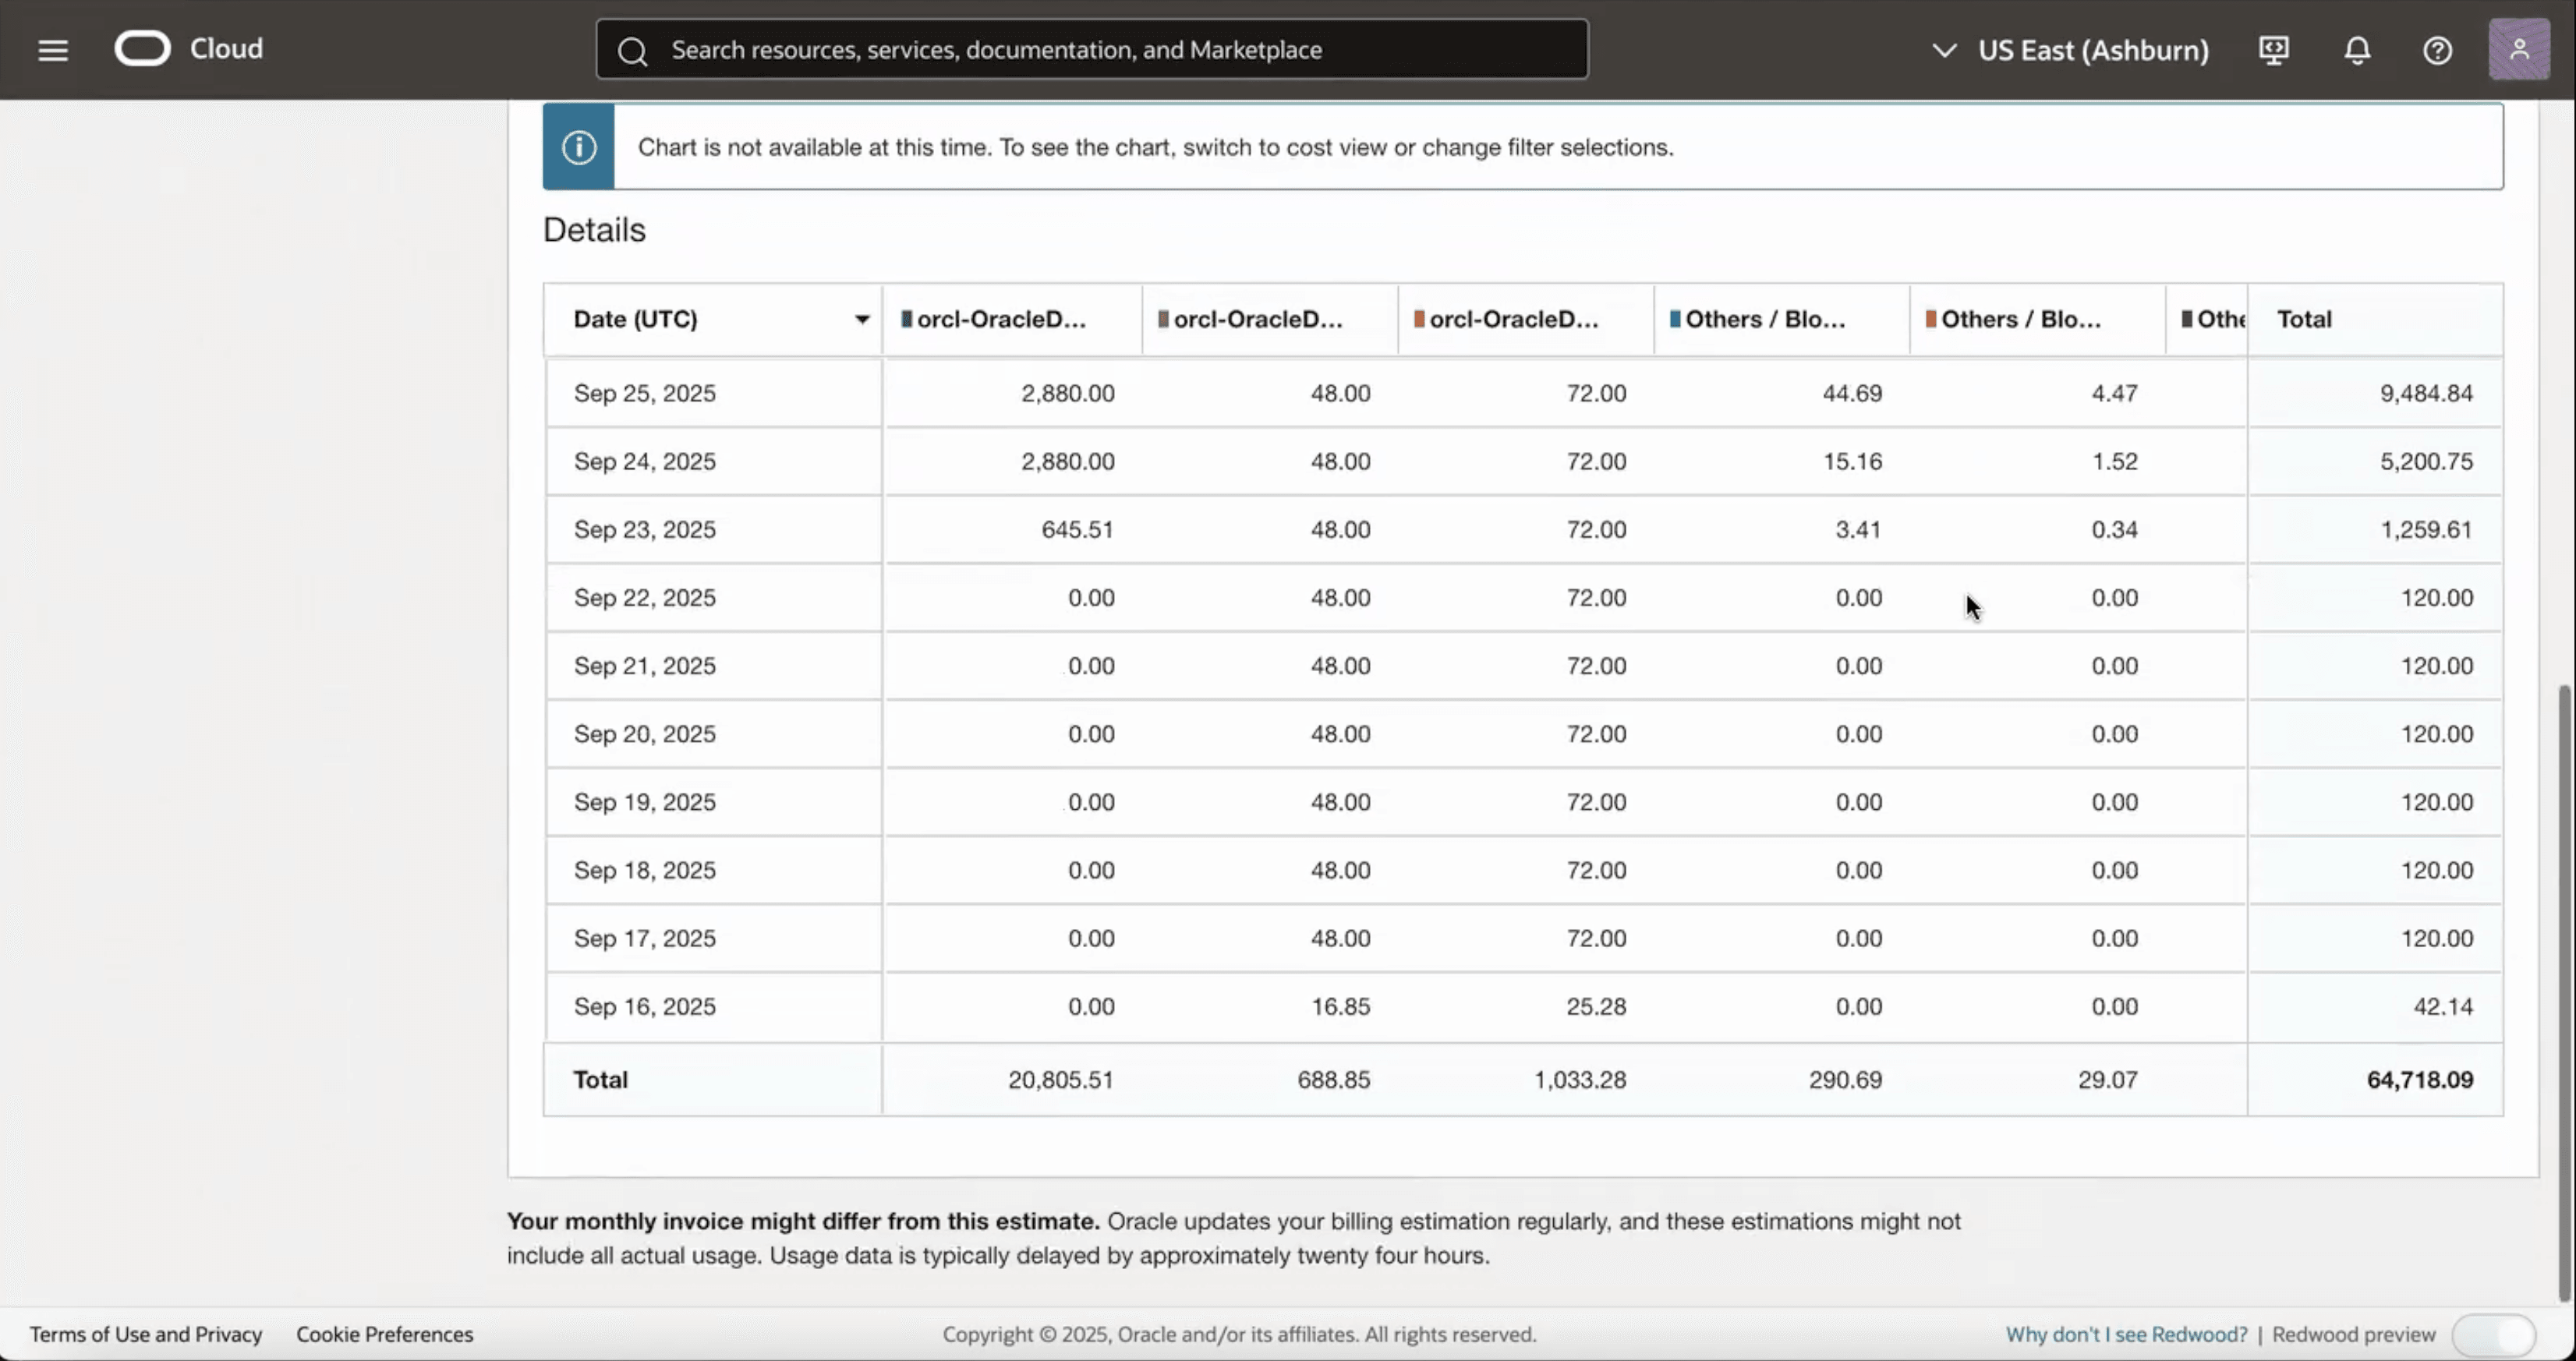
- From the Tab actions button, you can download the data as CSV, chart and PDF.
